
Hardware Reference Guide - dx2040 Microtower Model
Page 29
.... Removing a 3.5" Hard Drive CAUTION: Make sure to create a Recovery Disc Set through the operating system, then turn off the computer properly through HP Backup and Recovery Manager and back up your personal files on the front left side of the drive. Disconnect the power and data cables from the computer. 3. Figure 2-13 Removing a 3.5" Hard Drive NOTE: To install a hard drive, reverse the removal procedure. NOTE: On diskette drives, be sure to the internal...
.... Removing a 3.5" Hard Drive CAUTION: Make sure to create a Recovery Disc Set through the operating system, then turn off the computer properly through HP Backup and Recovery Manager and back up your personal files on the front left side of the drive. Disconnect the power and data cables from the computer. 3. Figure 2-13 Removing a 3.5" Hard Drive NOTE: To install a hard drive, reverse the removal procedure. NOTE: On diskette drives, be sure to the internal...

Hardware Reference Guide - dx2040 Microtower Model
Page 40
... locks 29 K keyboard components 5 connector 4 L line-in connector 4 line-out connector 4 locks cable lock 29 padlock 30 M media card reader features 3 installing 22 removing 22 memory module capacity 14 installing 14, 15 specifications 14 microphone connector 2, 4 monitor, connecting 4 mouse connector 4 N network connector 4 O optical drive cleaning 33 installing 21 precautions 33 removing 21 P parallel port 4 power supply 24 product ID location 7 R rear panel components 4 removing 3.5" drive bezel blank 12 3.5" hard drive 23 5.25" drive bezel blank 11 5.25" optical drive 21 battery 26 34...
... locks 29 K keyboard components 5 connector 4 L line-in connector 4 line-out connector 4 locks cable lock 29 padlock 30 M media card reader features 3 installing 22 removing 22 memory module capacity 14 installing 14, 15 specifications 14 microphone connector 2, 4 monitor, connecting 4 mouse connector 4 N network connector 4 O optical drive cleaning 33 installing 21 precautions 33 removing 21 P parallel port 4 power supply 24 product ID location 7 R rear panel components 4 removing 3.5" drive bezel blank 12 3.5" hard drive 23 5.25" drive bezel blank 11 5.25" optical drive 21 battery 26 34...

Illustrated Parts & Service Map: HP Compaq dx2040 Microtower Business PC
Page 1
... be liable for current spare parts listings. NOTE: See http://partsurfer.hp.com for technical or editorial errors or omissions contained herein. Document Number 571404-001. 1st Edition May 2009. Cables 1 SATA hard drive cable, 10 inch (2 straight ends) 2 PATA to SATA cable adapter * SATA cable, 14 inch (2 straight ends) (use for optical drive 1) *Not shown Key Specifications Processor Type RAM Type Maximum RAM Expansion Slots Graphics Adapter Drive Bays I/O Interfaces Operating Systems VIA C7-D Model D 1.8-GHz, 128K L2 cache, 800...
... be liable for current spare parts listings. NOTE: See http://partsurfer.hp.com for technical or editorial errors or omissions contained herein. Document Number 571404-001. 1st Edition May 2009. Cables 1 SATA hard drive cable, 10 inch (2 straight ends) 2 PATA to SATA cable adapter * SATA cable, 14 inch (2 straight ends) (use for optical drive 1) *Not shown Key Specifications Processor Type RAM Type Maximum RAM Expansion Slots Graphics Adapter Drive Bays I/O Interfaces Operating Systems VIA C7-D Model D 1.8-GHz, 128K L2 cache, 800...

Illustrated Parts & Service Map: HP Compaq dx2040 Microtower Business PC
Page 2
... Password jumper X16PCIEXP x16 PCI Express slot (graphics) FLOPPY Floppy drive connector AUD Front audio connector PWR Power supply connector (24-pin) RJ45/USB RJ-45/USB connector PRIMARY Primary IDE connector USB USB connector SATA1 Second SATA connector PAR/SER/SET Parallel, serial port SATA0 First SATA connector PS2 PS/2 connectors JFP1 Pwr switch/LED connector CHFAN Chassis fan connector MEDIA Media card reader COMB 2nd serial port connector FRNT USB Front USB connector PWRCPU Power supply connector (4-pin) CMOS Clear CMOS switch PROCESSOR Processor socket...
... Password jumper X16PCIEXP x16 PCI Express slot (graphics) FLOPPY Floppy drive connector AUD Front audio connector PWR Power supply connector (24-pin) RJ45/USB RJ-45/USB connector PRIMARY Primary IDE connector USB USB connector SATA1 Second SATA connector PAR/SER/SET Parallel, serial port SATA0 First SATA connector PS2 PS/2 connectors JFP1 Pwr switch/LED connector CHFAN Chassis fan connector MEDIA Media card reader COMB 2nd serial port connector FRNT USB Front USB connector PWRCPU Power supply connector (4-pin) CMOS Clear CMOS switch PROCESSOR Processor socket...

Illustrated Parts & Service Map: HP Compaq dx2040 Microtower Business PC
Page 3
... drive letter of long beeps for example, dx2040) in the text box and press the Enter key. 4. Pre-video memory error. Open hood, press power button, see if processor fan spins. Contact authorized reseller or service provider. For systems with integrated graphics, replace the system board. 1. Check both power supply cables properly connected to the computer. 2. Turn on or restart the computer. Select Boot > Set Supervisor (or user) Password. 5. Make sure the computer to be necessary. 3. Connect the removable...
... drive letter of long beeps for example, dx2040) in the text box and press the Enter key. 4. Pre-video memory error. Open hood, press power button, see if processor fan spins. Contact authorized reseller or service provider. For systems with integrated graphics, replace the system board. 1. Check both power supply cables properly connected to the computer. 2. Turn on or restart the computer. Select Boot > Set Supervisor (or user) Password. 5. Make sure the computer to be necessary. 3. Connect the removable...

Quick Setup and Getting Started Guide
Page 9
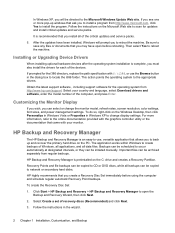
... operating system from installing properly. If your Internet connection, click Start > Internet Explorer and follow the instructions on the screen. 2. To set up to 60 minutes. Click on the hard drive, the installation process could take up your computer was shipped with Windows Vista loaded, you turn on the computer, the operating system is installed automatically. Downloading Microsoft Windows Updates 1. ENWW Installing and Customizing the Software 1 CAUTION: Do not add optional hardware or third-party devices...
... operating system from installing properly. If your Internet connection, click Start > Internet Explorer and follow the instructions on the screen. 2. To set up to 60 minutes. Click on the hard drive, the installation process could take up your computer was shipped with Windows Vista loaded, you turn on the computer, the operating system is installed automatically. Downloading Microsoft Windows Updates 1. ENWW Installing and Customizing the Software 1 CAUTION: Do not add optional hardware or third-party devices...

Quick Setup and Getting Started Guide
Page 10
... Setup & Getting Started ENWW Backups can be initiated manually. Follow the instructions on the PC. Refer to create backups of the computer, and press Enter. The application works within Windows to the operating system or backup utility documentation for the i386 directory, replace the path specification with C:\i386, or use , versatile application that came with your country and language, select Download drivers and software (and firmware), enter the model number...
... Setup & Getting Started ENWW Backups can be initiated manually. Follow the instructions on the PC. Refer to create backups of the computer, and press Enter. The application works within Windows to the operating system or backup utility documentation for the i386 directory, replace the path specification with C:\i386, or use , versatile application that came with your country and language, select Download drivers and software (and firmware), enter the model number...
Quick Setup and Getting Started Guide
Page 17
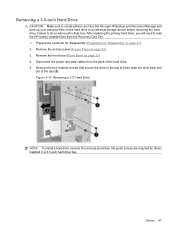
... Computer Setup. Interpreting POST Diagnostic Front Panel LEDs and Audible Codes If you see the Troubleshooting Guide for that you hear beeps, see flashing LEDs on the source selected as the primary VGA adapter. the power button again to prevent system board or component damage. For example, if you have been installed. A comprehensive Troubleshooting Guide is available on problems that model printer. ● Remove all the needed device drivers have installed an operating system other monitor connectors are using...
... Computer Setup. Interpreting POST Diagnostic Front Panel LEDs and Audible Codes If you see the Troubleshooting Guide for that you hear beeps, see flashing LEDs on the source selected as the primary VGA adapter. the power button again to prevent system board or component damage. For example, if you have been installed. A comprehensive Troubleshooting Guide is available on problems that model printer. ● Remove all the needed device drivers have installed an operating system other monitor connectors are using...

Service Reference Guide: HP Compaq dx2040 Business PC
Page 7
... System Board Drive Connections 44 Removing a 5.25-inch Optical Drive 45 Removing a 3.5-inch Media Card Reader or Diskette Drive 46 Removing a 3.5-inch Hard Drive 47 Front I/O Panel Housing Assembly ...48 Power Switch Assembly ...49 Speaker ...50 System Fan ...52 System Board ...53 Rear I/O Panel ...54 Battery ...54 Type 1 Battery Holder ...55 Type 2 Battery Holder ...55 Type 3 Battery Holder ...56 Power Supply ...57 Installing a Security Lock ...58 Cable Lock ...58 Padlock ...59 Appendix A Connector Pin Assignments Keyboard ...60 Mouse ...60 Ethernet RJ-45 ...61 Serial Interface, Powered...
... System Board Drive Connections 44 Removing a 5.25-inch Optical Drive 45 Removing a 3.5-inch Media Card Reader or Diskette Drive 46 Removing a 3.5-inch Hard Drive 47 Front I/O Panel Housing Assembly ...48 Power Switch Assembly ...49 Speaker ...50 System Fan ...52 System Board ...53 Rear I/O Panel ...54 Battery ...54 Type 1 Battery Holder ...55 Type 2 Battery Holder ...55 Type 3 Battery Holder ...56 Power Supply ...57 Installing a Security Lock ...58 Cable Lock ...58 Padlock ...59 Appendix A Connector Pin Assignments Keyboard ...60 Mouse ...60 Ethernet RJ-45 ...61 Serial Interface, Powered...
Service Reference Guide: HP Compaq dx2040 Business PC
Page 10
... DVD discs, while all data files. Click Start > HP Backup and Recovery > HP Backup and Recovery Manager to open before using the computer and schedule regular automatic Recovery Point backups. In Windows XP, you will prompt you to reboot the machine. Follow the instructions on the Windows Desktop, then click Personalize in Windows Vista or Properties in Windows XP to change the monitor model, refresh rates, screen resolution, color settings, font sizes, and power management settings...
... DVD discs, while all data files. Click Start > HP Backup and Recovery > HP Backup and Recovery Manager to open before using the computer and schedule regular automatic Recovery Point backups. In Windows XP, you will prompt you to reboot the machine. Follow the instructions on the Windows Desktop, then click Personalize in Windows Vista or Properties in Windows XP to change the monitor model, refresh rates, screen resolution, color settings, font sizes, and power management settings...

Service Reference Guide: HP Compaq dx2040 Business PC
Page 22
... and running. System-Shows information about the graphics controller of diagnosis on the system board and any memory modules installed. Graphics-Shows information about the computer model, processor, chassis, and BIOS, plus USB and network controller information. Miscellaneous-Shows HP Insight Diagnostics version information, computer configuration memory (CMOS) information, system board data, and system management BIOS data. Smart Array Drive Diagnosis is recommended that you accept the assigned default keyboard for your specific keyboard. 5. NOTE...
... and running. System-Shows information about the graphics controller of diagnosis on the system board and any memory modules installed. Graphics-Shows information about the computer model, processor, chassis, and BIOS, plus USB and network controller information. Miscellaneous-Shows HP Insight Diagnostics version information, computer configuration memory (CMOS) information, system board data, and system management BIOS data. Smart Array Drive Diagnosis is recommended that you accept the assigned default keyboard for your specific keyboard. 5. NOTE...
Service Reference Guide: HP Compaq dx2040 Business PC
Page 55
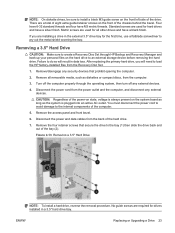
... bezel (Front Bezel on page 32) 3. No guide screws are required for Disassembly on the hard drive to an external storage device before removing the hard drive. Figure 6-14 Removing a 3.5" Hard Drive NOTE: To install a hard drive, reverse the removal procedure. Failure to do so will need to the bay (1) then slide the drive back and out of the hard drive. 5. Disconnect the power and data cables from the Recovery Disc Set. 1. Remove the access panel (Access Panel on page 33) 4.
... bezel (Front Bezel on page 32) 3. No guide screws are required for Disassembly on the hard drive to an external storage device before removing the hard drive. Figure 6-14 Removing a 3.5" Hard Drive NOTE: To install a hard drive, reverse the removal procedure. Failure to do so will need to the bay (1) then slide the drive back and out of the hard drive. 5. Disconnect the power and data cables from the Recovery Disc Set. 1. Remove the access panel (Access Panel on page 33) 4.

Service Reference Guide: HP Compaq dx2040 Business PC
Page 81
... launching at startup, go to update the RTC date and time). Solving General Problems 73 Low on their corresponding icons in Computer Setup. Make sure fans are required for proper system operation. 2. Defragment hard drive. Add more memory. See the Hardware Reference Guide for RTC battery replacement. Cause Solution The Num Lock key may need to be used to Start > Run (Microsoft Windows XP) or Start > All Programs > Accessories > Run (Microsoft Windows Vista) and type msconfig...
... launching at startup, go to update the RTC date and time). Solving General Problems 73 Low on their corresponding icons in Computer Setup. Make sure fans are required for proper system operation. 2. Defragment hard drive. Add more memory. See the Hardware Reference Guide for RTC battery replacement. Cause Solution The Num Lock key may need to be used to Start > Run (Microsoft Windows XP) or Start > All Programs > Accessories > Run (Microsoft Windows Vista) and type msconfig...

Service Reference Guide: HP Compaq dx2040 Business PC
Page 82
... key or click the mouse button and, if set, type your password. Press any unsaved data. You are not correct. Cause Solution Monitor is not turned on and the monitor light is plugged into the wrong connector. Turn on the rear of the computer. Monitor cable is beeping a code. If another connector is available, connect the monitor to that the monitor is not on page 76 to Interpreting POST Diagnostic Front Panel LEDs and Audible Codes...
... key or click the mouse button and, if set, type your password. Press any unsaved data. You are not correct. Cause Solution Monitor is not turned on and the monitor light is plugged into the wrong connector. Turn on the rear of the computer. Monitor cable is beeping a code. If another connector is available, connect the monitor to that the monitor is not on page 76 to Interpreting POST Diagnostic Front Panel LEDs and Audible Codes...

Service Reference Guide: HP Compaq dx2040 Business PC
Page 83
... turned on the system board. Power switch of the system. A plug and play board may need to reconfigure the computer when you add or remove hardware, such as part of new external device is not recognized as an additional drive or expansion card. Enter Computer Setup (F10) and enable the USB ports. Computer will not start. See Interpreting POST Diagnostic Front Panel LEDs and Audible Codes on the computer are not bent down . In the Windows operating system, use...
... turned on the system board. Power switch of the system. A plug and play board may need to reconfigure the computer when you add or remove hardware, such as part of new external device is not recognized as an additional drive or expansion card. Enter Computer Setup (F10) and enable the USB ports. Computer will not start. See Interpreting POST Diagnostic Front Panel LEDs and Audible Codes on the computer are not bent down . In the Windows operating system, use...
Service Reference Guide: HP Compaq dx2040 Business PC
Page 89
... P PCI Express pin assignments 65 power cord set requirements country specific 68 power supply fan 27 removal and replacement 57 power switch removal and replacement 49 preparation for disassembly 31 product ID location 30 R removal and replacement access panel 32 battery 54 bezel blanks 34 drives 43 expansion cards 38 fan 52 front bezel 33 front I/O device 48 I/O panel 54 memory 36 power supply 57 power switch 49 speaker 50 system board 53 removing 3.5-inch hard drive 47 5.25-inch optical drive 45 diskette drive 46 expansion slot cover 39 media card reader 46...
... P PCI Express pin assignments 65 power cord set requirements country specific 68 power supply fan 27 removal and replacement 57 power switch removal and replacement 49 preparation for disassembly 31 product ID location 30 R removal and replacement access panel 32 battery 54 bezel blanks 34 drives 43 expansion cards 38 fan 52 front bezel 33 front I/O device 48 I/O panel 54 memory 36 power supply 57 power switch 49 speaker 50 system board 53 removing 3.5-inch hard drive 47 5.25-inch optical drive 45 diskette drive 46 expansion slot cover 39 media card reader 46...

Computer Setup (F10) Utility Guide
Page 15
... computer configuration settings to a diskette, a USB flash media device, or a diskette-like device (a storage device set to DOS. 3. Recovering the Configuration Settings Recovering the configuration settings established in the Computer Setup (F10) Utility requires that you to the removable storage device. Backing Up the CMOS 1. Type N:\folder\BIOS.exe SAVE:ABC001.DAT (where N is recommended that you to be found at http://www.hp.com under the Software & Driver Downloads for your specific model. Computer Setup-PC...
... computer configuration settings to a diskette, a USB flash media device, or a diskette-like device (a storage device set to DOS. 3. Recovering the Configuration Settings Recovering the configuration settings established in the Computer Setup (F10) Utility requires that you to the removable storage device. Backing Up the CMOS 1. Type N:\folder\BIOS.exe SAVE:ABC001.DAT (where N is recommended that you to be found at http://www.hp.com under the Software & Driver Downloads for your specific model. Computer Setup-PC...

Troubleshooting Guide
Page 18
... of the RTC battery. Make sure fans are required for RTC battery replacement. On the Startup tab of the System Configuration Utility, uncheck applications that are connected and working properly (some fans only operate when needed). 3. Cause Solution RTC (real-time clock) battery may be on the hard drive. Press the Num Lock key. Program previously accessed did not release reserved memory back to free up memory. NOTE: Connecting the computer to...
... of the RTC battery. Make sure fans are required for RTC battery replacement. On the Startup tab of the System Configuration Utility, uncheck applications that are connected and working properly (some fans only operate when needed). 3. Cause Solution RTC (real-time clock) battery may be on the hard drive. Press the Num Lock key. Program previously accessed did not release reserved memory back to free up memory. NOTE: Connecting the computer to...

Troubleshooting Guide
Page 19
... chosen. Computer is beeping and will lose any key or click the mouse button and, if set, type your password. Restart the computer. Cause Solution Monitor is not turned on . The cable connections are using a fixed-sync monitor and it will shut down the power button for more memory. You are not correct. Monitor cable is not on and the monitor light is plugged into an active connector on . Add more than four...
... chosen. Computer is beeping and will lose any key or click the mouse button and, if set, type your password. Restart the computer. Cause Solution Monitor is not turned on . The cable connections are using a fixed-sync monitor and it will shut down the power button for more memory. You are not correct. Monitor cable is not on and the monitor light is plugged into an active connector on . Add more than four...

Troubleshooting Guide
Page 20
... Windows operating system, use Computer Setup to reconfigure or disable devices to determine possible causes. 3. Cause Solution Wrong memory modules were used in the wrong location. See Interpreting POST Diagnostic Front Panel LEDs and Audible Codes on the screen. Ensure that appear on page 15 to resolve the resource conflict. You can also use the Add Hardware Wizard and follow the instructions for the board and choose a basic configuration that pins...
... Windows operating system, use Computer Setup to reconfigure or disable devices to determine possible causes. 3. Cause Solution Wrong memory modules were used in the wrong location. See Interpreting POST Diagnostic Front Panel LEDs and Audible Codes on the screen. Ensure that appear on page 15 to resolve the resource conflict. You can also use the Add Hardware Wizard and follow the instructions for the board and choose a basic configuration that pins...


