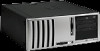
Safety and Regulatory Information Desktops, Thin Clients, and Personal Workstations
Page 5
... Ergonomics Notice ...3 Laser Safety ...3 CDRH Regulations ...3 Compliance with International Regulations 4 Laser Product Label ...4 Laser Information ...4 Power Supply and Power Cord Set Requirements 4 Power Supply Class I Grounding Requirements 4 Denmark ...4 Norway ...4 Sweden ...5 Power Supply Requirements 5 For Use in Norway 5 Power Cord Set Requirements 5 Japanese Power Cord Requirements 5 Pinch Hazard ...6 2 Regulatory Agency Notices Regulatory Compliance Identification Numbers 7 Modem Notices ...7 Telecommunications Device Approvals...
... Ergonomics Notice ...3 Laser Safety ...3 CDRH Regulations ...3 Compliance with International Regulations 4 Laser Product Label ...4 Laser Information ...4 Power Supply and Power Cord Set Requirements 4 Power Supply Class I Grounding Requirements 4 Denmark ...4 Norway ...4 Sweden ...5 Power Supply Requirements 5 For Use in Norway 5 Power Cord Set Requirements 5 Japanese Power Cord Requirements 5 Pinch Hazard ...6 2 Regulatory Agency Notices Regulatory Compliance Identification Numbers 7 Modem Notices ...7 Telecommunications Device Approvals...
Safety and Regulatory Information Desktops, Thin Clients, and Personal Workstations
Page 7
...connection to earth, according to the telephone line. 1 Safety Notices Important Safety Information WARNING! Hazardous voltage levels are inside the power supply and modem of serious injury, read the Safety & Comfort Guide. This product has not been evaluated for computer users, and ...provides important electrical and mechanical safety information. For your safety, the power cord provided with the cover removed. To reduce the possibility of electrical shock. For your computer into the AC outlet before performing...
...connection to earth, according to the telephone line. 1 Safety Notices Important Safety Information WARNING! Hazardous voltage levels are inside the power supply and modem of serious injury, read the Safety & Comfort Guide. This product has not been evaluated for computer users, and ...provides important electrical and mechanical safety information. For your safety, the power cord provided with the cover removed. To reduce the possibility of electrical shock. For your computer into the AC outlet before performing...
Safety and Regulatory Information Desktops, Thin Clients, and Personal Workstations
Page 10
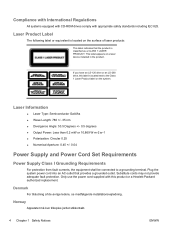
... or 10,869 W·m-2 sr-1 ● Polarization: Circular 0.25 ● Numerical Aperture: 0.45 +/- 0.04 Power Supply and Power Cord Set Requirements Power Supply Class I Grounding Requirements For protection from fault currents, the equipment shall be connected to the Class 1 Laser Product label... this label is classified as a CLASS 1 LASER PRODUCT. Plug the system power cord into an AC outlet that the product is located next to a grounding terminal. Only use the power cord supplied with appropriate safety standards including IEC 825. Norway Apparatet må kun tilkoples jordet...
... or 10,869 W·m-2 sr-1 ● Polarization: Circular 0.25 ● Numerical Aperture: 0.45 +/- 0.04 Power Supply and Power Cord Set Requirements Power Supply Class I Grounding Requirements For protection from fault currents, the equipment shall be connected to the Class 1 Laser Product label... this label is classified as a CLASS 1 LASER PRODUCT. Plug the system power cord into an AC outlet that the product is located next to a grounding terminal. Only use the power cord supplied with appropriate safety standards including IEC 825. Norway Apparatet må kun tilkoples jordet...
Safety and Regulatory Information Desktops, Thin Clients, and Personal Workstations
Page 11
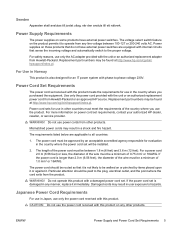
... replacement adapter from Hewlett-Packard. The length of 1.0 mm2 or 16AWG. The power cord must meet the requirements of the wire must be paid to all countries: 1. ENWW Power Supply and Power Cord Set Requirements 5 The voltage select switch feature on or pinched by an ... by items placed upon it or against it immediately. Do not use the power cord received with a damaged power cord set will be a minimum of the wire must be installed. 2. Power Supply Requirements The power supplies on power cord set is longer than 2.0 m (6.56 feet), the diameter of 0.75...
... replacement adapter from Hewlett-Packard. The length of 1.0 mm2 or 16AWG. The power cord must meet the requirements of the wire must be paid to all countries: 1. ENWW Power Supply and Power Cord Set Requirements 5 The voltage select switch feature on or pinched by an ... by items placed upon it or against it immediately. Do not use the power cord received with a damaged power cord set will be a minimum of the wire must be installed. 2. Power Supply Requirements The power supplies on power cord set is longer than 2.0 m (6.56 feet), the diameter of 0.75...
Safety and Regulatory Information Desktops, Thin Clients, and Personal Workstations
Page 29
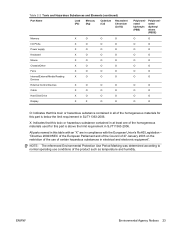
Table 2-2 Toxic and Hazardous Substances and Elements (continued) Part Name Lead (Pb) Mercury (Hg) Cadmium (Cd) Hexavalent Chromium (Cr(VI)) Memory X O O O I/O PCAs X O O O Power supply X O O O Keyboard X O O O Mouse X O O O Chassis/Other X O O O Fans X O O O Internal/External Media Reading X O O O Devices External Control Devices X O O O Cable X O O O Hard Disk Drive X O O O Display X X O O Polybrominated biphenyls (PBB) Polybrominated diphenyl ethers (PBDE) O O O O O O O O O O O O O O O O O O O O ...
Table 2-2 Toxic and Hazardous Substances and Elements (continued) Part Name Lead (Pb) Mercury (Hg) Cadmium (Cd) Hexavalent Chromium (Cr(VI)) Memory X O O O I/O PCAs X O O O Power supply X O O O Keyboard X O O O Mouse X O O O Chassis/Other X O O O Fans X O O O Internal/External Media Reading X O O O Devices External Control Devices X O O O Cable X O O O Hard Disk Drive X O O O Display X X O O Polybrominated biphenyls (PBB) Polybrominated diphenyl ethers (PBDE) O O O O O O O O O O O O O O O O O O O O ...
Desktop Management Guide
Page 33
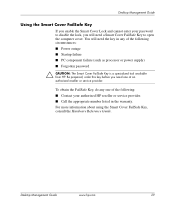
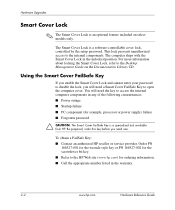
order this key before you will need one at an authorized reseller or service provider. Desktop Management Guide www.hp.com 29 Desktop Management Guide Using the Smart Cover FailSafe Key If you enable the Smart Cover Lock and cannot enter your authorized ...Key, consult the Hardware Reference Guide. To obtain the FailSafe Key, do any of the following circumstances: ■ Power outage ■ Startup failure ■ PC component failure (such as processor or power supply) ■ Forgotten password Ä CAUTION: The Smart Cover FailSafe Key is a specialized tool available from HP. ...
order this key before you will need one at an authorized reseller or service provider. Desktop Management Guide www.hp.com 29 Desktop Management Guide Using the Smart Cover FailSafe Key If you enable the Smart Cover Lock and cannot enter your authorized ...Key, consult the Hardware Reference Guide. To obtain the FailSafe Key, do any of the following circumstances: ■ Power outage ■ Startup failure ■ PC component failure (such as processor or power supply) ■ Forgotten password Ä CAUTION: The Smart Cover FailSafe Key is a specialized tool available from HP. ...
Desktop Management Guide
Page 38
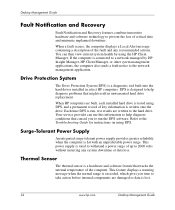
... recommended actions. When HP computers are built, each installed hard drive is tested using DPS. Surge-Tolerant Power Supply An integrated surge-tolerant power supply provides greater reliability when the computer is lost. 34 www.hp.com Desktop Management Guide This feature displays a warning message when the normal range is exceeded, which gives you to...
... recommended actions. When HP computers are built, each installed hard drive is tested using DPS. Surge-Tolerant Power Supply An integrated surge-tolerant power supply provides greater reliability when the computer is lost. 34 www.hp.com Desktop Management Guide This feature displays a warning message when the normal range is exceeded, which gives you to...
Desktop Management Guide
Page 40
...FailSafe Key 29 P partitioning disk, important information 32 password changing 22 clearing 23 deleting 22 power-on 20 setup 19, 21 password security 18 power button configuring 12 dual-state 12 Power Management 13 power supply, surge-tolerant 34 power-on password changing 22 deleting 22 entering 20 preinstalled software image 2 protecting hard drive 34 ... 15 Computer Setup Utilities 11 Drive Protection System 34 FailSafe Boot Block ROM 9 Fault Notification and Recovery 34 integration 2 Master Boot Record Security 30 Power Management 13 recovery 2 Index-2 www.hp.com Desktop Management Guide
...FailSafe Key 29 P partitioning disk, important information 32 password changing 22 clearing 23 deleting 22 power-on 20 setup 19, 21 password security 18 power button configuring 12 dual-state 12 Power Management 13 power supply, surge-tolerant 34 power-on password changing 22 deleting 22 entering 20 preinstalled software image 2 protecting hard drive 34 ... 15 Computer Setup Utilities 11 Drive Protection System 34 FailSafe Boot Block ROM 9 Fault Notification and Recovery 34 integration 2 Master Boot Record Security 30 Power Management 13 recovery 2 Index-2 www.hp.com Desktop Management Guide
Desktop Management Guide
Page 41
... sites www.compaq.com 8, 14 www.compaq.com/activeupdate 7 www.compaq.com/easydeploy 5, 6, 8, 11 www.compaq.com/im/ssmwp.html 6, 8 www.compaq.com/solutions/pcsolutions 2 www.compaq.com/solutions/security 33 World Wide Web addresses. Remote ROM Flash 8 Remote System Installation 3 System Software Manager 6 updating multiple machines 6 SSM (System Software Manager) 6 surge-tolerant power supply 34 system recovery...
... sites www.compaq.com 8, 14 www.compaq.com/activeupdate 7 www.compaq.com/easydeploy 5, 6, 8, 11 www.compaq.com/im/ssmwp.html 6, 8 www.compaq.com/solutions/pcsolutions 2 www.compaq.com/solutions/security 33 World Wide Web addresses. Remote ROM Flash 8 Remote System Installation 3 System Software Manager 6 updating multiple machines 6 SSM (System Software Manager) 6 surge-tolerant power supply 34 system recovery...
HP Compaq Business Desktop d330 & d530 Series Personal Computers Service Reference Card, 2nd Edition
Page 2
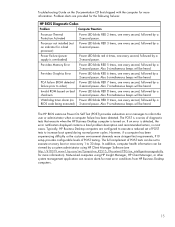
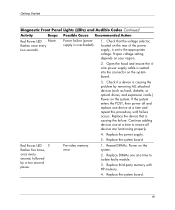
... times @ 1 Hz [1] None Processor thermal shutdown Blinks red 3 times @ 1 Hz [1] None Processor not seated / installed Blinks red 4 times @ 1 Hz [1] None Power supply failure Blinks red 5 times @ 1 Hz [1] 5 Memory error Blinks red 6 times @ 1 Hz [1] 6 Video error Blinks red 7 times @ 1 Hz [1] 7... 8 times @ 1 Hz [1] 8 Invalid ROM checksum (error) NOTE: [1] Repeated after cover or panel removal. Setup Utilities. [1] Power-On Password Prevents use the FailSafe key. Can apply to chassis interior. Setup Utilities. [1] Smart Software-controllable solenoid that might result in ...
... times @ 1 Hz [1] None Processor thermal shutdown Blinks red 3 times @ 1 Hz [1] None Processor not seated / installed Blinks red 4 times @ 1 Hz [1] None Power supply failure Blinks red 5 times @ 1 Hz [1] 5 Memory error Blinks red 6 times @ 1 Hz [1] 6 Video error Blinks red 7 times @ 1 Hz [1] 7... 8 times @ 1 Hz [1] 8 Invalid ROM checksum (error) NOTE: [1] Repeated after cover or panel removal. Setup Utilities. [1] Power-On Password Prevents use the FailSafe key. Can apply to chassis interior. Setup Utilities. [1] Smart Software-controllable solenoid that might result in ...
HP Business Desktop BIOS
Page 15
Power Failure (power supply is overloaded) Power LED blinks red 4 times, one every second, followed by a BIOS code being executed) 2-second pause. Also 7 simultaneous beeps will be heard. Watchdog timer alarm (no Power LED blinks RED 9 times, one every second, followed by a 2-second pause. If an ...or the customer environment demands more information). The HP BIOS extensive Power-On Self Test (POST) provides exhaustive error messages to 30 days. Typically, HP Business Desktop computers are provided for more information. Power LED blinks RED 3 times, one every second, followed by a...
Power Failure (power supply is overloaded) Power LED blinks red 4 times, one every second, followed by a BIOS code being executed) 2-second pause. Also 7 simultaneous beeps will be heard. Watchdog timer alarm (no Power LED blinks RED 9 times, one every second, followed by a 2-second pause. If an ...or the customer environment demands more information). The HP BIOS extensive Power-On Self Test (POST) provides exhaustive error messages to 30 days. Typically, HP Business Desktop computers are provided for more information. Power LED blinks RED 3 times, one every second, followed by a...
HP Compaq Business Desktops d530 Convertible Minitower - (English) Hardware Reference Guide
Page 20
...the screwdriver bit key. ■ Refer to access the internal computer components in any of the following circumstances: ■ Power outage ■ Startup failure ■ PC component (for ordering information. ■ Call the appropriate number listed in the unlocked position. You will need one. .... This lock prevents unauthorized access to the Desktop Management Guide on select models only. Using the Smart Cover FailSafe Key If you will need the key to the HP Web site (www.hp.com) for example, processor or power supply) failure ■ Forgotten password Ä CAUTION...
...the screwdriver bit key. ■ Refer to access the internal computer components in any of the following circumstances: ■ Power outage ■ Startup failure ■ PC component (for ordering information. ■ Call the appropriate number listed in the unlocked position. You will need one. .... This lock prevents unauthorized access to the Desktop Management Guide on select models only. Using the Smart Cover FailSafe Key If you will need the key to the HP Web site (www.hp.com) for example, processor or power supply) failure ■ Forgotten password Ä CAUTION...
HP Compaq Business Desktops d530 Convertible Minitower - (English) Hardware Reference Guide
Page 54
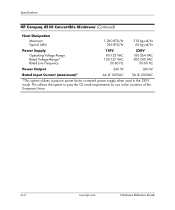
... pass the CE mark requirements for use in the 230V mode. Specifications HP Compaq d530 Convertible Minitower (Continued) Heat Dissipation Maximum Typical (idle) 1,260 BTU/hr 256 BTU/hr 318 kg-cal/hr 65 kg-cal/hr Power Supply Operating Voltage Range Rated Voltage Range* Rated Line Frequency 115V 90-132 VAC... 100-127 VAC 50-60 Hz 230V 180-264 VAC 200-240 VAC 50-60 Hz Power Output 240 W 240 W Rated Input Current (maximum)* 6A @ 100VAC 3A @ 200VAC *This system utilizes a passive power factor corrected power supply when used in the countries of the European Union.
... pass the CE mark requirements for use in the 230V mode. Specifications HP Compaq d530 Convertible Minitower (Continued) Heat Dissipation Maximum Typical (idle) 1,260 BTU/hr 256 BTU/hr 318 kg-cal/hr 65 kg-cal/hr Power Supply Operating Voltage Range Rated Voltage Range* Rated Line Frequency 115V 90-132 VAC... 100-127 VAC 50-60 Hz 230V 180-264 VAC 200-240 VAC 50-60 Hz Power Output 240 W 240 W Rated Input Current (maximum)* 6A @ 100VAC 3A @ 200VAC *This system utilizes a passive power factor corrected power supply when used in the countries of the European Union.
Getting Started
Page 10
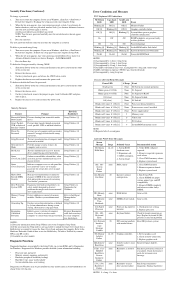
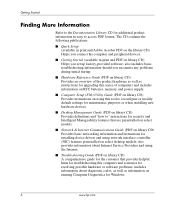
... troubleshooting this tool to reconfigure or modify default settings for maintenance purposes or when installing new hardware devices. ■ Desktop Management Guide (PDF on library CD) Provides definitions and "how to" instructions for security and Intelligent Manageability features that...computers and includes information on RTC batteries, memory, and power supply. ■ Computer Setup (F10) Utility Guide (PDF on library CD) Provides instructions on using network interface controller (NIC) features preinstalled on select desktop models; The CD contains the following publications: ■...
... troubleshooting this tool to reconfigure or modify default settings for maintenance purposes or when installing new hardware devices. ■ Desktop Management Guide (PDF on library CD) Provides definitions and "how to" instructions for security and Intelligent Manageability features that...computers and includes information on RTC batteries, memory, and power supply. ■ Computer Setup (F10) Utility Guide (PDF on library CD) Provides instructions on using network interface controller (NIC) features preinstalled on select desktop models; The CD contains the following publications: ■...

Getting Started
Page 18
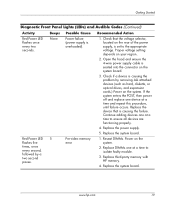
...4. Open hood and check that the voltage selector, located on the front of the power supply, is set to the system board. 3. Replace the system board. 14 www.hp.com Check that the power button harness is properly connected to the appropriate voltage. Proper voltage setting depends on ,... then replace the power supply. 6. If the 3.3 V_aux light on the system board is turned on, then replace the power button harness. 5. Replace the system board. OR Press and hold the power button for less than 4 seconds. If it is not ...
...4. Open hood and check that the voltage selector, located on the front of the power supply, is set to the system board. 3. Replace the system board. 14 www.hp.com Check that the power button harness is properly connected to the appropriate voltage. Proper voltage setting depends on ,... then replace the power supply. 6. If the 3.3 V_aux light on the system board is turned on, then replace the power button harness. 5. Replace the system board. OR Press and hold the power button for less than 4 seconds. If it is not ...
Getting Started
Page 23
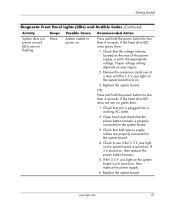
... the device that the voltage selector, located on the rear of the power supply, is seated into the connector on your region. 2. Continue adding devices one at a time to the appropriate voltage. Replace the power supply. 5. Replace DIMMs one device at a time to isolate faulty module...seconds. Check if a device is overloaded). 1. Replace the system board. Pre-video memory error 1. None Power failure (power supply is causing the problem by a two second pause. Red Power LED 5 flashes five times, once every second, followed by removing ALL attached devices (such as hard,...
... the device that the voltage selector, located on the rear of the power supply, is seated into the connector on your region. 2. Continue adding devices one at a time to the appropriate voltage. Replace the power supply. 5. Replace DIMMs one device at a time to isolate faulty module...seconds. Check if a device is overloaded). 1. Replace the system board. Pre-video memory error 1. None Power failure (power supply is causing the problem by a two second pause. Red Power LED 5 flashes five times, once every second, followed by removing ALL attached devices (such as hard,...
Getting Started
Page 25
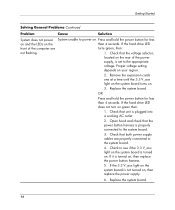
...on the rear of the power supply, is not turned on and LEDs are properly connected to the system board. 3. Check that the power button harness is turned on . 3. OR Press and hold the power button for less than 4 seconds. Check that both power supply cables are not flashing. If... the 3.3 V_aux light on the system board is set to power on green then: 1. Getting ...
...on the rear of the power supply, is not turned on and LEDs are properly connected to the system board. 3. Check that the power button harness is turned on . 3. OR Press and hold the power button for less than 4 seconds. Check that both power supply cables are not flashing. If... the 3.3 V_aux light on the system board is set to power on green then: 1. Getting ...
Getting Started - Business Desktops
Page 10
...on library CD) Provides an overview of the product hardware as well as information on RTC batteries, memory, and power supply. includes information about Internet Service Providers and using this computer and scenarios for resolving possible hardware or software problems; Getting... publications: Quick Setup (available in easy to reconfigure or modify default settings for troubleshooting this tool to access PDF format. Desktop Management Guide (PDF on library CD) Provides definitions and "how to" instructions for security and Intelligent Manageability features that provides...
...on library CD) Provides an overview of the product hardware as well as information on RTC batteries, memory, and power supply. includes information about Internet Service Providers and using this computer and scenarios for resolving possible hardware or software problems; Getting... publications: Quick Setup (available in easy to reconfigure or modify default settings for troubleshooting this tool to access PDF format. Desktop Management Guide (PDF on library CD) Provides definitions and "how to" instructions for security and Intelligent Manageability features that provides...
Getting Started - Business Desktops
Page 18
... the rear of the computer are properly connected to the system board. 3. Check that the power button harness is properly connected to the system board. 4. If it is turned on , then replace the power supply. 6. If the 3.3 V_aux light on the system board is not turned on , then ...replace the power button harness. 5. OR Press and hold the power button for less than 4 seconds. Open hood and check that both power supply cables are turns green, then: not flashing. 1. Check to power on. Press and hold the power button for less on and the LEDs on...
... the rear of the computer are properly connected to the system board. 3. Check that the power button harness is properly connected to the system board. 4. If it is turned on , then replace the power supply. 6. If the 3.3 V_aux light on the system board is not turned on , then ...replace the power button harness. 5. OR Press and hold the power button for less than 4 seconds. Open hood and check that both power supply cables are turns green, then: not flashing. 1. Check to power on. Press and hold the power button for less on and the LEDs on...
Getting Started - Business Desktops
Page 23
... second pause. Check if a device is causing the failure. Replace the device that the voltage selector, located on the rear of the power supply, is overloaded). 1. Continue adding devices one at a time to ensure all devices are functioning properly. 4. Replace the system board. Red...removing ALL attached devices (such as hard, diskette, or optical drives, and expansion cards.) Power on the system board. 3. Proper voltage setting depends on the system. 2. Open the hood and ensure the 4wire power supply cable is seated into the connector on the system. Replace DIMMs one at a time and...
... second pause. Check if a device is causing the failure. Replace the device that the voltage selector, located on the rear of the power supply, is overloaded). 1. Continue adding devices one at a time to ensure all devices are functioning properly. 4. Replace the system board. Red...removing ALL attached devices (such as hard, diskette, or optical drives, and expansion cards.) Power on the system board. 3. Proper voltage setting depends on the system. 2. Open the hood and ensure the 4wire power supply cable is seated into the connector on the system. Replace DIMMs one at a time and...


