Wireless Setup Guide
Page 2
... Access-Preshared Key) 1 Create pass phrase. 2 Record pass phrase 3 Download the latest WPA update for "WPA." 2 Start with integrated 802.11 WLAN (wireless local area network) capability. ISP cable, DSL modem, or other broadband technology (purchased separately). During router configuration, use the table below to add wireless capability. No action required. With these 3 pieces, you can buy a wireless PC Card to record this information. Your Internet service...
... Access-Preshared Key) 1 Create pass phrase. 2 Record pass phrase 3 Download the latest WPA update for "WPA." 2 Start with integrated 802.11 WLAN (wireless local area network) capability. ISP cable, DSL modem, or other broadband technology (purchased separately). During router configuration, use the table below to add wireless capability. No action required. With these 3 pieces, you can buy a wireless PC Card to record this information. Your Internet service...

Wireless Setup Guide
Page 5
... your network: a Select Start > Control Panel > Network and Internet Connection > Network Connections. b Right-click Wireless Network Connection and select Properties. (The Properties window is usually required to decrypt the data. Services such as ISDN, cable modem, DSL, and satellite are security encryption protocols. ■ Change the default SSID (your network name) on the wireless router and on , fast Internet connection. cable modem-A device that connects a computer to the cable television network, which in turn connects to your router instructions for...
... your network: a Select Start > Control Panel > Network and Internet Connection > Network Connections. b Right-click Wireless Network Connection and select Properties. (The Properties window is usually required to decrypt the data. Services such as ISDN, cable modem, DSL, and satellite are security encryption protocols. ■ Change the default SSID (your network name) on the wireless router and on , fast Internet connection. cable modem-A device that connects a computer to the cable television network, which in turn connects to your router instructions for...
Wireless Setup Guide
Page 7
... 100 to enhance your wireless user experience are expanding worldwide. TCP/IP (Transmission Control Protocol/Internet Protocol)-A network protocol for transmitting data packets within the same physical proximity for sharing resources such as an Internet connection, printers, files, and drives. The network uses high-frequency radio waves rather than wires to a network. wireless router-An all-in-one wireless communication device that specifies an...
... 100 to enhance your wireless user experience are expanding worldwide. TCP/IP (Transmission Control Protocol/Internet Protocol)-A network protocol for transmitting data packets within the same physical proximity for sharing resources such as an Internet connection, printers, files, and drives. The network uses high-frequency radio waves rather than wires to a network. wireless router-An all-in-one wireless communication device that specifies an...
Compaq Presario V3000 Notebook PC Maintenance and Service Guide
Page 2
... by its proprietor and used by Hewlett-Packard Company under license. © Copyright 2006, 2007 Hewlett-Packard Development Company, L.P. AMD, Sempron, Turion, and combinations thereof, are either trademarks or registered trademarks of Intel Corporation or its proprietor. Maintenance and Service Guide Compaq Presario V3000 Notebook PC Second Edition: April 2007 First Edition: June 2006 Document Part Number: 418333-002 HP shall...
... by its proprietor and used by Hewlett-Packard Company under license. © Copyright 2006, 2007 Hewlett-Packard Development Company, L.P. AMD, Sempron, Turion, and combinations thereof, are either trademarks or registered trademarks of Intel Corporation or its proprietor. Maintenance and Service Guide Compaq Presario V3000 Notebook PC Second Edition: April 2007 First Edition: June 2006 Document Part Number: 418333-002 HP shall...

Compaq Presario V3000 Notebook PC Maintenance and Service Guide
Page 17
.../54 cards. 1-10 Maintenance and Service Guide RJ-45 (network) jack Connects a network cable. USB port Connects an optional USB device. 1394 port Connects an optional IEEE 1394 or 1394a device, such as a television, VCR, camcorder, overhead projector, or video capture card. Memory Reader Supports the following optional digital card formats: Secure Digital (SD) Memory Card, MultiMediaCard (MMC), Secure Digital Input/Output (SD I/O), Memory Stick (MS), Memory Stick Pro (MSP), xD-Picture Card (XD), xDPicture Card (XD) Type M. Memory Reader light On: A digital card is being accessed...
.../54 cards. 1-10 Maintenance and Service Guide RJ-45 (network) jack Connects a network cable. USB port Connects an optional USB device. 1394 port Connects an optional IEEE 1394 or 1394a device, such as a television, VCR, camcorder, overhead projector, or video capture card. Memory Reader Supports the following optional digital card formats: Secure Digital (SD) Memory Card, MultiMediaCard (MMC), Secure Digital Input/Output (SD I/O), Memory Stick (MS), Memory Stick Pro (MSP), xD-Picture Card (XD), xDPicture Card (XD) Type M. Memory Reader light On: A digital card is being accessed...
Compaq Presario V3000 Notebook PC Maintenance and Service Guide
Page 19
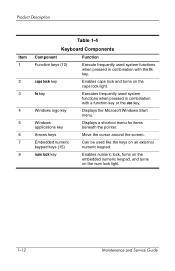
.... Windows logo key Displays the Microsoft Windows Start menu. fn key Executes frequently used like the keys on an external numeric keypad. Windows applications key Displays a shortcut menu for items beneath the pointer. Arrows keys Move the cursor around the screen. Product Description Item 1 2 3 4 5 6 7 8 Table 1-4 Keyboard Components Component Function Function keys (12) Execute frequently used system functions when pressed in combination with the fn key. caps lock key Enables caps lock and turns on the num lock light. 1-12 Maintenance and Service Guide
.... Windows logo key Displays the Microsoft Windows Start menu. fn key Executes frequently used like the keys on an external numeric keypad. Windows applications key Displays a shortcut menu for items beneath the pointer. Arrows keys Move the cursor around the screen. Product Description Item 1 2 3 4 5 6 7 8 Table 1-4 Keyboard Components Component Function Function keys (12) Execute frequently used system functions when pressed in combination with the fn key. caps lock key Enables caps lock and turns on the num lock light. 1-12 Maintenance and Service Guide
Compaq Presario V3000 Notebook PC Maintenance and Service Guide
Page 26
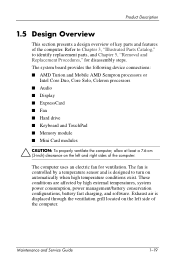
The fan is controlled by high external temperatures, system power consumption, power management/battery conservation configurations, battery fast charging, and software. The system board provides the following device connections: ■ AMD Turion and Mobile AMD Sempron processors or Intel Core Duo, Core Solo, Celeron processors ■ Audio ■ Display ■ ExpressCard ■ Fan ■ Hard drive ■ Keyboard and TouchPad ■ Memory module ■ Mini Card modules Ä CAUTION: To properly ventilate the computer, allow at...
The fan is controlled by high external temperatures, system power consumption, power management/battery conservation configurations, battery fast charging, and software. The system board provides the following device connections: ■ AMD Turion and Mobile AMD Sempron processors or Intel Core Duo, Core Solo, Celeron processors ■ Audio ■ Display ■ ExpressCard ■ Fan ■ Hard drive ■ Keyboard and TouchPad ■ Memory module ■ Mini Card modules Ä CAUTION: To properly ventilate the computer, allow at...
Compaq Presario V3000 Notebook PC Maintenance and Service Guide
Page 31
... prompt to boot from LAN" message that is displayed in the lower-left corner of the screen each time the computer is started or restarted in Windows. Maintenance and Service Guide 2-5 The Setup Utility features available for advanced users include a hard drive self-test, a Network Service Boot, and settings for all users. Troubleshooting Using Advanced Setup Utility Features This guide describes the Setup Utility features recommended for boot order preferences. For more information about the Setup Utility features recommended for a Network Service Boot.
... prompt to boot from LAN" message that is displayed in the lower-left corner of the screen each time the computer is started or restarted in Windows. Maintenance and Service Guide 2-5 The Setup Utility features available for advanced users include a hard drive self-test, a Network Service Boot, and settings for all users. Troubleshooting Using Advanced Setup Utility Features This guide describes the Setup Utility features recommended for boot order preferences. For more information about the Setup Utility features recommended for a Network Service Boot.
Compaq Presario V3000 Notebook PC Maintenance and Service Guide
Page 38
The "Press to change the boot order. 2-12 Maintenance and Service Guide The Setup Utility features available for advanced users include a hard drive self-test, a Network Service Boot, and settings for advanced users only, refer to Help and Support, which is accessible only when the computer is in Windows is the prompt to boot from LAN" message that is displayed in the lower-left corner of the screen each time the computer is the...
The "Press to change the boot order. 2-12 Maintenance and Service Guide The Setup Utility features available for advanced users include a hard drive self-test, a Network Service Boot, and settings for advanced users only, refer to Help and Support, which is accessible only when the computer is in Windows is the prompt to boot from LAN" message that is displayed in the lower-left corner of the screen each time the computer is the...
Compaq Presario V3000 Notebook PC Maintenance and Service Guide
Page 186
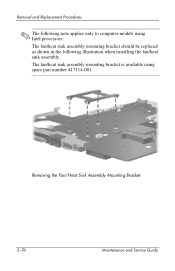
Removing the Fan/Heat Sink Assembly Mounting Bracket 5-76 Maintenance and Service Guide Removal and Replacement Procedures ✎ The following illustration when installing the fan/heat sink assembly. The fan/heat sink assembly mounting bracket is available using Intel processors: The fan/heat sink assembly mounting bracket should be replaced as shown in the following note applies only to computer models using spare part number 417114-001.
Removing the Fan/Heat Sink Assembly Mounting Bracket 5-76 Maintenance and Service Guide Removal and Replacement Procedures ✎ The following illustration when installing the fan/heat sink assembly. The fan/heat sink assembly mounting bracket is available using Intel processors: The fan/heat sink assembly mounting bracket should be replaced as shown in the following note applies only to computer models using spare part number 417114-001.
Compaq Presario V3000 Notebook PC Maintenance and Service Guide
Page 187
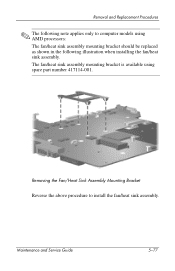
Maintenance and Service Guide 5-77 Removal and Replacement Procedures ✎ The following illustration when installing the fan/heat sink assembly. Removing the Fan/Heat Sink Assembly Mounting Bracket Reverse the above procedure to computer models using spare part number 417114-001. The fan/heat sink assembly mounting bracket is available using AMD processors: The fan/heat sink assembly mounting bracket should be replaced as shown in the following note applies only to install the fan/heat sink assembly.
Maintenance and Service Guide 5-77 Removal and Replacement Procedures ✎ The following illustration when installing the fan/heat sink assembly. Removing the Fan/Heat Sink Assembly Mounting Bracket Reverse the above procedure to computer models using spare part number 417114-001. The fan/heat sink assembly mounting bracket is available using AMD processors: The fan/heat sink assembly mounting bracket should be replaced as shown in the following note applies only to install the fan/heat sink assembly.
Compaq Presario V3000 Notebook PC Maintenance and Service Guide
Page 263
... cannot restore your computer, the reinstallation process reinstalls the program or utility to remove, and then click Uninstall. 2. Select Start > All Programs > Recovery Manager > Recovery Manager. Click either Software program re-installation or Hardware driver re-installation, and then click Next. C-6 Maintenance and Service Guide Reinstalling Preinstalled Programs and Drivers 1. Recovery Manager opens. c. Reinstalling Programs from your personal settings. b. Backup and Recovery in Windows Vista ■ In all cases, if a program has been deleted from Discs 1. Remove...
... cannot restore your computer, the reinstallation process reinstalls the program or utility to remove, and then click Uninstall. 2. Select Start > All Programs > Recovery Manager > Recovery Manager. Click either Software program re-installation or Hardware driver re-installation, and then click Next. C-6 Maintenance and Service Guide Reinstalling Preinstalled Programs and Drivers 1. Recovery Manager opens. c. Reinstalling Programs from your personal settings. b. Backup and Recovery in Windows Vista ■ In all cases, if a program has been deleted from Discs 1. Remove...
Compaq Presario V3000 Notebook PC Maintenance and Service Guide
Page 296
... adapter cable, spare part number 3-24, 3-28 right-side components 1-8 RJ-11 (modem) jack location 1-8 pin assignments D-5 RJ-45 (network) jack location 1-10 pin assignments D-2 RTC battery removal 5-10 spare part number 3-13, 3-32, 5-10 Rubber Feet Kit, spare part number 3-11, 3-33 S Screw Kit, spare part number 3-25, 3-33 screw listing A-1 security cable slot 1-8 serial number 3-1, 5-1 service considerations 4-2 Setup Utility 2-1 speaker assembly removal 5-60 spare part number 3-5, 3-32, 5-60 speakers 1-13 specifications battery 6-6 computer 6-1 display 6-3 Index-6 Maintenance and Service...
... adapter cable, spare part number 3-24, 3-28 right-side components 1-8 RJ-11 (modem) jack location 1-8 pin assignments D-5 RJ-45 (network) jack location 1-10 pin assignments D-2 RTC battery removal 5-10 spare part number 3-13, 3-32, 5-10 Rubber Feet Kit, spare part number 3-11, 3-33 S Screw Kit, spare part number 3-25, 3-33 screw listing A-1 security cable slot 1-8 serial number 3-1, 5-1 service considerations 4-2 Setup Utility 2-1 speaker assembly removal 5-60 spare part number 3-5, 3-32, 5-60 speakers 1-13 specifications battery 6-6 computer 6-1 display 6-3 Index-6 Maintenance and Service...

Drives - Windows Vista
Page 3
Table of contents 1 Handling drives 2 Drive light 3 Hard drives Replacing the hard drive ...3 4 Optical drives Inserting an optical disc ...7 Removing an optical disc when running on battery or external power 8 Removing an optical disc when no computer power is available 9 Avoiding the Sleep state or Hibernation 10 Index ...11 ENWW iii
Table of contents 1 Handling drives 2 Drive light 3 Hard drives Replacing the hard drive ...3 4 Optical drives Inserting an optical disc ...7 Removing an optical disc when running on battery or external power 8 Removing an optical disc when no computer power is available 9 Avoiding the Sleep state or Hibernation 10 Index ...11 ENWW iii
Drives - Windows Vista
Page 7
... through the operating system. Do not remove the hard drive while the computer is off or in Hibernation, turn the computer on , in the Sleep state, or in Hibernation. Then shut down the computer and close the display. 3. To remove the hard drive: 1. Unplug the power cord from the computer. 7. ENWW Replacing the hard drive 3 Remove the battery from the AC outlet. 5. Disconnect all external devices connected to the...
... through the operating system. Do not remove the hard drive while the computer is off or in Hibernation, turn the computer on , in the Sleep state, or in Hibernation. Then shut down the computer and close the display. 3. To remove the hard drive: 1. Unplug the power cord from the computer. 7. ENWW Replacing the hard drive 3 Remove the battery from the AC outlet. 5. Disconnect all external devices connected to the...
Drives - Windows Vista
Page 15
Index A airport security devices 1 C CD inserting 7 removing, with power 8 removing, without power 9 CD drive 6 O optical disc inserting 7 removing, with power 8 removing, without power 9 optical drive 6 S Sleep 10 D drive light 2 drives caring for 1 drive light 2 hard 3, 5 optical 6 See also hard drive, optical drive DVD inserting 7 removing, with power 8 removing, without power 9 DVD drive 6 H hard disk drive installing 5 removing 3 replacing 3 hard drive installing 5 removing 3 replacing 3 Hibernation 10 L light, drive 2 ENWW Index 11
Index A airport security devices 1 C CD inserting 7 removing, with power 8 removing, without power 9 CD drive 6 O optical disc inserting 7 removing, with power 8 removing, without power 9 optical drive 6 S Sleep 10 D drive light 2 drives caring for 1 drive light 2 hard 3, 5 optical 6 See also hard drive, optical drive DVD inserting 7 removing, with power 8 removing, without power 9 DVD drive 6 H hard disk drive installing 5 removing 3 replacing 3 hard drive installing 5 removing 3 replacing 3 Hibernation 10 L light, drive 2 ENWW Index 11
Drives
Page 9
... computer on a flat surface. 6. Save your work. 2. Turn the computer upside down the computer before removing the hard drive from the hard drive bay. Disconnect all external devices connected to the computer. 4. 3 Hard drives Replacing the hard drive CAUTION To prevent system lockup and loss of information: Shut down on by pressing the power button. Do not remove the hard drive while the computer is off or in hibernation. ENWW...
... computer on a flat surface. 6. Save your work. 2. Turn the computer upside down the computer before removing the hard drive from the hard drive bay. Disconnect all external devices connected to the computer. 4. 3 Hard drives Replacing the hard drive CAUTION To prevent system lockup and loss of information: Shut down on by pressing the power button. Do not remove the hard drive while the computer is off or in hibernation. ENWW...
Drives
Page 19
Index A airport security devices 1 C CD inserting 10 removing, with power 11 removing, without power 12 CD drive 9 inserting 10 removing, with power 11 removing, without power 12 optical drive 9 S standby 13 D drive light 3 drives caring for 1 drive light 3 hard 5, 7 optical 9 See also hard drive, optical drive DVD inserting 10 removing, with power 11 removing, without power 12 DVD drive 9 H hard disk drive installing 7 removing 5 replacing 5 hard drive installing 7 removing 5 replacing 5 hibernation 13 L light, drive 3 O optical disc ENWW Index 15
Index A airport security devices 1 C CD inserting 10 removing, with power 11 removing, without power 12 CD drive 9 inserting 10 removing, with power 11 removing, without power 12 optical drive 9 S standby 13 D drive light 3 drives caring for 1 drive light 3 hard 5, 7 optical 9 See also hard drive, optical drive DVD inserting 10 removing, with power 11 removing, without power 12 DVD drive 9 H hard disk drive installing 7 removing 5 replacing 5 hard drive installing 7 removing 5 replacing 5 hibernation 13 L light, drive 3 O optical disc ENWW Index 15
Notebook Tour Guide
Page 24
...wireless certification labels 16 release latch, battery 12 RJ-11 (modem) cable, identifying 15 RJ-11 (modem) jack, identifying 9 RJ-45 (network) jack, identifying 10, 11 S S-Video-out jack, identifying 10, 11 scrolling regions, TouchPad 2 security cable slot, identifying 9 serial number, computer 16 service tag 16 slots ExpressCard 10, 11 memory module 12 Memory Reader 10 security cable 9 speakers, identifying 4 specifications operating environment 17 rated input power 18 T temperature specifications 17 TouchPad buttons 2 identifying 2 scrolling regions 2 TouchPad light, identifying 2 TouchPad...
...wireless certification labels 16 release latch, battery 12 RJ-11 (modem) cable, identifying 15 RJ-11 (modem) jack, identifying 9 RJ-45 (network) jack, identifying 10, 11 S S-Video-out jack, identifying 10, 11 scrolling regions, TouchPad 2 security cable slot, identifying 9 serial number, computer 16 service tag 16 slots ExpressCard 10, 11 memory module 12 Memory Reader 10 security cable 9 speakers, identifying 4 specifications operating environment 17 rated input power 18 T temperature specifications 17 TouchPad buttons 2 identifying 2 scrolling regions 2 TouchPad light, identifying 2 TouchPad...
TouchPad and Keyboard
Page 16
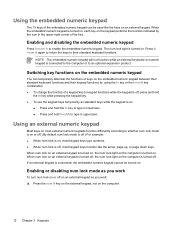
... keyboard functions. Enabling and disabling the embedded numeric keypad Press fn+num lk to type in the upper-right corner of the key. Switching key functions on the embedded numeric keypad You can be turned on. When num lock on an external keypad is turned on, the num lock light on the computer is on the computer. 12 Chapter 3 Keypads ENWW Enabling or disabling num lock mode as you work...
... keyboard functions. Enabling and disabling the embedded numeric keypad Press fn+num lk to type in the upper-right corner of the key. Switching key functions on the embedded numeric keypad You can be turned on. When num lock on an external keypad is turned on, the num lock light on the computer is on the computer. 12 Chapter 3 Keypads ENWW Enabling or disabling num lock mode as you work...


