
End User License Agreement
Page 2
...disk, CD or DVD) or an equivalent solution delivered in any product identification, copyright notices or proprietary restrictions from the Software Product. 6. UPGRADES. TRANSFER. You may only be governed by the Microsoft License Agreement. 2. This EULA is automatically terminated. entirely by the terms and ..., trade secret, and trademark law, as well as eligible for in this limitation or it is expressly provided for the upgrade. PROPRIETARY RIGHTS. All intellectual property rights in the Software Product and user documentation are protected by HP as other terms along...
...disk, CD or DVD) or an equivalent solution delivered in any product identification, copyright notices or proprietary restrictions from the Software Product. 6. UPGRADES. TRANSFER. You may only be governed by the Microsoft License Agreement. 2. This EULA is automatically terminated. entirely by the terms and ..., trade secret, and trademark law, as well as eligible for in this limitation or it is expressly provided for the upgrade. PROPRIETARY RIGHTS. All intellectual property rights in the Software Product and user documentation are protected by HP as other terms along...
Upgrading and Servicing Guide
Page 3
... the Side Panel 2 Replacing the Side Panel 2 Removing the Front Panel 2 Replacing the Front Panel 3 Locating Components Inside the PC 3 Removing and Replacing Drives 3 Removing a Drive 4 Replacing or Adding a Drive 5 Adding Memory 7 Removing a Memory Module 7 Installing a Memory Module 8 Removing or Installing an Add-In Card 8 ...
... the Side Panel 2 Replacing the Side Panel 2 Removing the Front Panel 2 Replacing the Front Panel 3 Locating Components Inside the PC 3 Removing and Replacing Drives 3 Removing a Drive 4 Replacing or Adding a Drive 5 Adding Memory 7 Removing a Memory Module 7 Installing a Memory Module 8 Removing or Installing an Add-In Card 8 ...
Upgrading and Servicing Guide
Page 5
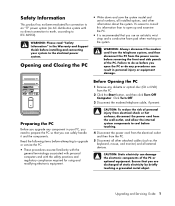
... if present. CAUTION: Static electricity can result in your system to IEC 60950). Read the following items before attempting to upgrade or service the PC. • These procedures assume familiarity with the general terminology associated with personal computers and with the safety practices and regulatory ...to earth, according to the electrical power system. CAUTION: To reduce the risk of the PC. Upgrading and Servicing Guide 1 Failure to prepare the PC so that you open up and examine the PC. • It is recommended that you use an antistatic wrist strap and a conductive ...
... if present. CAUTION: Static electricity can result in your system to IEC 60950). Read the following items before attempting to upgrade or service the PC. • These procedures assume familiarity with the general terminology associated with personal computers and with the safety practices and regulatory ...to earth, according to the electrical power system. CAUTION: To reduce the risk of the PC. Upgrading and Servicing Guide 1 Failure to prepare the PC so that you open up and examine the PC. • It is recommended that you use an antistatic wrist strap and a conductive ...
Upgrading and Servicing Guide
Page 6
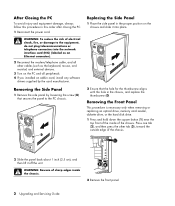
...(NIC) (labeled as the keyboard, mouse, and monitor) and external devices. 3 Turn on the PC and all other tab (3), toward the outside edge of the chassis. Removing the Front Panel This procedure...(1) near the top front of electrical shock, fire, or damage to the PC chassis. 2 Ensure that secures the panel to the equipment, do not plug telecommunications or telephone connectors into ...place. After Closing the PC To avoid injury and equipment damage, always follow this order after closing the PC. 1 Reconnect the power cord. WARNING: To reduce the ...
...(NIC) (labeled as the keyboard, mouse, and monitor) and external devices. 3 Turn on the PC and all other tab (3), toward the outside edge of the chassis. Removing the Front Panel This procedure...(1) near the top front of electrical shock, fire, or damage to the PC chassis. 2 Ensure that secures the panel to the equipment, do not plug telecommunications or telephone connectors into ...place. After Closing the PC To avoid injury and equipment damage, always follow this order after closing the PC. 1 Reconnect the power cord. WARNING: To reduce the ...
Upgrading and Servicing Guide
Page 7
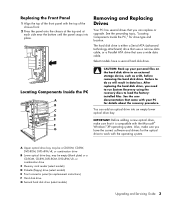
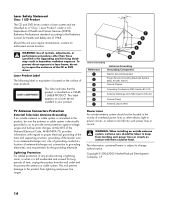
... panel (no replacement instructions) F Hard disk drive G Second hard disk drive (select models) Upgrading and Servicing Guide 3 You can replace or upgrade. See the preceding topic, "Locating Components Inside the PC," for details about the recovery procedure. Also, make sure that it is either a Serial ATA... lower optical drive bay. Removing and Replacing Drives Your PC has several drives that came with the Microsoft® Windows® XP operating system. Locating Components Inside the PC A B C D E R L F G CAUTION: Back up your PC for drive type and location. The hard disk drive...
... panel (no replacement instructions) F Hard disk drive G Second hard disk drive (select models) Upgrading and Servicing Guide 3 You can replace or upgrade. See the preceding topic, "Locating Components Inside the PC," for details about the recovery procedure. Also, make sure that it is either a Serial ATA... lower optical drive bay. Removing and Replacing Drives Your PC has several drives that came with the Microsoft® Windows® XP operating system. Locating Components Inside the PC A B C D E R L F G CAUTION: Back up your PC for drive type and location. The hard disk drive...
Upgrading and Servicing Guide
Page 8
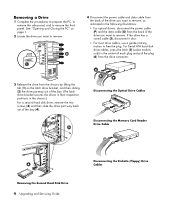
Removing a Drive 1 Complete the procedures to prepare the PC, to remove the side panel, and to free the plug. Disconnecting the Optical Drive Cables Disconnecting the Memory Card Reader Drive Cable Removing the Second Hard Disk Drive 4 Upgrading and Servicing Guide Disconnecting the Diskette (Floppy) Drive Cables If the drive... disconnect the power cable (P) and the data cable (D) from the back of the drive you want to remove. See "Opening and Closing the PC" on the latch drive bracket, and then sliding (2) the drive partway out of the bay. (The latch drive bracket secures the drives in ...
Removing a Drive 1 Complete the procedures to prepare the PC, to remove the side panel, and to free the plug. Disconnecting the Optical Drive Cables Disconnecting the Memory Card Reader Drive Cable Removing the Second Hard Disk Drive 4 Upgrading and Servicing Guide Disconnecting the Diskette (Floppy) Drive Cables If the drive... disconnect the power cable (P) and the data cable (D) from the back of the drive you want to remove. See "Opening and Closing the PC" on the latch drive bracket, and then sliding (2) the drive partway out of the bay. (The latch drive bracket secures the drives in ...
Upgrading and Servicing Guide
Page 9
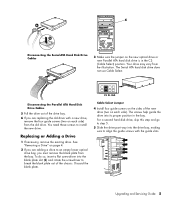
... the drive bay. 6 If you are adding a drive to step 5. 5 Slide the drive part way into its proper position in the CS (Cable Select) position. Upgrading and Servicing Guide 5 The Serial ATA hard disk drive does not use Cable Select. See "Removing a Drive" on page 4. 2 If you must remove the blank...
... the drive bay. 6 If you are adding a drive to step 5. 5 Slide the drive part way into its proper position in the CS (Cable Select) position. Upgrading and Servicing Guide 5 The Serial ATA hard disk drive does not use Cable Select. See "Removing a Drive" on page 4. 2 If you must remove the blank...
Upgrading and Servicing Guide
Page 10
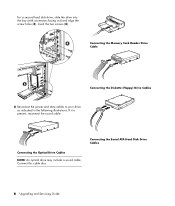
For a second hard disk drive, slide the drive into the bay (with connectors facing out) and align the screw holes (3). Connect this cable also. Insert the two screws (4). Connecting the Serial ATA Hard Disk Drive Cables 6 Upgrading and Servicing Guide Connecting the Memory Card Reader Drive Cable Connecting the Diskette (Floppy) Drive Cables 6 Reconnect the power and data cables to your drive as indicated in the following illustrations. If it is present, reconnect the sound cable. Connecting the Optical Drive Cables NOTE: An optical drive may include a sound cable.
For a second hard disk drive, slide the drive into the bay (with connectors facing out) and align the screw holes (3). Connect this cable also. Insert the two screws (4). Connecting the Serial ATA Hard Disk Drive Cables 6 Upgrading and Servicing Guide Connecting the Memory Card Reader Drive Cable Connecting the Diskette (Floppy) Drive Cables 6 Reconnect the power and data cables to your drive as indicated in the following illustrations. If it is present, reconnect the sound cable. Connecting the Optical Drive Cables NOTE: An optical drive may include a sound cable.
Upgrading and Servicing Guide
Page 11
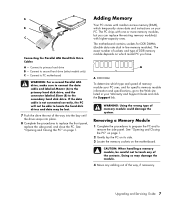
.... 7 Push the drive the rest of the contacts. Connecting the Parallel ATA Hard Disk Drive Cables A - If the data cable is not connected correctly, the PC will not be able to locate the hard disk drives and data may damage the module. 4 Move any of the way into the bay until... the drive snaps into place. 8 Complete the procedures to replace the front panel, replace the side panel, and close the PC. Upgrading and Servicing Guide 7 Connect to the secondary hard disk drive. Removing a Memory Module 1 Complete the procedures to prepare the...
.... 7 Push the drive the rest of the contacts. Connecting the Parallel ATA Hard Disk Drive Cables A - If the data cable is not connected correctly, the PC will not be able to locate the hard disk drives and data may damage the module. 4 Move any of the way into the bay until... the drive snaps into place. 8 Complete the procedures to replace the front panel, replace the side panel, and close the PC. Upgrading and Servicing Guide 7 Connect to the secondary hard disk drive. Removing a Memory Module 1 Complete the procedures to prepare the...
Upgrading and Servicing Guide
Page 12
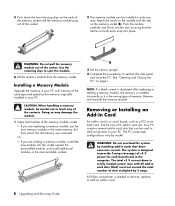
...of the memory module socket: • If you are replacing a memory module, put the new memory module in card. 8 Upgrading and Servicing Guide Installing a Memory Module Upgrade the memory in card slots that the latches on both latches of the same type and speed as a PCI or an AGP...a memory module, the memory is installed incorrectly or it is needed to replace the side panel, and close the PC. Your PC contains several add-in your PC. The PC component configurations vary by installing add-in cards that fits into the socket nearest the preinstalled module, and install additional ...
...of the memory module socket: • If you are replacing a memory module, put the new memory module in card. 8 Upgrading and Servicing Guide Installing a Memory Module Upgrade the memory in card slots that the latches on both latches of the same type and speed as a PCI or an AGP...a memory module, the memory is installed incorrectly or it is needed to replace the side panel, and close the PC. Your PC contains several add-in your PC. The PC component configurations vary by installing add-in cards that fits into the socket nearest the preinstalled module, and install additional ...
Upgrading and Servicing Guide
Page 13
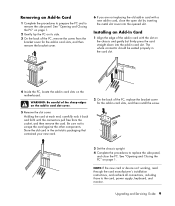
... installation instructions, and recheck all connections, including those to remove the side panel. Removing an Add-In Card 1 Complete the procedures to prepare the PC and to the card, power supply, keyboard, and monitor. Be sure not to replace the side panel, and close the open slot by inserting the... chassis and gently but firmly press the card straight down into the opened slot. Upgrading and Servicing Guide 9 Store the old card in the anti-static packaging that contained your new card. 2 On the back of the PC, remove the screw from the socket, and then remove the card. The whole...
... installation instructions, and recheck all connections, including those to remove the side panel. Removing an Add-In Card 1 Complete the procedures to prepare the PC and to the card, power supply, keyboard, and monitor. Be sure not to replace the side panel, and close the open slot by inserting the... chassis and gently but firmly press the card straight down into the opened slot. Upgrading and Servicing Guide 9 Store the old card in the anti-static packaging that contained your new card. 2 On the back of the PC, remove the screw from the socket, and then remove the card. The whole...
Upgrading and Servicing Guide
Page 14
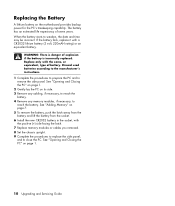
... with the same, or equivalent, type of battery. WARNING: There is danger of seven years. See "Opening and Closing the PC" on page 1. 2 Gently lay the PC on page 7. 5 To remove the battery, push the latch away from the battery and lift the battery from the socket. ...battery. 4 Remove any memory modules, if necessary, to close the PC. See "Opening and Closing the PC" on the motherboard provides backup power for the PC's timekeeping capability. Replacing the Battery A lithium battery on page 1. 10 Upgrading and Servicing Guide The battery has an estimated life expectancy of explosion ...
... with the same, or equivalent, type of battery. WARNING: There is danger of seven years. See "Opening and Closing the PC" on page 1. 2 Gently lay the PC on page 7. 5 To remove the battery, push the latch away from the battery and lift the battery from the socket. ...battery. 4 Remove any memory modules, if necessary, to close the PC. See "Opening and Closing the PC" on the motherboard provides backup power for the PC's timekeeping capability. Replacing the Battery A lithium battery on page 1. 10 Upgrading and Servicing Guide The battery has an estimated life expectancy of explosion ...
PC Basics Guide
Page 37
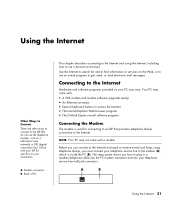
...PC may vary. A B Using the Internet 31 Before you can connect to the Internet and send or receive e-mail and faxes using the Internet, including how to use the telephone modem, such as a LAN (local area network) or DSL (digital subscriber line). Check with : • A 56K modem and modem software (upgrade...8226; The Internet Explorer Web browser program. • The Outlook Express e-mail software program. A Modem connector B Back of PC This chapter describes connecting to the Internet and using telephone dial-up connection to get, read, or send electronic mail messages. Connecting...
...PC may vary. A B Using the Internet 31 Before you can connect to the Internet and send or receive e-mail and faxes using the Internet, including how to use the telephone modem, such as a LAN (local area network) or DSL (digital subscriber line). Check with : • A 56K modem and modem software (upgrade...8226; The Internet Explorer Web browser program. • The Outlook Express e-mail software program. A Modem connector B Back of PC This chapter describes connecting to the Internet and using telephone dial-up connection to get, read, or send electronic mail messages. Connecting...
PC Basics Guide
Page 43
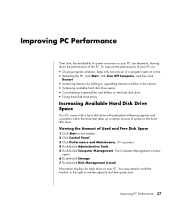
...disk drive. • Fixing hard disk drive errors. keep only one version of the PC. click Start, click Turn Off Computer, and then click Restart. • Increasing memory by adding or upgrading memory modules in the chassis. • Increasing available hard disk drive space. •... Consolidating scattered files and folders on the hard disk drive. Improving PC Performance Over time, the availability of system resources on the ...
...disk drive. • Fixing hard disk drive errors. keep only one version of the PC. click Start, click Turn Off Computer, and then click Restart. • Increasing memory by adding or upgrading memory modules in the chassis. • Increasing available hard disk drive space. •... Consolidating scattered files and folders on the hard disk drive. Improving PC Performance Over time, the availability of system resources on the ...
Compaq Presario Desktop Products - Warranty and Support Guide
Page 13
... computer. HP warrants the operation of the product. If HP is to recycle: www.hp.com/recycle COMPAQ PRESARIO DESKTOP PRODUCTS The Legal Language Compaq Limited Warranty Statement DURATION OF LIMITED WARRANTY Hardware: Original Systems - 1 year Technical phone assistance to diagnose ...any product to a condition as floods, tornadoes, lightning strikes, hurricanes, or earthquakes. 13 Protect Your Investment Obtaining a Warranty Upgrade Upgrade your old product for recycling. Service coverage begins on the outcome of system self-test programs run by HP, (c) unauthorized ...
... computer. HP warrants the operation of the product. If HP is to recycle: www.hp.com/recycle COMPAQ PRESARIO DESKTOP PRODUCTS The Legal Language Compaq Limited Warranty Statement DURATION OF LIMITED WARRANTY Hardware: Original Systems - 1 year Technical phone assistance to diagnose ...any product to a condition as floods, tornadoes, lightning strikes, hurricanes, or earthquakes. 13 Protect Your Investment Obtaining a Warranty Upgrade Upgrade your old product for recycling. Service coverage begins on the outcome of system self-test programs run by HP, (c) unauthorized ...
Compaq Presario Desktop Products - Warranty and Support Guide
Page 15
...software contained in a form that the right to you in this EULA. 8. The use on a single computer ("Your Computer"). After upgrading, you shall be an indirect transfer, such as other terms will also terminate upon conditions set forth elsewhere in relation to support services ..., and trademark law, as well as a consignment. The transfer may copy the Software Product into Your Computer's temporary memory (RAM) for the upgrade. Prior to the transfer, the end user receiving the transferred product must include all the EULA terms. Upon transfer of this EULA. 5. b....
...software contained in a form that the right to you in this EULA. 8. The use on a single computer ("Your Computer"). After upgrading, you shall be an indirect transfer, such as other terms will also terminate upon conditions set forth elsewhere in relation to support services ..., and trademark law, as well as a consignment. The transfer may copy the Software Product into Your Computer's temporary memory (RAM) for the upgrade. Prior to the transfer, the end user receiving the transferred product must include all the EULA terms. Upon transfer of this EULA. 5. b....
Compaq Presario Desktop Products - Warranty and Support Guide
Page 20
... are classified as to grounding electrodes, and requirements for Health and Safety Act of Compaq laser products: This label indicates that the product is provided with a voltage select ... WARNING: Use of controls, adjustments, or performance procedures other than those specified in the Upgrading and Servicing Guide may result in wire to an antenna-discharge unit, size of grounding ... Canada Terminal Equipment Technical Specifications. The abbreviation, IC, before installing or removing your PC's main AC disconnecting device and must be easily accessible at all times. It does...
... are classified as to grounding electrodes, and requirements for Health and Safety Act of Compaq laser products: This label indicates that the product is provided with a voltage select ... WARNING: Use of controls, adjustments, or performance procedures other than those specified in the Upgrading and Servicing Guide may result in wire to an antenna-discharge unit, size of grounding ... Canada Terminal Equipment Technical Specifications. The abbreviation, IC, before installing or removing your PC's main AC disconnecting device and must be easily accessible at all times. It does...
Warranty and Support Guide
Page 7
... software (how-to you purchased the HP option. If the removable media on availability of service upgrades and the cost for these service upgrades, refer to the HP Web site at : http://www.hp.com/support Service Upgrades HP has a range of purchase. Excludes system optimization, customization and network configuration. • Interpreting system...
... software (how-to you purchased the HP option. If the removable media on availability of service upgrades and the cost for these service upgrades, refer to the HP Web site at : http://www.hp.com/support Service Upgrades HP has a range of purchase. Excludes system optimization, customization and network configuration. • Interpreting system...
Warranty and Support Guide
Page 8
...otherwise subject to a separate license agreement between you and HP or its online documentation. Storage. Reservation of using the Software Product. UPGRADES. ADDITIONAL SOFTWARE. IF YOU DO NOT ACCEPT THESE LICENSE TERMS, YOUR SOLE REMEDY IS TO RETURN THE ENTIRE UNUSED PRODUCT (HARDWARE ... such Freeware whether in its suppliers. You may copy the Software Product into Your Computer's temporary memory (RAM) for the upgrade. HP and its suppliers reserve all of the original Software Product's proprietary notices and that it is licensed to you subject...
...otherwise subject to a separate license agreement between you and HP or its online documentation. Storage. Reservation of using the Software Product. UPGRADES. ADDITIONAL SOFTWARE. IF YOU DO NOT ACCEPT THESE LICENSE TERMS, YOUR SOLE REMEDY IS TO RETURN THE ENTIRE UNUSED PRODUCT (HARDWARE ... such Freeware whether in its suppliers. You may copy the Software Product into Your Computer's temporary memory (RAM) for the upgrade. HP and its suppliers reserve all of the original Software Product's proprietary notices and that it is licensed to you subject...
Warranty and Support Guide
Page 14
... indicates that the product is subject to grounding electrodes, and requirements for long periods of overhead power lines or other than those specified in the Upgrading and Servicing Guide may result in your product. This label appears on the surface of controls, adjustments, or performance procedures other electric light or power...
... indicates that the product is subject to grounding electrodes, and requirements for long periods of overhead power lines or other than those specified in the Upgrading and Servicing Guide may result in your product. This label appears on the surface of controls, adjustments, or performance procedures other electric light or power...


