Wireless Setup Guide
Page 7
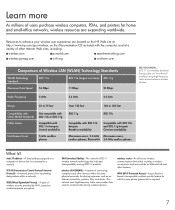
... drives. The network uses high-frequency radio waves rather than wires to communicate among 802.11 products. WPA (Wi-Fi Protected Access)-A specificationbased, interoperable wireless security feature for which a pass phrase (password) is connected to a computer or device that indicates interoperability among wireless devices. Wi-Fi (wireless fidelity)-The name for 802.11 wireless network technology that is required. 7 Learn more As millions of users...
... drives. The network uses high-frequency radio waves rather than wires to communicate among 802.11 products. WPA (Wi-Fi Protected Access)-A specificationbased, interoperable wireless security feature for which a pass phrase (password) is connected to a computer or device that indicates interoperability among wireless devices. Wi-Fi (wireless fidelity)-The name for 802.11 wireless network technology that is required. 7 Learn more As millions of users...

HP G70 Notebook PC Compaq Presario CQ70 Notebook PC - Maintenance and Service Guide
Page 4
... location 3-1 Computer major components 3-2 Display assembly components 3-9 Plastics Kit 3-10 Mass storage devices 3-11 Miscellaneous parts 3-12 Sequential part number listing 3-13 4 Removal and replacement procedures Preliminary replacement requirements 4-1 Tools required 4-1 Service considerations 4-1 Grounding guidelines 4-2 Unknown user password 4-4 Component replacement procedures 4-5 Serial number 4-5 Computer feet 4-6 Battery 4-6 Optical drive 4-7 Hard drive 4-9 RTC battery 4-11 Memory module 4-12 WLAN module 4-13 Keyboard 4-15 Keyboard cover 4-17 Power button...
... location 3-1 Computer major components 3-2 Display assembly components 3-9 Plastics Kit 3-10 Mass storage devices 3-11 Miscellaneous parts 3-12 Sequential part number listing 3-13 4 Removal and replacement procedures Preliminary replacement requirements 4-1 Tools required 4-1 Service considerations 4-1 Grounding guidelines 4-2 Unknown user password 4-4 Component replacement procedures 4-5 Serial number 4-5 Computer feet 4-6 Battery 4-6 Optical drive 4-7 Hard drive 4-9 RTC battery 4-11 Memory module 4-12 WLAN module 4-13 Keyboard 4-15 Keyboard cover 4-17 Power button...
HP G70 Notebook PC Compaq Presario CQ70 Notebook PC - Maintenance and Service Guide
Page 10
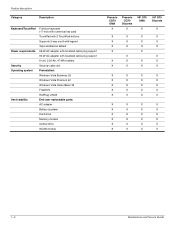
.../TouchPad Power requirements Security Operating system Serviceability Full-size keyboard (17-inch with numerical key pad) TouchPad with 2 TouchPad buttons Supports 2-way scroll with legend Taps enabled as default 65-W AC adapter with localized cable plug support 90-W AC adapter with localized cable plug support 6-cell, 2.20-Ah, 47-Whr battery Security cable slot Preinstalled: Windows Vista Business 32 Windows Vista Premium 32 Windows Vista Home Basic 32 FreeDOS RedFlag LINUX End-user replaceable parts: AC adapter Battery (system) Hard drive Memory module Optical drive WLAN module Presario...
.../TouchPad Power requirements Security Operating system Serviceability Full-size keyboard (17-inch with numerical key pad) TouchPad with 2 TouchPad buttons Supports 2-way scroll with legend Taps enabled as default 65-W AC adapter with localized cable plug support 90-W AC adapter with localized cable plug support 6-cell, 2.20-Ah, 47-Whr battery Security cable slot Preinstalled: Windows Vista Business 32 Windows Vista Premium 32 Windows Vista Home Basic 32 FreeDOS RedFlag LINUX End-user replaceable parts: AC adapter Battery (system) Hard drive Memory module Optical drive WLAN module Presario...

HP G70 Notebook PC Compaq Presario CQ70 Notebook PC - Maintenance and Service Guide
Page 16
... microphone, stereo array microphone, or monaural microphone. Component Vents (2) Function Enable airflow to cool internal components. ✎ The computer fan starts up automatically to optional powered stereo speakers, headphones, ear buds, a headset, or television audio. It is normal for the internal fan to cycle on . ■ Blinking: The computer is turned off until the battery reaches a low battery level. Blinking: The hard drive or optical drive is off during routine operation. 2-6 Maintenance and Service Guide...
... microphone, stereo array microphone, or monaural microphone. Component Vents (2) Function Enable airflow to cool internal components. ✎ The computer fan starts up automatically to optional powered stereo speakers, headphones, ear buds, a headset, or television audio. It is normal for the internal fan to cycle on . ■ Blinking: The computer is turned off until the battery reaches a low battery level. Blinking: The hard drive or optical drive is off during routine operation. 2-6 Maintenance and Service Guide...

HP G70 Notebook PC Compaq Presario CQ70 Notebook PC - Maintenance and Service Guide
Page 17
...light 3 External monitor port 4 RJ-45 (network) jack 5 HDMI port (select models only) 6 USB port 7 Digital Media Slot (select models only) 8 Digital Media Slot light (select models only) Function Connects an AC adapter. ■ On: The computer is connected to external power. ■ Off: The computer is in use. Connects an external VGA monitor or projector. Connects an optional video or audio device, such as a high-definition television, or any compatible digital or audio component. Supports the following optional digital card formats: ■ Memory Stick (MS) ■ Memory Stick Pro...
...light 3 External monitor port 4 RJ-45 (network) jack 5 HDMI port (select models only) 6 USB port 7 Digital Media Slot (select models only) 8 Digital Media Slot light (select models only) Function Connects an AC adapter. ■ On: The computer is connected to external power. ■ Off: The computer is in use. Connects an external VGA monitor or projector. Connects an optional video or audio device, such as a high-definition television, or any compatible digital or audio component. Supports the following optional digital card formats: ■ Memory Stick (MS) ■ Memory Stick Pro...
HP G70 Notebook PC Compaq Presario CQ70 Notebook PC - Maintenance and Service Guide
Page 41
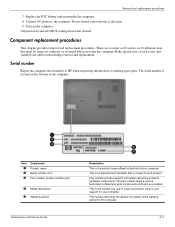
... computer. Serial number Report the computer serial number to the computer. Component replacement procedures This chapter provides removal and replacement procedures. Connect AC power to HP when requesting information or ordering spare parts. Make special note of your computer. This is the product name affixed to each screw and standoff size and location during removal and replacement. All passwords and all CMOS settings have been cleared. Replace the RTC battery and...
... computer. Serial number Report the computer serial number to the computer. Component replacement procedures This chapter provides removal and replacement procedures. Connect AC power to HP when requesting information or ordering spare parts. Make special note of your computer. This is the product name affixed to each screw and standoff size and location during removal and replacement. All passwords and all CMOS settings have been cleared. Replace the RTC battery and...
HP G70 Notebook PC Compaq Presario CQ70 Notebook PC - Maintenance and Service Guide
Page 77
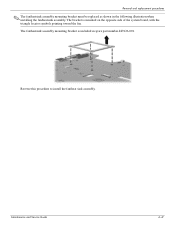
The fan/heatsink assembly mounting bracket is mounted on the opposite side of the system board, with the triangle locator symbols pointing toward the fan. Maintenance and Service Guide 4-41 The bracket is included in the following illustration when installing the fan/heatsink assembly. Removal and replacement procedures ✎ The fan/heatsink assembly mounting bracket must be replaced as shown in spare part number 489126-001. Reverse this procedure to install the fan/heat sink assembly.
The fan/heatsink assembly mounting bracket is mounted on the opposite side of the system board, with the triangle locator symbols pointing toward the fan. Maintenance and Service Guide 4-41 The bracket is included in the following illustration when installing the fan/heatsink assembly. Removal and replacement procedures ✎ The fan/heatsink assembly mounting bracket must be replaced as shown in spare part number 489126-001. Reverse this procedure to install the fan/heat sink assembly.

HP G70 Notebook PC Compaq Presario CQ70 Notebook PC - Maintenance and Service Guide
Page 84
... the boot order for: ❐ USB Floppy ❐ Internal CD/DVD ROM Drive ❐ Hard drive ❐ USB Diskette on Key ❐ USB Hard drive ❐ Network adapter Diagnostics menu Select Hard Disk Self Test Secondary Hard Disk Self Test (select models only) Memory Test To do this menu option is in DC mode. Enable/disable the processor Virtualization Technology. When enabled, saves power when the computer is in DC mode. Enable/disable the capacitive button tapping sound. Enable/disable LAN Power Saving. Setup Utility System Configuration menu Select Language Support Button...
... the boot order for: ❐ USB Floppy ❐ Internal CD/DVD ROM Drive ❐ Hard drive ❐ USB Diskette on Key ❐ USB Hard drive ❐ Network adapter Diagnostics menu Select Hard Disk Self Test Secondary Hard Disk Self Test (select models only) Memory Test To do this menu option is in DC mode. Enable/disable the processor Virtualization Technology. When enabled, saves power when the computer is in DC mode. Enable/disable the capacitive button tapping sound. Enable/disable LAN Power Saving. Setup Utility System Configuration menu Select Language Support Button...

HP G70 Notebook PC Compaq Presario CQ70 Notebook PC - Maintenance and Service Guide
Page 129
... media cards 1-3 graphics 1-2 hard drives 1-2 keyboard 1-4 memory module 1-2 microphone 1-3 modem module 1-3 operating system 1-4 optical drives 1-3 panel 1-2 ports 1-3 power requirements 1-4 processors 1-1 product name 1-1 security 1-4 serviceability 1-4 TouchPad 2-5 video 2-7 webcam 1-3 wireless 1-3 product name 1-1 R rear components 2-6 recovery methods f11 recovery 8-4 recovery discs 8-4 Recovery Manager 8-4 recovery partition 8-4 removal/replacement preliminaries 4-1 procedures 4-5 restore points 8-3 restoring factory settings 5-2 right-side components 2-8 RJ-11 (modem) jack location...
... media cards 1-3 graphics 1-2 hard drives 1-2 keyboard 1-4 memory module 1-2 microphone 1-3 modem module 1-3 operating system 1-4 optical drives 1-3 panel 1-2 ports 1-3 power requirements 1-4 processors 1-1 product name 1-1 security 1-4 serviceability 1-4 TouchPad 2-5 video 2-7 webcam 1-3 wireless 1-3 product name 1-1 R rear components 2-6 recovery methods f11 recovery 8-4 recovery discs 8-4 Recovery Manager 8-4 recovery partition 8-4 removal/replacement preliminaries 4-1 procedures 4-5 restore points 8-3 restoring factory settings 5-2 right-side components 2-8 RJ-11 (modem) jack location...
Drives - Windows Vista
Page 13
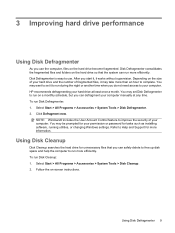
... folders on the hard drive so that you can run on -screen instructions. Disk Defragmenter is easy to Help and Support for tasks such as installing software, running utilities, or changing Windows settings. After you start it, it to run more efficiently. Select Start > All Programs > Accessories > System Tools > Disk Defragmenter. 2. You may set it works without supervision. Using Disk Cleanup Disk Cleanup searches the hard drive for your computer manually at least...
... folders on the hard drive so that you can run on -screen instructions. Disk Defragmenter is easy to Help and Support for tasks such as installing software, running utilities, or changing Windows settings. After you start it, it to run more efficiently. Select Start > All Programs > Accessories > System Tools > Disk Defragmenter. 2. You may set it works without supervision. Using Disk Cleanup Disk Cleanup searches the hard drive for your computer manually at least...
Drives - Windows Vista
Page 22
... location on -screen instructions to install the updated driver without downloading the file. - Open your hard drive. Follow the on your Internet browser and go to your specific product from the models listed. 4. 3. Click Install now to install Microsoft Update. Click Download only to save the file to http://www.microsoft.com. 2. Click Security & Updates. 3. Click your computer. If prompted to open a window containing additional information. 6. If prompted by User Account Control, click...
... location on -screen instructions to install the updated driver without downloading the file. - Open your hard drive. Follow the on your Internet browser and go to your specific product from the models listed. 4. 3. Click Install now to install Microsoft Update. Click Download only to save the file to http://www.microsoft.com. 2. Click Security & Updates. 3. Click your computer. If prompted to open a window containing additional information. 6. If prompted by User Account Control, click...

Drives - Windows Vista
Page 23
...software 9 Disk Defragmenter software 9 disk performance 9 drives caring for 1 hard 10, 11 optical 2 drives, optical drive 3 DVD burning 7, 16 changing region setting 6 copying 7 drive 2 playing 5 removing 8 DVD drive 3 H hard disk drive installing 11 removing 10 replacing 10 hard drive installing 11 removing 10 replacing 10 M maintenance Disk Cleanup 9 Disk Defragmenter 9 O optical disc Blu-ray 5 removing 8 using 3, 4 optical drive identifying 2 P playing a CD or DVD 5 R region codes, DVD 6 S software Disk Cleanup 9 Disk Defragmenter 9 T troubleshooting burning discs 16 device driver 17 disc...
...software 9 Disk Defragmenter software 9 disk performance 9 drives caring for 1 hard 10, 11 optical 2 drives, optical drive 3 DVD burning 7, 16 changing region setting 6 copying 7 drive 2 playing 5 removing 8 DVD drive 3 H hard disk drive installing 11 removing 10 replacing 10 hard drive installing 11 removing 10 replacing 10 M maintenance Disk Cleanup 9 Disk Defragmenter 9 O optical disc Blu-ray 5 removing 8 using 3, 4 optical drive identifying 2 P playing a CD or DVD 5 R region codes, DVD 6 S software Disk Cleanup 9 Disk Defragmenter 9 T troubleshooting burning discs 16 device driver 17 disc...
Software Update, Backup and Recovery - Windows Vista
Page 5
... the HP Web site. NOTE: Windows® includes the User Account Control feature to improve the security of your computer model, product category, and series or family. Refer to a network, consult the network administrator before installing any software updates, especially system BIOS updates. To update the software, follow these steps, which contains information regarding installing and troubleshooting the file. Access the updates on the HP Web site are...
... the HP Web site. NOTE: Windows® includes the User Account Control feature to improve the security of your computer model, product category, and series or family. Refer to a network, consult the network administrator before installing any software updates, especially system BIOS updates. To update the software, follow these steps, which contains information regarding installing and troubleshooting the file. Access the updates on the HP Web site are...
Software Update, Backup and Recovery - Windows Vista
Page 8
... to download the driver and install it later. Updating programs and drivers To download and install software other than a BIOS update, follow the instructions provided. or - Click the option for software and driver downloads, type your hard drive. When the list of the device. 4 Updating software NOTE: In some locations you want a specific SoftPaq, enter the SoftPaq number in the Search box, and then press enter. - When prompted, click Save and then select a storage location on your computer model number...
... to download the driver and install it later. Updating programs and drivers To download and install software other than a BIOS update, follow the instructions provided. or - Click the option for software and driver downloads, type your hard drive. When the list of the device. 4 Updating software NOTE: In some locations you want a specific SoftPaq, enter the SoftPaq number in the Search box, and then press enter. - When prompted, click Save and then select a storage location on your computer model number...
Wireless (Select Models Only) - Windows Vista
Page 24
... have a problem connecting to a WLAN, confirm that the integrated WLAN device is not properly installed. Select Start > Computer > System properties. 2. Identify the WLAN device from the Network adapters list. Cannot connect to a WLAN If you have an integrated WLAN device, or the driver for the WLAN device is properly installed on troubleshooting WLANs, refer to Help and Support for tasks such as installing software, running utilities, or changing Windows settings. You may...
... have a problem connecting to a WLAN, confirm that the integrated WLAN device is not properly installed. Select Start > Computer > System properties. 2. Identify the WLAN device from the Network adapters list. Cannot connect to a WLAN If you have an integrated WLAN device, or the driver for the WLAN device is properly installed on troubleshooting WLANs, refer to Help and Support for tasks such as installing software, running utilities, or changing Windows settings. You may...

Multimedia - Windows Vista
Page 13
... the display devices connected to the device manufacturer's instructions. 3. Configuring the audio using HDMI (select models only) To configure, first connect an audio or video device, such as a high-definition TV, to that graphics card. You must also determine what type of the HDMI cable into the HDMI port on the computer keyboard. - The computer can support one end of graphics card is installed on your computer, and then configure the default audio playback device according to the HDMI port on...
... the display devices connected to the device manufacturer's instructions. 3. Configuring the audio using HDMI (select models only) To configure, first connect an audio or video device, such as a high-definition TV, to that graphics card. You must also determine what type of the HDMI cable into the HDMI port on the computer keyboard. - The computer can support one end of graphics card is installed on your computer, and then configure the default audio playback device according to the HDMI port on...
Multimedia - Windows Vista
Page 30
..., press enter, and follow the instructions provided. Select Start > All Programs > HP > HP Update. 2. Open your country or region. 2. Obtaining the latest Windows device drivers You can be set to install. 7. To use the HP Update Utility: 1. If you want a specific SoftPaq, enter the SoftPaq number (do so, restart your computer. Click the Windows Vista® operating system. 5. Click Install now to http://www.hp.com/support, and select your Internet browser...
..., press enter, and follow the instructions provided. Select Start > All Programs > HP > HP Update. 2. Open your country or region. 2. Obtaining the latest Windows device drivers You can be set to install. 7. To use the HP Update Utility: 1. If you want a specific SoftPaq, enter the SoftPaq number (do so, restart your computer. Click the Windows Vista® operating system. 5. Click Install now to http://www.hp.com/support, and select your Internet browser...

Power Management - Windows Vista
Page 18
.... 8. Step 2: Disable Hibernation and Sleep 1. Select Start > Control Panel > System and Maintenance > Power Options. 2. Click the plus sign next to Sleep, and then click the plus sign next to Never. 9. Under the current power plan, click Change plan settings. 3. Click Change advanced power settings. 6. Click OK. 10. It is fully charged. Step 1: Fully charge the battery WARNING! Change the Turn off the display and Put the computer to sleep settings to sleep settings listed in the...
.... 8. Step 2: Disable Hibernation and Sleep 1. Select Start > Control Panel > System and Maintenance > Power Options. 2. Click the plus sign next to Sleep, and then click the plus sign next to Never. 9. Under the current power plan, click Change plan settings. 3. Click Change advanced power settings. 6. Click OK. 10. It is fully charged. Step 1: Fully charge the battery WARNING! Change the Turn off the display and Put the computer to sleep settings to sleep settings listed in the...

Power Management - Windows Vista
Page 20
.... 1. Step 4: Fully recharge the battery To recharge the battery: 1. Plug the computer into external power and maintain external power until the battery is fully charged and the battery light has turned off , turn it on -screen instructions. 16 Chapter 2 Using battery power If the computer is off . Click Restore default settings for this plan, and then follow the on when the battery is fully recharged. Under the current power plan, click Change plan settings. 3.
.... 1. Step 4: Fully recharge the battery To recharge the battery: 1. Plug the computer into external power and maintain external power until the battery is fully charged and the battery light has turned off , turn it on -screen instructions. 16 Chapter 2 Using battery power If the computer is off . Click Restore default settings for this plan, and then follow the on when the battery is fully recharged. Under the current power plan, click Change plan settings. 3.

Power Management - Windows Vista
Page 24
... conditions: ● When you need to replace the battery or access components inside the computer ● When you must first exit Sleep or Hibernation before shutdown is shut down. Click Shut Down. Save your work and close all open programs. 2. If the computer is unresponsive and you are connecting an external hardware device that does not connect to use the preceding shutdown procedures...
... conditions: ● When you need to replace the battery or access components inside the computer ● When you must first exit Sleep or Hibernation before shutdown is shut down. Click Shut Down. Save your work and close all open programs. 2. If the computer is unresponsive and you are connecting an external hardware device that does not connect to use the preceding shutdown procedures...


