
Wireless Setup Guide
Page 3
...wireless router Ethernet cable connected, remove the cable from the successfully access a computer and the wireless router. router manufacturer or your computer is on, turn on page 2. Refer to the information you cannot access a Web site, repeat steps 1 5 During router configuration, check whether the wireless router ...WEP, through 5, or contact your Web browser and accessing a Web site. If you successfully complete step 6, your router is set up and turn it off by opening your or WPA-PSK. Record this setup. 2 Make sure that the blue wireless light next to the wireless icon is...
...wireless router Ethernet cable connected, remove the cable from the successfully access a computer and the wireless router. router manufacturer or your computer is on, turn on page 2. Refer to the information you cannot access a Web site, repeat steps 1 5 During router configuration, check whether the wireless router ...WEP, through 5, or contact your Web browser and accessing a Web site. If you successfully complete step 6, your router is set up and turn it off by opening your or WPA-PSK. Record this setup. 2 Make sure that the blue wireless light next to the wireless icon is...

Wireless Setup Guide
Page 4
...IEEE 802.11x authentication for technical assistance. Highlight your network name in the Available wireless networks list. 3 Complete the following steps that correspond with wireless notebooks and wired desktop PROGRESS CHECK If you successfully complete step 6, all computers on your home or small-office network. Example of network with your wireless... have problems accessing a Web site, contact your router manufacturer or your computer and repeat steps 1 through 3. PROGRESS CHECK After step 1, the blue wireless light turns on. 1 Press the wireless on/off button on the screen.
...IEEE 802.11x authentication for technical assistance. Highlight your network name in the Available wireless networks list. 3 Complete the following steps that correspond with wireless notebooks and wired desktop PROGRESS CHECK If you successfully complete step 6, all computers on your home or small-office network. Example of network with your wireless... have problems accessing a Web site, contact your router manufacturer or your computer and repeat steps 1 through 3. PROGRESS CHECK After step 1, the blue wireless light turns on. 1 Press the wireless on/off button on the screen.

Wireless Setup Guide
Page 5
... data. Depending on your router. access point (AP)-A single-purpose wireless communication device that connects a computer to a phone line, which in turn connects to the Internet. A unique key is an essential security solution that connects a computer to the cable television network, which in... turn connects to the Internet. broadband-An always-on your wireless router security level, consider using coaxial or twisted-pair cabling) for ...
... data. Depending on your router. access point (AP)-A single-purpose wireless communication device that connects a computer to a phone line, which in turn connects to the Internet. A unique key is an essential security solution that connects a computer to the cable television network, which in... turn connects to the Internet. broadband-An always-on your wireless router security level, consider using coaxial or twisted-pair cabling) for ...
Wireless Setup Guide
Page 6
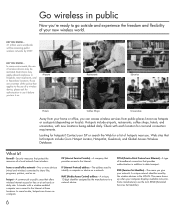
... requirements. MAC (Media Access Control) address-A unique, 12-digit identifier assigned by the manufacturer to share files, programs, printers, and so on a network. If you turn it on locale). Airports Restaurants Libraries Hotels Coffee Shops Universities Away from your home or office, you give your computer displays available networks. In some...
... requirements. MAC (Media Access Control) address-A unique, 12-digit identifier assigned by the manufacturer to share files, programs, printers, and so on a network. If you turn it on locale). Airports Restaurants Libraries Hotels Coffee Shops Universities Away from your home or office, you give your computer displays available networks. In some...

HP USB Digital Drive
Page 5
The status light on the Digital Drive turns on , remove the Digital Drive from the USB port, then reinsert the USB connector. 4 User Guide If the status light does not turn on when the connection is successful. To connect the Digital Drive to a USB port directly (with the connector cable in the unextended position): » Insert the USB connector on the Digital Drive into a USB port on your computer.
The status light on the Digital Drive turns on , remove the Digital Drive from the USB port, then reinsert the USB connector. 4 User Guide If the status light does not turn on when the connection is successful. To connect the Digital Drive to a USB port directly (with the connector cable in the unextended position): » Insert the USB connector on the Digital Drive into a USB port on your computer.

HP USB Digital Drive
Page 7
Insert the USB connector on the Digital Drive into a USB port on when the connection is successful. The status light on the Digital Drive turns on your computer. 2. If the status light does not turn on, remove the Digital Drive from the USB port, then reinsert the USB connector. 6 User Guide
Insert the USB connector on the Digital Drive into a USB port on when the connection is successful. The status light on the Digital Drive turns on your computer. 2. If the status light does not turn on, remove the Digital Drive from the USB port, then reinsert the USB connector. 6 User Guide

Backup and Recovery - Windows 7
Page 11
... discs to its factory condition. Recovering from the dedicated recovery partition (select models only) NOTE: Computers with an SSD may not have a partition. or - ● Turn on -screen instructions. On some models, you will not be able to recover using this procedure. Then, press f11 while the "Press for Startup Menu...
... discs to its factory condition. Recovering from the dedicated recovery partition (select models only) NOTE: Computers with an SSD may not have a partition. or - ● Turn on -screen instructions. On some models, you will not be able to recover using this procedure. Then, press f11 while the "Press for Startup Menu...

Drives - Windows 7
Page 5
... only source of magnetism and will not damage a drive. 1 1 Handling drives Drives are fragile computer components that must be mailed, place the drive in Hibernation, turn the computer on, and then shut it . Remove media from a drive before handling drives.
... only source of magnetism and will not damage a drive. 1 1 Handling drives Drives are fragile computer components that must be mailed, place the drive in Hibernation, turn the computer on, and then shut it . Remove media from a drive before handling drives.
Drives - Windows 7
Page 9
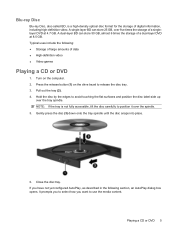
... disc format for the storage of data ● High-definition video ● Video games Playing a CD or DVD 1. Press the release button (1) on the computer. 2. Turn on the drive bezel to avoid touching the flat surfaces and position the disc label-side up over the tray spindle. It prompts you to...
... disc format for the storage of data ● High-definition video ● Video games Playing a CD or DVD 1. Press the release button (1) on the computer. 2. Turn on the drive bezel to avoid touching the flat surfaces and position the disc label-side up over the tray spindle. It prompts you to...

Drives - Windows 7
Page 14
.... 7. Do not remove the hard drive while the computer is off or in Hibernation. Shut down the computer through the operating system. Turn the computer upside down on by pressing the power button. Remove the battery from the computer (2). 9. With the hard drive bay toward ...you are not sure whether the computer is on, in the Sleep state, or in Hibernation, turn the computer on a flat surface. 6. Save your work. 2. Disconnect all external devices connected to the computer (1). 10 Chapter 4 Replacing the hard drive...
.... 7. Do not remove the hard drive while the computer is off or in Hibernation. Shut down the computer through the operating system. Turn the computer upside down on by pressing the power button. Remove the battery from the computer (2). 9. With the hard drive bay toward ...you are not sure whether the computer is on, in the Sleep state, or in Hibernation, turn the computer on a flat surface. 6. Save your work. 2. Disconnect all external devices connected to the computer (1). 10 Chapter 4 Replacing the hard drive...

Drives - Windows 7
Page 19
... playback window in either of the following ways: ◦ Playback may need to exit the program and then restart it. ● Increase system resources: ◦ Turn off the Internet before playing a CD or a DVD. ● Be sure that the disc is clean. To return to playing the disc, click the Play...
... playback window in either of the following ways: ◦ Playback may need to exit the program and then restart it. ● Increase system resources: ◦ Turn off the Internet before playing a CD or a DVD. ● Be sure that the disc is clean. To return to playing the disc, click the Play...
Drives - Windows 7
Page 20
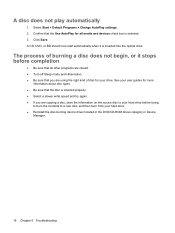
... automatically when it stops before trying to burn the contents to your drive. Confirm that the Use AutoPlay for all other programs are closed. ● Turn off Sleep mode and Hibernation. ● Be sure that you are using the right kind of burning a disc does not begin, or it is inserted...
... automatically when it stops before trying to burn the contents to your drive. Confirm that the Use AutoPlay for all other programs are closed. ● Turn off Sleep mode and Hibernation. ● Be sure that you are using the right kind of burning a disc does not begin, or it is inserted...
Memory Modules - Windows Vista and Windows 7
Page 7
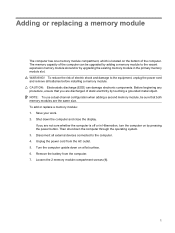
...sure that you are not sure whether the computer is located on a flat surface. 6. To add or replace a memory module: 1. WARNING! Turn the computer upside down the computer and close the display. To reduce the risk of the computer can damage electronic components. Loosen the 2 memory... upgraded by adding a memory module to the vacant expansion memory module slot and/or by upgrading the existing memory module in Hibernation, turn the computer on by touching a grounded metal object. Disconnect all external devices connected to the equipment, unplug the power cord and remove...
...sure that you are not sure whether the computer is located on a flat surface. 6. To add or replace a memory module: 1. WARNING! Turn the computer upside down the computer and close the display. To reduce the risk of the computer can damage electronic components. Loosen the 2 memory... upgraded by adding a memory module to the vacant expansion memory module slot and/or by upgrading the existing memory module in Hibernation, turn the computer on by touching a grounded metal object. Disconnect all external devices connected to the equipment, unplug the power cord and remove...

Memory Modules - Windows Vista and Windows 7
Page 10
Reconnect external power and external devices. 16. Turn on the computer. 4 Adding or replacing a memory module 14. Replace the battery. 15.
Reconnect external power and external devices. 16. Turn on the computer. 4 Adding or replacing a memory module 14. Replace the battery. 15.
Notebook Tour - Windows 7
Page 10
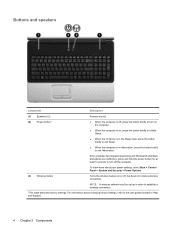
...If the computer has stopped responding and Windows® shutdown procedures are ineffective, press and hold the power button for at least 5 seconds to turn on the computer. ● When the computer is on or off the computer. (3) Wireless button To learn more about changing factory settings, ...refer to the user guides located in Help and Support. 4 Chapter 2 Components Turns the wireless feature on , press the button briefly to initiate Sleep. ● When the computer is in the Sleep state, press the button ...
...If the computer has stopped responding and Windows® shutdown procedures are ineffective, press and hold the power button for at least 5 seconds to turn on the computer. ● When the computer is on or off the computer. (3) Wireless button To learn more about changing factory settings, ...refer to the user guides located in Help and Support. 4 Chapter 2 Components Turns the wireless feature on , press the button briefly to initiate Sleep. ● When the computer is in the Sleep state, press the button ...

Notebook Tour - Windows 7
Page 11
... to the user guides located in Help and Support. Front components 5 If the computer is not plugged into an external power source, the light is turned off until the battery reaches a low battery level. (3) Drive light Blinking: The hard drive or optical drive is the only available power source has reached...
... to the user guides located in Help and Support. Front components 5 If the computer is not plugged into an external power source, the light is turned off until the battery reaches a low battery level. (3) Drive light Blinking: The hard drive or optical drive is the only available power source has reached...

Notebook Tour - Windows 7
Page 16
Records audio and video and captures still photographs. On: The integrated webcam is on. Display components Component (1) Internal display switch (2) Integrated webcam light (select models only) (3) Integrated webcam (select models only) (4) Internal microphone Description Turns off the display and initiates Sleep if the display is closed while the power is in use. Records sound. 10 Chapter 2 Components
Records audio and video and captures still photographs. On: The integrated webcam is on. Display components Component (1) Internal display switch (2) Integrated webcam light (select models only) (3) Integrated webcam (select models only) (4) Internal microphone Description Turns off the display and initiates Sleep if the display is closed while the power is in use. Records sound. 10 Chapter 2 Components

Notebook Tour - Windows 7
Page 17
... when all batteries in Hibernation. ● Blue: An integrated wireless device, such as a wireless local area network (WLAN) device and/or a Bluetooth® device, is turned on or the integrated numeric keypad is enabled. ● On: A battery is charging. ● Blinking: A battery that is the only available power source has reached...; On: The computer is on. ● Blinking: The computer is in the Sleep state. ● Off: The computer is off or in the computer are turned off. On: Num lock is on . ● Amber: All wireless devices are fully charged.
... when all batteries in Hibernation. ● Blue: An integrated wireless device, such as a wireless local area network (WLAN) device and/or a Bluetooth® device, is turned on or the integrated numeric keypad is enabled. ● On: A battery is charging. ● Blinking: A battery that is the only available power source has reached...; On: The computer is on. ● Blinking: The computer is in the Sleep state. ● Off: The computer is off or in the computer are turned off. On: Num lock is on . ● Amber: All wireless devices are fully charged.
Pointing Devices and Keyboard - Windows 7
Page 12
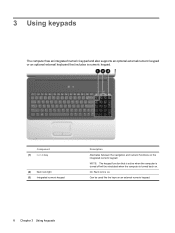
... light (3) Integrated numeric keypad Description Alternates between the navigation and numeric functions on . NOTE: The keypad function that includes a numeric keypad. On: Num lock is turned back on the integrated numeric keypad. 3 Using keypads The computer has an integrated numeric keypad and also supports an optional external numeric keypad or an...
... light (3) Integrated numeric keypad Description Alternates between the navigation and numeric functions on . NOTE: The keypad function that includes a numeric keypad. On: Num lock is turned back on the integrated numeric keypad. 3 Using keypads The computer has an integrated numeric keypad and also supports an optional external numeric keypad or an...
Pointing Devices and Keyboard - Windows 7
Page 13
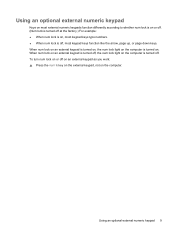
... arrow, page up, or page down keys. Using an optional external numeric keypad 9 When num lock on an external keypad is turned on, the num lock light on the computer is turned on , most keypad keys type numbers. ● When num lock is off, most external numeric keypads function differently according to... whether num lock is on or off. (Num lock is turned off at the factory.) For example: ● When num lock is on . To turn num lock on or off on an external keypad as you work: ▲ Press the num lk key...
... arrow, page up, or page down keys. Using an optional external numeric keypad 9 When num lock on an external keypad is turned on, the num lock light on the computer is turned on , most keypad keys type numbers. ● When num lock is off, most external numeric keypads function differently according to... whether num lock is on or off. (Num lock is turned off at the factory.) For example: ● When num lock is on . To turn num lock on or off on an external keypad as you work: ▲ Press the num lk key...


