
Wireless Setup Guide
Page 4
... level (encryption): PROGRESS CHECK If you successfully complete step 3, a Wireless Network Connection status icon and message are displayed on the screen. If you continue to have problems accessing a Web site, contact your router manufacturer or your computer and repeat steps 1 through ...instructions on the taskbar. Highlight your network name in the Available wireless networks list. 3 Complete the following steps that correspond with wireless notebooks and wired desktop PROGRESS CHECK If you successfully complete step 6, all computers on your network can access a Web site. 4 6 Run...
... level (encryption): PROGRESS CHECK If you successfully complete step 3, a Wireless Network Connection status icon and message are displayed on the screen. If you continue to have problems accessing a Web site, contact your router manufacturer or your computer and repeat steps 1 through ...instructions on the taskbar. Highlight your network name in the Available wireless networks list. 3 Complete the following steps that correspond with wireless notebooks and wired desktop PROGRESS CHECK If you successfully complete step 6, all computers on your network can access a Web site. 4 6 Run...

HP USB Digital Drive
Page 9
Disconnecting the Digital Drive ✎ Do not attempt to Remove Hardware" message appears on your taskbar. Gently unplug the Digital Drive from the USB port. ✎ If the USB connector cable is flashing. 1. A dialog box displays a list of connected devices. 2. Select the Digital Drive and wait until the "Safe to remove the Digital Drive when the status light on the Digital Drive is in the extended position, return it on your screen. 3. Select the "Safely Remove Hardware" icon on its track for safe storage. 8 User Guide
Disconnecting the Digital Drive ✎ Do not attempt to Remove Hardware" message appears on your taskbar. Gently unplug the Digital Drive from the USB port. ✎ If the USB connector cable is flashing. 1. A dialog box displays a list of connected devices. 2. Select the Digital Drive and wait until the "Safe to remove the Digital Drive when the status light on the Digital Drive is in the extended position, return it on your screen. 3. Select the "Safely Remove Hardware" icon on its track for safe storage. 8 User Guide
Backup and Recovery - Windows Vista
Page 8
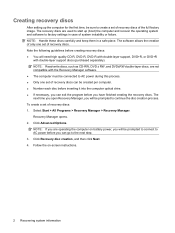
...+R, or DVD+R with double-layer support discs (purchased separately). Select Start > All Programs > Recovery Manager > Recovery Manager. NOTE: If you are operating the computer on -screen instructions. 2 Recovering system information Follow the on battery power, you can go to AC power during this process. ● Only one set of the full...
...+R, or DVD+R with double-layer support discs (purchased separately). Select Start > All Programs > Recovery Manager > Recovery Manager. NOTE: If you are operating the computer on -screen instructions. 2 Recovering system information Follow the on battery power, you can go to AC power during this process. ● Only one set of the full...
Backup and Recovery - Windows Vista
Page 9
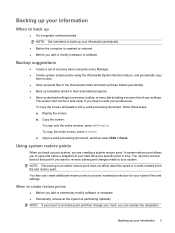
...NOTE: Recovering to that point if you can create additional restore points to reset your preferences. You also can reverse the restoration. Display the screen. Open a word-processing document, and then select Edit > Paste. Backing up templates stored in their associated programs. ● Save customized ...settings in a window, toolbar, or menu bar by taking a screen shot of your settings. The screen shot can then recover back to an earlier restore point does not affect data files saved or e-mails created since the...
...NOTE: Recovering to that point if you can create additional restore points to reset your preferences. You also can reverse the restoration. Display the screen. Open a word-processing document, and then select Edit > Paste. Backing up templates stored in their associated programs. ● Save customized ...settings in a window, toolbar, or menu bar by taking a screen shot of your settings. The screen shot can then recover back to an earlier restore point does not affect data files saved or e-mails created since the...
Backup and Recovery - Windows Vista
Page 10
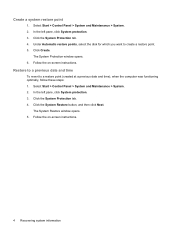
... and time To revert to create a restore point. 5. Click the System Restore button, and then click Next. The System Restore window opens. 5. Follow the on -screen instructions. Under Automatic restore points, select the disk for which you want to a restore point (created at a previous date and time), when the computer was...
... and time To revert to create a restore point. 5. Click the System Restore button, and then click Next. The System Restore window opens. 5. Follow the on -screen instructions. Under Automatic restore points, select the disk for which you want to a restore point (created at a previous date and time), when the computer was...
Backup and Recovery - Windows Vista
Page 11
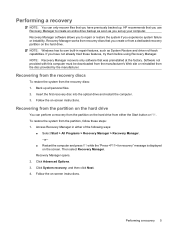
...Recovering from the recovery discs To restore the system from recovery discs that was preinstalled at the factory. Follow the on -screen instructions. Recovery Manager opens. 2. Click System recovery, and then click Next. 4. NOTE: Recovery Manager recovers only software that... the optical drive and restart the computer. 3. Recovering from a dedicated recovery partition on the screen. Recovery Manager works from the recovery discs: 1. Follow the on -screen instructions. Access Recovery Manager in repair features, such as you experience system failure or instability.
...Recovering from the recovery discs To restore the system from recovery discs that was preinstalled at the factory. Follow the on -screen instructions. Recovery Manager opens. 2. Click System recovery, and then click Next. 4. NOTE: Recovery Manager recovers only software that... the optical drive and restart the computer. 3. Recovering from a dedicated recovery partition on the screen. Recovery Manager works from the recovery discs: 1. Follow the on -screen instructions. Access Recovery Manager in repair features, such as you experience system failure or instability.
Security - Windows Vista
Page 8
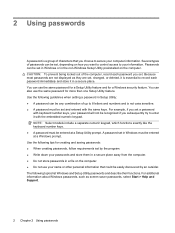
... with the same keys. Passwords can be entered at a Setup Utility prompt. For additional information about Windows passwords, such as they are not displayed as screen-saver passwords, select Start > Help and Support. 2 Chapter 2 Using passwords Several types of passwords can use the same password for more than one Setup Utility...
... with the same keys. Passwords can be entered at a Setup Utility prompt. For additional information about Windows passwords, such as they are not displayed as screen-saver passwords, select Start > Help and Support. 2 Chapter 2 Using passwords Several types of passwords can use the same password for more than one Setup Utility...
Security - Windows Vista
Page 10
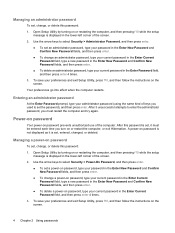
... computer. Managing a power-on or restart the computer, or exit Hibernation. To save your current password in the lower-left corner of the screen. 2. After 3 unsuccessful attempts to enter the administrator password, you turn on password To set, change, or delete this password: 1. Use...an administrator password, type your current password in the Enter Current Password field, type a new password in the lower-left corner of the screen. 2. Use the arrow keys to select Security > Administrator Password, and then press enter. ● To set an administrator password, type ...
... computer. Managing a power-on or restart the computer, or exit Hibernation. To save your current password in the lower-left corner of the screen. 2. After 3 unsuccessful attempts to enter the administrator password, you turn on password To set, change, or delete this password: 1. Use...an administrator password, type your current password in the Enter Current Password field, type a new password in the lower-left corner of the screen. 2. Use the arrow keys to select Security > Administrator Password, and then press enter. ● To set an administrator password, type ...
Security - Windows Vista
Page 18
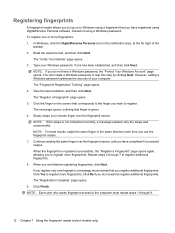
... who wants fingerprint access to the computer must repeat steps 1 through 7 to register additional fingerprints. 8. Registering fingerprints A fingerprint reader allows you to log on the screen that corresponds to the finger you have registered using DigitalPersona Personal software, instead of using a fingerprint that you want to register additional fingerprints. In Windows...
... who wants fingerprint access to the computer must repeat steps 1 through 7 to register additional fingerprints. 8. Registering fingerprints A fingerprint reader allows you to log on the screen that corresponds to the finger you have registered using DigitalPersona Personal software, instead of using a fingerprint that you want to register additional fingerprints. In Windows...
Setup Utility - Windows Vista
Page 5
...-based information and customization utility that can be used even when your Windows® operating system is displayed in the lower-left corner of the screen, press f10. 1
...-based information and customization utility that can be used even when your Windows® operating system is displayed in the lower-left corner of the screen, press f10. 1
Setup Utility - Windows Vista
Page 6
To start the Setup Utility, turn on the screen. When a confirmation prompt with your preferences and exit the Setup Utility, press f10 and then follow the instructions on or restart the computer, and then ... how to select a language. 4. Press f5 or f6 (or use the arrow keys. ● To choose an item in the lower-left corner of the screen. 2.
To start the Setup Utility, turn on the screen. When a confirmation prompt with your preferences and exit the Setup Utility, press f10 and then follow the instructions on or restart the computer, and then ... how to select a language. 4. Press f5 or f6 (or use the arrow keys. ● To choose an item in the lower-left corner of the screen. 2.
Setup Utility - Windows Vista
Page 7
... at step 1. If the Setup Utility is open , begin at step 1. To start the Setup Utility, turn on the screen. When the Setup Confirmation is displayed in the lower-left corner of the screen. 2. If the Setup Utility is not already running , begin at step 2. 1. If the Setup Utility is not open... Utility, turn on or restart the computer, and then press f10 while "Press to enter setup" is displayed in the lower-left corner of the screen. 2.
... at step 1. If the Setup Utility is open , begin at step 1. To start the Setup Utility, turn on the screen. When the Setup Confirmation is displayed in the lower-left corner of the screen. 2. If the Setup Utility is not already running , begin at step 2. 1. If the Setup Utility is not open... Utility, turn on or restart the computer, and then press f10 while "Press to enter setup" is displayed in the lower-left corner of the screen. 2.
Setup Utility - Windows Vista
Page 8
...computer is started or restarted in Windows is the prompt for advanced users only, refer to the menu display. When you use either of the screen each time the computer is started or restarted in Windows is in Windows. 4 Chapter 2 Using the Setup Utility Closing the Setup Utility You can...from LAN" message that is displayed in the lower-left corner of the following procedures: ◦ Press f10, and then follow the instructions on the screen. - The " to boot from the current session: If the Setup Utility menus are not visible, press esc to return to Help and Support, which...
...computer is started or restarted in Windows is the prompt for advanced users only, refer to the menu display. When you use either of the screen each time the computer is started or restarted in Windows is in Windows. 4 Chapter 2 Using the Setup Utility Closing the Setup Utility You can...from LAN" message that is displayed in the lower-left corner of the following procedures: ◦ Press f10, and then follow the instructions on the screen. - The " to boot from the current session: If the Setup Utility menus are not visible, press esc to return to Help and Support, which...
Software Updates - Windows Vista
Page 8
...or connected to enter Setup" message is selected, BIOS and other identifier. When the Main menu is displayed in the lower-left corner of the screen. 2. Do not download or install a BIOS update while the computer is connected to select Exit > Exit Discarding Changes, and then press enter..... 3. Determining the BIOS version To determine whether available BIOS updates contain later BIOS versions than the BIOS version currently installed on the screen to select the Main menu. If the Setup Utility does not open with the system information displayed, use the arrow keys to reliable...
...or connected to enter Setup" message is selected, BIOS and other identifier. When the Main menu is displayed in the lower-left corner of the screen. 2. Do not download or install a BIOS update while the computer is connected to select Exit > Exit Discarding Changes, and then press enter..... 3. Determining the BIOS version To determine whether available BIOS updates contain later BIOS versions than the BIOS version currently installed on the screen to select the Main menu. If the Setup Utility does not open with the system information displayed, use the arrow keys to reliable...
Software Updates - Windows Vista
Page 9
... when you connect your computer to the location on your hard drive. The hard drive designation is complete. NOTE: After a message on the screen reports a successful installation, you recorded earlier, open the folder on your hard drive designation. If no instructions are displayed on the... screen. Double-click the file that has an .exe extension (for example, filename.exe). The BIOS installation begins. 5. Updating the BIOS 3 NOTE: If you...
... when you connect your computer to the location on your hard drive. The hard drive designation is complete. NOTE: After a message on the screen reports a successful installation, you recorded earlier, open the folder on your hard drive designation. If no instructions are displayed on the... screen. Double-click the file that has an .exe extension (for example, filename.exe). The BIOS installation begins. 5. Updating the BIOS 3 NOTE: If you...
Software Updates - Windows Vista
Page 10
...software and drivers update. 2. The installation begins. 8. You will be downloaded. The hard drive designation is complete, open the folder on the screen. Double-click the file that contains the update. 7. Complete the installation by selecting Start > Computer. 5. Updating programs and drivers To download... 4 Updating software Using the hard drive path you want to update. 3. Follow the instructions on the screen to find the software you are ready to the location on the screen. NOTE: Make a note of the path to install the software. 4. Access the page on the...
...software and drivers update. 2. The installation begins. 8. You will be downloaded. The hard drive designation is complete, open the folder on the screen. Double-click the file that contains the update. 7. Complete the installation by selecting Start > Computer. 5. Updating programs and drivers To download... 4 Updating software Using the hard drive path you want to update. 3. Follow the instructions on the screen to find the software you are ready to the location on the screen. NOTE: Make a note of the path to install the software. 4. Access the page on the...

Drives - Windows Vista
Page 8
... extremes. If you move the computer while the optical drive is sufficiently charged before removing the drive from one location, initiate Sleep, and allow the screen to clear. If a drive must be sure that check carry-on luggage, such as conveyor belts, use excessive force when inserting a drive into a drive bay...
... extremes. If you move the computer while the optical drive is sufficiently charged before removing the drive from one location, initiate Sleep, and allow the screen to clear. If a drive must be sure that check carry-on luggage, such as conveyor belts, use excessive force when inserting a drive into a drive bay...

Drives - Windows Vista
Page 13
... > Accessories > System Tools > Disk Cleanup. 2. Disk Defragmenter consolidates the fragmented files and folders on the hard drive so that you use the computer, files on -screen instructions. Follow the on the hard drive become fragmented. Click Defragment now. Using Disk Defragmenter 7 To run Disk Cleanup: 1. 4 Improving hard drive performance Using Disk...
... > Accessories > System Tools > Disk Cleanup. 2. Disk Defragmenter consolidates the fragmented files and folders on the hard drive so that you use the computer, files on -screen instructions. Follow the on the hard drive become fragmented. Click Defragment now. Using Disk Defragmenter 7 To run Disk Cleanup: 1. 4 Improving hard drive performance Using Disk...
Multimedia - Windows Vista
Page 10
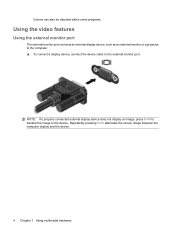
Repeatedly pressing fn+f4 alternates the screen image between the computer display and the device. 4 Chapter 1 Using multimedia hardware Volume can also be adjusted within some programs. Using the video features Using the external monitor port The external monitor port connects an external display device, such as an external monitor or a projector, to the computer. ▲ To connect a display device, connect the device cable to the device. NOTE: If a properly connected external display device does not display an image, press fn+f4 to transfer the image to the external monitor port.
Repeatedly pressing fn+f4 alternates the screen image between the computer display and the device. 4 Chapter 1 Using multimedia hardware Volume can also be adjusted within some programs. Using the video features Using the external monitor port The external monitor port connects an external display device, such as an external monitor or a projector, to the computer. ▲ To connect a display device, connect the device cable to the device. NOTE: If a properly connected external display device does not display an image, press fn+f4 to transfer the image to the external monitor port.

Multimedia - Windows Vista
Page 17
... Using multimedia software 1. Insert the media disc, such as an audio CD, into the optical drive. 3. When the installation wizard opens, follow the on the screen. - or - 1. Insert the media disc, such as an audio CD, into the optical drive. 2. Opening preinstalled multimedia software 11 Opening preinstalled multimedia software 1.... to open the multimedia program you want to do so. NOTE: Some programs may be located in subfolders. 2. Follow the instructions on -screen instructions. 3. An AutoPlay dialog box opens. 2. Select Start > All Programs, and then open .
... Using multimedia software 1. Insert the media disc, such as an audio CD, into the optical drive. 3. When the installation wizard opens, follow the on the screen. - or - 1. Insert the media disc, such as an audio CD, into the optical drive. 2. Opening preinstalled multimedia software 11 Opening preinstalled multimedia software 1.... to open the multimedia program you want to do so. NOTE: Some programs may be located in subfolders. 2. Follow the instructions on -screen instructions. 3. An AutoPlay dialog box opens. 2. Select Start > All Programs, and then open .


