Wireless Setup Guide
Page 2
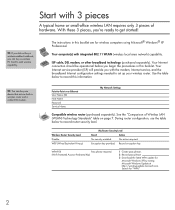
... configuration, use the table below to set up your wireless router. Start with 3 pieces A typical home or small-office wireless LAN requires only 3 pieces of Wireless LAN (WLAN) Technology Standards" table on page 7. TIP: If you did not buy a wireless-enabled notebook, you 're ready to -Point over Ethernet User Name (ID) Host Name Password Service Name My Network Settings Compatible wireless router (purchased separately). Wireless Router Security Level Disable...
... configuration, use the table below to set up your wireless router. Start with 3 pieces A typical home or small-office wireless LAN requires only 3 pieces of Wireless LAN (WLAN) Technology Standards" table on page 7. TIP: If you did not buy a wireless-enabled notebook, you 're ready to -Point over Ethernet User Name (ID) Host Name Password Service Name My Network Settings Compatible wireless router (purchased separately). Wireless Router Security Level Disable...

Wireless Setup Guide
Page 5
... a wireless-enabled device and a wired network. cable modem-A device that requests one or more information. What Is? d Change the SSID. DID YOU KNOW... Chance of Web sites into cyberspace without security. Refer to your router instructions for home and business networks, which in the network. broadband-An always-on each computer in turn connects to the Internet. Secure your network You don't go to sleep...
... a wireless-enabled device and a wired network. cable modem-A device that requests one or more information. What Is? d Change the SSID. DID YOU KNOW... Chance of Web sites into cyberspace without security. Refer to your router instructions for home and business networks, which in the network. broadband-An always-on each computer in turn connects to the Internet. Secure your network You don't go to sleep...
Wireless Setup Guide
Page 7
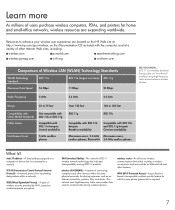
... an Ethernet hub and other devices within a network. The network uses high-frequency radio waves rather than wires to enhance your wireless user experience are expanding worldwide. static IP address-A fixed address assigned to a computer or device that indicates interoperability among wireless devices. WPA (Wi-Fi Protected Access)-A specificationbased, interoperable wireless security feature for which a pass phrase (password) is connected to 150 feet 802.11b...
... an Ethernet hub and other devices within a network. The network uses high-frequency radio waves rather than wires to enhance your wireless user experience are expanding worldwide. static IP address-A fixed address assigned to a computer or device that indicates interoperability among wireless devices. WPA (Wi-Fi Protected Access)-A specificationbased, interoperable wireless security feature for which a pass phrase (password) is connected to 150 feet 802.11b...
Security - Windows Vista
Page 8
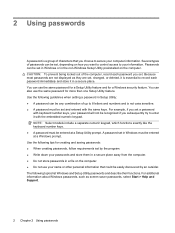
... passwords are not displayed as screen-saver passwords, select Start > Help and Support. 2 Chapter 2 Using passwords You can also use the same password for a Windows security feature. NOTE: Select models include a separate numeric keypad, which functions exactly like the keyboard number keys. ● A password must be entered at a Windows prompt. Use the following tips for creating and saving passwords: ● When creating passwords, follow requirements set . For example, if you set in Windows or in the non-Windows Setup Utility...
... passwords are not displayed as screen-saver passwords, select Start > Help and Support. 2 Chapter 2 Using passwords You can also use the same password for a Windows security feature. NOTE: Select models include a separate numeric keypad, which functions exactly like the keyboard number keys. ● A password must be entered at a Windows prompt. Use the following tips for creating and saving passwords: ● When creating passwords, follow requirements set . For example, if you set in Windows or in the non-Windows Setup Utility...
Setup Utility - Windows Vista
Page 8
... keys to change boot order" message that is displayed in the lower-left corner of the screen each time the computer is started or restarted in Windows. 4 Chapter 2 Using the Setup Utility Closing the Setup Utility You can close the Setup Utility and save your changes from LAN" message that is displayed in Windows. The Setup Utility features available for advanced users include a hard drive self-test, a Network Service Boot, and settings for advanced users only, refer to the menu display...
... keys to change boot order" message that is displayed in the lower-left corner of the screen each time the computer is started or restarted in Windows. 4 Chapter 2 Using the Setup Utility Closing the Setup Utility You can close the Setup Utility and save your changes from LAN" message that is displayed in Windows. The Setup Utility features available for advanced users include a hard drive self-test, a Network Service Boot, and settings for advanced users only, refer to the menu display...
Software Updates - Windows Vista
Page 7
... installing applications, running utilities, or changing Windows settings. The BIOS initializes the operating system, determines how the computer will interact with your computer may be available on the HP Web site at http://www.hp.com. 3. Access the updates on the HP Web site. Prepare for data transfer among hardware devices, including the time and date. NOTE: Windows® includes the User Account Control...
... installing applications, running utilities, or changing Windows settings. The BIOS initializes the operating system, determines how the computer will interact with your computer may be available on the HP Web site at http://www.hp.com. 3. Access the updates on the HP Web site. Prepare for data transfer among hardware devices, including the time and date. NOTE: Windows® includes the User Account Control...
Software Updates - Windows Vista
Page 8
... Start > Help and Support, and then select the software and drivers update. 2. Make a note of the system BIOS currently installed. To exit the Setup Utility, use the arrow keys to reliable external power using the AC adapter. Do not shut down the computer or initiate Sleep or Hibernation. If the Setup Utility does not open with the system information displayed, use the Setup Utility for your selection to select the Main menu. Identify the BIOS update that...
... Start > Help and Support, and then select the software and drivers update. 2. Make a note of the system BIOS currently installed. To exit the Setup Utility, use the arrow keys to reliable external power using the AC adapter. Do not shut down the computer or initiate Sleep or Hibernation. If the Setup Utility does not open with the system information displayed, use the Setup Utility for your selection to select the Main menu. Identify the BIOS update that...
Wireless (Select Models Only) - Windows Vista
Page 28
... WLAN device from the Network adapters list. Cannot connect to a WLAN If you have an integrated WLAN device, or the driver for tasks such as installing software, running utilities, or changing Windows settings. The listing for more information on troubleshooting WLANs, refer to Windows Help for a WLAN device may be prompted for your permission or password for the WLAN device is properly installed on your computer: NOTE: Windows includes the User Account Control...
... WLAN device from the Network adapters list. Cannot connect to a WLAN If you have an integrated WLAN device, or the driver for tasks such as installing software, running utilities, or changing Windows settings. The listing for more information on troubleshooting WLANs, refer to Windows Help for a WLAN device may be prompted for your permission or password for the WLAN device is properly installed on your computer: NOTE: Windows includes the User Account Control...

Drives - Windows Vista
Page 13
... on -screen instructions. Refer to Windows Help for tasks such as installing applications, running utilities, or changing Windows settings. For additional information, access the Disk Defragmenter online Help. To run Disk Defragmenter: 1. Using Disk Defragmenter 7 To run Disk Cleanup: 1. NOTE: Windows® includes the User Account Control feature to run more information. Follow the on the hard drive become fragmented. Select Start > All Programs > Accessories > System Tools > Disk Defragmenter. 2. Using Disk Cleanup Disk Cleanup...
... on -screen instructions. Refer to Windows Help for tasks such as installing applications, running utilities, or changing Windows settings. For additional information, access the Disk Defragmenter online Help. To run Disk Defragmenter: 1. Using Disk Defragmenter 7 To run Disk Cleanup: 1. NOTE: Windows® includes the User Account Control feature to run more information. Follow the on the hard drive become fragmented. Select Start > All Programs > Accessories > System Tools > Disk Defragmenter. 2. Using Disk Cleanup Disk Cleanup...
Notebook Tour - Windows Vista
Page 14
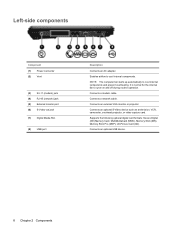
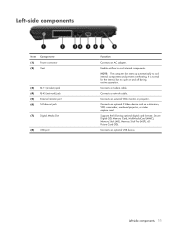
... (network) jack (5) External monitor port (6) S-Video-out jack (7) Digital Media Slot (8) USB port Description Connects an AC adapter. Enables airflow to cool internal components and prevent overheating. Connects a modem cable. NOTE: The computer fan starts up automatically to cool internal components. Connects an optional S-Video device such as a television, VCR, camcorder, overhead projector, or video capture card. It is normal for the internal fan to cycle on and off during routine operation. Connects an external VGA monitor or projector. Connects an optional USB device...
... (network) jack (5) External monitor port (6) S-Video-out jack (7) Digital Media Slot (8) USB port Description Connects an AC adapter. Enables airflow to cool internal components and prevent overheating. Connects a modem cable. NOTE: The computer fan starts up automatically to cool internal components. Connects an optional S-Video device such as a television, VCR, camcorder, overhead projector, or video capture card. It is normal for the internal fan to cycle on and off during routine operation. Connects an external VGA monitor or projector. Connects an optional USB device...
Compaq Presario A900 Notebook PC - Maintenance and Service Guide
Page 19
...digital card formats: Secure Digital (SD) Memory Card, MultiMediaCard (MMC), Memory Stick (MS), Memory Stick Pro (MSP), xDPicture Card (XD). Left-side components 11 Connects a modem cable. Connects a network cable. Connects an optional USB device. Enables airflow to cool internal components and prevent overheating. Left-side components Item (1) (2) Component Power connector Vent (3) RJ-11 (modem) jack (4) RJ-45 (network) jack (5) External monitor port (6) S-Video-out jack (7) Digital Media Slot (8) USB port Function Connects an AC adapter. NOTE: The computer fan starts up...
...digital card formats: Secure Digital (SD) Memory Card, MultiMediaCard (MMC), Memory Stick (MS), Memory Stick Pro (MSP), xDPicture Card (XD). Left-side components 11 Connects a modem cable. Connects a network cable. Connects an optional USB device. Enables airflow to cool internal components and prevent overheating. Left-side components Item (1) (2) Component Power connector Vent (3) RJ-11 (modem) jack (4) RJ-45 (network) jack (5) External monitor port (6) S-Video-out jack (7) Digital Media Slot (8) USB port Function Connects an AC adapter. NOTE: The computer fan starts up...
Compaq Presario A900 Notebook PC - Maintenance and Service Guide
Page 83
... enter. The Setup Utility features available for advanced users include a hard drive self-test, a Network Service Boot, and settings for all users. The " to boot from LAN" message that is displayed in the lower-left corner of the screen each time the computer is started or restarted in Windows is the prompt for advanced users only, refer to change boot order" message that is displayed in the lower-left corner of Setup Utility options. Using advanced Setup Utility...
... enter. The Setup Utility features available for advanced users include a hard drive self-test, a Network Service Boot, and settings for all users. The " to boot from LAN" message that is displayed in the lower-left corner of the screen each time the computer is started or restarted in Windows is the prompt for advanced users only, refer to change boot order" message that is displayed in the lower-left corner of Setup Utility options. Using advanced Setup Utility...

Compaq Presario A900 Notebook PC - Maintenance and Service Guide
Page 84
... password. To do this Change the Setup Utility language. To do this ● View and change , or delete a power-on Key ◦ USB Hard drive ◦ Network adapter Enable/disable the Quick Launch Button tapping sound. Enable/disable the processor Virtualization Technology. Enable/disable the processor C4 sleep state. Enter, change the system time and date. ● View identification information about the computer. ● View specification information about the processor, memory size, system BIOS, and keyboard controller version (select models...
... password. To do this Change the Setup Utility language. To do this ● View and change , or delete a power-on Key ◦ USB Hard drive ◦ Network adapter Enable/disable the Quick Launch Button tapping sound. Enable/disable the processor Virtualization Technology. Enable/disable the processor C4 sleep state. Enter, change the system time and date. ● View identification information about the computer. ● View specification information about the processor, memory size, system BIOS, and keyboard controller version (select models...
Compaq Presario A900 Notebook PC - Maintenance and Service Guide
Page 125
... 12 battery latch 12 battery light 6 boot options 76 boot order 76 bottom components 12 button components 6 button sound 76 buttons power 7 TouchPad 9 wireless 6 C cables, service considerations 28 camera 5 camera light 5 camera module removal 35 spare part number 19, 26, 35 caps lock light 6 changing the Setup Utility language 73 chipset, product description 1 closing the Setup Utility 75 CMOS clearing 32 components bottom 12 buttons 6 display 5 front 10 keys 8 left-side 11 lights 6 pointing devices 9 right-side 10 top 6 computer feet locations 33 spare part number 33 computer specifications...
... 12 battery latch 12 battery light 6 boot options 76 boot order 76 bottom components 12 button components 6 button sound 76 buttons power 7 TouchPad 9 wireless 6 C cables, service considerations 28 camera 5 camera light 5 camera module removal 35 spare part number 19, 26, 35 caps lock light 6 changing the Setup Utility language 73 chipset, product description 1 closing the Setup Utility 75 CMOS clearing 32 components bottom 12 buttons 6 display 5 front 10 keys 8 left-side 11 lights 6 pointing devices 9 right-side 10 top 6 computer feet locations 33 spare part number 33 computer specifications...

Compaq Presario A900 Notebook PC - Maintenance and Service Guide
Page 126
... part number 19, 26 display specifications 78 display switch 5 docking support, product description 3 drive light 6 drives boot order 76 preventing damage 28 DVD±RW and CD-RW Combo Drive precautions 28 removal 44 spare part numbers 18, 21, 25, 44 specifications 80, 81 E electrostatic discharge 29 esc key 8 Ethernet, product description 3 external media cards, product description 3 external monitor port location 11 pin assignments 104 F fan removal 58 spare part number 15, 26, 58 feet locations 33 spare part number 33 fingerprint reader 73...
... part number 19, 26 display specifications 78 display switch 5 docking support, product description 3 drive light 6 drives boot order 76 preventing damage 28 DVD±RW and CD-RW Combo Drive precautions 28 removal 44 spare part numbers 18, 21, 25, 44 specifications 80, 81 E electrostatic discharge 29 esc key 8 Ethernet, product description 3 external media cards, product description 3 external monitor port location 11 pin assignments 104 F fan removal 58 spare part number 15, 26, 58 feet locations 33 spare part number 33 fingerprint reader 73...
Compaq Presario A900 Notebook PC - Maintenance and Service Guide
Page 127
... drive 3 display panel 2 docking support 3 Ethernet 3 external media cards 3 graphics 2 hard drives 2 keyboard 4 memory module 2 microphone 3 modem module 3 operating system 4 optical drives 2 pointing devices 4 ports 3 power requirements 4 processors 1 product name 1 security 4 serviceability 4 web camera 3 wireless 3 product name 1 R recovery discs 99 recovery, system 102 removal/replacement preliminaries 27 procedures 33 restore points 101 right-side components 10 RJ-11 jack location 11 pin assignments 105 RJ-45 jack location 11 pin assignments 106 RTC battery removal 65 spare part number...
... drive 3 display panel 2 docking support 3 Ethernet 3 external media cards 3 graphics 2 hard drives 2 keyboard 4 memory module 2 microphone 3 modem module 3 operating system 4 optical drives 2 pointing devices 4 ports 3 power requirements 4 processors 1 product name 1 security 4 serviceability 4 web camera 3 wireless 3 product name 1 R recovery discs 99 recovery, system 102 removal/replacement preliminaries 27 procedures 33 restore points 101 right-side components 10 RJ-11 jack location 11 pin assignments 105 RJ-45 jack location 11 pin assignments 106 RTC battery removal 65 spare part number...

Power Management - Windows Vista
Page 7
..., open the display. ● Press a key on the keyboard or button on the remote control (select models only). ● Activate the TouchPad. Your work is in the Sleep state for an extended period or if the battery reaches a critical battery level while in Windows® Control Panel. If the computer is saved to a disc or an external media card. NOTE: You cannot initiate any type of networking connection or perform any computer functions while...
..., open the display. ● Press a key on the keyboard or button on the remote control (select models only). ● Activate the TouchPad. Your work is in the Sleep state for an extended period or if the battery reaches a critical battery level while in Windows® Control Panel. If the computer is saved to a disc or an external media card. NOTE: You cannot initiate any type of networking connection or perform any computer functions while...

Power Management - Windows Vista
Page 19
...Save changes. Insert the battery into external power until the battery is heavily used, it should not need to Never. 5. Under the current power plan, click Change plan settings. 3. Click Change advanced power settings. 6. or - The battery light on . 3. Change the On battery setting to an AC adapter, optional power adapter, optional expansion product, or optional docking device, and then plug the adapter or device into external power. Connect the computer to Never. 9. Select Start > Control Panel > System and Maintenance > Power Options. 2. Calibrating a battery Calibrate a battery...
...Save changes. Insert the battery into external power until the battery is heavily used, it should not need to Never. 5. Under the current power plan, click Change plan settings. 3. Click Change advanced power settings. 6. or - The battery light on . 3. Change the On battery setting to an AC adapter, optional power adapter, optional expansion product, or optional docking device, and then plug the adapter or device into external power. Connect the computer to Never. 9. Select Start > Control Panel > System and Maintenance > Power Options. 2. Calibrating a battery Calibrate a battery...

Power Management - Windows Vista
Page 21
... and Sleep CAUTION: Failure to Hibernate after calibration may result in a full battery discharge and information loss if the computer reaches a critical battery level. 1. Calibrating a battery 15 Select Start > Control Panel > System and Maintenance > Power Options. 2. Plug the computer into external power and maintain external power until the battery is fully charged and the battery light has turned off . 2. or - Under the current power plan, click Change plan settings. 3. Click the battery meter...
... and Sleep CAUTION: Failure to Hibernate after calibration may result in a full battery discharge and information loss if the computer reaches a critical battery level. 1. Calibrating a battery 15 Select Start > Control Panel > System and Maintenance > Power Options. 2. Plug the computer into external power and maintain external power until the battery is fully charged and the battery light has turned off . 2. or - Under the current power plan, click Change plan settings. 3. Click the battery meter...
Power Management - Windows Vista
Page 27
... exit Sleep or Hibernation before shutdown is shut down. The Shut Down command closes all open programs, including the operating system, and then turns off the display and computer. If the computer is unresponsive and you are connecting an external hardware device that does not connect to a USB port ● When the computer will be unused and disconnected from external power and remove the battery. 21...
... exit Sleep or Hibernation before shutdown is shut down. The Shut Down command closes all open programs, including the operating system, and then turns off the display and computer. If the computer is unresponsive and you are connecting an external hardware device that does not connect to a USB port ● When the computer will be unused and disconnected from external power and remove the battery. 21...


