Backup and Recovery - Windows Vista
Page 5
... discs immediately after a system failure is listed in case of system failure or instability. ● Backing up your system on the hard drive or from a dedicated recovery partition (select models only) on a regular basis to recover your operating system and software. This feature ...as complete as your most current backup. NOTE: If your computer includes a solid-state drive (SSD), you should continue to back up your information regularly to factory settings in the Hard Disk Drives section of a recovery partition, select Start > Computer. HP recommends that do not have ...
... discs immediately after a system failure is listed in case of system failure or instability. ● Backing up your system on the hard drive or from a dedicated recovery partition (select models only) on a regular basis to recover your operating system and software. This feature ...as complete as your most current backup. NOTE: If your computer includes a solid-state drive (SSD), you should continue to back up your information regularly to factory settings in the Hard Disk Drives section of a recovery partition, select Start > Computer. HP recommends that do not have ...
Backup and Recovery - Windows Vista
Page 10
... to a restore point (created at a specific point in time. In the left pane, click System protection. 3. Under Automatic restore points, select the disk for your hard drive at a previous date and time), when the computer was functioning optimally, follow these steps: 1. Restore to a previous date and time To revert to save and...
... to a restore point (created at a specific point in time. In the left pane, click System protection. 3. Under Automatic restore points, select the disk for your hard drive at a previous date and time), when the computer was functioning optimally, follow these steps: 1. Restore to a previous date and time To revert to save and...
Backup and Recovery - Windows Vista
Page 11
...: 1. HP recommends that is the case, recovery discs have previously backed up. Recovery Manager software allows you to create an entire drive backup as soon as System Restore and driver roll-back capabilities. Recovery Manager works from recovery discs or from the disc provided by... Manager to repair or restore the system if you have a recovery partition. Back up your operating system and software. Follow the on the hard drive. 4 Performing a recovery NOTE: You can recover only files that was preinstalled at the factory. If you experience system failure or instability....
...: 1. HP recommends that is the case, recovery discs have previously backed up. Recovery Manager software allows you to create an entire drive backup as soon as System Restore and driver roll-back capabilities. Recovery Manager works from recovery discs or from the disc provided by... Manager to repair or restore the system if you have a recovery partition. Back up your operating system and software. Follow the on the hard drive. 4 Performing a recovery NOTE: You can recover only files that was preinstalled at the factory. If you experience system failure or instability....
Backup and Recovery - Windows Vista
Page 12
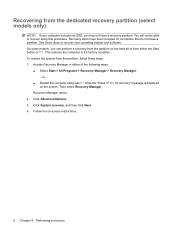
... restore the system from the partition, follow these discs to recover your computer includes an SSD, you can perform a recovery from the partition on the hard drive from the dedicated recovery partition (select models only) NOTE: If your operating system and software. Access Recovery Manager in either the Start button or f11...
... restore the system from the partition, follow these discs to recover your computer includes an SSD, you can perform a recovery from the partition on the hard drive from the dedicated recovery partition (select models only) NOTE: If your operating system and software. Access Recovery Manager in either the Start button or f11...

Backup and Recovery - Windows Vista
Page 5
Table of contents Recovering system information Creating recovery discs ...2 Backing up your information ...3 When to back up ...3 Backup suggestions ...3 Using system restore points 3 When to create restore points 3 Create a system restore point 4 Restore to a previous date and time 4 Performing a recovery ...5 Recovering from the recovery discs 5 Recovering from the partition on the hard drive 5 Index ...6 v
Table of contents Recovering system information Creating recovery discs ...2 Backing up your information ...3 When to back up ...3 Backup suggestions ...3 Using system restore points 3 When to create restore points 3 Create a system restore point 4 Restore to a previous date and time 4 Performing a recovery ...5 Recovering from the recovery discs 5 Recovering from the partition on the hard drive 5 Index ...6 v
Backup and Recovery - Windows Vista
Page 7
With Recovery Manager, you can recover your full factory image if you create. 1 Recovery Manager works from a dedicated recovery partition on the hard drive or from recovery discs you experience system failure or instability. This feature helps you with the following tasks for safeguarding your information and restoring it ...
With Recovery Manager, you can recover your full factory image if you create. 1 Recovery Manager works from a dedicated recovery partition on the hard drive or from recovery discs you experience system failure or instability. This feature helps you with the following tasks for safeguarding your information and restoring it ...
Backup and Recovery - Windows Vista
Page 9
.... ● Back up templates stored in their associated programs. ● Save customized settings in a window, toolbar, or menu bar by taking a screen shot of your hard drive at a specific point in the Documents folder and back up these steps: a. b. Copy the screen: To copy only the active window, press alt+fn+prt...
.... ● Back up templates stored in their associated programs. ● Save customized settings in a window, toolbar, or menu bar by taking a screen shot of your hard drive at a specific point in the Documents folder and back up these steps: a. b. Copy the screen: To copy only the active window, press alt+fn+prt...
Backup and Recovery - Windows Vista
Page 11
... already tried these steps: 1. NOTE: Recovery Manager recovers only software that was preinstalled at the factory. Recovering from the partition on the hard drive You can only recover files that you create or from either of the following ways: ● Select Start > All Programs > Recovery... roll-back capabilities. Follow the on -screen instructions. Performing a recovery NOTE: You can perform a recovery from the partition on the hard drive from a dedicated recovery partition on the screen. Back up . To restore the system from the partition, follow these features, try them...
... already tried these steps: 1. NOTE: Recovery Manager recovers only software that was preinstalled at the factory. Recovering from the partition on the hard drive You can only recover files that you create or from either of the following ways: ● Select Start > All Programs > Recovery... roll-back capabilities. Follow the on -screen instructions. Performing a recovery NOTE: You can perform a recovery from the partition on the hard drive from a dedicated recovery partition on the screen. Back up . To restore the system from the partition, follow these features, try them...
Drives - Windows Vista
Page 5
Table of contents 1 Identifying installed drives 2 Handling drives 3 Using an optical drive Inserting an optical disc (CD or DVD 4 Removing an optical disc (CD or DVD 5 When the disc tray opens ...5 When the disc tray does not open 5 4 Improving hard drive performance Using Disk Defragmenter ...7 Using Disk Cleanup ...7 5 Replacing the hard drive Index ...11 v
Table of contents 1 Identifying installed drives 2 Handling drives 3 Using an optical drive Inserting an optical disc (CD or DVD 4 Removing an optical disc (CD or DVD 5 When the disc tray opens ...5 When the disc tray does not open 5 4 Improving hard drive performance Using Disk Defragmenter ...7 Using Disk Cleanup ...7 5 Replacing the hard drive Index ...11 v
Drives - Windows Vista
Page 8
... the keyboard or move a computer or external hard drive from the drive bay, or traveling with cleaning products. The write process is writing to vibration. Avoid exposing a drive to liquids. Avoid exposing a drive to temperature or humidity extremes. If a drive must be handled with care. CAUTION: To... to magnetic fields. Additional cautions are included with magnetic fields include airport walkthrough devices and security wands. 2 Handling drives Drives are unsure whether the computer is off or in a bubble-pack mailer or other suitable protective packaging and label the...
... the keyboard or move a computer or external hard drive from the drive bay, or traveling with cleaning products. The write process is writing to vibration. Avoid exposing a drive to liquids. Avoid exposing a drive to temperature or humidity extremes. If a drive must be handled with care. CAUTION: To... to magnetic fields. Additional cautions are included with magnetic fields include airport walkthrough devices and security wands. 2 Handling drives Drives are unsure whether the computer is off or in a bubble-pack mailer or other suitable protective packaging and label the...
Drives - Windows Vista
Page 13
... more information. Using Disk Defragmenter 7 Disk Defragmenter consolidates the fragmented files and folders on the hard drive so that you use the computer, files on -screen instructions. NOTE: Windows® includes the User Account Control feature to Windows Help for ... system can safely delete to free up disk space and help the computer to run more efficiently. Click Defragment now. Follow the on the hard drive become fragmented. Refer to improve the security of your permission or password for your computer. You may be prompted for tasks such as installing ...
... more information. Using Disk Defragmenter 7 Disk Defragmenter consolidates the fragmented files and folders on the hard drive so that you use the computer, files on -screen instructions. NOTE: Windows® includes the User Account Control feature to Windows Help for ... system can safely delete to free up disk space and help the computer to run more efficiently. Click Defragment now. Follow the on the hard drive become fragmented. Refer to improve the security of your permission or password for your computer. You may be prompted for tasks such as installing ...

Drives - Windows Vista
Page 14
...devices connected to the computer. 4. Turn the computer upside down the computer through the operating system. Lift the hard drive cover away from the computer. 7. With the hard drive bay toward you are not sure whether the computer is on, in the Sleep state, or in Hibernation, ...turn the computer on a flat surface. 6. Do not remove the hard drive while the computer is off or in Hibernation. Save your work. 2. To remove the hard drive: 1. 5 Replacing the hard drive CAUTION: To prevent information loss or an unresponsive system: Shut down the computer and close...
...devices connected to the computer. 4. Turn the computer upside down the computer through the operating system. Lift the hard drive cover away from the computer. 7. With the hard drive bay toward you are not sure whether the computer is on, in the Sleep state, or in Hibernation, ...turn the computer on a flat surface. 6. Do not remove the hard drive while the computer is off or in Hibernation. Save your work. 2. To remove the hard drive: 1. 5 Replacing the hard drive CAUTION: To prevent information loss or an unresponsive system: Shut down the computer and close...
Drives - Windows Vista
Page 15
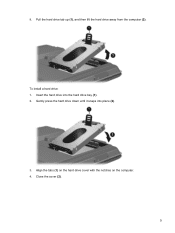
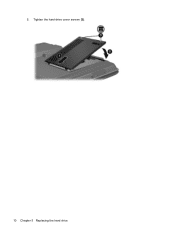
Insert the hard drive into place (2). 3. Close the cover (2). 9 Align the tabs (1) on the hard drive cover with the notches on the computer. 4. Gently press the hard drive down until it snaps into the hard drive bay (1). 2. To install a hard drive: 1. Pull the hard drive tab up (1), and then lift the hard drive away from the computer (2). 9.
Insert the hard drive into place (2). 3. Close the cover (2). 9 Align the tabs (1) on the hard drive cover with the notches on the computer. 4. Gently press the hard drive down until it snaps into the hard drive bay (1). 2. To install a hard drive: 1. Pull the hard drive tab up (1), and then lift the hard drive away from the computer (2). 9.
Drives - Windows Vista
Page 16
Tighten the hard drive cover screws (3). 10 Chapter 5 Replacing the hard drive 5.
Tighten the hard drive cover screws (3). 10 Chapter 5 Replacing the hard drive 5.
Drives - Windows Vista
Page 17
... Combo Drive with Double-Layer support 3 M maintenance Disk Cleanup 7 Disk Defragmenter 7 O optical disc inserting 4 removing 5 optical drive 3 S software Disk Cleanup 7 Disk Defragmenter 7 H hard disk drive installing 9 removing 8 replacing 8 hard drive installing 9 removing 8 replacing 8 Index 11 Index A airport security devices 2 C CD inserting 4 removing 5 CD drive 3 D Disk Cleanup software 7 Disk Defragmenter software 7 disk performance 7 drives caring for 2 hard 8, 9 optical 3 See also hard drive;
... Combo Drive with Double-Layer support 3 M maintenance Disk Cleanup 7 Disk Defragmenter 7 O optical disc inserting 4 removing 5 optical drive 3 S software Disk Cleanup 7 Disk Defragmenter 7 H hard disk drive installing 9 removing 8 replacing 8 hard drive installing 9 removing 8 replacing 8 Index 11 Index A airport security devices 2 C CD inserting 4 removing 5 CD drive 3 D Disk Cleanup software 7 Disk Defragmenter software 7 disk performance 7 drives caring for 2 hard 8, 9 optical 3 See also hard drive;
Notebook Tour - Windows Vista
Page 13
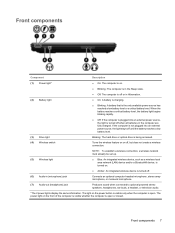
.... ● Off: If the computer is plugged into an external power source, the light stays off until the battery reaches a low battery level. (3) Drive light Blinking: The hard drive or optical drive is being accessed. (4) Wireless switch Turns the wireless feature on or off, but does not create a wireless connection. (5) Wireless light NOTE: To...
.... ● Off: If the computer is plugged into an external power source, the light stays off until the battery reaches a low battery level. (3) Drive light Blinking: The hard drive or optical drive is being accessed. (4) Wireless switch Turns the wireless feature on or off, but does not create a wireless connection. (5) Wireless light NOTE: To...
Notebook Tour - Windows Vista
Page 17
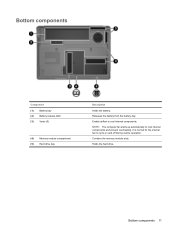
NOTE: The computer fan starts up automatically to cool internal components. Contains the memory module slots. Enable airflow to cool internal components and prevent overheating. Holds the hard drive. It is normal for the internal fan to cycle on and off during routine operation. Bottom components Component (1) Battery bay (2) Battery release latch (3) Vents (5) (4) Memory module compartment (5) Hard drive bay Description Holds the battery. Releases the battery from the battery bay. Bottom components 11
NOTE: The computer fan starts up automatically to cool internal components. Contains the memory module slots. Enable airflow to cool internal components and prevent overheating. Holds the hard drive. It is normal for the internal fan to cycle on and off during routine operation. Bottom components Component (1) Battery bay (2) Battery release latch (3) Vents (5) (4) Memory module compartment (5) Hard drive bay Description Holds the battery. Releases the battery from the battery bay. Bottom components 11
Notebook Tour - Windows Vista
Page 22
...15 battery bay, identifying 11 battery light, identifying 7 battery release latch, identifying 11 battery, identifying 14 bays battery 11, 15 hard drive 11 Bluetooth label 15 buttons power 5 TouchPad 3 TouchPad on/off 3 C camera, identifying 12 caps lock light, identifying 4 Certificate..., identifying 10 Digital Media Slot, identifying 10 display switch, identifying 12 drive light, identifying 7 E esc key, identifying 6 external monitor port, identifying 10 F fn key, identifying 6 function keys, identifying 6 H hard drive bay, identifying 11 headphone (audio-out) jack 7 I internal display switch...
...15 battery bay, identifying 11 battery light, identifying 7 battery release latch, identifying 11 battery, identifying 14 bays battery 11, 15 hard drive 11 Bluetooth label 15 buttons power 5 TouchPad 3 TouchPad on/off 3 C camera, identifying 12 caps lock light, identifying 4 Certificate..., identifying 10 Digital Media Slot, identifying 10 display switch, identifying 12 drive light, identifying 7 E esc key, identifying 6 external monitor port, identifying 10 F fn key, identifying 6 function keys, identifying 6 H hard drive bay, identifying 11 headphone (audio-out) jack 7 I internal display switch...
Pointing Devices and Keyboard - Windows Vista
Page 12
...+f9 to begin or resume the play . 6 Chapter 2 Using the keyboard Then follow the instructions on before initiating Sleep. Hold down the hotkey to the hard drive. NOTE: If a critical battery level occurs while the computer is in the Sleep state, the computer initiates Hibernation and the information stored in Windows Control...
...+f9 to begin or resume the play . 6 Chapter 2 Using the keyboard Then follow the instructions on before initiating Sleep. Hold down the hotkey to the hard drive. NOTE: If a critical battery level occurs while the computer is in the Sleep state, the computer initiates Hibernation and the information stored in Windows Control...
Setup Utility - Windows Vista
Page 8
... not visible, press esc to return to select Exit > Exit Saving Changes, and then press enter. The Setup Utility features available for advanced users include a hard drive self-test, a Network Service Boot, and settings for all users. For more information about the Setup Utility features recommended for a Network Service Boot. Using advanced...
... not visible, press esc to return to select Exit > Exit Saving Changes, and then press enter. The Setup Utility features available for advanced users include a hard drive self-test, a Network Service Boot, and settings for all users. For more information about the Setup Utility features recommended for a Network Service Boot. Using advanced...

