End User License Agreement
Page 1
..., printed materials and "online" or electronic documentation. GRANT OF LICENSE. You do not have Software Product into Your Computer's AGREE TO ALL TERMS AND temporary memory (RAM) for use of this EULA may load the Software ON THE CONDITION THAT YOU Product into the local... memory or storage device of Rights. Reservation of the HP Product. Notwithstanding the terms and conditions of the Freeware by HP for back-up copies of ...
..., printed materials and "online" or electronic documentation. GRANT OF LICENSE. You do not have Software Product into Your Computer's AGREE TO ALL TERMS AND temporary memory (RAM) for use of this EULA may load the Software ON THE CONDITION THAT YOU Product into the local... memory or storage device of Rights. Reservation of the HP Product. Notwithstanding the terms and conditions of the Freeware by HP for back-up copies of ...
HP Client Manager 6.1
Page 3
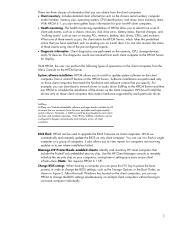
...obtain from the client computers. • Client inventory: Includes detailed client information such as the chassis serial number, computer model number, memory size, operating system, CPU identification, and many more secure client infrastructure. For example, you can use HPCM to change the BIOS ..., such as a chassis intrusion, disk drive error, battery status, thermal changes, and "walking assets" such as new or missing PCs, memory, battery, disk drives, CPUs, and monitors. System software installation: HPCM allows you to upgrade the BIOS firmware on the HPCM Server. BIOS...
...obtain from the client computers. • Client inventory: Includes detailed client information such as the chassis serial number, computer model number, memory size, operating system, CPU identification, and many more secure client infrastructure. For example, you can use HPCM to change the BIOS ..., such as a chassis intrusion, disk drive error, battery status, thermal changes, and "walking assets" such as new or missing PCs, memory, battery, disk drives, CPUs, and monitors. System software installation: HPCM allows you to upgrade the BIOS firmware on the HPCM Server. BIOS...
HP Client Manager 6.1
Page 4
... now has the option to enable alerts to keep the HP tool components (e.g. A SoftPaq package is increased productivity. Information collected includes manufacturer, OS, language, processor, memory, and free disk space. • HP Tool Update Wizard provides an easy method to be much more information. • In addition to receiving hardware alerts...
... now has the option to enable alerts to keep the HP tool components (e.g. A SoftPaq package is increased productivity. Information collected includes manufacturer, OS, language, processor, memory, and free disk space. • HP Tool Update Wizard provides an easy method to be much more information. • In addition to receiving hardware alerts...
HP Client Manager 6.1
Page 8
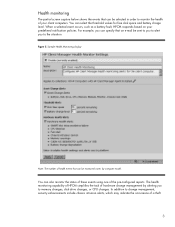
... based on your client computers. Health monitoring The partial screen capture below shows the events that can be sent to you to alert you to memory changes, disk drive changes, or CPU changes. You can select the threshold values for free disk space and battery charge level.
... based on your client computers. Health monitoring The partial screen capture below shows the events that can be sent to you to alert you to memory changes, disk drive changes, or CPU changes. You can select the threshold values for free disk space and battery charge level.
HP Client Manager 6.1
Page 9
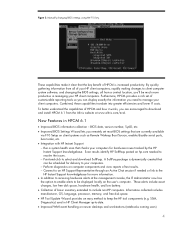
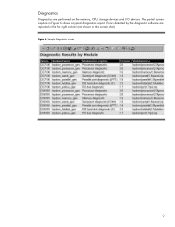
The partial screen capture in this screen shot). Errors detected by the diagnostic software are performed on the memory, CPU, storage devices and I/O devices. Sample Diagnostics screen 9 Diagnostics Diagnostics are reported in the far right column (not shown in Figure 6 shows a typical diagnostics report. Figure 6.
The partial screen capture in this screen shot). Errors detected by the diagnostic software are performed on the memory, CPU, storage devices and I/O devices. Sample Diagnostics screen 9 Diagnostics Diagnostics are reported in the far right column (not shown in Figure 6 shows a typical diagnostics report. Figure 6.
Hardware Reference Guide
Page 3
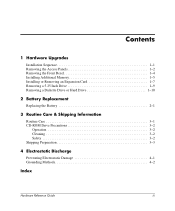
Contents 1 Hardware Upgrades Installation Sequence 1-1 Removing the Access Panels 1-2 Removing the Front Bezel 1-4 Installing Additional Memory 1-5 Installing or Removing an Expansion Card 1-7 Removing a 5.25 Inch Drive 1-9 Removing a Diskette Drive or Hard Drive 1-10 2 Battery Replacement Replacing the Battery 2-1 3 Routine Care & Shipping Information Routine Care 3-1 CD-ROM Drive Precautions 3-2 Operation 3-2 Cleaning 3-2 Safety 3-2 Shipping Preparation 3-3 4 Electrostatic Discharge Preventing Electrostatic Damage 4-1 Grounding Methods 4-2 Index Hardware Reference Guide iii
Contents 1 Hardware Upgrades Installation Sequence 1-1 Removing the Access Panels 1-2 Removing the Front Bezel 1-4 Installing Additional Memory 1-5 Installing or Removing an Expansion Card 1-7 Removing a 5.25 Inch Drive 1-9 Removing a Diskette Drive or Hard Drive 1-10 2 Battery Replacement Replacing the Battery 2-1 3 Routine Care & Shipping Information Routine Care 3-1 CD-ROM Drive Precautions 3-2 Operation 3-2 Cleaning 3-2 Safety 3-2 Shipping Preparation 3-3 4 Electrostatic Discharge Preventing Electrostatic Damage 4-1 Grounding Methods 4-2 Index Hardware Reference Guide iii
Hardware Reference Guide
Page 5
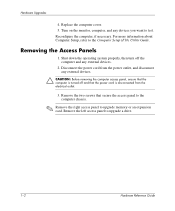
... the computer access panel, ensure that the computer is disconnected from the electrical outlet. 3. Hardware Upgrades 4. For more information about Computer Setup, refer to upgrade memory or an expansion card. Remove the left access panel to test.
... the computer access panel, ensure that the computer is disconnected from the electrical outlet. 3. Hardware Upgrades 4. For more information about Computer Setup, refer to upgrade memory or an expansion card. Remove the left access panel to test.
Hardware Reference Guide
Page 8
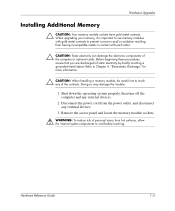
... the internal system components to cool before touching. Doing so may damage the module. 1. Hardware Upgrades Installing Additional Memory Ä CAUTION: Your memory module sockets have gold metal contacts. Hardware Reference Guide 1-5 Shut down the operating system properly, then turn off the... computer and any of static electricity by briefly touching a grounded metal object. When upgrading your memory, it is important to use memory modules with gold metal contacts to touch any external devices. 2. Refer to Chapter 4, "Electrostatic Discharge," for more ...
... the internal system components to cool before touching. Doing so may damage the module. 1. Hardware Upgrades Installing Additional Memory Ä CAUTION: Your memory module sockets have gold metal contacts. Hardware Reference Guide 1-5 Shut down the operating system properly, then turn off the... computer and any of static electricity by briefly touching a grounded metal object. When upgrading your memory, it is important to use memory modules with gold metal contacts to touch any external devices. 2. Refer to Chapter 4, "Electrostatic Discharge," for more ...
Hardware Reference Guide
Page 9
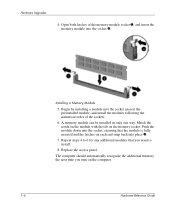
... the socket nearest the preinstalled module, and install the modules following the numerical order of the memory module socket 1, and insert the memory module into the socket 2. Repeat steps 4 to install. 8. Installing a Memory Module 5. Match the notch on the module with the tab on the computer. 1-6 Hardware ...in only one way. Replace the access panel. Push the module down into place 3. 7. The computer should automatically recognize the additional memory the next time you want to 6 for any additional modules that the module is fully inserted and the latches on each end snap...
... the socket nearest the preinstalled module, and install the modules following the numerical order of the memory module socket 1, and insert the memory module into the socket 2. Repeat steps 4 to install. 8. Installing a Memory Module 5. Match the notch on the module with the tab on the computer. 1-6 Hardware ...in only one way. Replace the access panel. Push the module down into place 3. 7. The computer should automatically recognize the additional memory the next time you want to 6 for any additional modules that the module is fully inserted and the latches on each end snap...
Hardware Reference Guide
Page 23
... number for coin cell 2-1 static electricity (caution) 2-2 C care of equipment 3-1 cautions battery replacement/disposal 2-2 handling memory modules 1-5 incompatible metals (RAM) 1-5 removing access panels 1-2 static electricity 1-1 static electricity (RAM) 1-5 CD-ROM ...electrostatic discharge grounding methods 4-2 preventing damage 4-1 Index F front bezel removing 1-4 I installation sequence 1-1 installing an expansion card 1-7 M memory hot surfaces (warning) 1-5 incompatible metals (caution) 1-5 installation procedure 1-5 static electricity (caution) 1-5 P packaging guidelines 3-3 R removing...
... number for coin cell 2-1 static electricity (caution) 2-2 C care of equipment 3-1 cautions battery replacement/disposal 2-2 handling memory modules 1-5 incompatible metals (RAM) 1-5 removing access panels 1-2 static electricity 1-1 static electricity (RAM) 1-5 CD-ROM ...electrostatic discharge grounding methods 4-2 preventing damage 4-1 Index F front bezel removing 1-4 I installation sequence 1-1 installing an expansion card 1-7 M memory hot surfaces (warning) 1-5 incompatible metals (caution) 1-5 installation procedure 1-5 static electricity (caution) 1-5 P packaging guidelines 3-3 R removing...

Quick Setup & Getting Started Guide
Page 26
.... If graphics card has been added, remove and reseat. Remove and reseat memory module. Ä CAUTION: Some models support ECC memory and non-ECC memory. Other models support only non-ECC memory. system is corrupted; Graphics controller not present or incorrectly initialized. 1. Getting Started... (see the flashing keyboard lights. Reflash the ROM using a ROMPaq diskette. For those systems that do support ECC memory, Compaq does not support mixing ECC and non-ECC memory. In addition, the system will not boot the operating system. *L = Long, S = Short 2-14 Quick Setup &...
.... If graphics card has been added, remove and reseat. Remove and reseat memory module. Ä CAUTION: Some models support ECC memory and non-ECC memory. Other models support only non-ECC memory. system is corrupted; Graphics controller not present or incorrectly initialized. 1. Getting Started... (see the flashing keyboard lights. Reflash the ROM using a ROMPaq diskette. For those systems that do support ECC memory, Compaq does not support mixing ECC and non-ECC memory. In addition, the system will not boot the operating system. *L = Long, S = Short 2-14 Quick Setup &...
Quick Setup & Getting Started Guide
Page 29
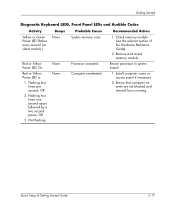
...Getting Started Guide 2-17 Red or Yellow Power LED On. Red or Yellow Power LED is running. Not flashing. Remove and reseat memory module. Computer overheated. Reseat processor in system board. 1. Ensure that computer air vents are not blocked and internal fan is :... OR 2. Recommended Action 1. Flashing two times one second apart, followed by a two second pause, OR 3. None None Processor unseated. Check memory module (see the relevant section of the Hardware Reference Guide). 2. Install computer cover or access panel if necessary. 2. Getting Started Diagnostic Keyboard ...
...Getting Started Guide 2-17 Red or Yellow Power LED On. Red or Yellow Power LED is running. Not flashing. Remove and reseat memory module. Computer overheated. Reseat processor in system board. 1. Ensure that computer air vents are not blocked and internal fan is :... OR 2. Recommended Action 1. Flashing two times one second apart, followed by a two second pause, OR 3. None None Processor unseated. Check memory module (see the relevant section of the Hardware Reference Guide). 2. Install computer cover or access panel if necessary. 2. Getting Started Diagnostic Keyboard ...
Computer Setup (F10) Utility Guide, Compaq Evo Desktop Family
Page 5
...; Change factory default settings. ■ Set the system date and time. ■ Set, view, change, or verify the system configuration, including settings for processor, graphics, memory, audio, storage, communications, and input devices. ■ Modify the boot order of bootable devices such as hard drives, diskette drives, optical drives, or LS-120...
...; Change factory default settings. ■ Set the system date and time. ■ Set, view, change, or verify the system configuration, including settings for processor, graphics, memory, audio, storage, communications, and input devices. ■ Modify the boot order of bootable devices such as hard drives, diskette drives, optical drives, or LS-120...
Computer Setup (F10) Utility Guide, Compaq Evo Desktop Family
Page 6
... Disabled to change the display status of the mode selected. To manually switch to Post Messages Enabled during system restarts (warm boots) as well as memory count, product name, and other non-error text messages.
... Disabled to change the display status of the mode selected. To manually switch to Post Messages Enabled during system restarts (warm boots) as well as memory count, product name, and other non-error text messages.
Computer Setup (F10) Utility Guide, Compaq Evo Desktop Family
Page 8
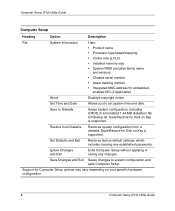
... Guide Computer Setup Heading Option Description File System Information Lists: • Product name • Processor type/speed/stepping • Cache size (L1/L2) • Installed memory size • System ROM (includes family name and version) • Chassis serial number • Asset tracking number • Integrated MAC address for Computer Setup options...
... Guide Computer Setup Heading Option Description File System Information Lists: • Product name • Processor type/speed/stepping • Cache size (L1/L2) • Installed memory size • System ROM (includes family name and version) • Chassis serial number • Asset tracking number • Integrated MAC address for Computer Setup options...
Computer Setup (F10) Utility Guide, Compaq Evo Desktop Family
Page 24
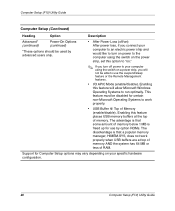
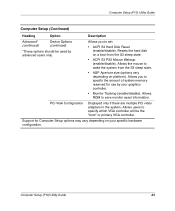
...Microsoft Operating Systems to work properly when USB buffers are at the top of memory. Enabling this feature places USB memory buffers at top of memory AND the system has 64 MB or less of Memory (enable/disable). Support for Computer Setup options may vary depending on your ...If you will allow Microsoft Windows Operating Systems to your specific hardware configuration. 20 Computer Setup (F10) Utility Guide The advantage is that a popular memory manager, HIMEM.SYS, does not work properly. • USB Buffer @ Top of RAM. This feature must be able to use the suspend/...
...Microsoft Operating Systems to work properly when USB buffers are at the top of memory. Enabling this feature places USB memory buffers at top of memory AND the system has 64 MB or less of Memory (enable/disable). Support for Computer Setup options may vary depending on your ...If you will allow Microsoft Windows Operating Systems to your specific hardware configuration. 20 Computer Setup (F10) Utility Guide The advantage is that a popular memory manager, HIMEM.SYS, does not work properly. • USB Buffer @ Top of RAM. This feature must be able to use the suspend/...
Computer Setup (F10) Utility Guide, Compaq Evo Desktop Family
Page 25
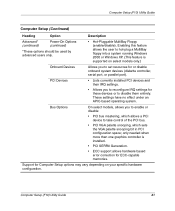
... advanced users only. • Hot-Pluggable MultiBay Floppy (enable/disable). These settings have no effect under an APIC-based operating system. Support for ECC-capable memories. PCI Devices • Lists currently installed PCI devices and their IRQ settings. • Allows you to take control of the PCI bus. • PCI VGA...
... advanced users only. • Hot-Pluggable MultiBay Floppy (enable/disable). These settings have no effect under an APIC-based operating system. Support for ECC-capable memories. PCI Devices • Lists currently installed PCI devices and their IRQ settings. • Allows you to take control of the PCI bus. • PCI VGA...
Computer Setup (F10) Utility Guide, Compaq Evo Desktop Family
Page 27
... users only. Allows you to specify which VGA controller will be used by your specific hardware configuration. Allows users to specify the amount of system memory reserved for Computer Setup options may vary depending on platform). PCI VGA Configuration Displayed only if there are multiple PCI video adapters in the system...
... users only. Allows you to specify which VGA controller will be used by your specific hardware configuration. Allows users to specify the amount of system memory reserved for Computer Setup options may vary depending on platform). PCI VGA Configuration Displayed only if there are multiple PCI video adapters in the system...


