Safety and Regulatory Information Desktops, Thin Clients, and Personal Workstations
Page 2
...translated to change without the prior written consent of this document may be construed as constituting an additional warranty. Safety and Regulatory Information Desktops, Thin Clients, and Personal Workstations Tenth Edition (October 2009) Ninth Edition (August 2009) Eighth Edition (March 2009) Seventh Edition ...Part Number: 418213-401 No part of Hewlett-Packard Company. The information contained herein is protected by copyright. HP shall not be liable for HP products and services are set forth in the express warranty statements accompanying such products and services. © ...
...translated to change without the prior written consent of this document may be construed as constituting an additional warranty. Safety and Regulatory Information Desktops, Thin Clients, and Personal Workstations Tenth Edition (October 2009) Ninth Edition (August 2009) Eighth Edition (March 2009) Seventh Edition ...Part Number: 418213-401 No part of Hewlett-Packard Company. The information contained herein is protected by copyright. HP shall not be liable for HP products and services are set forth in the express warranty statements accompanying such products and services. © ...
Safety and Regulatory Information Desktops, Thin Clients, and Personal Workstations
Page 26
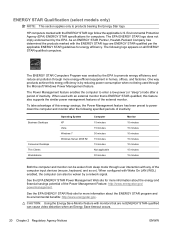
HP computers marked with an external monitor that are ENERGY STAR-qualified per the applicable ENERGY STAR guidelines for more information about the ENERGY STAR program ... Save Monitor feature with any of this energy efficiency is ENERGY STAR-qualified, this feature also supports the similar power management features of inactivity: Business Desktops Consumer Desktops Thin Clients Workstations Operating System XP Vista Windows 7 Windows Server 2008 R2 Computer 15 minutes 15 minutes 30 minutes 15 minutes 15 minutes Not...
HP computers marked with an external monitor that are ENERGY STAR-qualified per the applicable ENERGY STAR guidelines for more information about the ENERGY STAR program ... Save Monitor feature with any of this energy efficiency is ENERGY STAR-qualified, this feature also supports the similar power management features of inactivity: Business Desktops Consumer Desktops Thin Clients Workstations Operating System XP Vista Windows 7 Windows Server 2008 R2 Computer 15 minutes 15 minutes 30 minutes 15 minutes 15 minutes Not...
Safety and Regulatory Information Desktops, Thin Clients, and Personal Workstations
Page 27
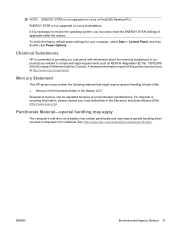
...://www.eiae.org). See http://www.dtsc.ca.gov/hazardouswaste/perchlorate/. Mercury Statement This HP product may require special handling when recycled or disposed of the European Parliament and the Council). Chemical Substances HP is necessary to comply with legal requirements such as REACH (Regulation EC No. 1907/... real-time clock battery may contain perchlorate and may contain the following material that might require special handling at http://www.hp.com/go/reach. NOTE: ENERGY STAR is not supported on Linux workstations. ENERGY STAR is not supported on Linux or FreeDOS...
...://www.eiae.org). See http://www.dtsc.ca.gov/hazardouswaste/perchlorate/. Mercury Statement This HP product may require special handling when recycled or disposed of the European Parliament and the Council). Chemical Substances HP is necessary to comply with legal requirements such as REACH (Regulation EC No. 1907/... real-time clock battery may contain perchlorate and may contain the following material that might require special handling at http://www.hp.com/go/reach. NOTE: ENERGY STAR is not supported on Linux workstations. ENERGY STAR is not supported on Linux or FreeDOS...
Hardware Reference Guide - dc7600 CMT
Page 3
...Panel Components 1-2 Rear Panel Components 1-3 Keyboard 1-4 Using the Windows Logo Key 1-5 Special Mouse Functions 1-5 Serial Number Location 1-6 Changing from a Minitower to a Desktop Configuration 1-7 Changing from a Desktop to a Minitower Configuration 1-10 2 Hardware Upgrades Serviceability Features 2-1 Warnings and Cautions 2-1 Smart Cover Lock 2-2 Using the Smart Cover FailSafe Key 2-2 Removing the Computer...10 Installing DIMMs 2-12 Installing or Removing an Expansion Card 2-15 Drive Positions 2-21 Installing Additional Drives 2-22 Hardware Reference Guide www.hp.com iii
...Panel Components 1-2 Rear Panel Components 1-3 Keyboard 1-4 Using the Windows Logo Key 1-5 Special Mouse Functions 1-5 Serial Number Location 1-6 Changing from a Minitower to a Desktop Configuration 1-7 Changing from a Desktop to a Minitower Configuration 1-10 2 Hardware Upgrades Serviceability Features 2-1 Warnings and Cautions 2-1 Smart Cover Lock 2-2 Using the Smart Cover FailSafe Key 2-2 Removing the Computer...10 Installing DIMMs 2-12 Installing or Removing an Expansion Card 2-15 Drive Positions 2-21 Installing Additional Drives 2-22 Hardware Reference Guide www.hp.com iii
Hardware Reference Guide - dc7600 CMT
Page 5
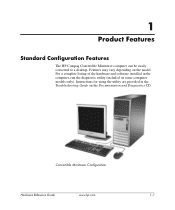
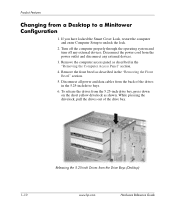
For a complete listing of the hardware and software installed in the Troubleshooting Guide on some computer models only). Instructions for using the utility are provided in the computer, run the diagnostic utility (included on the Documentation and Diagnostics CD. Convertible Minitower Configuration Hardware Reference Guide www.hp.com 1-1 Features may vary depending on the model. 1 Product Features Standard Configuration Features The HP Compaq Convertible Minitower computer can be easily converted to a desktop.
For a complete listing of the hardware and software installed in the Troubleshooting Guide on some computer models only). Instructions for using the utility are provided in the computer, run the diagnostic utility (included on the Documentation and Diagnostics CD. Convertible Minitower Configuration Hardware Reference Guide www.hp.com 1-1 Features may vary depending on the model. 1 Product Features Standard Configuration Features The HP Compaq Convertible Minitower computer can be easily converted to a desktop.
Hardware Reference Guide - dc7600 CMT
Page 9
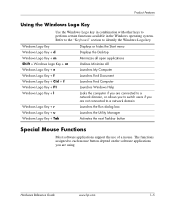
... available in combination with other keys to each mouse button depend on the software applications you are using. Hardware Reference Guide www.hp.com 1-5 Product Features Using the Windows Logo Key Use the Windows Logo key in the Windows operating system. Windows Logo Key ... Logo Key + l Windows Logo Key + r Windows Logo Key + u Windows Logo Key + Tab Displays or hides the Start menu Displays the Desktop Minimizes all open applications Undoes Minimize All Launches My Computer Launches Find Document Launches Find Computer Launches Windows Help Locks the computer if you are...
... available in combination with other keys to each mouse button depend on the software applications you are using. Hardware Reference Guide www.hp.com 1-5 Product Features Using the Windows Logo Key Use the Windows Logo key in the Windows operating system. Windows Logo Key ... Logo Key + l Windows Logo Key + r Windows Logo Key + u Windows Logo Key + Tab Displays or hides the Start menu Displays the Desktop Minimizes all open applications Undoes Minimize All Launches My Computer Launches Find Document Launches Find Computer Launches Windows Help Locks the computer if you are...
Hardware Reference Guide - dc7600 CMT
Page 11
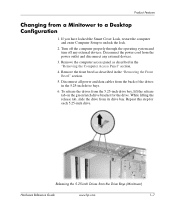
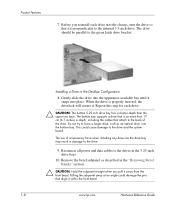
... described in the "Removing the Front Bezel" section. 5. If you have locked the Smart Cover Lock, restart the computer and enter Computer Setup to a Desktop Configuration 1. While lifting the release tab, slide the drive from a Minitower to unlock the lock. 2. Product Features Changing from its drive bay. Remove the... operating system and turn off any external devices. 3. Disconnect all power and data cables from the Drive Bays (Minitower) Hardware Reference Guide www.hp.com 1-7 Releasing the 5.25-inch Drives from the back of the drives in the 5.25-inch drive bays. 6.
... described in the "Removing the Front Bezel" section. 5. If you have locked the Smart Cover Lock, restart the computer and enter Computer Setup to a Desktop Configuration 1. While lifting the release tab, slide the drive from a Minitower to unlock the lock. 2. Product Features Changing from its drive bay. Remove the... operating system and turn off any external devices. 3. Disconnect all power and data cables from the Drive Bays (Minitower) Hardware Reference Guide www.hp.com 1-7 Releasing the 5.25-inch Drives from the back of the drives in the 5.25-inch drive bays. 6.
Hardware Reference Guide - dc7600 CMT
Page 12
... in the 5.25-inch drive bays. 10. Gently slide the drive into the uppermost available bay until it within the front bezel. 1-8 www.hp.com Hardware Reference Guide Repeat this step for each drive into place. The bottom bay supports a drive that is no more than 17 cm (6.7... a Drive in damage to the internal 3.5-inch drive. Remove the bezel subpanel as an optical drive, into the drive bay may result in the Desktop Configuration 8. Before you pull it . The use of the drive. Reconnect all power and data cables to the green latch drive bracket. Product Features 7....
... in the 5.25-inch drive bays. 10. Gently slide the drive into the uppermost available bay until it within the front bezel. 1-8 www.hp.com Hardware Reference Guide Repeat this step for each drive into place. The bottom bay supports a drive that is no more than 17 cm (6.7... a Drive in damage to the internal 3.5-inch drive. Remove the bezel subpanel as an optical drive, into the drive bay may result in the Desktop Configuration 8. Before you pull it . The use of the drive. Reconnect all power and data cables to the green latch drive bracket. Product Features 7....
Hardware Reference Guide - dc7600 CMT
Page 13
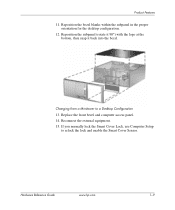
Reposition the subpanel (rotate it 90°) with the logo at the bottom, then snap it back into the bezel. Replace the front bezel and computer access panel. 14. Reposition the bezel blanks within the subpanel in the proper orientation for the desktop configuration. 12. Hardware Reference Guide www.hp.com 1-9 Changing from a Minitower to relock the lock and enable the Smart Cover Sensor. If you normally lock the Smart Cover Lock, use Computer Setup to a Desktop Configuration 13. Product Features 11. Reconnect the external equipment. 15.
Reposition the subpanel (rotate it 90°) with the logo at the bottom, then snap it back into the bezel. Replace the front bezel and computer access panel. 14. Reposition the bezel blanks within the subpanel in the proper orientation for the desktop configuration. 12. Hardware Reference Guide www.hp.com 1-9 Changing from a Minitower to relock the lock and enable the Smart Cover Sensor. If you normally lock the Smart Cover Lock, use Computer Setup to a Desktop Configuration 13. Product Features 11. Reconnect the external equipment. 15.
Hardware Reference Guide - dc7600 CMT
Page 14
...drivelock, pull the drives out of the drives in the 5.25-inch drive bays. 6. Product Features Changing from the Drive Bays (Desktop) www.hp.com Hardware Reference Guide Disconnect all power and data cables from the power outlet and disconnect any external devices. Disconnect the power cord ...from the back of the drive bay. 1-10 Releasing the 5.25-inch Drives from a Desktop to unlock the lock. 2. Remove the front ...
...drivelock, pull the drives out of the drives in the 5.25-inch drive bays. 6. Product Features Changing from the Drive Bays (Desktop) www.hp.com Hardware Reference Guide Disconnect all power and data cables from the power outlet and disconnect any external devices. Disconnect the power cord ...from the back of the drive bay. 1-10 Releasing the 5.25-inch Drives from a Desktop to unlock the lock. 2. Remove the front ...

Hardware Reference Guide - dc7600 CMT
Page 16
... the minitower configuration. 12. Replace the front bezel and computer access panel. 14. Pulling the subpanel away at the bottom, then snap it away from a Desktop to relock the lock and enable the Smart Cover Sensor. 1-12 www...
... the minitower configuration. 12. Replace the front bezel and computer access panel. 14. Pulling the subpanel away at the bottom, then snap it away from a Desktop to relock the lock and enable the Smart Cover Sensor. 1-12 www...

Hardware Reference Guide - dc7600 CMT
Page 18
...9632; Power outage ■ Startup failure ■ PC component (for ordering information. ■ Call the appropriate number listed in the warranty. 2-2 www.hp.com Hardware Reference Guide For more information about locking the Smart Cover Lock, refer to the internal components. order this key before you will need... Lock is an optional feature included on the Documentation and Diagnostics CD. Be prepared; This lock prevents unauthorized access to the Desktop Management Guide on some models only. You will need one. To obtain a FailSafe Key: ■ Contact an authorized...
...9632; Power outage ■ Startup failure ■ PC component (for ordering information. ■ Call the appropriate number listed in the warranty. 2-2 www.hp.com Hardware Reference Guide For more information about locking the Smart Cover Lock, refer to the internal components. order this key before you will need... Lock is an optional feature included on the Documentation and Diagnostics CD. Be prepared; This lock prevents unauthorized access to the Desktop Management Guide on some models only. You will need one. To obtain a FailSafe Key: ■ Contact an authorized...
Hardware Reference Guide - dc7600 CMT
Page 24
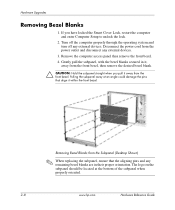
... proper orientation. Pulling the subpanel away at the bottom of the subpanel when properly oriented. 2-8 www.hp.com Hardware Reference Guide If you pull it within the front bezel. Removing Bezel Blanks from the Subpanel (Desktop Shown) ✎ When replacing the subpanel, ensure that align it away from the power outlet and...
... proper orientation. Pulling the subpanel away at the bottom of the subpanel when properly oriented. 2-8 www.hp.com Hardware Reference Guide If you pull it within the front bezel. Removing Bezel Blanks from the Subpanel (Desktop Shown) ✎ When replacing the subpanel, ensure that align it away from the power outlet and...
Hardware Reference Guide - dc7600 CMT
Page 37
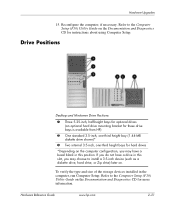
Reconfigure the computer, if necessary. Drive Positions Desktop and Minitower Drive Positions 1 Three 5.25-inch, half-height bays for optional drives (an optional hard drive mounting bracket for these drive bays is available from HP) 2 One standard 3.5-inch, one-third height bay (1.44-MB diskette drive shown)* 3 Two... a 3.5-inch device (such as a diskette drive, hard drive, or Zip drive) later on. Hardware Upgrades 15. Hardware Reference Guide www.hp.com 2-21 To verify the type and size of the storage devices installed in this slot, you do not have a bezel blank in the...
Reconfigure the computer, if necessary. Drive Positions Desktop and Minitower Drive Positions 1 Three 5.25-inch, half-height bays for optional drives (an optional hard drive mounting bracket for these drive bays is available from HP) 2 One standard 3.5-inch, one-third height bay (1.44-MB diskette drive shown)* 3 Two... a 3.5-inch device (such as a diskette drive, hard drive, or Zip drive) later on. Hardware Upgrades 15. Hardware Reference Guide www.hp.com 2-21 To verify the type and size of the storage devices installed in this slot, you do not have a bezel blank in the...
Hardware Reference Guide - dc7600 CMT
Page 41
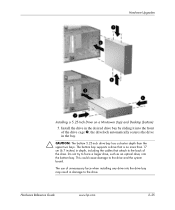
Do not try to the drive. Hardware Reference Guide www.hp.com 2-25 the drivelock automatically secures the drive in the bay. Ä CAUTION: The bottom 5.25-inch drive bay has a shorter depth than 17 cm (6.7 ... into the bottom bay. This could cause damage to the back of the drive cage 2; Hardware Upgrades Installing a 5.25-Inch Drive on a Minitower (top) and Desktop (bottom) 5. Install the drive in damage to force a larger drive, such as an optical drive, into the front of the drive.
Do not try to the drive. Hardware Reference Guide www.hp.com 2-25 the drivelock automatically secures the drive in the bay. Ä CAUTION: The bottom 5.25-inch drive bay has a shorter depth than 17 cm (6.7 ... into the bottom bay. This could cause damage to the back of the drive cage 2; Hardware Upgrades Installing a 5.25-Inch Drive on a Minitower (top) and Desktop (bottom) 5. Install the drive in damage to force a larger drive, such as an optical drive, into the front of the drive.

Hardware Reference Guide - dc7600 CMT
Page 47
Removing an Optical Drive in the desktop configuration, press down on the yellow drivelock mechanism 1 and slide the drive from the drive bay 2. Hardware Upgrades 5. Remove the drive from the drive bay as follows: ❏ To remove an optical drive in the Desktop Configuration Hardware Reference Guide www.hp.com 2-31
Removing an Optical Drive in the desktop configuration, press down on the yellow drivelock mechanism 1 and slide the drive from the drive bay 2. Hardware Upgrades 5. Remove the drive from the drive bay as follows: ❏ To remove an optical drive in the Desktop Configuration Hardware Reference Guide www.hp.com 2-31
Hardware Reference Guide - dc7600 CMT
Page 50
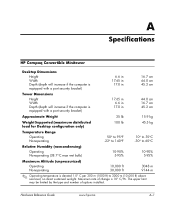
... ft 3048 m 9144 m ✎ Operating temperature is 10° C/Hr. no direct sustained sunlight. Hardware Reference Guide www.hp.com A-1 A Specifications HP Compaq Convertible Minitower Desktop Dimensions Height Width Depth (depth will increase if the computer is equipped with a port security bracket) 6.6 in 17.65 in 17...in 6.6 in 17.8 in 44.8 cm 16.7 cm 45.2 cm Approximate Weight 35 lb 15.9 kg Weight Supported (maximum distributed load for Desktop configuration only) 100 lb 45.5 kg Temperature Range Operating Nonoperating 50° to 95°F -22° to 140°F 10°...
... ft 3048 m 9144 m ✎ Operating temperature is 10° C/Hr. no direct sustained sunlight. Hardware Reference Guide www.hp.com A-1 A Specifications HP Compaq Convertible Minitower Desktop Dimensions Height Width Depth (depth will increase if the computer is equipped with a port security bracket) 6.6 in 17.65 in 17...in 6.6 in 17.8 in 44.8 cm 16.7 cm 45.2 cm Approximate Weight 35 lb 15.9 kg Weight Supported (maximum distributed load for Desktop configuration only) 100 lb 45.5 kg Temperature Range Operating Nonoperating 50° to 95°F -22° to 140°F 10°...

Hardware Reference Guide - dc7600 CMT
Page 56
C Security Lock Provisions ✎ For information on the Documentation and Diagnostics CD and the HP ProtectTools Security Manager Guide (some models) at www.hp.com. Cable Lock Installing a Cable Lock Hardware Reference Guide www.hp.com C-1 Installing a Security Lock The security locks displayed below and on the following pages can be used to the Computer Setup (F10) Utility Guide and the Desktop Management Guide on data security features, refer to secure the Convertible Minitower computer.
C Security Lock Provisions ✎ For information on the Documentation and Diagnostics CD and the HP ProtectTools Security Manager Guide (some models) at www.hp.com. Cable Lock Installing a Cable Lock Hardware Reference Guide www.hp.com C-1 Installing a Security Lock The security locks displayed below and on the following pages can be used to the Computer Setup (F10) Utility Guide and the Desktop Management Guide on data security features, refer to secure the Convertible Minitower computer.
Hardware Reference Guide - dc7600 CMT
Page 64
... on the monitor with any vents or air intakes. Do not place the keyboard, with the keyboard feet down, directly against the front of the desktop unit as this guide. ■ Operate the computer on the enclosure, and the same operating guidelines listed above the monitor to be operated within a separate...
... on the monitor with any vents or air intakes. Do not place the keyboard, with the keyboard feet down, directly against the front of the desktop unit as this guide. ■ Operate the computer on the enclosure, and the same operating guidelines listed above the monitor to be operated within a separate...
Desktop Management Guide
Page 15
... and create a custom profile, visit http://h30046.www3.hp.com/subhub.php?jumpid =go/pcn. Due to new standards adoption such as Windows Management Instrumentation (WMI), the HP Desktop Management Guide www.hp.com 11 Subscriber's Choice Subscriber's Choice is available for... review and retrieval. Desktop Management Guide For more information on your profile, HP will deliver E-mails notifying you that the information...
... and create a custom profile, visit http://h30046.www3.hp.com/subhub.php?jumpid =go/pcn. Due to new standards adoption such as Windows Management Instrumentation (WMI), the HP Desktop Management Guide www.hp.com 11 Subscriber's Choice Subscriber's Choice is available for... review and retrieval. Desktop Management Guide For more information on your profile, HP will deliver E-mails notifying you that the information...


