

Commercial Notebook Batteries: Performance Optimization
Page 4
...98 / WINDOWS NT (Using the Compaq Power Management Suite version 3.x and prior) Attach AC Power Cord and do not remove until Calibration is complete. COMMERCIAL NOTEBOOK BATTERIES: PERFORMANCE OPTIMIZATION (cont.) CALIBRATION WITH THE COMPAQ POWER MANAGEMENT SUITE To meet the need ... Control Panel / Power Management / Battery Calibration tab (or use the Battery Calibration utility, follow the instructions below for download at www.compaq.com/support/files/notebooks/us/index.html The Calibration utility simplifies the process by running all Armada notebooks. If removed, ...
...98 / WINDOWS NT (Using the Compaq Power Management Suite version 3.x and prior) Attach AC Power Cord and do not remove until Calibration is complete. COMMERCIAL NOTEBOOK BATTERIES: PERFORMANCE OPTIMIZATION (cont.) CALIBRATION WITH THE COMPAQ POWER MANAGEMENT SUITE To meet the need ... Control Panel / Power Management / Battery Calibration tab (or use the Battery Calibration utility, follow the instructions below for download at www.compaq.com/support/files/notebooks/us/index.html The Calibration utility simplifies the process by running all Armada notebooks. If removed, ...
Compaq ArmadaStation EM Maintenance and Service Guide
Page 4
...-Height Bay...5-14 Installing a Half-Height Drive...5-14 5.10 Left Speaker ...5-23 5.11 Control Bay ...5-24 5.12 Control Panel...5-26 5.13 Mechanism Assembly...5-27 5.14 Power Supply ...5-29 5.15 Backplane...5-31 chapter 6 SPECIFICATIONS ...6-1 appendix 1 CONNECTOR PIN ASSIGNMENTS ...A-1 appendix 2 POWER CORD SET REQUIREMENTS ...B-1 INDEX ...I-1 iv Contents
...-Height Bay...5-14 Installing a Half-Height Drive...5-14 5.10 Left Speaker ...5-23 5.11 Control Bay ...5-24 5.12 Control Panel...5-26 5.13 Mechanism Assembly...5-27 5.14 Power Supply ...5-29 5.15 Backplane...5-31 chapter 6 SPECIFICATIONS ...6-1 appendix 1 CONNECTOR PIN ASSIGNMENTS ...A-1 appendix 2 POWER CORD SET REQUIREMENTS ...B-1 INDEX ...I-1 iv Contents
Compaq ArmadaStation EM Maintenance and Service Guide
Page 5
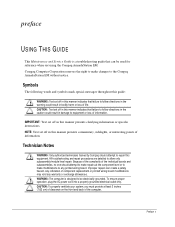
... this manner presents commentary, sidelights, or interesting points of information. Any indication of information. WARNING: Only authorized technicians trained by Compaq should attempt to make repairs at least 3 inches (7.62 cm) of clearance on the front and back of life. Improper ..., no one should attempt to repair this manner presents clarifying information or specific instructions. To ensure proper operation, plug the AC power cord into a properly grounded electrical outlet only. WARNING: Text set off in this equipment. Technician Notes ! CAUTION: To properly ventilate...
... this manner presents commentary, sidelights, or interesting points of information. Any indication of information. WARNING: Only authorized technicians trained by Compaq should attempt to make repairs at least 3 inches (7.62 cm) of clearance on the front and back of life. Improper ..., no one should attempt to repair this manner presents clarifying information or specific instructions. To ensure proper operation, plug the AC power cord into a properly grounded electrical outlet only. WARNING: Text set off in this equipment. Technician Notes ! CAUTION: To properly ventilate...

Compaq ArmadaStation EM Maintenance and Service Guide
Page 11
... a parallel printer. 5 External monitor connector Connects an external monitor. 6 Rear panel release latch Releases the rear panel. 7 Voltage switch label Shows the voltage selections. 8 Power connector Accepts a power cord. 9 Voltage select switch Sets the voltage for the country where the ArmadaStation EM is being used. 10 Security cable slot Attaches an optional security...
... a parallel printer. 5 External monitor connector Connects an external monitor. 6 Rear panel release latch Releases the rear panel. 7 Voltage switch label Shows the voltage selections. 8 Power connector Accepts a power cord. 9 Voltage select switch Sets the voltage for the country where the ArmadaStation EM is being used. 10 Security cable slot Attaches an optional security...
Compaq ArmadaStation EM Maintenance and Service Guide
Page 20
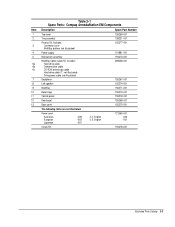
Power cord Australian European Japanese -008 U.K. English -002 U.S. not illustrated) Drive power cable (not illustrated) 298038-001 7 Backplane 155267-001 8 Left speaker 155274-001 9 MultiBay 155271-001 10 Bezel cage...following items are not illustrated. Table 3-1 Spare Parts: Compaq ArmadaStation EM Components Item Description Spare Part Number 1 Top cover 155269-001 2 Tray assembly 138221-001 Plastics Kit, includes: 3 Connector cover MultiBay buttons (not illustrated) 155277-001 4 Power supply 101881-001 5 Mechanism assembly 155270-001 MultiBay Option...
Power cord Australian European Japanese -008 U.K. English -002 U.S. not illustrated) Drive power cable (not illustrated) 298038-001 7 Backplane 155267-001 8 Left speaker 155274-001 9 MultiBay 155271-001 10 Bezel cage...following items are not illustrated. Table 3-1 Spare Parts: Compaq ArmadaStation EM Components Item Description Spare Part Number 1 Top cover 155269-001 2 Tray assembly 138221-001 Plastics Kit, includes: 3 Connector cover MultiBay buttons (not illustrated) 155277-001 4 Power supply 101881-001 5 Mechanism assembly 155270-001 MultiBay Option...

Compaq ArmadaStation EM Maintenance and Service Guide
Page 33
Turn off the expansion base. 4. Disconnect the power cord from the wall outlet – (Figure 5-3). 5. Disconnecting the Expansion Base 6. Disconnect the power cord from the expansion base —. Disconnect any MultiBay devices from the expansion base. 3. Undock the computer from the expansion base MultiBays. If installed, remove any external devices. 7. Removal and Replacement Procedures 5-3 Turn the expansion base keylock counterclockwise to unlock it. 2. Figure 5-3. 5.3 Preparing the Expansion Base for Disassembly 1.
Turn off the expansion base. 4. Disconnect the power cord from the wall outlet – (Figure 5-3). 5. Disconnecting the Expansion Base 6. Disconnect the power cord from the expansion base —. Disconnect any MultiBay devices from the expansion base. 3. Undock the computer from the expansion base MultiBays. If installed, remove any external devices. 7. Removal and Replacement Procedures 5-3 Turn the expansion base keylock counterclockwise to unlock it. 2. Figure 5-3. 5.3 Preparing the Expansion Base for Disassembly 1.

Compaq ArmadaStation EM Maintenance and Service Guide
Page 70
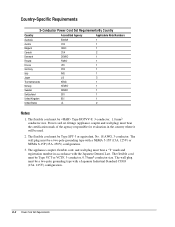
... by an acceptable accredited agency responsible for use in the country where the power cord set requirements, contact a Compaq authorized reseller or service provider. Power Cord Set Requirements B-1 B appendix POWER CORD SET REQUIREMENTS 3-Conductor Power Cord Set The wide range input feature of the Compaq ArmadaStation and Armada MiniStation permit them to operate from any line voltage from 100 to 120...
... by an acceptable accredited agency responsible for use in the country where the power cord set requirements, contact a Compaq authorized reseller or service provider. Power Cord Set Requirements B-1 B appendix POWER CORD SET REQUIREMENTS 3-Conductor Power Cord Set The wide range input feature of the Compaq ArmadaStation and Armada MiniStation permit them to operate from any line voltage from 100 to 120...
Compaq ArmadaStation EM Maintenance and Service Guide
Page 71
... it will be a two-pole grounding type with a Japanese Industrial Standard C8303 (15A, 125V) configuration. The flexible cord must be Type VCT or VCTF, 3-conductor, 0.75mm2 conductor size. B-2 Power Cord Set Requirements Country-Specific Requirements 3-Conductor Power Cord Set Requirements-By Country Country Accredited Agency Applicable Note Numbers Australia EANSW 1 Austria OVE 1 Belgium CEBC 1 Canada...
... it will be a two-pole grounding type with a Japanese Industrial Standard C8303 (15A, 125V) configuration. The flexible cord must be Type VCT or VCTF, 3-conductor, 0.75mm2 conductor size. B-2 Power Cord Set Requirements Country-Specific Requirements 3-Conductor Power Cord Set Requirements-By Country Country Accredited Agency Applicable Note Numbers Australia EANSW 1 Austria OVE 1 Belgium CEBC 1 Canada...
Compaq ArmadaStation EM Maintenance and Service Guide
Page 72
Index A AC power cord 3-conductor, B-1 activity lights, 1-6 additional information, vi alignment guides illustrated, 1-3 altitude specification, 6-1 B backplane ... 4-7 control panel illustrated, 3-2 removing, 5-26 spare part number, 3-3 D depth specification, 6-1 disassembly sequence chart, 5-2 disconnecting power, 5-3 diskette drive, 1-3 cable connecting, 5-19 illustrated, 3-2, 3-5 docking connector illustrated, 1-3 pinout, A-4 drive power cable illustrated, 3-5 E electrostatic discharge, 4-1 preventing damage, 4-2 expansion board installing, 5-9 expansion slot cover removing, 5-10 external ...
Index A AC power cord 3-conductor, B-1 activity lights, 1-6 additional information, vi alignment guides illustrated, 1-3 altitude specification, 6-1 B backplane ... 4-7 control panel illustrated, 3-2 removing, 5-26 spare part number, 3-3 D depth specification, 6-1 disassembly sequence chart, 5-2 disconnecting power, 5-3 diskette drive, 1-3 cable connecting, 5-19 illustrated, 3-2, 3-5 docking connector illustrated, 1-3 pinout, A-4 drive power cable illustrated, 3-5 E electrostatic discharge, 4-1 preventing damage, 4-2 expansion board installing, 5-9 expansion slot cover removing, 5-10 external ...

Armada E500 Series Quick Reference Guide
Page 35
...main battery and one is used for bay locations. With battery packs in the battery bay, DualBay, and/or MultiBay, connect the power cord to two battery packs in the optional battery charger. A third battery pack in the MultiBay depleted first. WARNING: Batteries/battery packs ...computer MultiBay Battery packs are charging. 3-2 Using Battery Packs Therefore, you want to use the public collection system or return them to Compaq, your authorized Compaq Partners, or other battery is for the MultiBay battery. To charge battery packs, follow these steps: 1. ! Using a New Battery...
...main battery and one is used for bay locations. With battery packs in the battery bay, DualBay, and/or MultiBay, connect the power cord to two battery packs in the optional battery charger. A third battery pack in the MultiBay depleted first. WARNING: Batteries/battery packs ...computer MultiBay Battery packs are charging. 3-2 Using Battery Packs Therefore, you want to use the public collection system or return them to Compaq, your authorized Compaq Partners, or other battery is for the MultiBay battery. To charge battery packs, follow these steps: 1. ! Using a New Battery...
Armada E500 Series Quick Reference Guide
Page 41
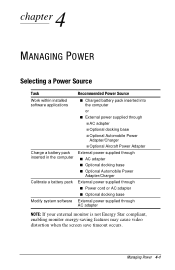
... through inserted in the computer s AC adapter s Optional docking base s Optional Automobile Power Adapter/Charger Calibrate a battery pack External power supplied through s Power cord or AC adapter s Optional docking base Modify system software External power supplied through AC adapter NOTE: If your external monitor is not Energy Star compliant, enabling monitor energy-saving features may...
... through inserted in the computer s AC adapter s Optional docking base s Optional Automobile Power Adapter/Charger Calibrate a battery pack External power supplied through s Power cord or AC adapter s Optional docking base Modify system software External power supplied through AC adapter NOTE: If your external monitor is not Energy Star compliant, enabling monitor energy-saving features may...

Armada E500 Series Quick Reference Guide
Page 94
Connecting an External Monitor CAUTION: To prevent damage to the computer, turn off the monitor. 2. To connect an external VGA monitor: 1. Plug the monitor power cord into the external monitor connector on the computer. Select the appropriate manufacturer and model, if necessary. Connecting External Devices 8-1 To prevent damage to the computer ...
Connecting an External Monitor CAUTION: To prevent damage to the computer, turn off the monitor. 2. To connect an external VGA monitor: 1. Plug the monitor power cord into the external monitor connector on the computer. Select the appropriate manufacturer and model, if necessary. Connecting External Devices 8-1 To prevent damage to the computer ...

Armada E500 Series Quick Reference Guide
Page 95
A Composite TV-Out is closed. Plug the television power cord into the Composite TV-Out on the computer. Click the Displays tab and select TV. Select the appropriate television format (NTSC, NTSC-J, PAL, or PAL-M). 4. ...
A Composite TV-Out is closed. Plug the television power cord into the Composite TV-Out on the computer. Click the Displays tab and select TV. Select the appropriate television format (NTSC, NTSC-J, PAL, or PAL-M). 4. ...

Armada E500 Series Quick Reference Guide
Page 96
Connect the serial printer signal cable to the parallel connector on the back of the computer. 4. Plug the printer power cord into the printer. 3. Connecting a Parallel Printer 1. Connect the parallel printer signal cable to the serial connector on ... Printer 1. Turn on the printer and resume your printer before printing for printer device driver configuration information and instructions. Plug the printer power cord into the keyboard/mouse connector. Connecting External Devices 8-3 External pointing devices need to operate. Plug the printer end of the printer signal...
Connect the serial printer signal cable to the parallel connector on the back of the computer. 4. Plug the printer power cord into the printer. 3. Connecting a Parallel Printer 1. Connect the parallel printer signal cable to the serial connector on ... Printer 1. Turn on the printer and resume your printer before printing for printer device driver configuration information and instructions. Plug the printer power cord into the keyboard/mouse connector. Connecting External Devices 8-3 External pointing devices need to operate. Plug the printer end of the printer signal...
Armada E500 Series Quick Reference Guide
Page 120
... regulations for each location in which you plan to use the computer. (Voltage, frequency, and plug configurations vary.) To contact a Compaq authorized dealer, reseller, or service provider near you, refer to "Worldwide Telephone Numbers" in Appendix D. s Consult with a voltage converter...to encounter climatic extremes, review the operating environment guidelines in Appendix A. s If you expect to power the computer with a Compaq authorized dealer, reseller, or service provider about power cord and adapter requirements for appliances. s If you are traveling internationally: !
... regulations for each location in which you plan to use the computer. (Voltage, frequency, and plug configurations vary.) To contact a Compaq authorized dealer, reseller, or service provider near you, refer to "Worldwide Telephone Numbers" in Appendix D. s Consult with a voltage converter...to encounter climatic extremes, review the operating environment guidelines in Appendix A. s If you expect to power the computer with a Compaq authorized dealer, reseller, or service provider about power cord and adapter requirements for appliances. s If you are traveling internationally: !

Armada E500 Series Quick Reference Guide
Page 200
...the type of procedures other than the voltage and current rating marked on August 2, 1976. If you should purchase a power cord that it . With specific regard to the laser, the equipment complies with appropriate safety standards, including IEC 825. ...Compaq authorized service provider. the beam is mandatory for the voltage and current marked on or pinched by government agencies for laser products on the product. Compliance is totally enclosed during all modes of the U.S. Food and Drug Administration implemented regulations for Class 1 laser products. The power cord...
...the type of procedures other than the voltage and current rating marked on August 2, 1976. If you should purchase a power cord that it . With specific regard to the laser, the equipment complies with appropriate safety standards, including IEC 825. ...Compaq authorized service provider. the beam is mandatory for the voltage and current marked on or pinched by government agencies for laser products on the product. Compliance is totally enclosed during all modes of the U.S. Food and Drug Administration implemented regulations for Class 1 laser products. The power cord...

Armada E500 Series Quick Reference Guide
Page 216
..., 1-1, 16-2 exiting Suspend (Standby), 4-4 restoring from Hibernation, 4-4 turning on computer, 4-3 power/suspend light blinking, 4-3, 4-5 on, 4-4 power-on password, 13-3 PC Card turning off power to, in Windows 98, 4-18 PC card modem turning off power in Windows NT 4.0, 4-15, 4-24, 4-26 power cord connecting, 12-6 power management and PC Cards, 9-5 power meter (Windows 98) preserving accuracy of , 4-11, 4-13 printer connecting...
..., 1-1, 16-2 exiting Suspend (Standby), 4-4 restoring from Hibernation, 4-4 turning on computer, 4-3 power/suspend light blinking, 4-3, 4-5 on, 4-4 power-on password, 13-3 PC Card turning off power to, in Windows 98, 4-18 PC card modem turning off power in Windows NT 4.0, 4-15, 4-24, 4-26 power cord connecting, 12-6 power management and PC Cards, 9-5 power meter (Windows 98) preserving accuracy of , 4-11, 4-13 printer connecting...

Armada E500 Series Quick Reference Guide
Page 219
...preparing for Windows, 15-6 displaying in Computer Setup, 12-2 displaying with hotkey, 12-2 displaying with hotkeys, 2-7, 2-9 video card in Compaq Diagnostics for , 12-5 international, 12-6 power cord, connecting, 12-6 traveling country-specific modem adapter, 6-7 troubleshooting audio problems, 16-2 basic problems, 16-2 battery problems, 16-6 CD-ROM..., 16-18 keyboard problems, 16-19 Microsoft Software problems, 16-22 modem problems, 16-23 PC Card problems, 16-29 pointing device problems, 16-32 power problems, 16-33 printer problems, 16-34 product key problems, 16-35 screen problems, 16-36...
...preparing for Windows, 15-6 displaying in Computer Setup, 12-2 displaying with hotkey, 12-2 displaying with hotkeys, 2-7, 2-9 video card in Compaq Diagnostics for , 12-5 international, 12-6 power cord, connecting, 12-6 traveling country-specific modem adapter, 6-7 troubleshooting audio problems, 16-2 basic problems, 16-2 battery problems, 16-6 CD-ROM..., 16-18 keyboard problems, 16-19 Microsoft Software problems, 16-22 modem problems, 16-23 PC Card problems, 16-29 pointing device problems, 16-32 power problems, 16-33 printer problems, 16-34 product key problems, 16-35 screen problems, 16-36...

Compaq Armada E500 Series Reference Guide
Page 29
... 98 the term Standby replaces the term Suspend. Primary battery pack. s Can replace a MultiBay/DualBay device to reduce computer weight. 5 Power cord 6 AC adapter 7 Modem cable (internal modem models only) 8 Country-specific modem adapter (provided with internal modem models by region as required...and used as shipped, but battery charge displays will not be used in computer battery bay) 4 Weight savers (2) Function Compaq Armada Personal Computer. Contains tamper-resistant security screws for use with nonRJ-11 telephone jacks. Getting Started 1-3 Adapts modem cable for...
... 98 the term Standby replaces the term Suspend. Primary battery pack. s Can replace a MultiBay/DualBay device to reduce computer weight. 5 Power cord 6 AC adapter 7 Modem cable (internal modem models only) 8 Country-specific modem adapter (provided with internal modem models by region as required...and used as shipped, but battery charge displays will not be used in computer battery bay) 4 Weight savers (2) Function Compaq Armada Personal Computer. Contains tamper-resistant security screws for use with nonRJ-11 telephone jacks. Getting Started 1-3 Adapts modem cable for...

Compaq Armada E500 Series Reference Guide
Page 30
... the equipment by unplugging the power cord from the electrical outlet, grasp the cord by the plug. 1-4 Getting Started Arrange them so that is an important safety feature. s Do not place anything on or trip over them. When unplugging ... plug is easily accessible at all times. s Plug the equipment into a grounded (earthed) electrical outlet that no one may accidentally step on power cords or cables. Do not pull on a cord or cable. WARNING: To reduce the risk of personal injury, electric shock, fire, or damage to the equipment: s Do not disable the...
... the equipment by unplugging the power cord from the electrical outlet, grasp the cord by the plug. 1-4 Getting Started Arrange them so that is an important safety feature. s Do not place anything on or trip over them. When unplugging ... plug is easily accessible at all times. s Plug the equipment into a grounded (earthed) electrical outlet that no one may accidentally step on power cords or cables. Do not pull on a cord or cable. WARNING: To reduce the risk of personal injury, electric shock, fire, or damage to the equipment: s Do not disable the...

