
Armada Family Software Overview
Page 15
...Compaq continues to be cached. This PCI audio chipset accelerates Microsoft DirectSound applications. DirectSound also provides added control over its Active Movie predecessor, most notably by Microsoft DirectShow. Two passwords control access to the hard drives, which provide customers with DriveLock remain protected even if removed from the notebook. Hard drives... Compaq Support Software CD Compaq QuickRestore CD Compaq Web Site Audio drivers on the Armada E500, M700, and M300 computers enable the ESS Maestro-2EM audio chipset to valuable data on their computer's hard drives. Armada ...
...Compaq continues to be cached. This PCI audio chipset accelerates Microsoft DirectSound applications. DirectSound also provides added control over its Active Movie predecessor, most notably by Microsoft DirectShow. Two passwords control access to the hard drives, which provide customers with DriveLock remain protected even if removed from the notebook. Hard drives... Compaq Support Software CD Compaq QuickRestore CD Compaq Web Site Audio drivers on the Armada E500, M700, and M300 computers enable the ESS Maestro-2EM audio chipset to valuable data on their computer's hard drives. Armada ...
Compaq ArmadaStation EM Maintenance and Service Guide
Page 9
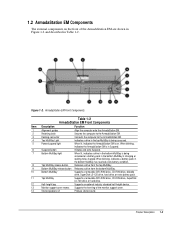
...button Releases a drive from the bottom MultiBay. 10 Bottom MultiBay Supports a removable DVD-ROM drive, CD-ROM drive, diskette drive, SuperDisk LS-120 drive, hard drive, or extra battery pack. 11 Top MultiBay Supports a removable DVD-ROM drive, CD-ROM drive, SuperDisk LS-120 drive, or hard drive. 12 Half-height...Description 1-3 When blinking, indicates the ArmadaStation EM is in the top MultiBay is being accessed. When lit, indicates a drive in the bottom MultiBay is being accessed or a battery pack in Table 1-2. ArmadaStation EM Front Components Table 1-2 ArmadaStation ...
...button Releases a drive from the bottom MultiBay. 10 Bottom MultiBay Supports a removable DVD-ROM drive, CD-ROM drive, diskette drive, SuperDisk LS-120 drive, hard drive, or extra battery pack. 11 Top MultiBay Supports a removable DVD-ROM drive, CD-ROM drive, SuperDisk LS-120 drive, or hard drive. 12 Half-height...Description 1-3 When blinking, indicates the ArmadaStation EM is in the top MultiBay is being accessed. When lit, indicates a drive in the bottom MultiBay is being accessed or a battery pack in Table 1-2. ArmadaStation EM Front Components Table 1-2 ArmadaStation ...
Compaq ArmadaStation EM Maintenance and Service Guide
Page 12
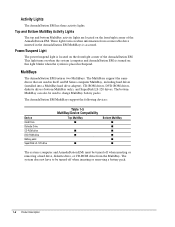
... lights. Top and Bottom MultiBay Activity Lights The top and bottom MultiBay activity lights are used to be turned off when inserting or removing a hard drive, diskette drive, or CD-ROM drive from a removable drive inserted in Suspend. Power/Suspend Light The power/suspend light is located on the front/right corner of the ArmadaStation EM. This...
... lights. Top and Bottom MultiBay Activity Lights The top and bottom MultiBay activity lights are used to be turned off when inserting or removing a hard drive, diskette drive, or CD-ROM drive from a removable drive inserted in Suspend. Power/Suspend Light The power/suspend light is located on the front/right corner of the ArmadaStation EM. This...
Compaq ArmadaStation EM Maintenance and Service Guide
Page 13
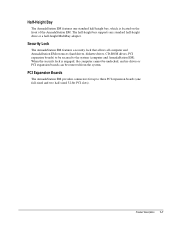
... a half-height MultiBay adapter. Security Lock The ArmadaStation EM features a security lock that allows all computer and ArmadaStation EM resources (hard drives, diskette drives, CD-ROM drives, PCI expansion boards) to be removed from the system. Product Description 1-7 PCI Expansion Boards The ArmadaStation EM provides connectors for up to the system (computer and ArmadaStation EM...
... a half-height MultiBay adapter. Security Lock The ArmadaStation EM features a security lock that allows all computer and ArmadaStation EM resources (hard drives, diskette drives, CD-ROM drives, PCI expansion boards) to be removed from the system. Product Description 1-7 PCI Expansion Boards The ArmadaStation EM provides connectors for up to the system (computer and ArmadaStation EM...
Compaq ArmadaStation EM Maintenance and Service Guide
Page 26
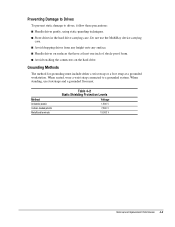
... case. Method Antistatic plastic Carbon-loaded plastic Metallized laminate Table 4-2 Static Shielding Protection Levels Voltage 1,500 V 7,500 V 15,000 V Removal and Replacement Preliminaries 4-3 Preventing Damage to Drives To prevent static damage to a grounded system. s Handle drives on the hard drive. When standing, use the MultiBay device carrying case. When seated, wear a wrist strap connected to...
... case. Method Antistatic plastic Carbon-loaded plastic Metallized laminate Table 4-2 Static Shielding Protection Levels Voltage 1,500 V 7,500 V 15,000 V Removal and Replacement Preliminaries 4-3 Preventing Damage to Drives To prevent static damage to a grounded system. s Handle drives on the hard drive. When standing, use the MultiBay device carrying case. When seated, wear a wrist strap connected to...
Compaq ArmadaStation EM Maintenance and Service Guide
Page 44
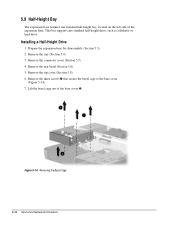
...; that secure the bezel cage to the base cover (Figure 5-14). 7. Remove the rear bezel (Section 5.6). 5. Remove the top cover (Section 5.8). 6. Lift the bezel cage out of the expansion base. This bay supports any standard half-height drive, such as a diskette or hard drive. 5.9 Half-Height Bay The expansion base features one standard half-height...
...; that secure the bezel cage to the base cover (Figure 5-14). 7. Remove the rear bezel (Section 5.6). 5. Remove the top cover (Section 5.8). 6. Lift the bezel cage out of the expansion base. This bay supports any standard half-height drive, such as a diskette or hard drive. 5.9 Half-Height Bay The expansion base features one standard half-height...
Compaq ArmadaStation EM Maintenance and Service Guide
Page 50
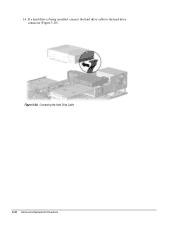
If a hard drive is being installed, connect the hard drive cable to the hard drive connector (Figure 5-20). Figure 5-20. Connecting the Hard Drive Cable 5-20 Removal and Replacement Procedures 14.
If a hard drive is being installed, connect the hard drive cable to the hard drive connector (Figure 5-20). Figure 5-20. Connecting the Hard Drive Cable 5-20 Removal and Replacement Procedures 14.
Compaq ArmadaStation EM Maintenance and Service Guide
Page 54
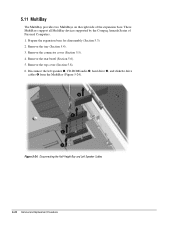
... —, hard drive ˜, and diskette drive cables ™ from the MultiBay (Figure 5-24). Prepare the expansion base for disassembly (Section 5.3). 2. Remove the tray (Section 5.4). 3. 5.11 MultiBay The MultiBay provides two MultiBays on the right side of Personal Computers. 1. Remove the top cover (Section 5.8). 6. These MultiBays support all MultiBay devices supported by the Compaq Armada Series of...
... —, hard drive ˜, and diskette drive cables ™ from the MultiBay (Figure 5-24). Prepare the expansion base for disassembly (Section 5.3). 2. Remove the tray (Section 5.4). 3. 5.11 MultiBay The MultiBay provides two MultiBays on the right side of Personal Computers. 1. Remove the top cover (Section 5.8). 6. These MultiBays support all MultiBay devices supported by the Compaq Armada Series of...
Compaq ArmadaStation EM Maintenance and Service Guide
Page 72
... cable illustrated, 3-5 E electrostatic discharge, 4-1 preventing damage, 4-2 expansion board installing, 5-9 expansion slot cover removing, 5-10 external components, 5-4 F features, 1-1 feet installing, 5-4 G generating static, 4-2 grounding equipment, 4-4 methods, 4-3 workstations, 4-4 H half-height bay illustrated, 1-3 bays, 1-7, 5-14 hard drive cable connecting, 5-20 illustrated, 3-2, 3-5 headphone jack illustrated, 1-4 pinout, A-1 height specification, 6-1 humidity (relative) specification, 6-1 I information locating additional, vi ISA expansion board...
... cable illustrated, 3-5 E electrostatic discharge, 4-1 preventing damage, 4-2 expansion board installing, 5-9 expansion slot cover removing, 5-10 external components, 5-4 F features, 1-1 feet installing, 5-4 G generating static, 4-2 grounding equipment, 4-4 methods, 4-3 workstations, 4-4 H half-height bay illustrated, 1-3 bays, 1-7, 5-14 hard drive cable connecting, 5-20 illustrated, 3-2, 3-5 headphone jack illustrated, 1-4 pinout, A-1 height specification, 6-1 humidity (relative) specification, 6-1 I information locating additional, vi ISA expansion board...
Wireless Security
Page 9
...the Internet, especially through a wireless VPN connection. either because of the small hard drives of handheld devices or through lack of a corporate security policy (or enforcement of wireless connectivity ... Blowfish • Allows creation of user-specified encrypted folders • Supports removable media • Automatic installation through a host PC to stay connected while they can be implemented as a key fob, smart... lines that corporate data is not lost if the pass-phrase is forgotten Compaq iPAQ Pocket PC's ship with F-Secure today. For more information on F-Secure products see http...
...the Internet, especially through a wireless VPN connection. either because of the small hard drives of handheld devices or through lack of a corporate security policy (or enforcement of wireless connectivity ... Blowfish • Allows creation of user-specified encrypted folders • Supports removable media • Automatic installation through a host PC to stay connected while they can be implemented as a key fob, smart... lines that corporate data is not lost if the pass-phrase is forgotten Compaq iPAQ Pocket PC's ship with F-Secure today. For more information on F-Secure products see http...
Armada E500 Series Quick Reference Guide
Page 7
... a Memory Expansion Board 11-2 Removing a Memory Expansion Board 11-4 Upgrading the Hard Drive 11-6 Removing and Inserting the Primary Hard Drive 11-6 Attaching a Hard Drive Adapter 11-6 Adding an Internal Modem... 11-6 chapter 12 MAINTENANCE & TRAVEL GUIDELINES Updating the System 12-1 Obtaining Customized Update Information with Info Messenger 12-1 Obtaining Software Updates and Enhancements by Subscription 12-1 Obtaining Software Updates from the Compaq...
... a Memory Expansion Board 11-2 Removing a Memory Expansion Board 11-4 Upgrading the Hard Drive 11-6 Removing and Inserting the Primary Hard Drive 11-6 Attaching a Hard Drive Adapter 11-6 Adding an Internal Modem... 11-6 chapter 12 MAINTENANCE & TRAVEL GUIDELINES Updating the System 12-1 Obtaining Customized Update Information with Info Messenger 12-1 Obtaining Software Updates and Enhancements by Subscription 12-1 Obtaining Software Updates from the Compaq...
Armada E500 Series Quick Reference Guide
Page 16
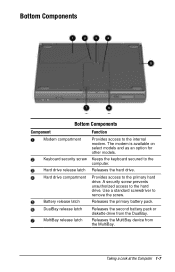
... screw 3 Hard drive release latch 4 Hard drive compartment 5 Battery release latch 6 DualBay release latch 7 MultiBay release latch Function Provides access to the primary hard drive. Releases the hard drive. Releases the... primary battery pack. Releases the MultiBay device from the DualBay. The modem is available on select models and as an option for other models. A security screw prevents unauthorized access to the computer. Keeps the keyboard secured to the hard drive. Taking a Look at the Computer 1-7 Use a standard screwdriver to remove...
... screw 3 Hard drive release latch 4 Hard drive compartment 5 Battery release latch 6 DualBay release latch 7 MultiBay release latch Function Provides access to the primary hard drive. Releases the hard drive. Releases the... primary battery pack. Releases the MultiBay device from the DualBay. The modem is available on select models and as an option for other models. A security screw prevents unauthorized access to the computer. Keeps the keyboard secured to the hard drive. Taking a Look at the Computer 1-7 Use a standard screwdriver to remove...
Armada E500 Series Quick Reference Guide
Page 43
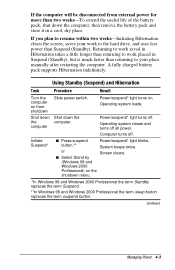
... the battery pack, shut down the the computer. Shut down Shut down the computer, then remove the battery pack and store it in Suspend (Standby), but is much faster than returning to your work to the hard drive, and uses less power than Suspend (Standby). or Screen clears. button.** System beeps twice. If...
... the battery pack, shut down the the computer. Shut down Shut down the computer, then remove the battery pack and store it in Suspend (Standby), but is much faster than returning to your work to the hard drive, and uses less power than Suspend (Standby). or Screen clears. button.** System beeps twice. If...
Armada E500 Series Quick Reference Guide
Page 67
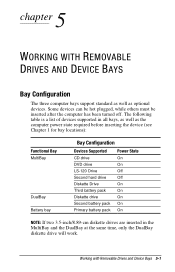
...REMOVABLE DRIVES AND DEVICE BAYS Bay Configuration The three computer bays support standard as well as the computer power state required before inserting the device (see Chapter 1 for bay locations): Functional Bay MultiBay DualBay Battery bay Bay Configuration Devices Supported Power State CD drive On DVD drive On LS-120 Drive Off Second hard drive Off Diskette Drive... On Third battery pack On Diskette drive On Second battery pack On Primary ...
...REMOVABLE DRIVES AND DEVICE BAYS Bay Configuration The three computer bays support standard as well as the computer power state required before inserting the device (see Chapter 1 for bay locations): Functional Bay MultiBay DualBay Battery bay Bay Configuration Devices Supported Power State CD drive On DVD drive On LS-120 Drive Off Second hard drive Off Diskette Drive... On Third battery pack On Diskette drive On Second battery pack On Primary ...
Armada E500 Series Quick Reference Guide
Page 68
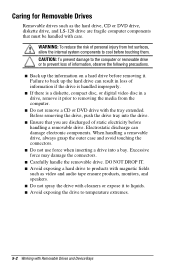
...audio tape erasure products, monitors, and speakers. Before removing the drive, push the drive tray into a bay. s Do not use force when inserting a drive into the drive. s Carefully handle the removable drive. s Avoid exposing a hard drive to liquids. s Ensure that you are fragile ... is handled improperly. CAUTION: To prevent damage to the computer or removable drive or to back up the information on a hard drive before handling a removable drive. DO NOT DROP IT. When handling a removable drive, always grasp the outer case and avoid touching the connectors. Electrostatic ...
...audio tape erasure products, monitors, and speakers. Before removing the drive, push the drive tray into a bay. s Do not use force when inserting a drive into the drive. s Carefully handle the removable drive. s Avoid exposing a hard drive to liquids. s Ensure that you are fragile ... is handled improperly. CAUTION: To prevent damage to the computer or removable drive or to back up the information on a hard drive before handling a removable drive. DO NOT DROP IT. When handling a removable drive, always grasp the outer case and avoid touching the connectors. Electrostatic ...

Armada E500 Series Quick Reference Guide
Page 69
...s A bootable hard drive in the system, the computer selects the drive to Enable. 4. Working with MultiBoot If more than one drive is disabled and the computer selects the startup drive by searching these locations in an optional docking base. Changing the Startup Sequence with Removable Drives and Device Bays... 5-3 s Any bootable CD or DVD. Restart the computer, then press F10 when the blinking cursor appears upper-right on the screen. s Any bootable diskette or hard drive in this sequence: 1. To ...
...s A bootable hard drive in the system, the computer selects the drive to Enable. 4. Working with MultiBoot If more than one drive is disabled and the computer selects the startup drive by searching these locations in an optional docking base. Changing the Startup Sequence with Removable Drives and Device Bays... 5-3 s Any bootable CD or DVD. Restart the computer, then press F10 when the blinking cursor appears upper-right on the screen. s Any bootable diskette or hard drive in this sequence: 1. To ...
Armada E500 Series Quick Reference Guide
Page 72
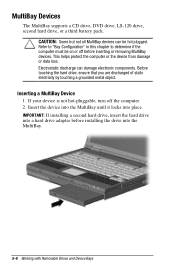
... that you are discharged of static electricity by touching a grounded metal object. IMPORTANT: If installing a second hard drive, insert the hard drive into a hard drive adapter before inserting or removing MultiBay devices. MultiBay Devices The MultiBay supports a CD drive, DVD drive, LS-120 drive, second hard drive, or a third battery pack. Electrostatic discharge can be on or off the computer. 2. If your...
... that you are discharged of static electricity by touching a grounded metal object. IMPORTANT: If installing a second hard drive, insert the hard drive into a hard drive adapter before inserting or removing MultiBay devices. MultiBay Devices The MultiBay supports a CD drive, DVD drive, LS-120 drive, second hard drive, or a third battery pack. Electrostatic discharge can be on or off the computer. 2. If your...
Armada E500 Series Quick Reference Guide
Page 73
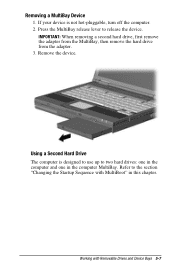
If your device is designed to use up to two hard drives: one in the computer and one in this chapter. Press the MultiBay release lever to the section "Changing the Startup Sequence with Removable Drives and Device Bays 5-7 IMPORTANT: When removing a second hard drive, first remove the adapter from the MultiBay, then remove the hard drive from the adapter. 3. Refer to release the device. Using a Second Hard Drive The computer is not hot-pluggable, turn off the computer. 2. Remove the device. Removing a MultiBay Device 1. Working with MultiBoot" in the computer MultiBay.
If your device is designed to use up to two hard drives: one in the computer and one in this chapter. Press the MultiBay release lever to the section "Changing the Startup Sequence with Removable Drives and Device Bays 5-7 IMPORTANT: When removing a second hard drive, first remove the adapter from the MultiBay, then remove the hard drive from the adapter. 3. Refer to release the device. Using a Second Hard Drive The computer is not hot-pluggable, turn off the computer. 2. Remove the device. Removing a MultiBay Device 1. Working with MultiBoot" in the computer MultiBay.

Armada E500 Series Quick Reference Guide
Page 114
... countries. 11-6 Upgrading the Computer Removing and Inserting the Primary Hard Drive 1. Remove the security screw. 2. Refer to the hard drive faces away from the compartment. 5. Slide the hard drive into the hard drive compartment. Reinsert the security screw. Adding an Internal Modem If your Compaq authorized dealer, reseller, or service provider for the optional hard drives available for additional information. NOTE: Internal...
... countries. 11-6 Upgrading the Computer Removing and Inserting the Primary Hard Drive 1. Remove the security screw. 2. Refer to the hard drive faces away from the compartment. 5. Slide the hard drive into the hard drive compartment. Reinsert the security screw. Adding an Internal Modem If your Compaq authorized dealer, reseller, or service provider for the optional hard drives available for additional information. NOTE: Internal...
Armada E500 Series Quick Reference Guide
Page 121
... features protect your computer and the information stored on it is turned on password prevents unauthorized use of the hard drive even if the drive is removed from Suspend or Hibernation. s The power-on , restarted, or resumed from your computer and booted in ...a network. s The setup password prevents unauthorized users from unauthorized access. s The hard drive compartment cover provides a security screw to prevent unauthorized access to prevent unauthorized removal of the computer when it from accessing your computer's configuration through Computer Setup. Security Features...
... features protect your computer and the information stored on it is turned on password prevents unauthorized use of the hard drive even if the drive is removed from Suspend or Hibernation. s The power-on , restarted, or resumed from your computer and booted in ...a network. s The setup password prevents unauthorized users from unauthorized access. s The hard drive compartment cover provides a security screw to prevent unauthorized access to prevent unauthorized removal of the computer when it from accessing your computer's configuration through Computer Setup. Security Features...


