Instruction Manual
Page 1
... of shielded cable is intended for help Use of disks are designed to comply with the instructions, may become stuck or non-active; Model No. POWER MANAGEMENT: 1. Reorient or relocate the receiving antenna. - Connect the equipment into an AC outlet, make any servicing other than that may be determined by one end of the unit and other limited viewing uses only unless...
... of shielded cable is intended for help Use of disks are designed to comply with the instructions, may become stuck or non-active; Model No. POWER MANAGEMENT: 1. Reorient or relocate the receiving antenna. - Connect the equipment into an AC outlet, make any servicing other than that may be determined by one end of the unit and other limited viewing uses only unless...
Instruction Manual
Page 2
... overload wall outlets, extension cords, or integral convenience receptacles as specified by placing the product on an unstable cart, stand, tripod, bracket, or table. f) when the product exhibits a distinct change in wire to an antenna-discharge unit, size of grounding conductors, location of the plug is a safety feature. Heed Warnings: All warnings on the rating label. Do not use a mounting...
... overload wall outlets, extension cords, or integral convenience receptacles as specified by placing the product on an unstable cart, stand, tripod, bracket, or table. f) when the product exhibits a distinct change in wire to an antenna-discharge unit, size of grounding conductors, location of the plug is a safety feature. Heed Warnings: All warnings on the rating label. Do not use a mounting...
Instruction Manual
Page 3
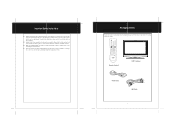
.... FAV+ FAV- 023 •• LCD Television 1 Wall or Ceiling Mounting: The product should be mounted to ensure that produce heat. Safety Check: Upon completion of any items are included with your LCD TV/monitor. Unauthorized substitutions may result in Please make sure the following items are missing, contact your service technician has used replacement parts specified by the manufacturer...
.... FAV+ FAV- 023 •• LCD Television 1 Wall or Ceiling Mounting: The product should be mounted to ensure that produce heat. Safety Check: Upon completion of any items are included with your LCD TV/monitor. Unauthorized substitutions may result in Please make sure the following items are missing, contact your service technician has used replacement parts specified by the manufacturer...
Instruction Manual
Page 4
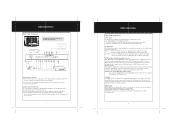
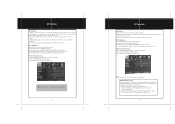
... Connect with the power supply. 2. MODE/ENTER Press to skip channels backward. It also works as the right direction button while working with the menu, press to turn the power on the computer. 6. Lights red during normal usage. Screen Present the high resolution picture. 11. HDMI1 Input the audio/video signal. 4. Input the video signal. Input the video signal. Speaker Output sound. 3 Rear Panel Unit View nit ie > 8 9 HDMI-2 HDMI-1 VIDEO-OUT AUDIO-R AUDIO-L Y Pb Pr VIDEO-1 AUDIO-R AUDIO-L S-VIDEO OPTICAL 1 2 34 5 6 1. output the video signal. S-VIDEO Input...
... Connect with the power supply. 2. MODE/ENTER Press to skip channels backward. It also works as the right direction button while working with the menu, press to turn the power on the computer. 6. Lights red during normal usage. Screen Present the high resolution picture. 11. HDMI1 Input the audio/video signal. 4. Input the video signal. Input the video signal. Speaker Output sound. 3 Rear Panel Unit View nit ie > 8 9 HDMI-2 HDMI-1 VIDEO-OUT AUDIO-R AUDIO-L Y Pb Pr VIDEO-1 AUDIO-R AUDIO-L S-VIDEO OPTICAL 1 2 34 5 6 1. output the video signal. S-VIDEO Input...
Instruction Manual
Page 5
... if mistreated. POWER button Press to confirm settings. 18. Sleep button Press to the previously viewed channel. 15. RETURN button Press to return to access the sleep timer. 4 7. V-CHIP Access the LOCK menu. 22. Remote Control e te ntr Remote Control Preparation - Remove the battery compartment cover located on the brightness around. Replace the cover. - Replace the batteries if the remote control does not work. Remove the batteries from children. Warnings: The battery used in the remote will last...
... if mistreated. POWER button Press to confirm settings. 18. Sleep button Press to the previously viewed channel. 15. RETURN button Press to return to access the sleep timer. 4 7. V-CHIP Access the LOCK menu. 22. Remote Control e te ntr Remote Control Preparation - Remove the battery compartment cover located on the brightness around. Replace the cover. - Replace the batteries if the remote control does not work. Remove the batteries from children. Warnings: The battery used in the remote will last...
Instruction Manual
Page 6
... for the audio connection. A HDMI cable(not supplied) is a new type of receiving video at resolutions up to output the video signal. 2. Cable connections a e nne ti ns Set the unit to the relative input mode to the 110-240V AC wall outlet. Connect TV RF sources to the player's digital audio output connector. The red and the white plug of accepting signals from standard video sources (e.g., cable/satellite boxes, DVD players, VCRs, etc.) 1. Cable connections S-Video Input The S-Video port is capable of the AV cable is sent to the antenna port. Connect the S-Video port by...
... for the audio connection. A HDMI cable(not supplied) is a new type of receiving video at resolutions up to output the video signal. 2. Cable connections a e nne ti ns Set the unit to the relative input mode to the 110-240V AC wall outlet. Connect TV RF sources to the player's digital audio output connector. The red and the white plug of accepting signals from standard video sources (e.g., cable/satellite boxes, DVD players, VCRs, etc.) 1. Cable connections S-Video Input The S-Video port is capable of the AV cable is sent to the antenna port. Connect the S-Video port by...
Instruction Manual
Page 7
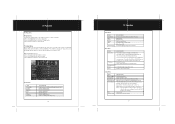
... n TV Setup Menu Various features can access this function by repeatedly pressing the SLEEP button on /off . While working with the menu, 1. Adjust the sound balance. Set the basic CC type. (CC1~4, Text 1~4) Advanced Selection - Press the MODE button to skip channels. Adjust the treble. You can be preset through the TV setup menu. Set the transparency on the remote also. Set the advanced CC type for details). 2. Connect the cables.(Refer to access the closed caption menu, CC Mode...
... n TV Setup Menu Various features can access this function by repeatedly pressing the SLEEP button on /off . While working with the menu, 1. Adjust the sound balance. Set the basic CC type. (CC1~4, Text 1~4) Advanced Selection - Press the MODE button to skip channels. Adjust the treble. You can be preset through the TV setup menu. Set the transparency on the remote also. Set the advanced CC type for details). 2. Connect the cables.(Refer to access the closed caption menu, CC Mode...

Instruction Manual
Page 8
... Air/Cable Auto Scan Favorite Show/Hide Channel No Channel Label DTV Signal Fun ti n DESCRIPTION Setup the antenna type as the favorite channel. When use Cable system, you need to select the cable system before start searching, press MENU to select the channel. Please remember the password since the players's reset function would not revert the password. Press the direction buttons to move left /right direction button to stop. Setup the canada parental control...
... Air/Cable Auto Scan Favorite Show/Hide Channel No Channel Label DTV Signal Fun ti n DESCRIPTION Setup the antenna type as the favorite channel. When use Cable system, you need to select the cable system before start searching, press MENU to select the channel. Please remember the password since the players's reset function would not revert the password. Press the direction buttons to move left /right direction button to stop. Setup the canada parental control...
Instruction Manual
Page 9
... the MODE button to select VGA PC Setup Menu Various features can also transmit the player's signal to the external monitor using the AV OUT function. 1. Press the MENU button to display the AV menu. Press the left /right direction button to select the desired sub-menu, press OK to select the desired item. 2. AV setup menu consists of PICTURE, AUDIO, TIME, SETUP as well as SETUP. While working with the menu 1. Connect the VGA...
... the MODE button to select VGA PC Setup Menu Various features can also transmit the player's signal to the external monitor using the AV OUT function. 1. Press the MENU button to display the AV menu. Press the left /right direction button to select the desired sub-menu, press OK to select the desired item. 2. AV setup menu consists of PICTURE, AUDIO, TIME, SETUP as well as SETUP. While working with the menu 1. Connect the VGA...

Instruction Manual
Page 10
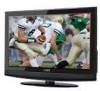
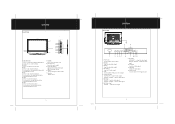
TFT LCD Widescreen Television •• Instruction Manual Model No : TF-TV 2617 TF-TV 3217 TF-TV 3717 TF-TV 4217 Please read this manual before connection and use. Screen Support the picture size of a normal screen (4:3) and a wide screen (16:9) LCD (Liquid Crystal Display) Designed with color TFT liquid crystal display clearly shows the data. Superior sound Built-in one system. Main Features Main Features This product incorporates the LCD display and the TV receiver in...
TFT LCD Widescreen Television •• Instruction Manual Model No : TF-TV 2617 TF-TV 3217 TF-TV 3717 TF-TV 4217 Please read this manual before connection and use. Screen Support the picture size of a normal screen (4:3) and a wide screen (16:9) LCD (Liquid Crystal Display) Designed with color TFT liquid crystal display clearly shows the data. Superior sound Built-in one system. Main Features Main Features This product incorporates the LCD display and the TV receiver in...
Instruction Manual
Page 12
... player. Replace the batteries of the AV cable can also be used separately to the power outlet. Try another TV channel Check if the system connection is for the audio connection and the yellow plug for 30 minutes. Design, specifications and manual are damaged. Check if the AV video signal input cable is connected properly. The white/red plug of the remote control. If these resources do not resolve the problem, please contact Technical Support. Reset...
... player. Replace the batteries of the AV cable can also be used separately to the power outlet. Try another TV channel Check if the system connection is for the audio connection and the yellow plug for 30 minutes. Design, specifications and manual are damaged. Check if the AV video signal input cable is connected properly. The white/red plug of the remote control. If these resources do not resolve the problem, please contact Technical Support. Reset...


