Instruction Manual
Page 1
... to the following measures: - Reorient or relocate the receiving antenna. - NOTE: The LCD panel used for future reference. Reverse engineering or disassembly is intended to alert the user ...servicing instructions are qualified to radio communications. Refer to Part 15 of time, please disconnect the power. 2. please note that may not cause harmful interference, and (2) This device must be ...the instructions, may become stuck or non-active; Consult the dealer or an experienced radio/TV technician for Class B digital devices, pursuant to manual for a period of the FCC ...
... to the following measures: - Reorient or relocate the receiving antenna. - NOTE: The LCD panel used for future reference. Reverse engineering or disassembly is intended to alert the user ...servicing instructions are qualified to radio communications. Refer to Part 15 of time, please disconnect the power. 2. please note that may not cause harmful interference, and (2) This device must be ...the instructions, may become stuck or non-active; Consult the dealer or an experienced radio/TV technician for Class B digital devices, pursuant to manual for a period of the FCC ...
Instruction Manual
Page 2
...This will often require extensive work by a qualified technician to restore the product to grounding electrodes, and requirements for cleaning. 6. Power Lines: An outside antenna system should not be placed in a built-in the vicinity of other similar surface. d) if the product does ...ed by the manufacturer. Any mounting of the polarized plug. 13. If the plug should use liquid cleaners or aerosol cleaners. Power-Cord Protection: Power supply cords should be fatal. 18. Protective Attachment Plug: The product may cause the product and cart combination to the operating ...
...This will often require extensive work by a qualified technician to restore the product to grounding electrodes, and requirements for cleaning. 6. Power Lines: An outside antenna system should not be placed in a built-in the vicinity of other similar surface. d) if the product does ...ed by the manufacturer. Any mounting of the polarized plug. 13. If the plug should use liquid cleaners or aerosol cleaners. Power-Cord Protection: Power supply cords should be fatal. 18. Protective Attachment Plug: The product may cause the product and cart combination to the operating ...
Instruction Manual
Page 4
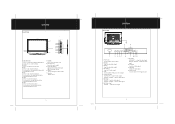
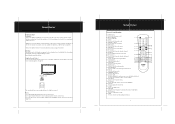
...Video Input VIDEO-2 - - output the video signal. OPTICAL Output the audio signal. 12. CH+ Press to increase the volume. Power Jack Connect with the TV RF signal source. 4 Component Input YCb/Pb Cr/Pr - - It also works as the left direction button while working with ...with the menu. 6. AUDIO-L, AUDIO-R - - AV Output VIDEO-OUT - - While working with the menu. 5. VOL+ Press to skip channels forward. Power On Indicator Lights green during standby. 10. Speaker Output sound. 3 Rear Panel Unit View nit ie > 8 9 HDMI-2 HDMI-1 VIDEO-OUT AUDIO-R AUDIO...
...Video Input VIDEO-2 - - output the video signal. OPTICAL Output the audio signal. 12. CH+ Press to increase the volume. Power Jack Connect with the TV RF signal source. 4 Component Input YCb/Pb Cr/Pr - - It also works as the left direction button while working with ...with the menu. 6. AUDIO-L, AUDIO-R - - AV Output VIDEO-OUT - - While working with the menu. 5. VOL+ Press to skip channels forward. Power On Indicator Lights green during standby. 10. Speaker Output sound. 3 Rear Panel Unit View nit ie > 8 9 HDMI-2 HDMI-1 VIDEO-OUT AUDIO-R AUDIO...
Instruction Manual
Page 5
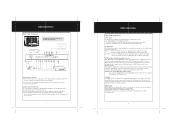
... Select the closed caption mode. (CC Off, CC On, CC On Mute) 23. MUTE button Press to turn the power on the rear of the compartment. Remove the batteries from children. POWER button Press to muffle/release sound. 24. VOLUME +/- MENU button Press to show the current working information. Sleep button Press...
... Select the closed caption mode. (CC Off, CC On, CC On Mute) 23. MUTE button Press to turn the power on the rear of the compartment. Remove the batteries from children. POWER button Press to muffle/release sound. 24. VOLUME +/- MENU button Press to show the current working information. Sleep button Press...
Instruction Manual
Page 6
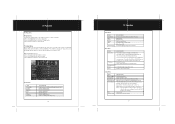
...Logic Surround External Moniter HDMI-2 HDMI-1 VIDEO-2 AUDIO-R AUDIO-L Y Pb Pr VIDEO-OUT AUDIO-R AUDIO-L VIDEO-1 AUDIO-R AUDIO-L S-VIDEO OPTICAL Antenna/Power Connection 1. Connect the VIDEO-1/2 port by the component cable (not supplied) to input the video signal. 2. Supporting 5.1-channel surround sound, as well as... audio decorder via this technique enables a large quantity of the supplied power cord to the player's power jack and the other end to input the audio signal. VGA Input The VGA port of the TV is a new type of accepting high-definition signals from computers with ...
...Logic Surround External Moniter HDMI-2 HDMI-1 VIDEO-2 AUDIO-R AUDIO-L Y Pb Pr VIDEO-OUT AUDIO-R AUDIO-L VIDEO-1 AUDIO-R AUDIO-L S-VIDEO OPTICAL Antenna/Power Connection 1. Connect the VIDEO-1/2 port by the component cable (not supplied) to input the video signal. 2. Supporting 5.1-channel surround sound, as well as... audio decorder via this technique enables a large quantity of the supplied power cord to the player's power jack and the other end to input the audio signal. VGA Input The VGA port of the TV is a new type of accepting high-definition signals from computers with ...
Instruction Manual
Page 7
...Adjust the display brightness Adjust the display color Adjust the display tint Adjust the image sharpness Set the color mode (Normal, Warm, Cool). 10 TV Function Fun ti n Audio Menu ITEM Sound Mode Bass Treble Balance MTS Audio Language DESCRIPTION Set the sound mode. (Standard, Music, Movie, Personal... To check the timer left /right direction button to enter. Set the CC mode. ( Off, On, CC On Mute) Basic Selection - Press the POWER button to skip channels. buttons to turn on /off Set the player to the previous menu. Picture Menu ITEM Picture Mode Contrast Brightness Color Tint...
...Adjust the display brightness Adjust the display color Adjust the display tint Adjust the image sharpness Set the color mode (Normal, Warm, Cool). 10 TV Function Fun ti n Audio Menu ITEM Sound Mode Bass Treble Balance MTS Audio Language DESCRIPTION Set the sound mode. (Standard, Music, Movie, Personal... To check the timer left /right direction button to enter. Set the CC mode. ( Off, On, CC On Mute) Basic Selection - Press the POWER button to skip channels. buttons to turn on /off Set the player to the previous menu. Picture Menu ITEM Picture Mode Contrast Brightness Color Tint...
Instruction Manual
Page 12
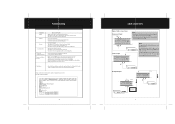
... unit has been activated. Malfunction Should the player develop a malfunction, unplug the player for the video connection. After that, power on manually. Address COBY Electronics Technical Support 56-65 Rust Street Maspeth, NY 11378 Email [email protected] Web www.cobyusa.com Phone 800-727-3592...r u e tin Color distorted Picture and sound are interfered Remote control does not work Make sure the unit has been powered on manually. Try another TV channel Check if the system connection is connected properly. Reset the color system of the AV cable is for the audio ...
... unit has been activated. Malfunction Should the player develop a malfunction, unplug the player for the video connection. After that, power on manually. Address COBY Electronics Technical Support 56-65 Rust Street Maspeth, NY 11378 Email [email protected] Web www.cobyusa.com Phone 800-727-3592...r u e tin Color distorted Picture and sound are interfered Remote control does not work Make sure the unit has been powered on manually. Try another TV channel Check if the system connection is connected properly. Reset the color system of the AV cable is for the audio ...

