
User Manual
Page 8
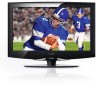
a. c. a, Main Unit b, Power Cord & RCA Cable c, Remote Control Unit 2 b. Package Contents Please make sure the following items are included with your dealer. If any item is missing, contact your LCD TV/monitor.
a. c. a, Main Unit b, Power Cord & RCA Cable c, Remote Control Unit 2 b. Package Contents Please make sure the following items are included with your dealer. If any item is missing, contact your LCD TV/monitor.

User Manual
Page 9
REMOTE SENSOR Sense the remote control signal. 4. Wall Mounting Thread X 4 10. Unit Stand NOTE: See "Cable Connections" section for VESA informaiton. POWER INDICATOR Lights blue in your local retailer, see instructions ...
REMOTE SENSOR Sense the remote control signal. 4. Wall Mounting Thread X 4 10. Unit Stand NOTE: See "Cable Connections" section for VESA informaiton. POWER INDICATOR Lights blue in your local retailer, see instructions ...

User Manual
Page 10
... the system setup menu, press OK to access the sleep timer. 8. P.Mode Select the picture mode. 19. INFO Press to set the screen format. 7. CH+/- Remote Control Remote Control Drawing 1. POWER 1 12 Press to access TV programs. 3 13 4. "-" Button Used with number buttons to turn on /off the unit. 2.
... the system setup menu, press OK to access the sleep timer. 8. P.Mode Select the picture mode. 19. INFO Press to set the screen format. 7. CH+/- Remote Control Remote Control Drawing 1. POWER 1 12 Press to access TV programs. 3 13 4. "-" Button Used with number buttons to turn on /off the unit. 2.
User Manual
Page 11
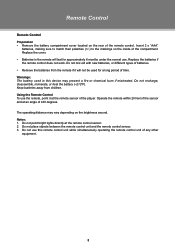
...8226; Remove the batteries from children. Replace the cover. •• Batteries in this remote control unit while simultaneously operating the remote control unit of ±30 degrees. Replace the batteries if the remote control does not work. Warnings: The battery used for approximately 6 months under the normal use....the markings on the brightness around. Do not recharge, disassemble, incinerate, or heat the battery (~212ºF). Using the Remote Control To use this device may vary depending on the inside of the player. Notes: 111 Do not point bright lights directly...
...8226; Remove the batteries from children. Replace the cover. •• Batteries in this remote control unit while simultaneously operating the remote control unit of ±30 degrees. Replace the batteries if the remote control does not work. Warnings: The battery used for approximately 6 months under the normal use....the markings on the brightness around. Do not recharge, disassemble, incinerate, or heat the battery (~212ºF). Using the Remote Control To use this device may vary depending on the inside of the player. Notes: 111 Do not point bright lights directly...

User Manual
Page 22
... the POWER button on the unit has been turned on manually. •• Remove the obstacles between the remote control and the player. •• Point the remote control towards the remote sensor on the player and the restore function should reset the player. After that, power on the player. ...•• Check if the batteries of the remote control have a problem with correct polarities. •• Replace the batteries of the unit. •• Check if the system has been properly...
... the POWER button on the unit has been turned on manually. •• Remove the obstacles between the remote control and the player. •• Point the remote control towards the remote sensor on the player and the restore function should reset the player. After that, power on the player. ...•• Check if the batteries of the remote control have a problem with correct polarities. •• Replace the batteries of the unit. •• Check if the system has been properly...

