
User Manual
Page 1
TFT LCD Widescreen Television Instruction Manual TFTV1925/2225 Please read this manual carefully before connection and use
TFT LCD Widescreen Television Instruction Manual TFTV1925/2225 Please read this manual carefully before connection and use

User Manual
Page 2
... rear panel and the other than that all the connections have been properly made. •• If the unit will not be used for future reference. Retain this information for a long time, disconnect the plug from the remote. TF-TV 1925/2225 Serial No. Power Supply: Connect one end of electric to the AC100-240V wall outlet. For Customer Use: Enter below the serial number...
... rear panel and the other than that all the connections have been properly made. •• If the unit will not be used for future reference. Retain this information for a long time, disconnect the plug from the remote. TF-TV 1925/2225 Serial No. Power Supply: Connect one end of electric to the AC100-240V wall outlet. For Customer Use: Enter below the serial number...

User Manual
Page 3
... operation of the FCC Rules. patents and other intellectual property rights owned by Macrovision Corporation and other limited viewing uses only unless otherwise authorized by Macrovision Corporation, and is required to deliver a crisp, clear, and detailed picture. Occasionally, a few of thin film transistors that may become stuck or non-active; LCD Information The LCD panel used in a particular installation...
... operation of the FCC Rules. patents and other intellectual property rights owned by Macrovision Corporation and other limited viewing uses only unless otherwise authorized by Macrovision Corporation, and is required to deliver a crisp, clear, and detailed picture. Occasionally, a few of thin film transistors that may become stuck or non-active; LCD Information The LCD panel used in a particular installation...
User Manual
Page 4
... not attempt to service this product through openings as opening or removing covers may expose you to the operating instructions. 1111 Grounding or Polarization: This product may be hazardous. 777 Water and Moisture: Do not use liquid cleaners or aerosol cleaners. Do not defeat the safety purpose of the polarized plug. 1111 Power-Cord Protection: Power supply cords should be routed...
... not attempt to service this product through openings as opening or removing covers may expose you to the operating instructions. 1111 Grounding or Polarization: This product may be hazardous. 777 Water and Moisture: Do not use liquid cleaners or aerosol cleaners. Do not defeat the safety purpose of the polarized plug. 1111 Power-Cord Protection: Power supply cords should be routed...

User Manual
Page 5
... requirements for service. 2222 Replacement Parts: When replacement parts are covered by the operating instructions as improper adjustment of other products (including amplifiers) that produce heat. 2222 Outdoor Antenna Grounding: If an outside antenna is connected to the product, be sure that the product is in damage and will often require extensive work by following conditions: a) when the power-supply or plug is...
... requirements for service. 2222 Replacement Parts: When replacement parts are covered by the operating instructions as improper adjustment of other products (including amplifiers) that produce heat. 2222 Outdoor Antenna Grounding: If an outside antenna is connected to the product, be sure that the product is in damage and will often require extensive work by following conditions: a) when the power-supply or plug is...

User Manual
Page 7
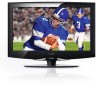
.... Multiple Mode TV AV S-VIDEO COMPONENT HDMI VGA High Quality Property High Resolution Adopt an MPEG2 decoding format to experience some light or dark spots appearing on the LCD screen. 1 Superior sound Built-in one system. Main Features This product incorporates the LCD display and the TV receiver in Dolby Digital decoder to output high quality sound effects. Screen Support the picture size of a normal screen (4:3) and a wide screen (16:9) LCD (Liquid Crystal Display...
.... Multiple Mode TV AV S-VIDEO COMPONENT HDMI VGA High Quality Property High Resolution Adopt an MPEG2 decoding format to experience some light or dark spots appearing on the LCD screen. 1 Superior sound Built-in one system. Main Features This product incorporates the LCD display and the TV receiver in Dolby Digital decoder to output high quality sound effects. Screen Support the picture size of a normal screen (4:3) and a wide screen (16:9) LCD (Liquid Crystal Display...

User Manual
Page 9
... to turn on the wall. SOURCE Press this button to display a working mode option menu, use the up/down direction button to select the desired mode, press OK to fix the unit on /off the player. 9. Unit Stand NOTE: See "Cable Connections" section for VESA informaiton. POWER INDICATOR Lights blue in your local retailer, see instructions when installing the unit. 3 See the Specification page for detailed description on mode, 9 3. TFT SCREEN Present high resolution pictures 2. Adjust sound output level...
... to turn on the wall. SOURCE Press this button to display a working mode option menu, use the up/down direction button to select the desired mode, press OK to fix the unit on /off the player. 9. Unit Stand NOTE: See "Cable Connections" section for VESA informaiton. POWER INDICATOR Lights blue in your local retailer, see instructions when installing the unit. 3 See the Specification page for detailed description on mode, 9 3. TFT SCREEN Present high resolution pictures 2. Adjust sound output level...

User Manual
Page 10
... Electronic Program Guide. 9 21 10. MUTE Press to adjust sound level. 5. FAV Press to exit the system menu. 21. EXIT Press to display the favorite channel list. 18. CC Set the closed caption mode. 9. SOURCE Press this button to turn on /off the unit. 2. MTS Set the audio mode. 22. Numeric Keypad Press to access TV programs. 3 13 4. "-" Button Used with number buttons to input data. 2 3. FORMAT 16 5 17 Press to access the sleep timer. 8. SLEEP 6 18 Press to set the screen format...
... Electronic Program Guide. 9 21 10. MUTE Press to adjust sound level. 5. FAV Press to exit the system menu. 21. EXIT Press to display the favorite channel list. 18. CC Set the closed caption mode. 9. SOURCE Press this button to turn on /off the unit. 2. MTS Set the audio mode. 22. Numeric Keypad Press to access TV programs. 3 13 4. "-" Button Used with number buttons to input data. 2 3. FORMAT 16 5 17 Press to access the sleep timer. 8. SLEEP 6 18 Press to set the screen format...
User Manual
Page 11
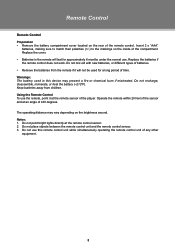
... if the remote control does not work. Notes: 111 Do not point bright lights directly at the remote control sensor. 222 Do not place objects between the remote control unit and the remote control sensor. 333 Do not use . Replace the cover. •• Batteries in this remote control unit while simultaneously operating the remote control unit of any other equipment. 5 Remote Control Remote Control Preparation •• Remove the battery compartment cover located on...
... if the remote control does not work. Notes: 111 Do not point bright lights directly at the remote control sensor. 222 Do not place objects between the remote control unit and the remote control sensor. 333 Do not use . Replace the cover. •• Batteries in this remote control unit while simultaneously operating the remote control unit of any other equipment. 5 Remote Control Remote Control Preparation •• Remove the battery compartment cover located on...

User Manual
Page 12
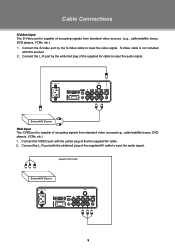
... player's power jack and the other end to connect outdoor antenna. 222 Insert one end of accepting high-definition signals from computers with a VGA output jack. You can use 75 Ohm coaxial cable to the 110-240V AC wall outlet. VGA Input - Cable connections Antenna/Power Connection 111 Connect TV RF sources to have all necessary connections properly done before connect the power supply. 222 If you have difficulty inserting the plug, turn...
... player's power jack and the other end to connect outdoor antenna. 222 Insert one end of accepting high-definition signals from computers with a VGA output jack. You can use 75 Ohm coaxial cable to the 110-240V AC wall outlet. VGA Input - Cable connections Antenna/Power Connection 111 Connect TV RF sources to have all necessary connections properly done before connect the power supply. 222 If you have difficulty inserting the plug, turn...

User Manual
Page 13
... used separately to input the audio signal in the S-video/Component connection. IMPORTANT NOTICE - Cable Connections Coaxial Output - The player's AV function would enable users to chose from external signal sources. Four input modes are not included with this product. HDMI, RCA, S-VIDEO,COMPONENT. When work with this output socket, you to view programs from , it ranks as well. 7 The mentioned cable is for the audio L/R connection and the yellow plug for you can also be used . The white/red plug of power cord...
... used separately to input the audio signal in the S-video/Component connection. IMPORTANT NOTICE - Cable Connections Coaxial Output - The player's AV function would enable users to chose from external signal sources. Four input modes are not included with this product. HDMI, RCA, S-VIDEO,COMPONENT. When work with this output socket, you to view programs from , it ranks as well. 7 The mentioned cable is for the audio L/R connection and the yellow plug for you can also be used . The white/red plug of power cord...

User Manual
Page 14
... is required for audio transmission. These HDMI input connectors are capable of receiving video at resolutions up to connect R,L port for the HDMI connection. A HDMI cable is not included with this product. 222 Use the red and white plug of supplied AV cable to 1080p (1080-progressive). External AV Source 8 HDMI Cable External AV Source Component Input (Y Cb/Pb Cr/Pr) The component port is a new type of connection that transmits digital audio and video signals simultaneously over a single cable. Cable Connections HDMI Input HDMI (High Definition Multimedia...
... is required for audio transmission. These HDMI input connectors are capable of receiving video at resolutions up to connect R,L port for the HDMI connection. A HDMI cable is not included with this product. 222 Use the red and white plug of supplied AV cable to 1080p (1080-progressive). External AV Source 8 HDMI Cable External AV Source Component Input (Y Cb/Pb Cr/Pr) The component port is a new type of connection that transmits digital audio and video signals simultaneously over a single cable. Cable Connections HDMI Input HDMI (High Definition Multimedia...
User Manual
Page 15
Cable Connections S-Video Input The S-Video port is capable of the supplied AV cable to input the audio signal. Supplied RCA Cable External AV Source 9 External AV Source RCA Input The CVBS port is not included with the white/red plug of accepting signals from standard video sources(e.g., cable/satellite boxes, DVD players, VCRs, etc.) 111 Connect the VIDEO port with the yellow plug of the the supplied AV cable. 222 Connect the L, R port with this product 222 Connect the L, R port by the S-Video cable to input the audio signal. S-Video cable is capable of accepting signals from...
Cable Connections S-Video Input The S-Video port is capable of the supplied AV cable to input the audio signal. Supplied RCA Cable External AV Source 9 External AV Source RCA Input The CVBS port is not included with the white/red plug of accepting signals from standard video sources(e.g., cable/satellite boxes, DVD players, VCRs, etc.) 111 Connect the VIDEO port with the yellow plug of the the supplied AV cable. 222 Connect the L, R port with this product 222 Connect the L, R port by the S-Video cable to input the audio signal. S-Video cable is capable of accepting signals from...

User Manual
Page 16
See the "Channel Menu" section for details). 222 Press the POWER button to turn on the player. 333 Press the MODE button to select the TV signal mode. 444 Press the CH+/- System Setup Menu Various features can press the number buttons to input channels directly. While working with the menu, 111 Press the up the setup menu. Adjust the display contrast Adjust the display brightness Adjust the display color Adjust the display tint Adjust the image sharpness Set the color mode (Normal, Warm...
See the "Channel Menu" section for details). 222 Press the POWER button to turn on the player. 333 Press the MODE button to select the TV signal mode. 444 Press the CH+/- System Setup Menu Various features can press the number buttons to input channels directly. While working with the menu, 111 Press the up the setup menu. Adjust the display contrast Adjust the display brightness Adjust the display color Adjust the display tint Adjust the image sharpness Set the color mode (Normal, Warm...

User Manual
Page 17
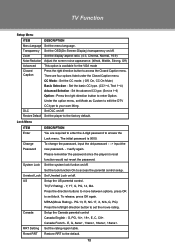
... function on the remote once. Set the MTS audio for the ATV mode. (Mono, Stereo, SAP) Set the audio language. (English, French, Spanish) Time Menu ITEM Sleep Timer Time Zone Daylight Saving Time Clock DESCRIPTION The unit will shut down would start immediately after setting. To check the timer left, press the SLEEP button on /off . Display the DTV clock information. 11 TV Function Audio Menu ITEM Sound Mode Bass Treble...
... function on the remote once. Set the MTS audio for the ATV mode. (Mono, Stereo, SAP) Set the audio language. (English, French, Spanish) Time Menu ITEM Sleep Timer Time Zone Daylight Saving Time Clock DESCRIPTION The unit will shut down would start immediately after setting. To check the timer left, press the SLEEP button on /off . Display the DTV clock information. 11 TV Function Audio Menu ITEM Sound Mode Bass Treble...
User Manual
Page 18
... OSD(On-Screen-Display) transparency on /off Restore Default Set the player to the default. 12 Press the right direction button to access the parental control setup. Set Unrated Lock on /off . Set the rating region table. CC Mode - To change the password, input the old password - - > input the new password- - >verify again. Set the lock function On to enter Option. Setup the Canada parental control Canada English - Lock Menu ITEM Enter Change Password System Lock Unrated Lock US Canada RRT Setting Reset RRT DESCRIPTION...
... OSD(On-Screen-Display) transparency on /off Restore Default Set the player to the default. 12 Press the right direction button to access the parental control setup. Set Unrated Lock on /off . Set the rating region table. CC Mode - To change the password, input the old password - - > input the new password- - >verify again. Set the lock function On to enter Option. Setup the Canada parental control Canada English - Lock Menu ITEM Enter Change Password System Lock Unrated Lock US Canada RRT Setting Reset RRT DESCRIPTION...

User Manual
Page 19
... need to access the Show/Hide menu. DTV Signal Display the DTV signal intensity. 13 Show/Hide Hide unwanted programs. Select this option, press the right direction button to select the desired channel. Select "Channel Label", press the right direction button to stop. Press the left /right button to access the Favorite List. Auto Scan Search channels automatically. When use the Channel No option or directly locate the channel by the number panel...
... need to access the Show/Hide menu. DTV Signal Display the DTV signal intensity. 13 Show/Hide Hide unwanted programs. Select this option, press the right direction button to select the desired channel. Select "Channel Label", press the right direction button to stop. Press the left /right button to access the Favorite List. Auto Scan Search channels automatically. When use the Channel No option or directly locate the channel by the number panel...

User Manual
Page 20
... AV mode (AV, S-Video, Component, HDMI). System Setup Menu Various features can be preset through the system menu, please read the user's manual of the external device as well. 111 Connect the external AV signal source. While working with the menu, 111 Press the up the setup menu. Warm NOTE: Please see the TV section for details 222 Press the MODE button to the "Cable Connection" section for menu descriptions 14 When input AV signals...
... AV mode (AV, S-Video, Component, HDMI). System Setup Menu Various features can be preset through the system menu, please read the user's manual of the external device as well. 111 Connect the external AV signal source. While working with the menu, 111 Press the up the setup menu. Warm NOTE: Please see the TV section for details 222 Press the MODE button to the "Cable Connection" section for menu descriptions 14 When input AV signals...

User Manual
Page 21
... the "Cable Connection" section. 222 Turn on the units and press the MODE button to enter. While working with the monitor after, adjust "H-Pos", "V-Pos", "Clock" as well as your expectation, please perform the following steps to adjust the screen manually . 111 Enter the "Advanced" sub-menu from the SETUP menu, select "Auto" and press the left /right direction button to adjust. 333 Press MENU to adjust the monitor automatically...
... the "Cable Connection" section. 222 Turn on the units and press the MODE button to enter. While working with the monitor after, adjust "H-Pos", "V-Pos", "Clock" as well as your expectation, please perform the following steps to adjust the screen manually . 111 Enter the "Advanced" sub-menu from the SETUP menu, select "Auto" and press the left /right direction button to adjust. 333 Press MENU to adjust the monitor automatically...

User Manual
Page 22
... AV video signal input cable is connected properly. •• Check if the system has been properly connected. •• If using antenna, adjust the antenna. •• Make sure the POWER button on the unit has been turned on manually. •• Remove the obstacles between the remote control and the player. •• Point the remote control towards the remote sensor on the player and the restore function should reset the player. Trouble Shooting...
... AV video signal input cable is connected properly. •• Check if the system has been properly connected. •• If using antenna, adjust the antenna. •• Make sure the POWER button on the unit has been turned on manually. •• Remove the obstacles between the remote control and the player. •• Point the remote control towards the remote sensor on the player and the restore function should reset the player. Trouble Shooting...


