Instruction Manual
Page 2
Retain this information for a long time, disconnect the plug from the remote. Power Management: •• Before plugging the power cord into the AC outlet, make sure that all the connections have been properly made. •• ...
Retain this information for a long time, disconnect the plug from the remote. Power Management: •• Before plugging the power cord into the AC outlet, make sure that all the connections have been properly made. •• ...

Instruction Manual
Page 8
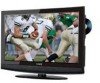
C.C MTS/SOUND DVD SETUP EXIT MODE SLEEP CH-LIST INFO EPG FAV FORMAT TITLE ANGLE SUBTITLE MENU PLAY/PAUSE STOP SLOW/STEP F.BWD F.FWD PREV NEXT PROGRAM GOTO ZOOM REPEAT b. If any item is missing, contact your product. c. Package Contents Please make sure the following items are included with your dealer. a, Main Unit b, Power Cord & RCA Cable c, Remote Control Unit 2 OPEN/CLOSE •• a.
C.C MTS/SOUND DVD SETUP EXIT MODE SLEEP CH-LIST INFO EPG FAV FORMAT TITLE ANGLE SUBTITLE MENU PLAY/PAUSE STOP SLOW/STEP F.BWD F.FWD PREV NEXT PROGRAM GOTO ZOOM REPEAT b. If any item is missing, contact your product. c. Package Contents Please make sure the following items are included with your dealer. a, Main Unit b, Power Cord & RCA Cable c, Remote Control Unit 2 OPEN/CLOSE •• a.
Instruction Manual
Page 9
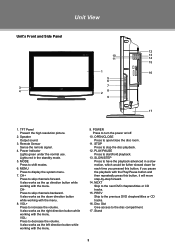
... press this button, it will move step-by-step forward. 14. Disc Slot Give access to have the playback advanced in the standby mode. 5. Remote Sensor Sense the remote signal. 4. Lights red in a slow motion, which would be futher slowed down direction button while working with the menu. It also works as...
... press this button, it will move step-by-step forward. 14. Disc Slot Give access to have the playback advanced in the standby mode. 5. Remote Sensor Sense the remote signal. 4. Lights red in a slow motion, which would be futher slowed down direction button while working with the menu. It also works as...
Instruction Manual
Page 11
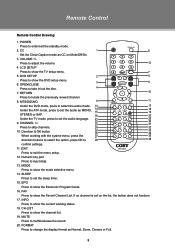
.... 24 F.BWD F.FWD PREV NEXT 32 10. CHANNEL +/- 22 PLAY/PAUSE STOP... 18 19 STEREO or SAP. 16 TITLE ANGLE SUBTITLE MENU 20 Under the TV mode, press to 28 36 confirm settings. 11. Press to locate the ...menu. 3 9 6. CH-LIST Press to show the mode selective menu. 14. Remote Control Remote Control Drawing 1. VOLUME +/- MTS/SOUND 5 11 DVD SETUP EXIT Under the DVD ...CLOSE 6 Set the Close Caption mode as Normal, Zoom, Cinema or Full. 5 LCD SETUP Press to input data. 13. FAV Press to enter/exit the standby mode...
.... 24 F.BWD F.FWD PREV NEXT 32 10. CHANNEL +/- 22 PLAY/PAUSE STOP... 18 19 STEREO or SAP. 16 TITLE ANGLE SUBTITLE MENU 20 Under the TV mode, press to 28 36 confirm settings. 11. Press to locate the ...menu. 3 9 6. CH-LIST Press to show the mode selective menu. 14. Remote Control Remote Control Drawing 1. VOLUME +/- MTS/SOUND 5 11 DVD SETUP EXIT Under the DVD ...CLOSE 6 Set the Close Caption mode as Normal, Zoom, Cinema or Full. 5 LCD SETUP Press to input data. 13. FAV Press to enter/exit the standby mode...

Instruction Manual
Page 12
...F.BWD Press to search fast backward through a disc. 34. NEXT Repeatedly press the button to search fast forward through a disc. 35. Remote Control Remote Control Drawing 21. F.FWD Press to skip forward through a disc. 26. Goto Go to zoom in a disc. 29. Zoom Press ... Press to select the available camer angles under the DVD mode. 22. TITLE Press to repeat a special section on a disc. 32. Slow/Step Press to set the subtitle under the DVD mode. 30. Subtitle Press to have the playback advanced in a slow motion...
...F.BWD Press to search fast backward through a disc. 34. NEXT Repeatedly press the button to search fast forward through a disc. 35. Remote Control Remote Control Drawing 21. F.FWD Press to skip forward through a disc. 26. Goto Go to zoom in a disc. 29. Zoom Press ... Press to select the available camer angles under the DVD mode. 22. TITLE Press to repeat a special section on a disc. 32. Slow/Step Press to set the subtitle under the DVD mode. 30. Subtitle Press to have the playback advanced in a slow motion...

Instruction Manual
Page 13
...battery (~212ºF). Insert 2 x "AAA" batteries, making sure to match their polarities (+/-) to the markings on the inside of the remote control. Do not mix old with new batteries, or different types of batteries. •• Remove the batteries from children. Replace the ...OPEN/CLOSE RETURN The operating distance may present a fire or chemical burn if mistreated. Keep batteries away from the remote if it at the same time. 7 Remote Control Preparation •• Remove the battery compartment cover located on the rear of the compartment. Warnings: The battery...
...battery (~212ºF). Insert 2 x "AAA" batteries, making sure to match their polarities (+/-) to the markings on the inside of the remote control. Do not mix old with new batteries, or different types of batteries. •• Remove the batteries from children. Replace the ...OPEN/CLOSE RETURN The operating distance may present a fire or chemical burn if mistreated. Keep batteries away from the remote if it at the same time. 7 Remote Control Preparation •• Remove the battery compartment cover located on the rear of the compartment. Warnings: The battery...

Instruction Manual
Page 17
... down would start immediately after setting. To check the timer left, press the SLEEP button on the remote also. You can access this function by repeatedly pressing the SLEEP button on the remote once. Adjust the sound balance. Set the DTV time zone. (Pacific, Alaska, Hawaii, Eastern, ...Sleep Time. To cancel the sleep timer, set the timer to Off. The count down automatically on /off. Adjust the treble. TV Function Audio Menu ITEM Sound Mode Bass Treble Balance Surround AVC Audio Language DESCRIPTION Set the sound mode. (Standard, Music, Movie, Sport, Personal...
... down would start immediately after setting. To check the timer left, press the SLEEP button on the remote also. You can access this function by repeatedly pressing the SLEEP button on the remote once. Adjust the sound balance. Set the DTV time zone. (Pacific, Alaska, Hawaii, Eastern, ...Sleep Time. To cancel the sleep timer, set the timer to Off. The count down automatically on /off. Adjust the treble. TV Function Audio Menu ITEM Sound Mode Bass Treble Balance Surround AVC Audio Language DESCRIPTION Set the sound mode. (Standard, Music, Movie, Sport, Personal...
Instruction Manual
Page 24
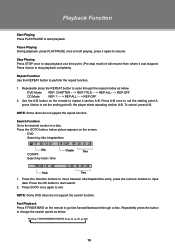
... Playing During playback, press PLAY/PAUSE once to hold playing, press it twice to input data. Press the GOTO button, below picture appears on the remote to go fast forward/backward through the repeat modes as below , DVD Mode REP: CHAPTER - - > REP:TITLE - - > REP:ALL- - > REP:OFF CD Mode ...REP: 1 - - > REP:ALL - - > REP:OFF 222 Use the A-B button on the remote to repeat a section A-B. NOTE: Some DVD discs do not support the repeat function. Search Function Go to stop playback at a time point. (Pre-stop playback...
... Playing During playback, press PLAY/PAUSE once to hold playing, press it twice to input data. Press the GOTO button, below picture appears on the remote to go fast forward/backward through the repeat modes as below , DVD Mode REP: CHAPTER - - > REP:TITLE - - > REP:ALL- - > REP:OFF CD Mode ...REP: 1 - - > REP:ALL - - > REP:OFF 222 Use the A-B button on the remote to repeat a section A-B. NOTE: Some DVD discs do not support the repeat function. Search Function Go to stop playback at a time point. (Pre-stop playback...
Instruction Manual
Page 26
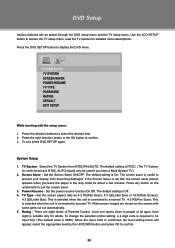
Use the LCD SETUP button to display the DVD menu. Press the DVD SETUP button to access the TV setup menu, read the TV section for detailed menu descriptions. Select the TV System from becoming damaged. Set the Screen Saver ON/OFF. Set the screen aspect ratio as 4:3 PS(Pan Scan), 4:3 LB(Letter ... confirmed, the level setting menu will appear, select the appropriate level by the UP/DOWN button and press OK to anormal TV. There are shown on the unit/remote to prevent your display from NTSC/PAL/AUTO. When the input code is suitable only for adults. The screen saver is ...
Use the LCD SETUP button to display the DVD menu. Press the DVD SETUP button to access the TV setup menu, read the TV section for detailed menu descriptions. Select the TV System from becoming damaged. Set the Screen Saver ON/OFF. Set the screen aspect ratio as 4:3 PS(Pan Scan), 4:3 LB(Letter ... confirmed, the level setting menu will appear, select the appropriate level by the UP/DOWN button and press OK to anormal TV. There are shown on the unit/remote to prevent your display from NTSC/PAL/AUTO. When the input code is suitable only for adults. The screen saver is ...
Instruction Manual
Page 28
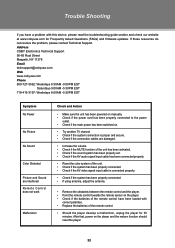
Address COBY Electronics Technical Support 56-65 Rust Street Maspeth, NY 11378 Email [email protected] the power outlet. •• Check if the main power has been switched on. •• Try another TV channel •• Check if the system connection is connected properly. •• Check if the system has been ...; Check if the AV audio signal input cable has been connected properly. •• Reset the color system of the remote control. •• Should the player develop a malfunction, unplug the player for Frequently Asked Questions (FAQs) and firmware ...
Address COBY Electronics Technical Support 56-65 Rust Street Maspeth, NY 11378 Email [email protected] the power outlet. •• Check if the main power has been switched on. •• Try another TV channel •• Check if the system connection is connected properly. •• Check if the system has been ...; Check if the AV audio signal input cable has been connected properly. •• Reset the color system of the remote control. •• Should the player develop a malfunction, unplug the player for Frequently Asked Questions (FAQs) and firmware ...


