Recovery Guide for NBPC1023
Page 2
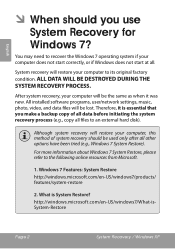
... copy of system recovery should be used only after all other options have been tried (e.g., Windows 7 System Restore). All installed software programs, user/network settings, music, photo, video, and data files will restore your computer does not start correctly, or if Windows does not start at all. For more information about Windows 7 System Restore, please refer to its original factory condition. You may need to recover the Windows 7 operating system if your...
... copy of system recovery should be used only after all other options have been tried (e.g., Windows 7 System Restore). All installed software programs, user/network settings, music, photo, video, and data files will restore your computer does not start correctly, or if Windows does not start at all. For more information about Windows 7 System Restore, please refer to its original factory condition. You may need to recover the Windows 7 operating system if your...
Recovery Guide for NBPC1023
Page 3
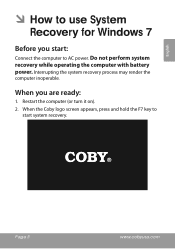
When the Coby logo screen appears, press and hold the F7 key to start : Connect the computer to use System Recovery for Windows 7 Before you are ready: 1. Interrupting the system recovery process may render the computer inoperable. Do not perform system recovery while operating the computer with battery power. When you start system recovery. Page 3 www.cobyusa.com English ÂÂ How to AC power. Restart the computer (or turn it on). 2.
When the Coby logo screen appears, press and hold the F7 key to start : Connect the computer to use System Recovery for Windows 7 Before you are ready: 1. Interrupting the system recovery process may render the computer inoperable. Do not perform system recovery while operating the computer with battery power. When you start system recovery. Page 3 www.cobyusa.com English ÂÂ How to AC power. Restart the computer (or turn it on). 2.
Recovery Guide for NBPC1023
Page 4
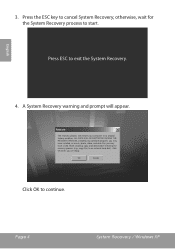
..., including any software programs you may have installed, or music, photo, video, and data files you are ready. Press the ESC key to continue. OK Cancel Click OK to cancel System Recovery; English 4. Restore The recovery process will appear. otherwise, wait for the System Recovery process to an external hard disk). Click OK when you may have saved. Page 4 System Recovery / Windows XP 3. Make...
..., including any software programs you may have installed, or music, photo, video, and data files you are ready. Press the ESC key to continue. OK Cancel Click OK to cancel System Recovery; English 4. Restore The recovery process will appear. otherwise, wait for the System Recovery process to an external hard disk). Click OK when you may have saved. Page 4 System Recovery / Windows XP 3. Make...
User Manual
Page 2
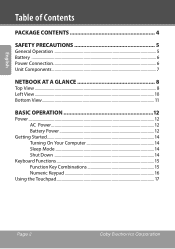
English Table of Contents Package Contents 4 Safety Precautions 5 General Operation 5 Battery ...6 Power Connection 6 Unit Components...7 Netbook at a Glance 8 Top View...8 Left View...10 Bottom View...11 Basic Operation 12 Power...12 AC Power 12 Battery Power 12 Getting Started...14 Turning On Your Computer 14 Sleep Mode 14 Shut Down 14 Keyboard Functions 15 Function Key Combinations 15 Numeric Keypad 16 Using the Touchpad 17 Page 2 Coby Electronics Corporation
English Table of Contents Package Contents 4 Safety Precautions 5 General Operation 5 Battery ...6 Power Connection 6 Unit Components...7 Netbook at a Glance 8 Top View...8 Left View...10 Bottom View...11 Basic Operation 12 Power...12 AC Power 12 Battery Power 12 Getting Started...14 Turning On Your Computer 14 Sleep Mode 14 Shut Down 14 Keyboard Functions 15 Function Key Combinations 15 Numeric Keypad 16 Using the Touchpad 17 Page 2 Coby Electronics Corporation
User Manual
Page 3
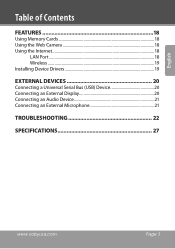
English Table of Contents Features 18 Using Memory Cards 18 Using the Web Camera 18 Using the Internet 18 LAN Port...18 Wireless ...19 Installing Device Drivers 19 External Devices 20 Connecting a Universal Serial Bus (USB) Device 20 Connecting an External Display 20 Connecting an Audio Device 21 Connecting an External Microphone 21 Troubleshooting 22 Specifications 27 www.cobyusa.com Page 3
English Table of Contents Features 18 Using Memory Cards 18 Using the Web Camera 18 Using the Internet 18 LAN Port...18 Wireless ...19 Installing Device Drivers 19 External Devices 20 Connecting a Universal Serial Bus (USB) Device 20 Connecting an External Display 20 Connecting an Audio Device 21 Connecting an External Microphone 21 Troubleshooting 22 Specifications 27 www.cobyusa.com Page 3
User Manual
Page 4
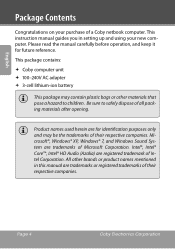
This instruction manual guides you in this manual are for future reference. Microsoft®, Windows® XP, Windows® 7, and Windows Sound System are registered trademark of Microsoft Corporation. Intel®, Intel® Core™, Intel® HD Audio (Azalia) are trademarks of Intel Corporation. Be sure to children. This package contains: Coby computer unit 100-240V AC adapter 3-cell...
This instruction manual guides you in this manual are for future reference. Microsoft®, Windows® XP, Windows® 7, and Windows Sound System are registered trademark of Microsoft Corporation. Intel®, Intel® Core™, Intel® HD Audio (Azalia) are trademarks of Intel Corporation. Be sure to children. This package contains: Coby computer unit 100-240V AC adapter 3-cell...
User Manual
Page 8
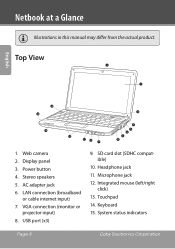
Display panel 3. AC adapter jack 6. USB port (x3) 9. Microphone jack 12. Keyboard 15. Power button 4. VGA connection (monitor or projector input) 8. Integrated mouse (left/right click) 13. Stereo speakers 5. Headphone jack 11. Web camera 2. LAN connection (broadband or cable internet input) 7. Touchpad 14. System status indicators Page 8 Coby Electronics Corporation SD card slot (SDHC compatible) 10. Netbook at a Glance Illustrations in this manual may differ from the actual product. Top View 1 2 English 15 3 13 4 14 5 6 12 11 10 9 7 8 1.
Display panel 3. AC adapter jack 6. USB port (x3) 9. Microphone jack 12. Keyboard 15. Power button 4. VGA connection (monitor or projector input) 8. Integrated mouse (left/right click) 13. Stereo speakers 5. Headphone jack 11. Web camera 2. LAN connection (broadband or cable internet input) 7. Touchpad 14. System status indicators Page 8 Coby Electronics Corporation SD card slot (SDHC compatible) 10. Netbook at a Glance Illustrations in this manual may differ from the actual product. Top View 1 2 English 15 3 13 4 14 5 6 12 11 10 9 7 8 1.
User Manual
Page 9
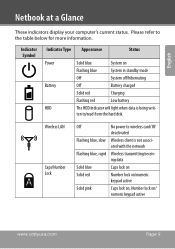
... hard disk. Wireless LAN Caps/Number Lock Off No power to wireless card/ RF deactivated Flashing blue, slow Wireless client is being written to the table below for more information. Indicator Symbol Indicator Type Appearance Status Power Battery HDD Solid blue System on Flashing blue System in standby mode Off System off/hibernating Off Battery charged Solid red Charging Flashing red Low battery The HDD indicator will light when data is not associated with the network Flashing...
... hard disk. Wireless LAN Caps/Number Lock Off No power to wireless card/ RF deactivated Flashing blue, slow Wireless client is being written to the table below for more information. Indicator Symbol Indicator Type Appearance Status Power Battery HDD Solid blue System on Flashing blue System in standby mode Off System off/hibernating Off Battery charged Solid red Charging Flashing red Low battery The HDD indicator will light when data is not associated with the network Flashing...
User Manual
Page 11
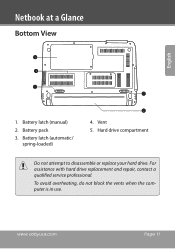
For assistance with hard drive replacement and repair, contact a qualified service professional. Battery latch (manual) 2. Battery latch (automatic/ spring-loaded) 1 2 3 2 4. www.cobyusa.com Page 11 Battery pack 3. Vent 5. Hard drive compartment Do not attempt to disassemble or replace your hard drive. English Netbook at a Glance Bottom View 5 4 3 1 1. To avoid overheating, do not block the vents when the computer is in use.
For assistance with hard drive replacement and repair, contact a qualified service professional. Battery latch (manual) 2. Battery latch (automatic/ spring-loaded) 1 2 3 2 4. www.cobyusa.com Page 11 Battery pack 3. Vent 5. Hard drive compartment Do not attempt to disassemble or replace your hard drive. English Netbook at a Glance Bottom View 5 4 3 1 1. To avoid overheating, do not block the vents when the computer is in use.

User Manual
Page 12
.... Connect the AC adapter to the locked position. Slide the battery release latch to charge the battery. To connect the AC adapter: Connect the power cord to the transformer pack. Plug the power cord into place. The battery power status indicator will flash when the battery is fully charged before first use. Page 12 Coby Electronics Corporation English Basic Operation Power Your computer includes...
.... Connect the AC adapter to the locked position. Slide the battery release latch to charge the battery. To connect the AC adapter: Connect the power cord to the transformer pack. Plug the power cord into place. The battery power status indicator will flash when the battery is fully charged before first use. Page 12 Coby Electronics Corporation English Basic Operation Power Your computer includes...
User Manual
Page 14
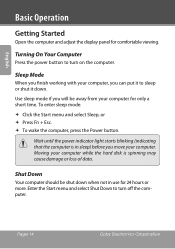
... power indicator light starts blinking (indicating that the computer is spinning may cause damage or loss of data. Shut Down Your computer should be away from your computer, you finish working with your computer for comfortable viewing. Enter the Start menu and select Shut Down to turn off the computer. Turning On Your Computer Press the power button to turn on the computer. Page 14 Coby...
... power indicator light starts blinking (indicating that the computer is spinning may cause damage or loss of data. Shut Down Your computer should be away from your computer, you finish working with your computer for comfortable viewing. Enter the Start menu and select Shut Down to turn off the computer. Turning On Your Computer Press the power button to turn on the computer. Page 14 Coby...
User Manual
Page 15
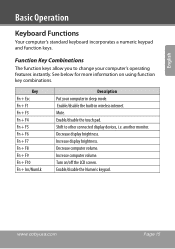
... + F6 Fn + F7 Fn + F8 Fn + F9 Fn + F10 Fn + Ins/NumLk Description Put your computer's operating features instantly. Decrease display brightness. Enable/disable the built-in sleep mode. Enable/disable the Numeric keypad. Enable/disable the touch pad. another monitor. Decrease computer volume. Turn on using function key combinations. www.cobyusa.com Page 15 Function Key Combinations The function keys allow you to other connected display devices, i.e. Shift to change your computer in wireless internet. Increase computer...
... + F6 Fn + F7 Fn + F8 Fn + F9 Fn + F10 Fn + Ins/NumLk Description Put your computer's operating features instantly. Decrease display brightness. Enable/disable the built-in sleep mode. Enable/disable the Numeric keypad. Enable/disable the touch pad. another monitor. Decrease computer volume. Turn on using function key combinations. www.cobyusa.com Page 15 Function Key Combinations The function keys allow you to other connected display devices, i.e. Shift to change your computer in wireless internet. Increase computer...
User Manual
Page 16
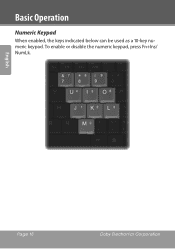
English Page 16 Coby Electronics Corporation To enable or disable the numeric keypad, press Fn+Ins/ NumLk. Basic Operation Numeric Keypad When enabled, the keys indicated below can be used as a 10-key numeric keypad.
English Page 16 Coby Electronics Corporation To enable or disable the numeric keypad, press Fn+Ins/ NumLk. Basic Operation Numeric Keypad When enabled, the keys indicated below can be used as a 10-key numeric keypad.
User Manual
Page 18
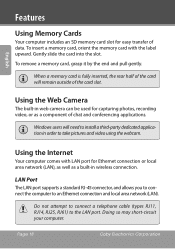
...-in web camera can be used for Ethernet connection or local area network (LAN), as well as a component of the card will need to take pictures and video using the webcam. Doing so may short-circuit your computer. Windows users will remain outside of data. Using the Internet Your computer comes with the label upward. Gently slide the card into the slot. Page 18 Coby Electronics Corporation To remove a memory card...
...-in web camera can be used for Ethernet connection or local area network (LAN), as well as a component of the card will need to take pictures and video using the webcam. Doing so may short-circuit your computer. Windows users will remain outside of data. Using the Internet Your computer comes with the label upward. Gently slide the card into the slot. Page 18 Coby Electronics Corporation To remove a memory card...
User Manual
Page 20
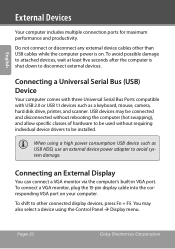
... power consumption USB device such as a keyboard, mouse, camera, hard disk drive, printer, and scanner. You may be connected and disconnected without rebooting the computer (hot swapping), and allow specific classes of hardware to be installed. To avoid possible damage to other than USB cables while the computer power is shut down to disconnect external devices. When using the Control Panel Display menu. Connecting an External Display You can connect a VGA monitor via the computer's built-in VGA port. English External Devices...
... power consumption USB device such as a keyboard, mouse, camera, hard disk drive, printer, and scanner. You may be connected and disconnected without rebooting the computer (hot swapping), and allow specific classes of hardware to be installed. To avoid possible damage to other than USB cables while the computer power is shut down to disconnect external devices. When using the Control Panel Display menu. Connecting an External Display You can connect a VGA monitor via the computer's built-in VGA port. English External Devices...
User Manual
Page 23
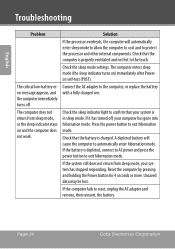
... while Screen saver may have entered sleep mode. touch the touchpad or any key to exit sleep mode. Keyboard A number appears when The numeric lock function is enabled, the computer may be enabled; All or some of the keys on . mode unexpectedly. If using battery power, check that the screen brightness level is not at its minimum there is plugged into a working electrical outlet. If using AC power, check that the AC adapter is connected to...
... while Screen saver may have entered sleep mode. touch the touchpad or any key to exit sleep mode. Keyboard A number appears when The numeric lock function is enabled, the computer may be enabled; All or some of the keys on . mode unexpectedly. If using battery power, check that the screen brightness level is not at its minimum there is plugged into a working electrical outlet. If using AC power, check that the AC adapter is connected to...
User Manual
Page 24
... power and press the power button to reset, unplug the AC adapter and remove, then reinsert, the battery. If the system still does not return from sleep mode, or the sleep indicator stays on ) immediately after Poweron self-test (POST). If it has turned off . The computer enters sleep mode (the sleep indicator turns on and the computer does not work. English Troubleshooting Problem The critical low-battery error...
... power and press the power button to reset, unplug the AC adapter and remove, then reinsert, the battery. If the system still does not return from sleep mode, or the sleep indicator stays on ) immediately after Poweron self-test (POST). If it has turned off . The computer enters sleep mode (the sleep indicator turns on and the computer does not work. English Troubleshooting Problem The critical low-battery error...
User Manual
Page 25
..., volume is unreadable or Check that the Mute function is plugged into the audio output (headphone) jack. This information is available under the menu Display Settings Monitor. The Adapter Information window should display the correct device driver name. dicator turns on your computer. Troubleshooting English Problem Solution The screen is turned up. This information is available under the menu Personalize Display Settings Advanced Settings Adapter. installed. If there is no external device...
..., volume is unreadable or Check that the Mute function is plugged into the audio output (headphone) jack. This information is available under the menu Display Settings Monitor. The Adapter Information window should display the correct device driver name. dicator turns on your computer. Troubleshooting English Problem Solution The screen is turned up. This information is available under the menu Personalize Display Settings Advanced Settings Adapter. installed. If there is no external device...
User Manual
Page 26
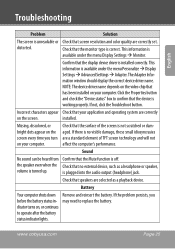
... internet or network. Replace the battery. Internal components of the device carry a risk of electric shock. Turn off the computer by pressing and holding the power button for 4 seconds or more. Attempting to repair the device yourself. Page 26 Coby Electronics Corporation The hard disk drive does not work. The surge protector in the Boot Sequence. To prevent this from happening, disable the sleep timer when you may lock...
... internet or network. Replace the battery. Internal components of the device carry a risk of electric shock. Turn off the computer by pressing and holding the power button for 4 seconds or more. Attempting to repair the device yourself. Page 26 Coby Electronics Corporation The hard disk drive does not work. The surge protector in the Boot Sequence. To prevent this from happening, disable the sleep timer when you may lock...
User Manual
Page 27
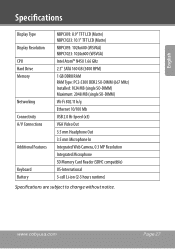
www.cobyusa.com Page 27 English Specifications Display Type Display Resolution CPU Hard Drive Memory Networking Connectivity A/V Connections Additional Features Keyboard Battery NBPC893: 8.9" TFT LCD (Matte) NBPC1023: 10.1" TFT LCD (Matte) NBPC893: 1024x600 (WSVGA) NBPC1023: 1024x600 (WSVGA) Intel Atom™ N450 1.66 GHz 2.5" SATA 160 GB (5400 RPM) 1 GB DDRII RAM RAM Type: PC2-5300 DDR2 SO-DIMM (667 MHz) Installed: 1024 MB (single SO-DIMM) Maximum: 2048 MB (single SO-DIMM) Wi-Fi...
www.cobyusa.com Page 27 English Specifications Display Type Display Resolution CPU Hard Drive Memory Networking Connectivity A/V Connections Additional Features Keyboard Battery NBPC893: 8.9" TFT LCD (Matte) NBPC1023: 10.1" TFT LCD (Matte) NBPC893: 1024x600 (WSVGA) NBPC1023: 1024x600 (WSVGA) Intel Atom™ N450 1.66 GHz 2.5" SATA 160 GB (5400 RPM) 1 GB DDRII RAM RAM Type: PC2-5300 DDR2 SO-DIMM (667 MHz) Installed: 1024 MB (single SO-DIMM) Maximum: 2048 MB (single SO-DIMM) Wi-Fi...


