
User Manual
Page 1
COBY Electronics Corp. 1991 Marcus Avenue, Suite 301 Lake Success, NY 11042 www.cobyusa.com www.ecoby.com 850 / 852 / 854 AC 8″ Widescreen Digital Photo Frame with Multimedia Playback DP850 DP852 DP854 INSTRUCTION MANUAL Please read this manual carefully before operation
COBY Electronics Corp. 1991 Marcus Avenue, Suite 301 Lake Success, NY 11042 www.cobyusa.com www.ecoby.com 850 / 852 / 854 AC 8″ Widescreen Digital Photo Frame with Multimedia Playback DP850 DP852 DP854 INSTRUCTION MANUAL Please read this manual carefully before operation

User Manual
Page 8
...of your photo frame's Power In jack and plug the other equipment at the same time. • Remove the batteries if the remote control will last for an extended period of the adapter into your choice into an AC 100-240V wall outlet. DC OUT: 9V 1.5A DP850 / DP852 / DP854...compartment out 3. Replace the batteries if the remote is indicated here or on the left panel of the arrow 2. Getting photos and files onto your Digital Picture Frame Your Picture Frame should be disposed of no greater than 15 feet (15″) and at a distance of safely and not incinerated....
...of your photo frame's Power In jack and plug the other equipment at the same time. • Remove the batteries if the remote control will last for an extended period of the adapter into your choice into an AC 100-240V wall outlet. DC OUT: 9V 1.5A DP850 / DP852 / DP854...compartment out 3. Replace the batteries if the remote is indicated here or on the left panel of the arrow 2. Getting photos and files onto your Digital Picture Frame Your Picture Frame should be disposed of no greater than 15 feet (15″) and at a distance of safely and not incinerated....
User Manual
Page 9
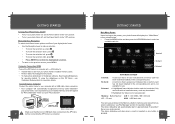
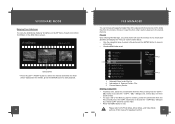
... in the corresponding slot. USB Port (computer) USB Port (mini) DP850 / DP852 / DP854 Make sure that there's no card inserted. GETTING STARTED Main Menu Screen Upon turning on the power, your photo frame. Selected Inserted No Card Selected MAIN MENU SCREEN Inserted: No Card: Selected: A...Navigation To select the different menu options and files of your photo frame off, set the Power Switch to the "On" position. • To turn your digital photo frame: • Use the Navigation keys to make photo slideshows in -color indicates that is being selected. Connecting to a ...
... in the corresponding slot. USB Port (computer) USB Port (mini) DP850 / DP852 / DP854 Make sure that there's no card inserted. GETTING STARTED Main Menu Screen Upon turning on the power, your photo frame. Selected Inserted No Card Selected MAIN MENU SCREEN Inserted: No Card: Selected: A...Navigation To select the different menu options and files of your photo frame off, set the Power Switch to the "On" position. • To turn your digital photo frame: • Use the Navigation keys to make photo slideshows in -color indicates that is being selected. Connecting to a ...
User Manual
Page 11
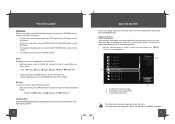
... Video Mode, your digital video files, select the Video icon from the Photo Mode screen and press t h e ENTER button to display the photo in full-screen. • To view the previous photo, press the LEFT button (or the UP button on the DP frame). • To view the next photo, press the RIGHT ...; To change between the screen ratio modes Full Screen, Fit to Screen and Crop to start playback. Your photo frame can play your photo frame will change the degree of the selected File. 3. Zoom To change the level of magnification, press ZOOM. • Each successive press of...
... Video Mode, your digital video files, select the Video icon from the Photo Mode screen and press t h e ENTER button to display the photo in full-screen. • To view the previous photo, press the LEFT button (or the UP button on the DP frame). • To view the next photo, press the RIGHT ...; To change between the screen ratio modes Full Screen, Fit to Screen and Crop to start playback. Your photo frame can play your photo frame will change the degree of the selected File. 3. Zoom To change the level of magnification, press ZOOM. • Each successive press of...
User Manual
Page 12
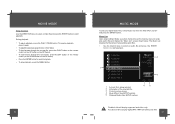
... control (or the DOWN button on the DP frame). • Press the ENTER button for normal playback. • To stop playback, press the MENU button. 22 MUSIC MODE To play digital MP3, WMA and OGG audi.o files ... and press t h e ENTER b u t t o n to start playback. Music List Upon entering Music Mode, your digital audio files, select Music icon from the Main Menu screen and press the ENTER button. Music Effect ( See SETUP section..., press the VOL- A music file is being selected. 2. Your photo frame can play your photo frame will display supported audio files, only.
... control (or the DOWN button on the DP frame). • Press the ENTER button for normal playback. • To stop playback, press the MENU button. 22 MUSIC MODE To play digital MP3, WMA and OGG audi.o files ... and press t h e ENTER b u t t o n to start playback. Music List Upon entering Music Mode, your digital audio files, select Music icon from the Main Menu screen and press the ENTER button. Music Effect ( See SETUP section..., press the VOL- A music file is being selected. 2. Your photo frame can play your photo frame will display supported audio files, only.
User Manual
Page 18
... the DP frame. File List Upon entering File Manager, your photo frame will be displayed in the File List 2. Current Memory Device Deleting / Copy a File • To delete a file, select the unwanted file from the File List and press the COPY / DEL button to exit. FLODER A PHOTO VIDEO 1...box. Please refer to the built-in memory), select the desired file from other memory devices to the Photo Mode, Music Mode, and Video Mode sections of this manual for all supported digital files of Selected Folder / File 3. VividShare Slideshow 1.VVD Selected File • Press the LEFT / ...
... the DP frame. File List Upon entering File Manager, your photo frame will be displayed in the File List 2. Current Memory Device Deleting / Copy a File • To delete a file, select the unwanted file from the File List and press the COPY / DEL button to exit. FLODER A PHOTO VIDEO 1...box. Please refer to the built-in memory), select the desired file from other memory devices to the Photo Mode, Music Mode, and Video Mode sections of this manual for all supported digital files of Selected Folder / File 3. VividShare Slideshow 1.VVD Selected File • Press the LEFT / ...
User Manual
Page 19
... select the desired time and On/Off. Press the LEFT/RIGHT button to select On / Off and time. 3. Random Sets the photo slideshow repeat On function on the DP frame is set an Alarm Time: Press the UP / DOWN button to select the Off/On and time and press the LEFT/RIGHT... display an option / sub-menu. • Press the RIGHT/LEFT button to select the desired time and On. Sets the photo display ratio. SETUP MENU To adjust the settings and options of your digital photo frame, select SETUP from the Slideshow Main Menu. Sets the Alarm Tone Alarm 1 Sets Snooze Mode 37 Sets the...
... select the desired time and On/Off. Press the LEFT/RIGHT button to select On / Off and time. 3. Random Sets the photo slideshow repeat On function on the DP frame is set an Alarm Time: Press the UP / DOWN button to select the Off/On and time and press the LEFT/RIGHT... display an option / sub-menu. • Press the RIGHT/LEFT button to select the desired time and On. Sets the photo display ratio. SETUP MENU To adjust the settings and options of your digital photo frame, select SETUP from the Slideshow Main Menu. Sets the Alarm Tone Alarm 1 Sets Snooze Mode 37 Sets the...


