User Manual
Page 2
... to alert the user to the presence of important operation and servicing instructions in the literature accompanying the appliance. DP356 Serial No. For Customer Use: Enter below the serial number that may be of sufficient magnitude to constitute a risk of electric shock. Retain this information for future reference. Page 2 Coby Electronics Corporation Model No. Precautions The lightning flash with arrowhead symbol...
... to alert the user to the presence of important operation and servicing instructions in the literature accompanying the appliance. DP356 Serial No. For Customer Use: Enter below the serial number that may be of sufficient magnitude to constitute a risk of electric shock. Retain this information for future reference. Page 2 Coby Electronics Corporation Model No. Precautions The lightning flash with arrowhead symbol...
User Manual
Page 4
... installation. Do not make any interference received, including interference that may cause harmful interference to the following measures: • Reorient or relocate the receiving antenna. • Increase the separation between the equipment and receiver. • Connect the equipment into an outlet on , the user is required to stop operation of the equipment. Page 4 Coby Electronics Corporation Precautions This device...
... installation. Do not make any interference received, including interference that may cause harmful interference to the following measures: • Reorient or relocate the receiving antenna. • Increase the separation between the equipment and receiver. • Connect the equipment into an outlet on , the user is required to stop operation of the equipment. Page 4 Coby Electronics Corporation Precautions This device...

User Manual
Page 5
... rating label. Read Instructions: All the safety and operating instructions should never be read before cleaning. Follow Instructions: All operating and usage instructions should be equipped with a polarized alternat- Do not use this product near water (e.g., near a swimming pool and the like). 8. Quick stops, excessive force, and uneven surfaces may be retained for future reference. 3. Ventilation: Slots and openings in installation such as...
... rating label. Read Instructions: All the safety and operating instructions should never be read before cleaning. Follow Instructions: All operating and usage instructions should be equipped with a polarized alternat- Do not use this product near water (e.g., near a swimming pool and the like). 8. Quick stops, excessive force, and uneven surfaces may be retained for future reference. 3. Ventilation: Slots and openings in installation such as...

User Manual
Page 6
...-up static charges. See the operating instructions for long periods of time. This will only fit into the outlet, try reversing the direction of antenna-discharge unit, connection to the product, be walked on or pinched by the manufacturer. 14. This plug will prevent damage to the product due to lightning or power-line surges. Page 6 Coby Electronics Corporation...
...-up static charges. See the operating instructions for long periods of time. This will only fit into the outlet, try reversing the direction of antenna-discharge unit, connection to the product, be walked on or pinched by the manufacturer. 14. This plug will prevent damage to the product due to lightning or power-line surges. Page 6 Coby Electronics Corporation...
User Manual
Page 7
... result in damage and will often require extensive work by the manufacturer. 24. Replacement Parts: When replacement parts are covered by the operating instructions as opening or removing covers may result in a fire or electric shock. Heat: The product should be sure that your service technician has used replacement parts specified by following conditions: a) when the power-supply or plug is in the vicinity of...
... result in damage and will often require extensive work by the manufacturer. 24. Replacement Parts: When replacement parts are covered by the operating instructions as opening or removing covers may result in a fire or electric shock. Heat: The product should be sure that your service technician has used replacement parts specified by following conditions: a) when the power-supply or plug is in the vicinity of...
User Manual
Page 8
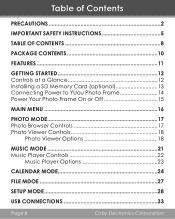
Table of Contents Precautions 2 Important Safety Instructions 5 Table of Contents 8 Package Contents 10 Feature s 11 Getting Started 12 Controls at a Glance 12 Installing a SD Memory Card (optional 13 Connecting Power to YUou Photo Frame 14 Power Your Photo Frame On or Off 15 Main Menu 16 Photo Mode 17 Photo Browser Controls 17 Photo Viewer Controls 18 Photo Viewer Options 18 Music Mode 21 Music Player Controls 22 Music Player Options 23 CALENDAR MODE 24 FILE MDOE 27 Setup Mode 28 USB Connections 33 Page 8 Coby Electronics Corporation
Table of Contents Precautions 2 Important Safety Instructions 5 Table of Contents 8 Package Contents 10 Feature s 11 Getting Started 12 Controls at a Glance 12 Installing a SD Memory Card (optional 13 Connecting Power to YUou Photo Frame 14 Power Your Photo Frame On or Off 15 Main Menu 16 Photo Mode 17 Photo Browser Controls 17 Photo Viewer Controls 18 Photo Viewer Options 18 Music Mode 21 Music Player Controls 22 Music Player Options 23 CALENDAR MODE 24 FILE MDOE 27 Setup Mode 28 USB Connections 33 Page 8 Coby Electronics Corporation
User Manual
Page 11
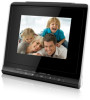
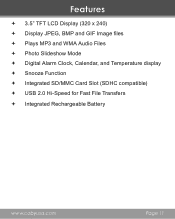
Features 3.5" TFT LCD Display (320 x 240) Display JPEG, BMP and GIF Image files Plays MP3 and WMA Audio Files Photo Slideshow Mode Digital Alarm Clock, Calendar, and Temperature display Snooze Function Integrated SD/MMC Card Slot (SDHC compatible) USB 2.0 Hi-Speed for Fast File Transfers Integrated Rechargeable Battery www.cobyusa.com Page 11
Features 3.5" TFT LCD Display (320 x 240) Display JPEG, BMP and GIF Image files Plays MP3 and WMA Audio Files Photo Slideshow Mode Digital Alarm Clock, Calendar, and Temperature display Snooze Function Integrated SD/MMC Card Slot (SDHC compatible) USB 2.0 Hi-Speed for Fast File Transfers Integrated Rechargeable Battery www.cobyusa.com Page 11
User Manual
Page 13
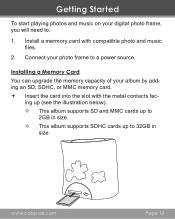
... start playing photos and music on your photo frame to a power source. Installing a Memory Card You can upgrade the memory capacity of your album by adding an SD, SDHC, or MMC memory card. Insert the card into the slot with compatible photo and music files. 2. ing up (see the illustration below). —— This album supports SD and MMC cards up to 2GB in size. —— This album supports SDHC cards up to : 1. Connect your digital photo frame...
... start playing photos and music on your photo frame to a power source. Installing a Memory Card You can upgrade the memory capacity of your album by adding an SD, SDHC, or MMC memory card. Insert the card into the slot with compatible photo and music files. 2. ing up (see the illustration below). —— This album supports SD and MMC cards up to 2GB in size. —— This album supports SDHC cards up to : 1. Connect your digital photo frame...
User Manual
Page 14
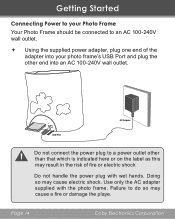
... may cause a fire or damage the playe. Getting Started Connecting Power to your Photo Frame Your Photo Frame should be connected to an AC 100-240V wall outlet. Using the supplied power adapter, plug one end of the adapter into your photo frame's USB Port and plug the other than that which... shock Do not handle the power plug with the photo frame. USB Port AC Adapter Do not connect the power plug to do so may cause electric shock. Page 14 Coby Electronics Corporation Use only the AC adapter supplied with wet hands. Failure to a power outlet other end into an ...
... may cause a fire or damage the playe. Getting Started Connecting Power to your Photo Frame Your Photo Frame should be connected to an AC 100-240V wall outlet. Using the supplied power adapter, plug one end of the adapter into your photo frame's USB Port and plug the other than that which... shock Do not handle the power plug with the photo frame. USB Port AC Adapter Do not connect the power plug to do so may cause electric shock. Page 14 Coby Electronics Corporation Use only the AC adapter supplied with wet hands. Failure to a power outlet other end into an ...
User Manual
Page 17
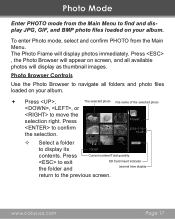
... photo files loaded on screen, and all available photos will display photos immediately. Photo Browser Controls Use the Photo Browser to move the selection right. www.cobyusa.com Page 17 The Photo Frame will display as thumbnail images. to confirm the selection. 2010-1-19 15:48 —— Select a folder to the previous screen. Press Current number/Total quantity to exit the folder and SD Card insert indicator Internal time display return to display...
... photo files loaded on screen, and all available photos will display photos immediately. Photo Browser Controls Use the Photo Browser to move the selection right. www.cobyusa.com Page 17 The Photo Frame will display as thumbnail images. to confirm the selection. 2010-1-19 15:48 —— Select a folder to the previous screen. Press Current number/Total quantity to exit the folder and SD Card insert indicator Internal time display return to display...

User Manual
Page 19
Information To view the file information of 25%. Photo Mode Zoom In To zoom in the photo, press once will play the music that located on or off. You photo frame will zoom in the photo in increments of the photo. (Background Music) To turn the background music playing on the internal flash memory or SD/MMC Card as background music. Press and hold or to adjus the...
Information To view the file information of 25%. Photo Mode Zoom In To zoom in the photo, press once will play the music that located on or off. You photo frame will zoom in the photo in increments of the photo. (Background Music) To turn the background music playing on the internal flash memory or SD/MMC Card as background music. Press and hold or to adjus the...
User Manual
Page 22
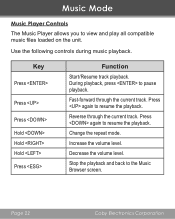
.... Decrease the volume level. Music Mode Music Player Controls The Music Player allows you to resume the playback. Press again to view and play all compatible music files loaded on the unit. Page 22 Coby Electronics Corporation Change the repeat mode. Increase the volume level. Stop the playback and back to the Music Browser screen. Fast-forward through the current track. Key Press Press Press Hold Hold Hold Press Function Start/Resume track playback. Reverse...
.... Decrease the volume level. Music Mode Music Player Controls The Music Player allows you to resume the playback. Press again to view and play all compatible music files loaded on the unit. Page 22 Coby Electronics Corporation Change the repeat mode. Increase the volume level. Stop the playback and back to the Music Browser screen. Fast-forward through the current track. Key Press Press Press Hold Hold Hold Press Function Start/Resume track playback. Reverse...

User Manual
Page 26
Page 26 Coby Electronics Corporation You can also set the appearance of the Calendar screen in the "Setting" mode: Setting > Calendar Setup > Display Mode. Clock Calendar Mode Preset alarm time Clock display Year 2010 April 27 Tuesday Month Date Week Press or to display the previous or next month.
Page 26 Coby Electronics Corporation You can also set the appearance of the Calendar screen in the "Setting" mode: Setting > Calendar Setup > Display Mode. Clock Calendar Mode Preset alarm time Clock display Year 2010 April 27 Tuesday Month Date Week Press or to display the previous or next month.

User Manual
Page 29
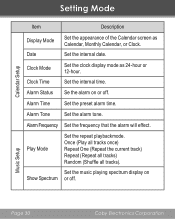
Set the slide transition effects. Set the clock display on or off while photo display. Set the slideshow repeat mode as Full Screen, Fit to Scree, or Crop to Fill. Set the time interval between photos in slideshow mode(in the Main Menu, the options are: Browse Mode, Thumbnail, and Slideshow. Set the photo display mode as Once or Repeat. Photo Setup www.cobyusa.com Page 29 Setting Mode Item Display Mode Display Ratio Slideshow Duration Slideshow Repeat Slideshow Effect Clock Description Set the photo display mode once you confirm "Photo" in seconds).
Set the slide transition effects. Set the clock display on or off while photo display. Set the slideshow repeat mode as Full Screen, Fit to Scree, or Crop to Fill. Set the time interval between photos in slideshow mode(in the Main Menu, the options are: Browse Mode, Thumbnail, and Slideshow. Set the photo display mode as Once or Repeat. Photo Setup www.cobyusa.com Page 29 Setting Mode Item Display Mode Display Ratio Slideshow Duration Slideshow Repeat Slideshow Effect Clock Description Set the photo display mode once you confirm "Photo" in seconds).
User Manual
Page 30
...Set the clock display mode as Calendar, Monthly Calendar, or Clock. Alarm Tone Set the alarm tone. Set the music playing spectrum display on or off . Date Set the internal date. Alarm Time Set the preset alarm time. Play Mode Set the repeat playbackmode. Music Setup Page 30 Coby Electronics Corporation Once (Play all tracks once) Repeat One (Repeat the current track) Repeat (Repeat all tracks) Random (Shuffle all tracks). Clock Time Set the internal time. Calendar Setup Setting Mode Item Description Display Mode Set the appearance of the Calendar screen...
...Set the clock display mode as Calendar, Monthly Calendar, or Clock. Alarm Tone Set the alarm tone. Set the music playing spectrum display on or off . Date Set the internal date. Alarm Time Set the preset alarm time. Play Mode Set the repeat playbackmode. Music Setup Page 30 Coby Electronics Corporation Once (Play all tracks once) Repeat One (Repeat the current track) Repeat (Repeat all tracks) Random (Shuffle all tracks). Clock Time Set the internal time. Calendar Setup Setting Mode Item Description Display Mode Set the appearance of the Calendar screen...
User Manual
Page 33
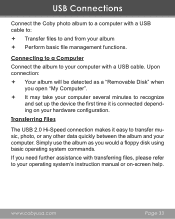
... the device the first time it easy to your computer. Upon connection: Your album will be detected as you need further assistance with a USB cable. USB Connections Connect the Coby photo album to a computer with a USB cable to: Transfer files to and from your hardware configuration. www.cobyusa.com Page 33 Transferring Files The USB 2.0 Hi-Speed connection makes it is connected depending on -screen help. If you would a floppy disk using basic operating...
... the device the first time it easy to your computer. Upon connection: Your album will be detected as you need further assistance with a USB cable. USB Connections Connect the Coby photo album to a computer with a USB cable to: Transfer files to and from your hardware configuration. www.cobyusa.com Page 33 Transferring Files The USB 2.0 Hi-Speed connection makes it is connected depending on -screen help. If you would a floppy disk using basic operating...
User Manual
Page 35
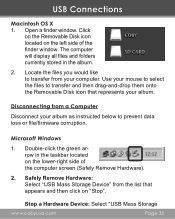
... computer screen (Safely Remove Hardware). 2. Double-click the green arrow in the album. 2. Use your mouse to select the files to transfer from your album as instructed below to prevent data loss or file/firmware corruption. Disconnecting from the list that represents your album. Stop a Hardware Device: Select "USB Mass Storage www.cobyusa.com Page 35 USB Connections Macintosh OS X 1. Microsoft Windows 1. The computer will display all files and folders currently...
... computer screen (Safely Remove Hardware). 2. Double-click the green arrow in the album. 2. Use your mouse to select the files to transfer from your album as instructed below to prevent data loss or file/firmware corruption. Disconnecting from the list that represents your album. Stop a Hardware Device: Select "USB Mass Storage www.cobyusa.com Page 35 USB Connections Macintosh OS X 1. Microsoft Windows 1. The computer will display all files and folders currently...

User Manual
Page 38
... the Reset button on . Ensure that the player is fully charged. Page 38 Coby Electronics Corporation Troubleshooting If you have a problem with this device, please read the troubleshooting guide below and check our website at www.cobyusa. If these resources do not work. Ensure that the player is fully charged. The buttons do not resolve the problem, please contact Technical Support. Address COBY Electronics Technical Support 150...
... the Reset button on . Ensure that the player is fully charged. Page 38 Coby Electronics Corporation Troubleshooting If you have a problem with this device, please read the troubleshooting guide below and check our website at www.cobyusa. If these resources do not work. Ensure that the player is fully charged. The buttons do not resolve the problem, please contact Technical Support. Address COBY Electronics Technical Support 150...

User Manual
Page 39
I cannot transfer files to the player. Ensure that your computer is running a supported operating system. If you have connected the player through a USB hub, try using another USB cable. If you are attached securely to the player. The sound quality of the music is poor. Try playing the file on the rear of the player) and try downloading the file again...
I cannot transfer files to the player. Ensure that your computer is running a supported operating system. If you have connected the player through a USB hub, try using another USB cable. If you are attached securely to the player. The sound quality of the music is poor. Try playing the file on the rear of the player) and try downloading the file again...
User Manual
Page 40
... play my music file. Ensure that the correct menu language has been set. Reset the player (use a paper clip to the Firmware Upgrades section of the player. Ensure that the headphones are corrupted or something is wrong with the display. Ensure that the file is in a compatible format. The file may be copy-protected and you downloaded the file...
... play my music file. Ensure that the correct menu language has been set. Reset the player (use a paper clip to the Firmware Upgrades section of the player. Ensure that the headphones are corrupted or something is wrong with the display. Ensure that the file is in a compatible format. The file may be copy-protected and you downloaded the file...


