
User Manual
Page 2
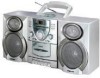
LOCATION OF CONTROLS Front View SideView RearView
LOCATION OF CONTROLS Front View SideView RearView

User Manual
Page 3
... CONTROLS (Cont.) 1. PAUSE BUTTON 2. CASSETTE COMPARTMENT 8. DIAL POINTER 17. CD BACKWARD SKIP/SEARCH BUTTON 24. ROD ANTENNA 33. AC POWER CORD 35. SPEAKER JACK (RIGHT) 37. STOP/EJECT BUTTON 3. VOLUME CONTROL 15. SPAEKER BOX 30. REWIND BUTTON 5. BAND SWITCH 9. FM STEREO INDICATOR 11. REPEAT BUTTON 12. CD PLAY / PAUSE BUTTON 14. PLAY/PAUSE INDICATOR 18. LED DISPLAY 19. REPEAT 1/ALL INDICATOR 20. PROGRAM INDICATOR 21. CD STOP BUTTON 23. PROGRAM BUTTON 25. POWER INDICATOR 26. FUNCTION SWITCH 28. CD OPEN/CLOSE CONTROL DOOR 31. HANDLE 32. BATTERY...
... CONTROLS (Cont.) 1. PAUSE BUTTON 2. CASSETTE COMPARTMENT 8. DIAL POINTER 17. CD BACKWARD SKIP/SEARCH BUTTON 24. ROD ANTENNA 33. AC POWER CORD 35. SPEAKER JACK (RIGHT) 37. STOP/EJECT BUTTON 3. VOLUME CONTROL 15. SPAEKER BOX 30. REWIND BUTTON 5. BAND SWITCH 9. FM STEREO INDICATOR 11. REPEAT BUTTON 12. CD PLAY / PAUSE BUTTON 14. PLAY/PAUSE INDICATOR 18. LED DISPLAY 19. REPEAT 1/ALL INDICATOR 20. PROGRAM INDICATOR 21. CD STOP BUTTON 23. PROGRAM BUTTON 25. POWER INDICATOR 26. FUNCTION SWITCH 28. CD OPEN/CLOSE CONTROL DOOR 31. HANDLE 32. BATTERY...

User Manual
Page 4
... stereo broadcasts are attached to the main unit, the unit can be completely disconnected if no AC/DC selector switch. Adjust the Volume Controls. For AM reception the unit has a built-in jack. ANTENNAS Fully extend the Telescope Antenna to the AC in antenna. GENERAL OPERATION POWER SOURCES Before connecting the Unit to an AC outlet, check that the indicated battery polarity is observed. Connect the supplied AC power cord to receive...
... stereo broadcasts are attached to the main unit, the unit can be completely disconnected if no AC/DC selector switch. Adjust the Volume Controls. For AM reception the unit has a built-in jack. ANTENNAS Fully extend the Telescope Antenna to the AC in antenna. GENERAL OPERATION POWER SOURCES Before connecting the Unit to an AC outlet, check that the indicated battery polarity is observed. Connect the supplied AC power cord to receive...

User Manual
Page 5
... and push the cassette door to the end during playback or recording, the play button will release itself automatically, stopping the tape at the same time. Depress the Play Button, Adjust the Volume Control Knobs, to the TAPE position. Slide the Function Switch to the listening level. Depress the Play Button. Auto Stop System When the tape runs to close . STEREO HEADPHONE JACK For private listening, insert the plug of headphone, the External Speakers are automatically disconnected...
... and push the cassette door to the end during playback or recording, the play button will release itself automatically, stopping the tape at the same time. Depress the Play Button, Adjust the Volume Control Knobs, to the TAPE position. Slide the Function Switch to the listening level. Depress the Play Button. Auto Stop System When the tape runs to close . STEREO HEADPHONE JACK For private listening, insert the plug of headphone, the External Speakers are automatically disconnected...
User Manual
Page 6
.... Signals from Tape A will be recorder/dubbed on to be copied into the TAPE b cassette compartment 3. Insert the blank tape into the desired station. 2. Load a cassette into the Tape A Cassette Door. Press the PAUSE button again to the Tape or Dubbing position. Depress Play Button of Tape A and both Record Button of TAPE B, which also engages the PLAY button. 5. RECORDING FROM THE BUILT-IN RADIO 1. Press the PAUSE button of TAPE B 4. Slide the Function switch to begin recording. RECORDING...
.... Signals from Tape A will be recorder/dubbed on to be copied into the TAPE b cassette compartment 3. Insert the blank tape into the desired station. 2. Load a cassette into the Tape A Cassette Door. Press the PAUSE button again to the Tape or Dubbing position. Depress Play Button of Tape A and both Record Button of TAPE B, which also engages the PLAY button. 5. RECORDING FROM THE BUILT-IN RADIO 1. Press the PAUSE button of TAPE B 4. Slide the Function switch to begin recording. RECORDING...

User Manual
Page 7
... Indicator' is interrupted. TO STOP PLAY BACK Press the STOP button, then the total number of tracks will be displayed. 5 Press the PLAY/PAUSE button to start playback from the TV or RADIO. 4 Subjecting the unit to open the CD compartment while the disc is no disc, "- -" sign will displayed again. TO INTERRUPT PLAYBACK 1 Press the PLAY/PAUSE button, and play back is flashing. 2 Press the button again to fast backward the playing program REPEAT PLAY 1 During PLAY mode...
... Indicator' is interrupted. TO STOP PLAY BACK Press the STOP button, then the total number of tracks will be displayed. 5 Press the PLAY/PAUSE button to start playback from the TV or RADIO. 4 Subjecting the unit to open the CD compartment while the disc is no disc, "- -" sign will displayed again. TO INTERRUPT PLAYBACK 1 Press the PLAY/PAUSE button, and play back is flashing. 2 Press the button again to fast backward the playing program REPEAT PLAY 1 During PLAY mode...

User Manual
Page 8
... COVER. 4. NO USER SERVICEABLE PARTS INSIDE. 6. SPECIFICATIONS GENERAL Power Supply : AC 230V ~ 50Hz AC 110/220V ~ 60/50Hz (Option) DC 12V = 8 x "D" (UM-1/R-20) size batteries (not included) Frequency Range: AM 530 - 1710 KHz FM 88 - 108 MHz SW 4 - 12 MHz (Option) Power Consumption: 19 Watts RMS Output: 2.2 Watts per channel CX400 Peak Output Power: 50W total (4 Ω at most audio stores. Version...
... COVER. 4. NO USER SERVICEABLE PARTS INSIDE. 6. SPECIFICATIONS GENERAL Power Supply : AC 230V ~ 50Hz AC 110/220V ~ 60/50Hz (Option) DC 12V = 8 x "D" (UM-1/R-20) size batteries (not included) Frequency Range: AM 530 - 1710 KHz FM 88 - 108 MHz SW 4 - 12 MHz (Option) Power Consumption: 19 Watts RMS Output: 2.2 Watts per channel CX400 Peak Output Power: 50W total (4 Ω at most audio stores. Version...


