
User Manual
Page 2
ÂÂ Table of Contents English Package Contents ...4 Camera at a Glance...5 Front View...5 Top View...6 Rear View...6 Left View...6 Right View...6 Bottom View...6 Getting Started...7 Install the Batteries...7 Insert a Memory Card...7 Using the Camera...9 Turning the Camera On/Off...9 Changing Camera Modes...9 Video Mode...9 To Record Video...9 Zoom...10 Video Size...10 Page 2 Table Of Contents
ÂÂ Table of Contents English Package Contents ...4 Camera at a Glance...5 Front View...5 Top View...6 Rear View...6 Left View...6 Right View...6 Bottom View...6 Getting Started...7 Install the Batteries...7 Insert a Memory Card...7 Using the Camera...9 Turning the Camera On/Off...9 Changing Camera Modes...9 Video Mode...9 To Record Video...9 Zoom...10 Video Size...10 Page 2 Table Of Contents
User Manual
Page 3
English Photo Mode...10 To Take a Photo...10 Zoom...10 Photo Size...11 Playback Mode...11 Playback Controls...11 Connecting to a TV...13 Transferring Files to a Computer 14 Software by ArcSoft®...16 Software Requirements...16 Installing the Software...16 About ArcSoft MediaImpression 17 Specifications...18 Troubleshooting & Support 19 Safety Notices...21 Table Of Contents Page 3
English Photo Mode...10 To Take a Photo...10 Zoom...10 Photo Size...11 Playback Mode...11 Playback Controls...11 Connecting to a TV...13 Transferring Files to a Computer 14 Software by ArcSoft®...16 Software Requirements...16 Installing the Software...16 About ArcSoft MediaImpression 17 Specifications...18 Troubleshooting & Support 19 Safety Notices...21 Table Of Contents Page 3

User Manual
Page 4
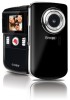
...package includes: CAM3001 camera Two (2) "AA" batteries AV cable USB extension cable Detachable hand strap Pouch Installation CD Should any of all packing materials after opening. Be sure to children. This... the dealer from whom you for future reference. Please read these instructions before using your camcorder, and retain them for purchasing this product. Page 4 Package Contents English ÂÂ Package Contents Thank you purchased this Coby CAM3001 Mini Digital Video Camera.
...package includes: CAM3001 camera Two (2) "AA" batteries AV cable USB extension cable Detachable hand strap Pouch Installation CD Should any of all packing materials after opening. Be sure to children. This... the dealer from whom you for future reference. Please read these instructions before using your camcorder, and retain them for purchasing this product. Page 4 Package Contents English ÂÂ Package Contents Thank you purchased this Coby CAM3001 Mini Digital Video Camera.
User Manual
Page 6
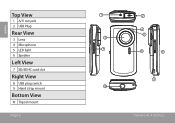
English Top View 1 A/V out jack 2 USB Plug Rear View 3 Lens 4 Microphone 5 LED light 6 Speaker Left View 7 SD/SDHC card slot Right View 8 USB plug switch 9 Hand strap mount Bottom View 10 Tripod mount Page 6 1 3 7 10 2 4 5 6 8 9 Camera At A Glance
English Top View 1 A/V out jack 2 USB Plug Rear View 3 Lens 4 Microphone 5 LED light 6 Speaker Left View 7 SD/SDHC card slot Right View 8 USB plug switch 9 Hand strap mount Bottom View 10 Tripod mount Page 6 1 3 7 10 2 4 5 6 8 9 Camera At A Glance

User Manual
Page 7
... camera. 2. Insert a Memory Card This camera records to those indicated in the diagram inside the battery compartment. 3. Make sure that the write protection switch on the left side of the video camera. Insert two (2) "AA" alkaline batteries. English Install the Batteries 1. Install the memory card by the marking next to begin using your digital video camera. Push the card until it into place. To release and remove the card, press the card in this device...
... camera. 2. Insert a Memory Card This camera records to those indicated in the diagram inside the battery compartment. 3. Make sure that the write protection switch on the left side of the video camera. Insert two (2) "AA" alkaline batteries. English Install the Batteries 1. Install the memory card by the marking next to begin using your digital video camera. Push the card until it into place. To release and remove the card, press the card in this device...
User Manual
Page 9
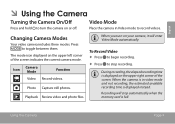
... when the memory card is full. Recording will enter Video Mode automatically. Press to record videos. Playback Review video and photo files. Photo Capture still photos. When the camera is in Video mode to toggle between them. During recording, the elapsed recording time is displayed instead. English ÂÂ Using the Camera Turning the Camera On/Off Video Mode Press and hold to turn on your camera, it will stop recording. Changing Camera Modes Your video camera includes three modes. Using The Camera Page 9 Icon Camera Mode Function Video Record videos. Place the...
... when the memory card is full. Recording will enter Video Mode automatically. Press to record videos. Playback Review video and photo files. Photo Capture still photos. When the camera is in Video mode to toggle between them. During recording, the elapsed recording time is displayed instead. English ÂÂ Using the Camera Turning the Camera On/Off Video Mode Press and hold to turn on your camera, it will stop recording. Changing Camera Modes Your video camera includes three modes. Using The Camera Page 9 Icon Camera Mode Function Video Record videos. Place the...

User Manual
Page 10
... between video sizes. The video size is displayed on the memory card is displayed at a lower resolution of the screen (640 or 320). Recording must be stopped to take a photo. Photo Mode Place the camera in Press to zoom out. Video Size The camera records at a default video size of the screen. Page 10 Using The Camera English Zoom To use the camera's digital zoom function: Press to zoom in Press to zoom out. The estimated number of available photos...
... between video sizes. The video size is displayed on the memory card is displayed at a lower resolution of the screen (640 or 320). Recording must be stopped to take a photo. Photo Mode Place the camera in Press to zoom out. Video Size The camera records at a default video size of the screen. Page 10 Using The Camera English Zoom To use the camera's digital zoom function: Press to zoom in Press to zoom out. The estimated number of available photos...

User Manual
Page 11
... camera records at a default photo size of the screen indicates a video file; Using The Camera Page 11 Playback Controls Press or to browse the files on the camera. —— The icon on the camera. Playback Mode Place the camera in or out of the screen (3MP or 1MP). the [JPG] icon indicates a photo file. Press to a normal view. press again to stop. Press or to zoom...
... camera records at a default photo size of the screen indicates a video file; Using The Camera Page 11 Playback Controls Press or to browse the files on the camera. —— The icon on the camera. Playback Mode Place the camera in or out of the screen (3MP or 1MP). the [JPG] icon indicates a photo file. Press to a normal view. press again to stop. Press or to zoom...

User Manual
Page 13
... playback mode controls to play videos or watch photos on the TV. Connect the cable's mini plug to the A/V output jack located on the camera to place it Playback mode. English ÂÂ Connecting to a TV To view your video and photo files on a bigger screen, use the included A/V cable to connect your TV If you will turn off automatically. 3. Press on the top of the TV. 2. When the TV source mode is set properly, you need help setting its input...
... playback mode controls to play videos or watch photos on the TV. Connect the cable's mini plug to the A/V output jack located on the camera to place it Playback mode. English ÂÂ Connecting to a TV To view your video and photo files on a bigger screen, use the included A/V cable to connect your TV If you will turn off automatically. 3. Press on the top of the TV. 2. When the TV source mode is set properly, you need help setting its input...

User Manual
Page 14
... USB plug switch on Mac OS X. If the camera is off, turn it up to extend the USB plug. 2. Page 14 Transferring Files To A Computer Press the switch in and slide it on the camera. Transfer files from the camera onto your computer as a removable disk. English ÂÂ Transferring Files to a Computer Connect your camera to a computer to transfer files from the camera to your hard drive. If no prompt appears, you are planning to install the software...
... USB plug switch on Mac OS X. If the camera is off, turn it up to extend the USB plug. 2. Page 14 Transferring Files To A Computer Press the switch in and slide it on the camera. Transfer files from the camera onto your computer as a removable disk. English ÂÂ Transferring Files to a Computer Connect your camera to a computer to transfer files from the camera to your hard drive. If no prompt appears, you are planning to install the software...

User Manual
Page 15
... to recognize and install the appropriate drivers for your convenience. Transferring Files To A Computer Page 15 You can simply remove the SD card from the camera and load it may take a moment for the computer to transfer files. The first time you can use this cable if the only available USB ports are located on to connect to a computer. English The camera must be turned on the...
... to recognize and install the appropriate drivers for your convenience. Transferring Files To A Computer Page 15 You can simply remove the SD card from the camera and load it may take a moment for the computer to transfer files. The first time you can use this cable if the only available USB ports are located on to connect to a computer. English The camera must be turned on the...

User Manual
Page 16
English Software Requirements CPU: Pentium III 800MHz or higher Disk Space: At least 250MB space free Memory: 128MB or higher Operating System: Windows 7/Vista/XP (with an installation CD which includes software for photo editing, video editing, and uploading your videos to launch the installation routine. When the CD is inserted, an AutoRun menu will appear. Page 16...
English Software Requirements CPU: Pentium III 800MHz or higher Disk Space: At least 250MB space free Memory: 128MB or higher Operating System: Windows 7/Vista/XP (with an installation CD which includes software for photo editing, video editing, and uploading your videos to launch the installation routine. When the CD is inserted, an AutoRun menu will appear. Page 16...

User Manual
Page 17
... been installed, you may need to share your videos with family, friends, or the world with the application (click on -screen instructions to start the program. Exit this CD menu. To sign up for uploading videos to the help file included with the YouTube web service. symbol in [My Computer] or [Windows Explorer], and then double-click the file named [autorun. View the user manual PDF. Explore...
... been installed, you may need to share your videos with family, friends, or the world with the application (click on -screen instructions to start the program. Exit this CD menu. To sign up for uploading videos to the help file included with the YouTube web service. symbol in [My Computer] or [Windows Explorer], and then double-click the file named [autorun. View the user manual PDF. Explore...

User Manual
Page 18
Page 18 Specifications English ÂÂ Specifications Display Type Image Sensor Video Resolution Zoom Lens Focus Range White Balance Exposure Removable Memory Support Video Format Photo Format A/V Output PC Connection Power 1.44" color LCD 1.3 MP CMOS (1280 x 960) VGA (640 x 480), 30 fps QVGA (320 x 240), 30 fps 4x digital 3mm f/2.8 1.2m ~ infinity Auto Auto SD/SDHC (up to 8GB) AVI (Motion JPEG) JPEG Mini Composite Video/Mono USB 2.0 Hi-speed 2 x "AA" batteries Specifications and manual are subject to change without notice.
Page 18 Specifications English ÂÂ Specifications Display Type Image Sensor Video Resolution Zoom Lens Focus Range White Balance Exposure Removable Memory Support Video Format Photo Format A/V Output PC Connection Power 1.44" color LCD 1.3 MP CMOS (1280 x 960) VGA (640 x 480), 30 fps QVGA (320 x 240), 30 fps 4x digital 3mm f/2.8 1.2m ~ infinity Auto Auto SD/SDHC (up to 8GB) AVI (Motion JPEG) JPEG Mini Composite Video/Mono USB 2.0 Hi-speed 2 x "AA" batteries Specifications and manual are subject to change without notice.

User Manual
Page 19
English ÂÂ Troubleshooting & Support If you experience a problem with this device, please read the troubleshooting guide below and check our website at www.cobyusa.com for Frequently Asked Questions (FAQ) and firmware updates. Try replacing the batteries. Address Email Web Phone COBY Electronics Technical Support 150 Knowlton Way Savannah, GA 31407 [email protected] www.cobyusa.com 800-727-3592: Monday-Friday, 8:30AM-9:00PM...
English ÂÂ Troubleshooting & Support If you experience a problem with this device, please read the troubleshooting guide below and check our website at www.cobyusa.com for Frequently Asked Questions (FAQ) and firmware updates. Try replacing the batteries. Address Email Web Phone COBY Electronics Technical Support 150 Knowlton Way Savannah, GA 31407 [email protected] www.cobyusa.com 800-727-3592: Monday-Friday, 8:30AM-9:00PM...

User Manual
Page 20
Delete several files and try again. Blurry images or video may result when there is not enough light on the subject. Be sure to allow adequate time for the image to save if the camera is not held steady during recording. Try recording in memory. Images will not save completely before turning off before data has finished processing. Page 20 Troubleshooting & Support Recorded images are not saved in...
Delete several files and try again. Blurry images or video may result when there is not enough light on the subject. Be sure to allow adequate time for the image to save if the camera is not held steady during recording. Try recording in memory. Images will not save completely before turning off before data has finished processing. Page 20 Troubleshooting & Support Recorded images are not saved in...

User Manual
Page 21
... presence of important operation and servicing instructions in the literature accompanying the appliance. Serial No. Safety Notices Page 21 English ÂÂ Safety Notices For Customer Use: Enter below the serial number that may be of sufficient magnitude to constitute a risk of the unit. The lightning flash with arrowhead symbol within an equilateral triangle is intended to alert the user to...
... presence of important operation and servicing instructions in the literature accompanying the appliance. Serial No. Safety Notices Page 21 English ÂÂ Safety Notices For Customer Use: Enter below the serial number that may be of sufficient magnitude to constitute a risk of the unit. The lightning flash with arrowhead symbol within an equilateral triangle is intended to alert the user to...

User Manual
Page 22
... otherwise specified in a residential installation. This equipment generates, uses and can be required to stop operation of the equipment. If this equipment does cause harmful interference to radio or television reception, which the receiver is connected. • Consult the dealer or an experienced radio/TV technician for Class B digital devices, pursuant to Part 15 of the FCC rules...
... otherwise specified in a residential installation. This equipment generates, uses and can be required to stop operation of the equipment. If this equipment does cause harmful interference to radio or television reception, which the receiver is connected. • Consult the dealer or an experienced radio/TV technician for Class B digital devices, pursuant to Part 15 of the FCC rules...
User Manual
Page 23
... power supply to protect it from the wall outlet before the product is provided or the manufacturer instructions have been adhered to . 4. These openings should not be blocked by the manufacturer. This prvoduct should never be placed in a built-in installation such as this product near water (e.g., near a swimming pool and the like). 8. English Important Safety Instructions 1. Cleaning...
... power supply to protect it from the wall outlet before the product is provided or the manufacturer instructions have been adhered to . 4. These openings should not be blocked by the manufacturer. This prvoduct should never be placed in a built-in installation such as this product near water (e.g., near a swimming pool and the like). 8. English Important Safety Instructions 1. Cleaning...
User Manual
Page 24
... your service technician has used replacement parts specified by following conditions: a) when the power-supply or plug is in fire, electric shock, or other hazards. 15. Heat: The product should be sure that produce heat. e) if the product has been dropped or damaged in damage and will often require extensive work by the operating instructions as opening or removing covers may...
... your service technician has used replacement parts specified by following conditions: a) when the power-supply or plug is in fire, electric shock, or other hazards. 15. Heat: The product should be sure that produce heat. e) if the product has been dropped or damaged in damage and will often require extensive work by the operating instructions as opening or removing covers may...


