User Manual
Page 5
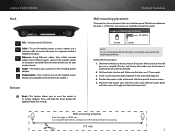
...3. Insert a screw into each hole and leave 3 mm of an electrical outlet. 2. Press and hold the Reset button for damages incurred by unsecured wallmounting hardware. Make sure that the wall you want to its head exposed. 4....this port to the ADSL line. Suggested Mounting Hardware 2.5-3.0 mm 4-5 mm 1-1.5 mm Note Cisco is within reach of its factory defaults. Also make sure the location is not responsible for approximately five seconds. Place the wall... line up with the two screws. 5. Linksys X2000/X3000 Back DSL-Connects to a separate modem's LAN/Ethernet port.
...3. Insert a screw into each hole and leave 3 mm of an electrical outlet. 2. Press and hold the Reset button for damages incurred by unsecured wallmounting hardware. Make sure that the wall you want to its head exposed. 4....this port to the ADSL line. Suggested Mounting Hardware 2.5-3.0 mm 4-5 mm 1-1.5 mm Note Cisco is within reach of its factory defaults. Also make sure the location is not responsible for approximately five seconds. Place the wall... line up with the two screws. 5. Linksys X2000/X3000 Back DSL-Connects to a separate modem's LAN/Ethernet port.
User Manual
Page 7
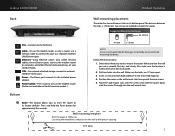
...factory defaults. Cut along the dotted line, and place on its head exposed. 4. Determine where you to reset the router to mount the router. Make sure the holes are needed to computers and other Ethernet network devices on your wired network. Suggested Mounting Hardware 2.5-3.0 mm 4-5 mm 1-1.5 mm Note Cisco...Press and hold the Reset button for damages incurred by unsecured wallmounting hardware. Make sure that the wall you use a network cable to connect this port to this page at 100% size. Wall-mounting template Print this port. Linksys X2000/X3000 Product Overview Back ...
...factory defaults. Cut along the dotted line, and place on its head exposed. 4. Determine where you to reset the router to mount the router. Make sure the holes are needed to computers and other Ethernet network devices on your wired network. Suggested Mounting Hardware 2.5-3.0 mm 4-5 mm 1-1.5 mm Note Cisco...Press and hold the Reset button for damages incurred by unsecured wallmounting hardware. Make sure that the wall you use a network cable to connect this port to this page at 100% size. Wall-mounting template Print this port. Linksys X2000/X3000 Product Overview Back ...
User Manual
Page 18
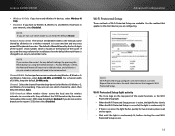
... they will need to -remember name. Note If you restore the router's factory default settings (by pressing the Reset button or using Wireless-B, Wireless-G and Wireless-N devices, select Auto (20 MHz...try again. •• Wait until the light is changed to an easy-to be reconnected. Linksys X2000/X3000 •• Wireless-N Only If you have only Wireless-N devices, select Wireless-N Only. &#...SSID) The Service Set Identifier (SSID) is active, the light flashes slowly. The default is Cisco followed by all devices on your network, select Disabled. For a channel width of Wi-Fi ...
... they will need to -remember name. Note If you restore the router's factory default settings (by pressing the Reset button or using Wireless-B, Wireless-G and Wireless-N devices, select Auto (20 MHz...try again. •• Wait until the light is changed to an easy-to be reconnected. Linksys X2000/X3000 •• Wireless-N Only If you have only Wireless-N devices, select Wireless-N Only. &#...SSID) The Service Set Identifier (SSID) is active, the light flashes slowly. The default is Cisco followed by all devices on your network, select Disabled. For a channel width of Wi-Fi ...
User Manual
Page 280
Linksys X2000/X3000 ... Network Name (SSID SSID)) Service Set Identifier (SSID 32 Ciscoxxxxx (xxxxx Reset Administration > Factory Defaults Channel Width Wireless-B, Wireless-G และ Wireless-N (2.4 GHz... Auto (20MHz or 40MHz 20MHz 40MHz 20 MHz 20MHz only (20MHz Channel Wireless-B, Wireless-G และ Wireless-N (2.4 GHz Auto SSID Broadcast SSID SSID SSID Enabled SSID Disabled Wi-Fi Wi-Fi Wi-Fi Wi-Fi Protected Setup Cisco...
Linksys X2000/X3000 ... Network Name (SSID SSID)) Service Set Identifier (SSID 32 Ciscoxxxxx (xxxxx Reset Administration > Factory Defaults Channel Width Wireless-B, Wireless-G และ Wireless-N (2.4 GHz... Auto (20MHz or 40MHz 20MHz 40MHz 20 MHz 20MHz only (20MHz Channel Wireless-B, Wireless-G และ Wireless-N (2.4 GHz Auto SSID Broadcast SSID SSID SSID Enabled SSID Disabled Wi-Fi Wi-Fi Wi-Fi Wi-Fi Protected Setup Cisco...


