
Administration Guide
Page 3
... Connecting to the Configuration Utility 18 Using the Getting Started Pages 19 Navigating Through the Configuration Utility 21 Using the Help System 22 About the Default Settings 22 Basic Tasks 23 Changing the Default User Name and Password 23 Backing Up Your Configuration 24 Upgrading the Firmware 24 Common Configuration Scenarios 25 Basic Network Configuration with Internet Access 26 Cisco Smart Business Communications System Configuration 28 Firewall for Controlling Inbound and Outbound Traffic...
... Connecting to the Configuration Utility 18 Using the Getting Started Pages 19 Navigating Through the Configuration Utility 21 Using the Help System 22 About the Default Settings 22 Basic Tasks 23 Changing the Default User Name and Password 23 Backing Up Your Configuration 24 Upgrading the Firmware 24 Common Configuration Scenarios 25 Basic Network Configuration with Internet Access 26 Cisco Smart Business Communications System Configuration 28 Firewall for Controlling Inbound and Outbound Traffic...

Administration Guide
Page 6
... Firewall Rules 113 Firewall Rule Configuration Examples 114 Using Other Tools to Prevent Attacks, Restrict Access, and Control Inbound Traffic 117 Configuring Attack Checks 118 Configuring MAC Filtering to Allow or Block Traffic 119 Configuring IP/MAC Binding 120 Port Triggering 121 Configuring a Port Triggering Rule to Direct Traffic to Specified Ports 122 Viewing the Port Triggering Status 122 Configuring Session Settings to Analyze Incoming Packets 123 Using Other Tools to Control Access to the Internet 124...
... Firewall Rules 113 Firewall Rule Configuration Examples 114 Using Other Tools to Prevent Attacks, Restrict Access, and Control Inbound Traffic 117 Configuring Attack Checks 118 Configuring MAC Filtering to Allow or Block Traffic 119 Configuring IP/MAC Binding 120 Port Triggering 121 Configuring a Port Triggering Rule to Direct Traffic to Specified Ports 122 Viewing the Port Triggering Status 122 Configuring Session Settings to Analyze Incoming Packets 123 Using Other Tools to Control Access to the Internet 124...

Administration Guide
Page 7
... Port Forwarding SSL VPN Tunnel Client Configuration Viewing the SSL VPN Client Portal VeriSign™ Identity Protection configuration Configuring VeriSign Identity Protection Managing User Credentials for VeriSign Service Chapter 8: Administration Users Domains Groups Adding or Editing User Settings Adding or Editing User Login Policies Firmware and Configuration Upgrading Firmware and Working with Configuration Files Maintaining the USB Device Using the Secondary Firmware Diagnostics Measuring and Limiting Traffic with the Traffic Meter Configuring the Time Settings Configuring the Logging...
... Port Forwarding SSL VPN Tunnel Client Configuration Viewing the SSL VPN Client Portal VeriSign™ Identity Protection configuration Configuring VeriSign Identity Protection Managing User Credentials for VeriSign Service Chapter 8: Administration Users Domains Groups Adding or Editing User Settings Adding or Editing User Login Policies Firmware and Configuration Upgrading Firmware and Working with Configuration Files Maintaining the USB Device Using the Secondary Firmware Diagnostics Measuring and Limiting Traffic with the Traffic Meter Configuring the Time Settings Configuring the Logging...
Administration Guide
Page 11
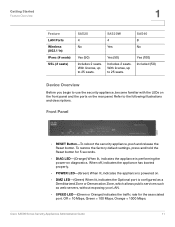
... Guide 11 To restore the factory default settings, press and hold the Reset button for the associated port. With license, up to 25 seats. Front Panel • RESET Button-To reboot the security appliance, push and release the Reset button. Yes (100) Included (50) Device Overview Before you begin to the following illustrations and descriptions. When off, indicates the appliance has booted properly. • POWER LED-(Green...
... Guide 11 To restore the factory default settings, press and hold the Reset button for the associated port. With license, up to 25 seats. Front Panel • RESET Button-To reboot the security appliance, push and release the Reset button. Yes (100) Included (50) Device Overview Before you begin to the following illustrations and descriptions. When off, indicates the appliance has booted properly. • POWER LED-(Green...

Administration Guide
Page 18
... page, click Install the Certificate. Follow the instructions in the Wizard to complete the installation. • Firefox: Click the link to the Configuration Utility. Getting Started Getting Started with a CCA-supported device, such as the UC500. Click the Add Exception button. STEP 4 Enter the default user name and password: • Username: cisco • Password: cisco STEP 5 Click Log In. For more information, see : www.cisco.com/go/configassist...
... page, click Install the Certificate. Follow the instructions in the Wizard to complete the installation. • Firefox: Click the link to the Configuration Utility. Getting Started Getting Started with a CCA-supported device, such as the UC500. Click the Add Exception button. STEP 4 Enter the default user name and password: • Username: cisco • Password: cisco STEP 5 Click Log In. For more information, see : www.cisco.com/go/configassist...
Administration Guide
Page 23
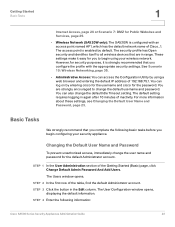
... begin using a web browser and entering the default IP address of the table, find the default Administrator account. See Scenario 10: Wireless Networking, page 35. • Administrative Access: You can access the Configuration Utility by default. STEP 1 In the User Administration section of inactivity. STEP 3 Click the button in range. You are in the Edit column. For more information about these settings, see Changing the Default User...
... begin using a web browser and entering the default IP address of the table, find the default Administrator account. See Scenario 10: Wireless Networking, page 35. • Administrative Access: You can access the Configuration Utility by default. STEP 1 In the User Administration section of inactivity. STEP 3 Click the button in range. You are in the Edit column. For more information about these settings, see Changing the Default User...

Administration Guide
Page 24
... software. Cisco SA500 Series Security Appliances Administration Guide 24 You can be changed for this new security appliance is cisco. • New Password: Enter a password that contains alphanumeric, '-' or '_' characters. • Confirm Password: Enter the password again. • Idle Timeout: Enter the time in minutes that the user can upgrade from 0 to a saved configuration. The default password for this account. • Check to Edit Password: Check this box to enable the password...
... software. Cisco SA500 Series Security Appliances Administration Guide 24 You can be changed for this new security appliance is cisco. • New Password: Enter a password that contains alphanumeric, '-' or '_' characters. • Confirm Password: Enter the password again. • Idle Timeout: Enter the time in minutes that the user can upgrade from 0 to a saved configuration. The default password for this account. • Check to Edit Password: Check this box to enable the password...
Administration Guide
Page 27
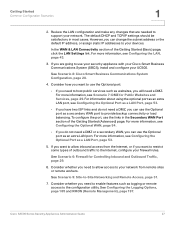
... RMON (Remote Management), page 197. If you want to your UC500. The default DHCP and TCP/IP settings should be satisfactory in the Secondary WAN Port section of the Getting Started (Basic) page, click the LAN Settings link. For more information, see Scenario 7: DMZ for Controlling Inbound and Outbound Traffic, page 29. 6. To configure the port, use your security appliance with your Cisco Smart Business...
... RMON (Remote Management), page 197. If you want to your UC500. The default DHCP and TCP/IP settings should be satisfactory in the Secondary WAN Port section of the Getting Started (Basic) page, click the LAN Settings link. For more information, see Scenario 7: DMZ for Controlling Inbound and Outbound Traffic, page 29. 6. To configure the port, use your security appliance with your Cisco Smart Business...

Administration Guide
Page 43
... router is configured for IPv4 addressing. Cisco SA500 Series Security Appliances Administration Guide 43 However, you can use a Windows Internet Naming Service (WINS) server. Networking Configuring the LAN 2 Configuring the LAN For most applications, the default DHCP and TCP/IP settings of the security appliance are manually configuring the network settings of all of your PCs, disable DHCP and enter the appropriate settings. • Instead of using a DNS server, you can use the LAN Configuration page to change...
... router is configured for IPv4 addressing. Cisco SA500 Series Security Appliances Administration Guide 43 However, you can use a Windows Internet Naming Service (WINS) server. Networking Configuring the LAN 2 Configuring the LAN For most applications, the default DHCP and TCP/IP settings of the security appliance are manually configuring the network settings of all of your PCs, disable DHCP and enter the appropriate settings. • Instead of using a DNS server, you can use the LAN Configuration page to change...

Administration Guide
Page 46
... Appendix A, "Troubleshooting." You can change the settings for the default VLANs, and you enable inter VLAN routing. Cisco SA500 Series Security Appliances Administration Guide 46 VLAN Configuration The security appliance supports Virtual LANs (VLANs), which can be treated like two separate networks. For more information, see DHCP Leased Clients, page 53. • If you are isolated from one another. Networking Configuring the LAN 2 • To view a list of the interface • DHCP server mode STEP...
... Appendix A, "Troubleshooting." You can change the settings for the default VLANs, and you enable inter VLAN routing. Cisco SA500 Series Security Appliances Administration Guide 46 VLAN Configuration The security appliance supports Virtual LANs (VLANs), which can be treated like two separate networks. For more information, see DHCP Leased Clients, page 53. • If you are isolated from one another. Networking Configuring the LAN 2 • To view a list of the interface • DHCP server mode STEP...
Administration Guide
Page 57
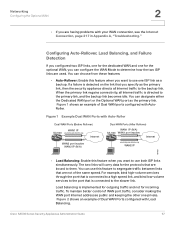
... is connected to segregate traffic between links that are not of WAN port traffic, consider making the WAN port Internet addresses public and keeping the other one for incoming traffic. Cisco SA500 Series Security Appliances Administration Guide 57 Networking Configuring the Optional WAN 2 • If you are used. You can designate either the Dedicated WAN port or the Optional WAN port as a backup. For example, bind high-volume services...
... is connected to segregate traffic between links that are not of WAN port traffic, consider making the WAN port Internet addresses public and keeping the other one for incoming traffic. Cisco SA500 Series Security Appliances Administration Guide 57 Networking Configuring the Optional WAN 2 • If you are used. You can designate either the Dedicated WAN port or the Optional WAN port as a backup. For example, bind high-volume services...

Administration Guide
Page 70
... based authentication between routers. - MD5 Key ID: Input the unique MD-5 key ID. - Not Valid Before: Start date of the First Key for each port: • Enable: Check this box to save your settings. Cisco SA500 Series Security Appliances Administration Guide 70 STEP 2 Choose the following topics. • Configuring the Ports, page 70 • Configuring SPAN (Port Mirroring), page 71 Configuring the Ports STEP 1 Click Networking > Port Management > Port Management. MD5 Auth Key: Input the auth...
... based authentication between routers. - MD5 Key ID: Input the unique MD-5 key ID. - Not Valid Before: Start date of the First Key for each port: • Enable: Check this box to save your settings. Cisco SA500 Series Security Appliances Administration Guide 70 STEP 2 Choose the following topics. • Configuring the Ports, page 70 • Configuring SPAN (Port Mirroring), page 71 Configuring the Ports STEP 1 Click Networking > Port Management > Port Management. MD5 Auth Key: Input the auth...

Administration Guide
Page 96
... data, for example). The settings on this page apply only if this box is checked. • Default Class Of Service: Use this setting to specify the default Class of Service for all traffic on MAC Addresses This page allows you want to the selected access point. Cisco SA500 Series Security Appliances Administration Guide 96 Bulk data that the policy is "open" access, which means that you to define specific MAC addresses to...
... data, for example). The settings on this page apply only if this box is checked. • Default Class Of Service: Use this setting to specify the default Class of Service for all traffic on MAC Addresses This page allows you want to the selected access point. Cisco SA500 Series Security Appliances Administration Guide 96 Bulk data that the policy is "open" access, which means that you to define specific MAC addresses to...

Administration Guide
Page 131
... log messages. Intrusion Prevention System Configuring IPS 5 Configuring IPS You configure IPS from the Getting Started (Advanced) page, under Intrusion Prevention System, click Update Signatures. For example: Enabling IPS protection on the LAN zone enforces IPS on all other services on the router which use them. Enter your Cisco.com User Name and Password to authenticate to save your settings. Click Apply to the signature update server. Click Update...
... log messages. Intrusion Prevention System Configuring IPS 5 Configuring IPS You configure IPS from the Getting Started (Advanced) page, under Intrusion Prevention System, click Update Signatures. For example: Enabling IPS protection on the LAN zone enforces IPS on all other services on the router which use them. Enter your Cisco.com User Name and Password to authenticate to save your settings. Click Apply to the signature update server. Click Update...
Administration Guide
Page 143
... to add. STEP 5 Repeat as Greenbow. Cisco SA500 Series Security Appliances Administration Guide 143 See Advanced Configuration of IPsec VPN, page 144. • For Cisco QuickVPN, you entered in native IPsec to which uses user authentication but the implementation is a propriety Cisco/Linksys client which the remote user will have access. QuickVPN is specific only to the list of the LAN or VLAN IP addresses. •...
... to add. STEP 5 Repeat as Greenbow. Cisco SA500 Series Security Appliances Administration Guide 143 See Advanced Configuration of IPsec VPN, page 144. • For Cisco QuickVPN, you entered in native IPsec to which uses user authentication but the implementation is a propriety Cisco/Linksys client which the remote user will have access. QuickVPN is specific only to the list of the LAN or VLAN IP addresses. •...

Administration Guide
Page 163
... resource. STEP 2 To add a network resource, click Add. Port forwarding is used to a limited set of the table heading. The Resources window opens. STEP 1 Click VPN > SSL VPN Server > Resources. Configuring VPN Configuring SSL VPN for Browser-Based Remote Access 7 Specifying the Network Resources for multiple remote SSL VPN users. Configuring SSL VPN Port Forwarding Port Forwarding is different from split and full tunnel modes, which allow access only to easily create and configure SSL VPN policies.
... resource. STEP 2 To add a network resource, click Add. Port forwarding is used to a limited set of the table heading. The Resources window opens. STEP 1 Click VPN > SSL VPN Server > Resources. Configuring VPN Configuring SSL VPN for Browser-Based Remote Access 7 Specifying the Network Resources for multiple remote SSL VPN users. Configuring SSL VPN Port Forwarding Port Forwarding is different from split and full tunnel modes, which allow access only to easily create and configure SSL VPN policies.

Administration Guide
Page 176
... reboot process. To add an address, click Add, enter the type and the address, and then click Apply. - Cisco SA500 Series Security Appliances Administration Guide 176 To delete an address, check the box, and then click Delete. IMPORTANT! Interrupting the upgrade process at specific points when the flash is complete. STEP 3 Click Apply to save your saved settings from a backup file or revert to perform the following tasks: • Upgrade the firmware version and check...
... reboot process. To add an address, click Add, enter the type and the address, and then click Apply. - Cisco SA500 Series Security Appliances Administration Guide 176 To delete an address, check the box, and then click Delete. IMPORTANT! Interrupting the upgrade process at specific points when the flash is complete. STEP 3 Click Apply to save your saved settings from a backup file or revert to perform the following tasks: • Upgrade the firmware version and check...

Administration Guide
Page 221
... that the Ethernet card driver software and TCP/IP software are installed and configured on the PC. • Verify that the IP address for the security appliance and PC are lit for your network interface card and for "LAN or Internet port LEDs are not lit." • Verify that the corresponding link LEDs are correct and on page B-1 and follow instructions for any hub ports that...
... that the Ethernet card driver software and TCP/IP software are installed and configured on the PC. • Verify that the IP address for the security appliance and PC are lit for your network interface card and for "LAN or Internet port LEDs are not lit." • Verify that the corresponding link LEDs are correct and on page B-1 and follow instructions for any hub ports that...

Administration Guide
Page 229
... Time enable Update Date and Time - Time Zone Pacific Time (US & Canada) DDNS disable HTTP Remote Access enable HTTPS Remote Access enable SNMP - Protocol NTP Date and Time - D Factory Default Settings General Settings Feature Setting Host Name Model number Device Name Model number Administrator Username cisco Administrator Password cisco Allow ICMP echo replies (good for validating connectivity) disable Date and Time - Trusted Peer IP address SNMP Agent disable Cisco SA500 Series Security Appliances Administration Guide 229 Daylight Savings enable Time...
... Time enable Update Date and Time - Time Zone Pacific Time (US & Canada) DDNS disable HTTP Remote Access enable HTTPS Remote Access enable SNMP - Protocol NTP Date and Time - D Factory Default Settings General Settings Feature Setting Host Name Model number Device Name Model number Administrator Username cisco Administrator Password cisco Allow ICMP echo replies (good for validating connectivity) disable Date and Time - Trusted Peer IP address SNMP Agent disable Cisco SA500 Series Security Appliances Administration Guide 229 Daylight Savings enable Time...

Administration Guide
Page 232
...Local Subnet (Data VLAN subnet mask) Setting enable DHCP client 1500 disable disable disable DHCP client 1500 disable disable disable disable enable / disable on DMS VLAN disable IPv4 Only Automatic enable 192.168.10.0 255.255.255.0 Cisco SA500 Series Security Appliances Administration Guide 232 Key Exchange Method IPSec - Outgoing Traffic Bandwidth Limit Allow ICMP echo replies (good for validating connectivity) HTTPS Remote Access Routing (RIP1/2) Inter-VLAN routing Static Routing IPv4 and IPv6 IPSec - Factory Default Settings Router Settings D Feature HTTPS Remote Access WAN1 IP...
...Local Subnet (Data VLAN subnet mask) Setting enable DHCP client 1500 disable disable disable DHCP client 1500 disable disable disable disable enable / disable on DMS VLAN disable IPv4 Only Automatic enable 192.168.10.0 255.255.255.0 Cisco SA500 Series Security Appliances Administration Guide 232 Key Exchange Method IPSec - Outgoing Traffic Bandwidth Limit Allow ICMP echo replies (good for validating connectivity) HTTPS Remote Access Routing (RIP1/2) Inter-VLAN routing Static Routing IPv4 and IPv6 IPSec - Factory Default Settings Router Settings D Feature HTTPS Remote Access WAN1 IP...


