
User Guide
Page 3
... Phone 39 Switching Between the Handset/Headset/Speakerphone During a Call 39 Sending Audio to the Phone Speaker 39 Choosing Your Preferred Audio Device 40 Adjusting Call Volume and Muting 40 Adjusting Call Volume 40 Using Mute 40 Placing or Answering a Call 41 Using Dial Assistance 41 Putting a Call on Hold 42 Resuming a Call 42 Ending a Call 42 Transferring Calls 42 Performing an Attended Transfer 43 Performing an Unattended (Blind) Transfer 43 Redialing 44 Viewing and Returning Missed Calls 44 Turning the Missed Calls...
... Phone 39 Switching Between the Handset/Headset/Speakerphone During a Call 39 Sending Audio to the Phone Speaker 39 Choosing Your Preferred Audio Device 40 Adjusting Call Volume and Muting 40 Adjusting Call Volume 40 Using Mute 40 Placing or Answering a Call 41 Using Dial Assistance 41 Putting a Call on Hold 42 Resuming a Call 42 Ending a Call 42 Transferring Calls 42 Performing an Attended Transfer 43 Performing an Unattended (Blind) Transfer 43 Redialing 44 Viewing and Returning Missed Calls 44 Turning the Missed Calls...

User Guide
Page 4
...or Changing a Phone Password 56 Accessing Voicemail 56 Chapter 4: Using Advanced Phone Features 57 Configuring Privacy and Security Features 58 Blocking Caller ID 58 Blocking Anonymous Calls 58 Using Secure Call 59 Enabling Dial Assistance 59 Creating Speed Dials 60 Using Speed Dials 60 Using the Paging Feature 61 Paging Another Phone 61 Configuring Auto Answer 61 Monitoring/Accessing Another Phone from Your Phone 62 Customizing Your LCD Screen 62 Changing the LCD Screen Contrast 62 Setting the Backlight Timer 63 Cisco Small Business IP Phone SPA9XX User Guide...
...or Changing a Phone Password 56 Accessing Voicemail 56 Chapter 4: Using Advanced Phone Features 57 Configuring Privacy and Security Features 58 Blocking Caller ID 58 Blocking Anonymous Calls 58 Using Secure Call 59 Enabling Dial Assistance 59 Creating Speed Dials 60 Using Speed Dials 60 Using the Paging Feature 61 Paging Another Phone 61 Configuring Auto Answer 61 Monitoring/Accessing Another Phone from Your Phone 62 Customizing Your LCD Screen 62 Changing the LCD Screen Contrast 62 Setting the Backlight Timer 63 Cisco Small Business IP Phone SPA9XX User Guide...
User Guide
Page 5
... for Your Phone 69 Using Star Codes 70 Advanced Procedures for Technical Support Personnel 72 Rebooting Your Phone 73 Chapter 5: Using the Web Interface 74 Logging in to the Web Interface 75 Setting Do Not Disturb 75 Configuring Call Forwarding 76 Configuring Call Waiting 76 Blocking Caller ID 77 Blocking Anonymous Calls 77 Using Your Personal Directory 77 Viewing Call History Lists 78 Creating Speed Dials 79 Accepting Text Messages 79 Adjusting Audio Volume 80 Changing the LCD Contrast 80 Cisco Small Business IP Phone SPA9XX User Guide 4
... for Your Phone 69 Using Star Codes 70 Advanced Procedures for Technical Support Personnel 72 Rebooting Your Phone 73 Chapter 5: Using the Web Interface 74 Logging in to the Web Interface 75 Setting Do Not Disturb 75 Configuring Call Forwarding 76 Configuring Call Waiting 76 Blocking Caller ID 77 Blocking Anonymous Calls 77 Using Your Personal Directory 77 Viewing Call History Lists 78 Creating Speed Dials 79 Accepting Text Messages 79 Adjusting Audio Volume 80 Changing the LCD Contrast 80 Cisco Small Business IP Phone SPA9XX User Guide 4

User Guide
Page 7
... call forwarding, redialing, speed dialing, transferring calls, conference calling and accessing voice mail. Calls can be made or received with a handset, headset or over an IP network. Cisco Small Business IP Phone SPA9XX User Guide 6 It contains the following chapters: • Chapter 1-Getting Started (this chapter)-Gives a description of this book and an overview of the Cisco SPA9000 Voice System IP Phones. • Chapter 2, "Installing Your Phone" • Chapter 3, "Using Basic Phone Functions" • Chapter 4, "Using Advanced Phone Features" • Chapter 5, "Using the Web...
... call forwarding, redialing, speed dialing, transferring calls, conference calling and accessing voice mail. Calls can be made or received with a handset, headset or over an IP network. Cisco Small Business IP Phone SPA9XX User Guide 6 It contains the following chapters: • Chapter 1-Getting Started (this chapter)-Gives a description of this book and an overview of the Cisco SPA9000 Voice System IP Phones. • Chapter 2, "Installing Your Phone" • Chapter 3, "Using Basic Phone Functions" • Chapter 4, "Using Advanced Phone Features" • Chapter 5, "Using the Web...
User Guide
Page 8
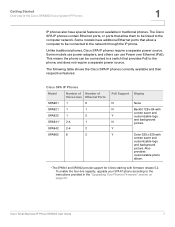
... traditional phones. Some models use power adapters, and others can be connected to a switch that allow a computer to be linked to the phone, and does not require a separate power source. The Cisco SPA IP phones contain Ethernet ports, or ports that provides PoE to the computer network. Unlike traditional phones, Cisco SPA IP phones require a separate power source. Getting Started Overview of Voice Lines Ethernet Ports SPA901 1 0 SPA921 1 1 SPA922 1 2 SPA941* 2-4 1 SPA942 2-4 2 SPA962 6 2 PoE Support Display...
... traditional phones. Some models use power adapters, and others can be connected to a switch that allow a computer to be linked to the phone, and does not require a separate power source. The Cisco SPA IP phones contain Ethernet ports, or ports that provides PoE to the computer network. Unlike traditional phones, Cisco SPA IP phones require a separate power source. Getting Started Overview of Voice Lines Ethernet Ports SPA901 1 0 SPA921 1 1 SPA922 1 2 SPA941* 2-4 1 SPA942 2-4 2 SPA962 6 2 PoE Support Display...

User Guide
Page 22
... buttons. Cisco Small Business IP Phone SPA9XX User Guide 21 See the Cisco SPA IP Phone Connections graphic, item #2. If you still don't see the display, then contact your Phone Administrator or Internet Telephony Service Provider (ITSP). The date, name and number of the WBP54G to the Cisco WBP54G: STEP 1 Configure the Cisco WBP54G using the Setup Wizard. If the phone does not provide this sequence, the display will display the standard menu for Phone Adapters Quick Installation Guide...
... buttons. Cisco Small Business IP Phone SPA9XX User Guide 21 See the Cisco SPA IP Phone Connections graphic, item #2. If you still don't see the display, then contact your Phone Administrator or Internet Telephony Service Provider (ITSP). The date, name and number of the WBP54G to the Cisco WBP54G: STEP 1 Configure the Cisco WBP54G using the Setup Wizard. If the phone does not provide this sequence, the display will display the standard menu for Phone Adapters Quick Installation Guide...

User Guide
Page 31
... Numbers and Text in Fields, page 37 • Adjusting Call Volume and Muting, page 40 • Placing or Answering a Call, page 41 • Putting a Call on using your phone's lines and buttons and provides instructions on Hold, page 42 • Resuming a Call, page 42 • Ending a Call, page 42 • Transferring Calls, page 42 • Redialing, page 44 • Viewing and Returning Missed Calls, page 44 • Turning the Missed Calls Shortcut On and Off, page 45 • Forwarding Calls, page 45 • Setting Do Not Disturb, page 48...
... Numbers and Text in Fields, page 37 • Adjusting Call Volume and Muting, page 40 • Placing or Answering a Call, page 41 • Putting a Call on using your phone's lines and buttons and provides instructions on Hold, page 42 • Resuming a Call, page 42 • Ending a Call, page 42 • Transferring Calls, page 42 • Redialing, page 44 • Viewing and Returning Missed Calls, page 44 • Turning the Missed Calls Shortcut On and Off, page 45 • Forwarding Calls, page 45 • Setting Do Not Disturb, page 48...

User Guide
Page 33
... LCD screen. Push to access voice mail (must be used). Use to dial phone numbers, enter letters, and choose menu items. Press to place a call . Your phone may vary, but typically, when lit: • Green: Line is idle. • Red (steady): Line is on SPA92x) Indicates phone line status. Using Basic Phone Functions Understanding Your Phone's Lines and Buttons 3 Table 1 IP Phone Components # Phone Feature 1 Handset 2 Message Waiting Indicator 3 LCD Screen 4 Line keys 5 Softkey buttons 6 Navigation button 7 Keypad 8 Messages button 9 Hold button Description...
... LCD screen. Push to access voice mail (must be used). Use to dial phone numbers, enter letters, and choose menu items. Press to place a call . Your phone may vary, but typically, when lit: • Green: Line is idle. • Red (steady): Line is on SPA92x) Indicates phone line status. Using Basic Phone Functions Understanding Your Phone's Lines and Buttons 3 Table 1 IP Phone Components # Phone Feature 1 Handset 2 Message Waiting Indicator 3 LCD Screen 4 Line keys 5 Softkey buttons 6 Navigation button 7 Keypad 8 Messages button 9 Hold button Description...

User Guide
Page 34
... on hook). When the speaker is on your call history, and set up functions (such as call forwarding). Add Adds a new item (for n/a example, a new directory entry). Using Basic Phone Functions Understanding Your Phone's Lines and Buttons 3 Table 1 IP Phone Components # Phone Feature 10 Setup button 11 Mute button 12 Volume button 13 Headset button 14 Speaker button Description Press to access the phone's configuration menu to configure features and preferences (such as your directory and speed dials), access your phone system. Table 2 Typical SPA IP Phone Softkey...
... on hook). When the speaker is on your call history, and set up functions (such as call forwarding). Add Adds a new item (for n/a example, a new directory entry). Using Basic Phone Functions Understanding Your Phone's Lines and Buttons 3 Table 1 IP Phone Components # Phone Feature 10 Setup button 11 Mute button 12 Volume button 13 Headset button 14 Speaker button Description Press to access the phone's configuration menu to configure features and preferences (such as your directory and speed dials), access your phone system. Table 2 Typical SPA IP Phone Softkey...

User Guide
Page 35
... dialing the number that you . Cisco Small Business IP Phone SPA9XX User Guide 34 Placing a Three-Way Conference Call, page 51 Copy Using the navigation button, n/a highlight an item and press Copy to n/a press this if you are transferring the call.) Transferring Calls, page 42 Call Rtn/lcr Returns the last missed call by dialing the number that will contain characters (for example, a speed dial). DelChar/delChr Deletes the last number or n/a letter. Change Opens a menu so that called you. Delete Deletes...
... dialing the number that you . Cisco Small Business IP Phone SPA9XX User Guide 34 Placing a Three-Way Conference Call, page 51 Copy Using the navigation button, n/a highlight an item and press Copy to n/a press this if you are transferring the call.) Transferring Calls, page 42 Call Rtn/lcr Returns the last missed call by dialing the number that will contain characters (for example, a speed dial). DelChar/delChr Deletes the last number or n/a letter. Change Opens a menu so that called you. Delete Deletes...

User Guide
Page 36
...speed dial). Using the Phone Directories, page 52 DND Do Not Disturb; Forward/cfwd Forwards calls coming to dial a number. Using Basic Phone Functions Understanding Your Phone's Lines and Buttons 3 Table 2 Typical SPA IP Phone Softkey Buttons Button Function For More Information Dial Press to your phone. Cisco Small Business IP Phone SPA9XX User Guide 35 Forwarding Calls, page 45 GrPickup/grPick Allows you n/a can edit numbers or letters, or enable or disable a feature. n/a Num In some menus, you need to pick up (answer) a call at a ringing extension...
...speed dial). Using the Phone Directories, page 52 DND Do Not Disturb; Forward/cfwd Forwards calls coming to dial a number. Using Basic Phone Functions Understanding Your Phone's Lines and Buttons 3 Table 2 Typical SPA IP Phone Softkey Buttons Button Function For More Information Dial Press to your phone. Cisco Small Business IP Phone SPA9XX User Guide 35 Forwarding Calls, page 45 GrPickup/grPick Allows you n/a can edit numbers or letters, or enable or disable a feature. n/a Num In some menus, you need to pick up (answer) a call at a ringing extension...

User Guide
Page 39
Using Headsets The SPA IP Phones support headsets from the headset into the telephone port on the back of the SPA IP Phone. • For wired headsets: Connect the 2.5mm connector from different manufacturers. In general, to connect a headset: • For wireless headsets: Connect the headset's telephone cord into the headset port on or off hook). Consult the documentation for your reseller. Cisco Small Business IP Phone SPA9XX User Guide 38 To use the speakerphone, press the Speaker button (the handset can...
Using Headsets The SPA IP Phones support headsets from the headset into the telephone port on the back of the SPA IP Phone. • For wired headsets: Connect the 2.5mm connector from different manufacturers. In general, to connect a headset: • For wireless headsets: Connect the headset's telephone cord into the headset port on or off hook). Consult the documentation for your reseller. Cisco Small Business IP Phone SPA9XX User Guide 38 To use the speakerphone, press the Speaker button (the handset can...

User Guide
Page 40
... handset to a wireless headset, however, do not replace the handset or you are switching from the handset to the speakerphone, make sure the speakerphone or headset light is lifted. STEP 4 Press Y/N to enable or disable the feature. STEP 1 Press the Setup button. Consult the user documentation for more information. To use your headset for your headset with Your IP Phone NOTE: Steps to answer a ringing call. Only one device at a time can be on the hook...
... handset to a wireless headset, however, do not replace the handset or you are switching from the handset to the speakerphone, make sure the speakerphone or headset light is lifted. STEP 4 Press Y/N to enable or disable the feature. STEP 1 Press the Setup button. Consult the user documentation for more information. To use your headset for your headset with Your IP Phone NOTE: Steps to answer a ringing call. Only one device at a time can be on the hook...

User Guide
Page 41
... using the IP Phone Web Interface. Pressing the Volume button while not on a call , press + on a call adjusts the volume of the phone's ringer. Press the Mute button again to decrease the volume. See "Adjusting Audio Volume" section on the phone. Cisco Small Business IP Phone SPA9XX User Guide 40 STEP 2 Select Preferences. Adjusting Call Volume To adjust the volume while you want is not used. STEP 5 Press Save. to unmute. Using Mute To mute the phone microphone, speaker, or headset microphone, press the Mute button on page...
... using the IP Phone Web Interface. Pressing the Volume button while not on a call , press + on a call adjusts the volume of the phone's ringer. Press the Mute button again to decrease the volume. See "Adjusting Audio Volume" section on the phone. Cisco Small Business IP Phone SPA9XX User Guide 40 STEP 2 Select Preferences. Adjusting Call Volume To adjust the volume while you want is not used. STEP 5 Press Save. to unmute. Using Mute To mute the phone microphone, speaker, or headset microphone, press the Mute button on page...

User Guide
Page 45
... was from the Missed Call list: a. Press the Setup button. Select Call History. Choose the call you if a call and use the softkey buttons and keypad to return and press Dial. To redial another number: STEP 1 Press the Redial button and select the desired number. b. d. When you can also turn off this feature - Using Basic Phone Functions Redialing 3 Redialing To redial the last number called, press the Redial button twice. see...
... was from the Missed Call list: a. Press the Setup button. Select Call History. Choose the call you if a call and use the softkey buttons and keypad to return and press Dial. To redial another number: STEP 1 Press the Redial button and select the desired number. b. d. When you can also turn off this feature - Using Basic Phone Functions Redialing 3 Redialing To redial the last number called, press the Redial button twice. see...

User Guide
Page 46
... page 76. To access this option: STEP 1 Press the Setup button. STEP 6 Press Save. Forwarding Calls You can also set call forwarding options from your LCD screen when you miss a call : a. c. STEP 4 Press Y/N to view a list of missed calls. • If the LCD screen does not show a missed call . STEP 2 Select Preferences. You can forward all missed calls: • If the LCD screen shows a missed call, press the Miss button to enable or disable the feature. Cisco Small Business IP Phone SPA9XX User Guide...
... page 76. To access this option: STEP 1 Press the Setup button. STEP 6 Press Save. Forwarding Calls You can also set call forwarding options from your LCD screen when you miss a call : a. c. STEP 4 Press Y/N to view a list of missed calls. • If the LCD screen does not show a missed call . STEP 2 Select Preferences. You can forward all missed calls: • If the LCD screen shows a missed call, press the Miss button to enable or disable the feature. Cisco Small Business IP Phone SPA9XX User Guide...

User Guide
Page 49
... Call Forward. STEP 4 Press Clear. The LCD screen indicates that Do Not Disturb is not configured, callers hear a busy signal or message. Then: a. b. If you have voice mail configured, incoming callers immediately reach voice mail. You can also set Do Not Disturb, either: • Press the DND softkey. Press the Y/N button to prevent incoming calls from your phone; Cisco Small Business IP Phone SPA9XX User Guide 48 To set Do Not Disturb from ringing your phone. Choose Do Not Disturb. Using Basic Phone Functions Setting Do Not Disturb...
... Call Forward. STEP 4 Press Clear. The LCD screen indicates that Do Not Disturb is not configured, callers hear a busy signal or message. Then: a. b. If you have voice mail configured, incoming callers immediately reach voice mail. You can also set Do Not Disturb, either: • Press the DND softkey. Press the Y/N button to prevent incoming calls from your phone; Cisco Small Business IP Phone SPA9XX User Guide 48 To set Do Not Disturb from ringing your phone. Choose Do Not Disturb. Using Basic Phone Functions Setting Do Not Disturb...

User Guide
Page 57
... Setup button. Cisco Small Business IP Phone SPA9XX User Guide 56 STEP 2 Select Set Password. STEP 3 Enter the number to scroll, then press the Alpha softkey. To set or change the number for your voicemail (for example, if your phone is normally "vmm." Accessing Voicemail To access voicemail, press the Messages button on your voicemail system. Your system administrator should configure your phone with the correct voicemail number so that pressing the Messages button automatically dials your phone. Using Basic Phone Functions Setting...
... Setup button. Cisco Small Business IP Phone SPA9XX User Guide 56 STEP 2 Select Set Password. STEP 3 Enter the number to scroll, then press the Alpha softkey. To set or change the number for your voicemail (for example, if your phone is normally "vmm." Accessing Voicemail To access voicemail, press the Messages button on your voicemail system. Your system administrator should configure your phone with the correct voicemail number so that pressing the Messages button automatically dials your phone. Using Basic Phone Functions Setting...

User Guide
Page 79
... the page, click Submit Changes. Cisco Small Business IP Phone SPA9XX User Guide 78 To enter a new item into the directory: STEP 1 select the line and enter the information in the following format: n=Marketing;p=5045551212 where "n=" indicates the name for your phone. Viewing Call History Lists To view Call History Lists: STEP 1 Log in to the web interface. A window appears with the Personal Directory listings for the entry and "p=" indicates the phone number (including area code...
... the page, click Submit Changes. Cisco Small Business IP Phone SPA9XX User Guide 78 To enter a new item into the directory: STEP 1 select the line and enter the information in the following format: n=Marketing;p=5045551212 where "n=" indicates the name for your phone. Viewing Call History Lists To view Call History Lists: STEP 1 Log in to the web interface. A window appears with the Personal Directory listings for the entry and "p=" indicates the phone number (including area code...

User Guide
Page 87
Document Title Cisco Small Business SPA and Wireless IP Phone Administration Guide Cisco SPA9000 Voice System Setup Wizard User Guide Description Administration and advanced configuration of your SPA9000 voice system and SPA IP phones using the setup wizard. System Administrators, VARs, and Service Providers Cisco Small Business IP Phone SPA9XX User Guide 86 These documents and more are available at www.cisco.com/go/smallbiz. Where to Go From Here Related Documentation B Related...
Document Title Cisco Small Business SPA and Wireless IP Phone Administration Guide Cisco SPA9000 Voice System Setup Wizard User Guide Description Administration and advanced configuration of your SPA9000 voice system and SPA IP phones using the setup wizard. System Administrators, VARs, and Service Providers Cisco Small Business IP Phone SPA9XX User Guide 86 These documents and more are available at www.cisco.com/go/smallbiz. Where to Go From Here Related Documentation B Related...


