Quick Start Guide
Page 7
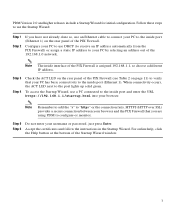
...7 HTTPS (HTTP over SSL) provides a secure connection between your browser and the PIX Firewall that your PC has basic connectivity to the inside port (Ethernet 1) on the rear panel of the PIX Firewall (see Table 2 on the rear panel of the PIX Firewall. When connectivity occurs, the ACT LED ... your username or password, just press Enter. PDM Version 2.0 and higher releases include a Startup Wizard for initial configuration. Follow these steps to use DHCP (to receive an IP address automatically from the PIX Firewall) or assign a static IP address to your PC to the inside interface of the...
...7 HTTPS (HTTP over SSL) provides a secure connection between your browser and the PIX Firewall that your PC has basic connectivity to the inside port (Ethernet 1) on the rear panel of the PIX Firewall (see Table 2 on the rear panel of the PIX Firewall. When connectivity occurs, the ACT LED ... your username or password, just press Enter. PDM Version 2.0 and higher releases include a Startup Wizard for initial configuration. Follow these steps to use DHCP (to receive an IP address automatically from the PIX Firewall) or assign a static IP address to your PC to the inside interface of the...
Quick Start Guide
Page 9
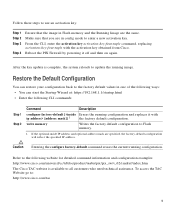
...-four-tuple with the activation key obtained from Cisco. Refer to the following CLI commands: Step 1 Step 2 Command Description configure factory-default [ [address mask]] 1 the factory default configuration. Follow these steps to use an activation key: Step 1 Step 2 Step 3 Step 4 Ensure that you are in Flash memory ....html • Enter the following website for detailed command information and configuration examples: http://www.cisco.com/univercd/cc/td/doc/product/iaabu/pix/pix_sw/v_62/cmdref/index.htm The Cisco TAC website is complete, the system reloads to update the running...
...-four-tuple with the activation key obtained from Cisco. Refer to the following CLI commands: Step 1 Step 2 Command Description configure factory-default [ [address mask]] 1 the factory default configuration. Follow these steps to use an activation key: Step 1 Step 2 Step 3 Step 4 Ensure that you are in Flash memory ....html • Enter the following website for detailed command information and configuration examples: http://www.cisco.com/univercd/cc/td/doc/product/iaabu/pix/pix_sw/v_62/cmdref/index.htm The Cisco TAC website is complete, the system reloads to update the running...
Quick Start Guide
Page 10
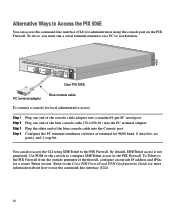
...standard 9-pin PC serial port. Use PDM or the console to configure SSH/Telnet access to the PIX Firewall. Refer to the Cisco PIX Firewall and VPN Configuration Guide for a secure Telnet session. Plug one end of the console cable adapter into ...Configure the PC terminal emulation software or terminal for administration using SSH/Telnet to the PIX Firewall. Alternative Ways to Access the PIX 506E You can also access the CLI using the console port on a PC or workstation. 67935 ACT LINK ETHERNET 1 ACT LINK ETHERNET 0 DC POWER USB CONSOLE INPUT DC POWER INPUT Cisco PIX 506E...
...standard 9-pin PC serial port. Use PDM or the console to configure SSH/Telnet access to the PIX Firewall. Refer to the Cisco PIX Firewall and VPN Configuration Guide for a secure Telnet session. Plug one end of the console cable adapter into ...Configure the PC terminal emulation software or terminal for administration using SSH/Telnet to the PIX Firewall. Alternative Ways to Access the PIX 506E You can also access the CLI using the console port on a PC or workstation. 67935 ACT LINK ETHERNET 1 ACT LINK ETHERNET 0 DC POWER USB CONSOLE INPUT DC POWER INPUT Cisco PIX 506E...
User Guide
Page 3
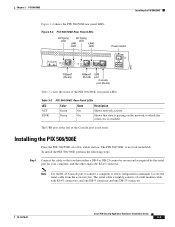
... DB-25 connector. 78-15170-02 Cisco PIX Security Appliance Hardware Installation Guide 3-3 Installing the PIX 506/506E Place the PIX 506/506E on the network to enter configuration commands. The serial cable assembly consists of the PIX 506/506E rear panel LEDs. The PIX 506/506E is not used. To install the PIX 506/506E, perform the following steps: Step 1 Connect the cable so that data...
... DB-25 connector. 78-15170-02 Cisco PIX Security Appliance Hardware Installation Guide 3-3 Installing the PIX 506/506E Place the PIX 506/506E on the network to enter configuration commands. The serial cable assembly consists of the PIX 506/506E rear panel LEDs. The PIX 506/506E is not used. To install the PIX 506/506E, perform the following steps: Step 1 Connect the cable so that data...


