
User Guide
Page 5
... THE FOLLOWING. SAVE THESE INSTRUCTIONS • This product should be abused by persons with pacemakers. • Due to the radio signals between base station and handset, wearers of hearing aids may fall and be a remote risk of electric shock from the type of power source indicated on the label. • Do...
... THE FOLLOWING. SAVE THESE INSTRUCTIONS • This product should be abused by persons with pacemakers. • Due to the radio signals between base station and handset, wearers of hearing aids may fall and be a remote risk of electric shock from the type of power source indicated on the label. • Do...

User Guide
Page 6
... resulting in the instruction manual. Check with metal objects when handling the battery. Do not use lithium batteries or nonrechargeable batteries that may damage the handset and charger. • Do not dispose of the battery cell can be protected from condensation during storage and defrosting. Released electrolyte is rechargeable and can...
... resulting in the instruction manual. Check with metal objects when handling the battery. Do not use lithium batteries or nonrechargeable batteries that may damage the handset and charger. • Do not dispose of the battery cell can be protected from condensation during storage and defrosting. Released electrolyte is rechargeable and can...
User Guide
Page 7
... Dual-Mode Internet Telephony Kit Overview The Charger The Base Station The Handset's Front Panel The Handset's Side Panel The Handset's Back Panel Chapter 3: Getting Started Before You Begin Getting Started with the Handset Getting Started with the Base Station Powering On the Handset Entering Names, Numbers and Special Characters Phone Features Adjusting the Call...
... Dual-Mode Internet Telephony Kit Overview The Charger The Base Station The Handset's Front Panel The Handset's Side Panel The Handset's Back Panel Chapter 3: Getting Started Before You Begin Getting Started with the Handset Getting Started with the Base Station Powering On the Handset Entering Names, Numbers and Special Characters Phone Features Adjusting the Call...
User Guide
Page 8
... Intercom and Conference Calls 26 Skype Voicemail 27 Your Skype Profile 30 Skype Settings 31 The Handset's Display Screen Icons 35 Landline Features 38 Landline Voicemail 42 Using Additional Features 43 Customizing the Handset 44 Managing the Handset(s) 53 Chapter 5: Network Settings 59 The Network 59 Appendix A: Troubleshooting 67 Common Problems and Solutions...
... Intercom and Conference Calls 26 Skype Voicemail 27 Your Skype Profile 30 Skype Settings 31 The Handset's Display Screen Icons 35 Landline Features 38 Landline Voicemail 42 Using Additional Features 43 Customizing the Handset 44 Managing the Handset(s) 53 Chapter 5: Network Settings 59 The Network 59 Appendix A: Troubleshooting 67 Common Problems and Solutions...
User Guide
Page 9
... is a subscription feature that provides you with a traditional phone number for choosing the Linksys Dual-Mode Internet Telephony Kit with a handset, charger, and a base station. Skype Voicemail™ Skype voicemail allows you to traditional landline and mobile phones. The Dual-Mode... traditional phone service (optional). All of your computer when you want to talk to make phone calls using your friends. After the handset receives its initial charge, you must have to ordinary phones. Chapter 1: Introduction Welcome Thank you for receiving Skype calls on your cordless...
... is a subscription feature that provides you with a traditional phone number for choosing the Linksys Dual-Mode Internet Telephony Kit with a handset, charger, and a base station. Skype Voicemail™ Skype voicemail allows you to traditional landline and mobile phones. The Dual-Mode... traditional phone service (optional). All of your computer when you want to talk to make phone calls using your friends. After the handset receives its initial charge, you must have to ordinary phones. Chapter 1: Introduction Welcome Thank you for receiving Skype calls on your cordless...

User Guide
Page 11
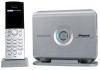
... Telephony Kit Chapter 2: Getting to Know the Dual-Mode Internet Telephony Kit 3 Overview When the handset's power runs low, slide it into an electrical outlet. Figure 2-1: Handset on Charger and Base Station Chapter 2: Getting to Know the Dual-Mode Internet Telephony Kit Overview ...The Dual-Mode Internet Telephony Kit with Skype includes eight items: • A handset • A charger • A power adapter for the charger • A base station • A power adapter for the base station • ...
... Telephony Kit Chapter 2: Getting to Know the Dual-Mode Internet Telephony Kit 3 Overview When the handset's power runs low, slide it into an electrical outlet. Figure 2-1: Handset on Charger and Base Station Chapter 2: Getting to Know the Dual-Mode Internet Telephony Kit Overview ...The Dual-Mode Internet Telephony Kit with Skype includes eight items: • A handset • A charger • A power adapter for the charger • A base station • A power adapter for the base station • ...
User Guide
Page 12
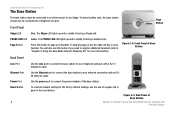
... Telephony Kit The Base Station The base station must be connected to a telephone line port. Press this button if you need to register additional handsets (refer to your telephone wall jack with an RJ45 ethernet cable. Figure 2-2: Front Panel of the base station. The Skype LED lights up ...Page Button Amber. To make landline calls, the base station should also be connected to an ethernet port to use this button to page your handset. Front Panel Page Button Skype LED Blue. Ethernet Port Use the Ethernet port to connect the base station to "Chapter 4: Using the Dual...
... Telephony Kit The Base Station The base station must be connected to a telephone line port. Press this button if you need to register additional handsets (refer to your telephone wall jack with an RJ45 ethernet cable. Figure 2-2: Front Panel of the base station. The Skype LED lights up ...Page Button Amber. To make landline calls, the base station should also be connected to an ethernet port to use this button to page your handset. Front Panel Page Button Skype LED Blue. Ethernet Port Use the Ethernet port to connect the base station to "Chapter 4: Using the Dual...

User Guide
Page 13
... to navigate menus. LED Red. The LED lights up to four cordless handsets for a single base station (refer to change your Skype Status, press down , left - The Handset's Front Panel The LED and keys of Handset 5 The context-sensitive keys are described here. Depending on the left and...Calls list. Call Press this key to Know the Dual-Mode Internet Telephony Kit The Handset's Front Panel Figure 2-4: Front of the handset are described in use. You can have up when the handset is an incoming call volume. Star or Alpha Intercom mute Dual-Mode Internet Telephony ...
... to navigate menus. LED Red. The LED lights up to four cordless handsets for a single base station (refer to change your Skype Status, press down , left - The Handset's Front Panel The LED and keys of Handset 5 The context-sensitive keys are described here. Depending on the left and...Calls list. Call Press this key to Know the Dual-Mode Internet Telephony Kit The Handset's Front Panel Figure 2-4: Front of the handset are described in use. You can have up when the handset is an incoming call volume. Star or Alpha Intercom mute Dual-Mode Internet Telephony ...

User Guide
Page 14
Star, Alpha Use for up to 15 minutes. 6 Chapter 2: Getting to Know the Dual-Mode Internet Telephony Kit The Handset's Front Panel Your choices include powering off . The caller cannot hear you, but you can hear the caller. Dual-Mode Internet Telephony Kit Icon Name ...) key, locks the keys, or enters a pause. NOTE: If the battery charge is on the handset when the handset is off the phone. Intercom Press this key to see the Skype menu when the handset is low, the handset may not power on for the functions of a * (star) key or to power on . Press...
Star, Alpha Use for up to 15 minutes. 6 Chapter 2: Getting to Know the Dual-Mode Internet Telephony Kit The Handset's Front Panel Your choices include powering off . The caller cannot hear you, but you can hear the caller. Dual-Mode Internet Telephony Kit Icon Name ...) key, locks the keys, or enters a pause. NOTE: If the battery charge is on the handset when the handset is off the phone. Intercom Press this key to see the Skype menu when the handset is low, the handset may not power on for the functions of a * (star) key or to power on . Press...

User Guide
Page 15
The Handset's Side Panel If you have a headset (optional), open the headset flap. Then plug your headset into the headset port. Dual-Mode Internet Telephony Kit HEADSET Chapter 2: Getting to Know the Dual-Mode Internet Telephony Kit The Handset's Side Panel Figure 2-5: Headset Port 7
The Handset's Side Panel If you have a headset (optional), open the headset flap. Then plug your headset into the headset port. Dual-Mode Internet Telephony Kit HEADSET Chapter 2: Getting to Know the Dual-Mode Internet Telephony Kit The Handset's Side Panel Figure 2-5: Headset Port 7

User Guide
Page 16
For directions on the back panel. Speakerphone Battery Compartment Figure 2-6: Back Panel of Handset 8 Chapter 2: Getting to "Chapter 3: Getting Started." Dual-Mode Internet Telephony Kit The Handset's Back Panel The handset's speakerphone and battery compartment are located on how to insert the batteries, refer to Know the Dual-Mode Internet Telephony Kit The Handset's Back Panel
For directions on the back panel. Speakerphone Battery Compartment Figure 2-6: Back Panel of Handset 8 Chapter 2: Getting to "Chapter 3: Getting Started." Dual-Mode Internet Telephony Kit The Handset's Back Panel The handset's speakerphone and battery compartment are located on how to insert the batteries, refer to Know the Dual-Mode Internet Telephony Kit The Handset's Back Panel
User Guide
Page 17
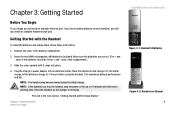
... and charge them, follow these instructions: 1. Chapter 3: Getting Started Before You Begin Dual-Mode Internet Telephony Kit Figure 3-1: Handset's Batteries Figure 3-2: Handset on the charger. Slide the cover upward until it snaps into an electrical outlet. This maximizes battery performance and life. Remove... the cover of the battery compartment. 2. Place the handset on Charger 9 Proceed to recharge. Chapter 3: Getting Started Before You Begin To use Skype you will also need an available ethernet port...
... and charge them, follow these instructions: 1. Chapter 3: Getting Started Before You Begin Dual-Mode Internet Telephony Kit Figure 3-1: Handset's Batteries Figure 3-2: Handset on the charger. Slide the cover upward until it snaps into an electrical outlet. This maximizes battery performance and life. Remove... the cover of the battery compartment. 2. Place the handset on Charger 9 Proceed to recharge. Chapter 3: Getting Started Before You Begin To use Skype you will also need an available ethernet port...
User Guide
Page 18
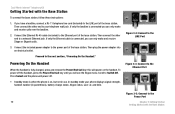
...only make and receive calls over the landline. 2. Figure 3-3: Connect to Switch Off. Scroll to the LINE Port Powering On the Handset When the handset is connected you will power on , but not in parenthesis), battery charge status, Skype status, user i.d. Connect the included power ...Started Getting Started with the Base Station To connect the base station, follow these instructions: 1. If only the Ethernet cable is on the handset. Then plug the power adapter into an electrical outlet. Figure 3-4: Connect to the Ethernet Port Figure 3-5: Connect to the Ethernet port ...
...only make and receive calls over the landline. 2. Figure 3-3: Connect to Switch Off. Scroll to the LINE Port Powering On the Handset When the handset is connected you will power on , but not in parenthesis), battery charge status, Skype status, user i.d. Connect the included power ...Started Getting Started with the Base Station To connect the base station, follow these instructions: 1. If only the Ethernet cable is on the handset. Then plug the power adapter into an electrical outlet. Figure 3-4: Connect to the Ethernet Port Figure 3-5: Connect to the Ethernet port ...

User Guide
Page 19
it works as a backspace. To delete all characters, press and hold 0 (zero) to add a space. Entering Names, Numbers and Special Characters Use the handset number keys to change between uppercase and lowercase letters or numeric characters. Dual-Mode Internet Telephony Kit Chapter 3: Getting Started 11 Entering Names, Numbers and ...
it works as a backspace. To delete all characters, press and hold 0 (zero) to add a space. Entering Names, Numbers and Special Characters Use the handset number keys to change between uppercase and lowercase letters or numeric characters. Dual-Mode Internet Telephony Kit Chapter 3: Getting Started 11 Entering Names, Numbers and ...
User Guide
Page 23
...and losing signal strength, you may see the message Unregistered on the base station. NOTE: Your base station can register up to confirm. When 4 handsets are communicating and calls can be too far from the base station. If you don't see the Signal Strength icon, you will flash. 3. ...which gives you may be registered to the base station. Move the handset closer to that base station. However, if you bought an extra handset or de-registered a handset, you time to the base unit. To register the handset when the Unregistered message has displayed: 1. Use Clear to make calls...
...and losing signal strength, you may see the message Unregistered on the base station. NOTE: Your base station can register up to confirm. When 4 handsets are communicating and calls can be too far from the base station. If you don't see the Signal Strength icon, you will flash. 3. ...which gives you may be registered to the base station. Move the handset closer to that base station. However, if you bought an extra handset or de-registered a handset, you time to the base unit. To register the handset when the Unregistered message has displayed: 1. Use Clear to make calls...

User Guide
Page 24
Dual-Mode Internet Telephony Kit Staying within range. For more information on the handset's display screen. The installation of the base station's range during a call will flash on how to use the Telephony Kit, refer to "Chapter 4: Using the Dual-Mode Internet Telephony Kit." 16 Chapter 3: Getting Started First Time Phone Use Your call , an alarm tone will sound and the Base/Handset Link icon will be disconnected if you do not move back within Range If you move outside of the Dual-Mode Internet Telephony Kit is complete. Congratulations!
Dual-Mode Internet Telephony Kit Staying within range. For more information on the handset's display screen. The installation of the base station's range during a call will flash on how to use the Telephony Kit, refer to "Chapter 4: Using the Dual-Mode Internet Telephony Kit." 16 Chapter 3: Getting Started First Time Phone Use Your call , an alarm tone will sound and the Base/Handset Link icon will be disconnected if you do not move back within Range If you move outside of the Dual-Mode Internet Telephony Kit is complete. Congratulations!

User Guide
Page 25
...Key Lock, or Pause Speakerphone Figure 4-1: Front of Handset mute Chapter 4: Using the Dual-Mode Internet Telephony Kit 17 Overview Chapter 4: Using the Dual-Mode Internet Telephony Kit Overview This chapter explains how to • Use the handset • Use Skype features • Use landline ...features • Manage the handset Soft Key Navigation Pad Call Star, Alpha Intercom IMPORTANT: Emergency calls cannot be placed through a...
...Key Lock, or Pause Speakerphone Figure 4-1: Front of Handset mute Chapter 4: Using the Dual-Mode Internet Telephony Kit 17 Overview Chapter 4: Using the Dual-Mode Internet Telephony Kit Overview This chapter explains how to • Use the handset • Use Skype features • Use landline ...features • Manage the handset Soft Key Navigation Pad Call Star, Alpha Intercom IMPORTANT: Emergency calls cannot be placed through a...
User Guide
Page 26
... where the country code is displayed, press OK. When you are finished, press OK. 5. For a Skype Contact, enter the Name or Skype Name, using the handset keys. When the correct information is "1" (North America), dial +19055556622. For a SkypeOut Contact, enter the Contact Name using the... handset keys. Enter the number of contact and press OK. 4. Scroll to your list. When you are finished, press OK. NOTE: To make a SkypeOut call for ...
... where the country code is displayed, press OK. When you are finished, press OK. 5. For a Skype Contact, enter the Name or Skype Name, using the handset keys. When the correct information is "1" (North America), dial +19055556622. For a SkypeOut Contact, enter the Contact Name using the... handset keys. Enter the number of contact and press OK. 4. Scroll to your list. When you are finished, press OK. NOTE: To make a SkypeOut call for ...

User Guide
Page 27
... names displays. 4. Press Enter. will be displayed. Press Select. 3. Scroll to find the name. Scroll through the Contact list or use the handset key to change the name. Scroll to highlight the name you enter the same name for a Skype user that is not on your contact list.... Press Select. 3. Pres.s Call. The more specific the name, the shorter the search. A list of the name. NOTE: If you want, or use the handset keys to the user's name and press Options. Press Menu. 2. Scroll to your contact list. 1. Finding a Skype User You can also: 1. Chapter 4: Using...
... names displays. 4. Press Enter. will be displayed. Press Select. 3. Scroll to find the name. Scroll through the Contact list or use the handset key to change the name. Scroll to highlight the name you enter the same name for a Skype user that is not on your contact list.... Press Select. 3. Pres.s Call. The more specific the name, the shorter the search. A list of the name. NOTE: If you want, or use the handset keys to the user's name and press Options. Press Menu. 2. Scroll to your contact list. 1. Finding a Skype User You can also: 1. Chapter 4: Using...

User Guide
Page 29
..., Contact list, find the name you want to change. Use Clear to Block. Scroll to make a correction. 4. Scroll to confirm. Edit the name using the handset keys. Blocking a Contact You can allow new, rename, block, unblock or remove a contact from your list. Press Select. 3. A confirmation request will be dialed. Using the...
..., Contact list, find the name you want to change. Use Clear to Block. Scroll to make a correction. 4. Scroll to confirm. Edit the name using the handset keys. Blocking a Contact You can allow new, rename, block, unblock or remove a contact from your list. Press Select. 3. A confirmation request will be dialed. Using the...