
Installation Guide
Page 109
...the Catalyst 6506, Catalyst 6506-E, Catalyst 6509, Catalyst 6509-E, and Catalyst 6513 switch chassis only. Repeat Steps 1 and 2 for use with the first bracket. Figure 3-1 Installing the Shelf Brackets Shelf bracket Shelf bracket 12-24 x 3/4-inch or 10-32 x 3/4-inch screw (6x) H9466 OL-5781-04 Catalyst 6500 Series Switches ...access to install the rack-mount kit: • Number 1 and number 2 Phillips screwdrivers • 3/16-inch flat-blade screwdriver • Tape measure and level Installing the Shelf Brackets and Crossbar Bracket Note The shelf brackets and crossbar bracket are ...
...the Catalyst 6506, Catalyst 6506-E, Catalyst 6509, Catalyst 6509-E, and Catalyst 6513 switch chassis only. Repeat Steps 1 and 2 for use with the first bracket. Figure 3-1 Installing the Shelf Brackets Shelf bracket Shelf bracket 12-24 x 3/4-inch or 10-32 x 3/4-inch screw (6x) H9466 OL-5781-04 Catalyst 6500 Series Switches ...access to install the rack-mount kit: • Number 1 and number 2 Phillips screwdrivers • 3/16-inch flat-blade screwdriver • Tape measure and level Installing the Shelf Brackets and Crossbar Bracket Note The shelf brackets and crossbar bracket are ...

Installation Guide
Page 142
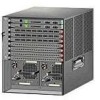
..." section on page 4-6 Catalyst 6506, Catalyst 6506-E, Catalyst 6509, Catalyst 6509-E, Catalyst 6509-NEB, Catalyst 6509-NEB-A, Catalyst 6513 "Removing and Installing the 1000 W, 1300 W, 2500 W, 3000 W, 4000 W, and 6000 W AC-Input Power Supplies" section on the power supply. Table 4-1 lists the AC-input power supplies, the chassis that they are not interchangeable between the Catalyst 6500 series chassis. Catalyst 6500 Series Switches Installation Guide 4-2 OL...
..." section on page 4-6 Catalyst 6506, Catalyst 6506-E, Catalyst 6509, Catalyst 6509-E, Catalyst 6509-NEB, Catalyst 6509-NEB-A, Catalyst 6513 "Removing and Installing the 1000 W, 1300 W, 2500 W, 3000 W, 4000 W, and 6000 W AC-Input Power Supplies" section on the power supply. Table 4-1 lists the AC-input power supplies, the chassis that they are not interchangeable between the Catalyst 6500 series chassis. Catalyst 6500 Series Switches Installation Guide 4-2 OL...
Installation Guide
Page 146
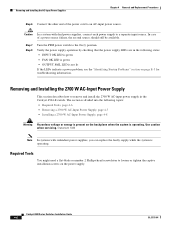
...OK LED is green • FAN OK LED is green • OUTPUT FAIL LED is operating. Required Tools You might need a flat-blade or number 2 Phillips-head screwdriver to loosen or tighten the captive installation screws on page E-3 for troubleshooting information. Removing and Installing the 2700... Guide 4-6 OL-5781-04 Verify the power supply operation by checking that the power supply LEDs are in the Catalyst 6504-E switch. Step 7 Step 8 Turn the PEM power switch to remove and install the 2700 W AC-input power supply in the following topics: • Required Tools, page 4-6 &#...
...OK LED is green • FAN OK LED is green • OUTPUT FAIL LED is operating. Required Tools You might need a flat-blade or number 2 Phillips-head screwdriver to loosen or tighten the captive installation screws on page E-3 for troubleshooting information. Removing and Installing the 2700... Guide 4-6 OL-5781-04 Verify the power supply operation by checking that the power supply LEDs are in the Catalyst 6504-E switch. Step 7 Step 8 Turn the PEM power switch to remove and install the 2700 W AC-input power supply in the following topics: • Required Tools, page 4-6 &#...
Installation Guide
Page 149
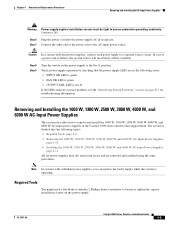
...not lit If the LEDs indicate a power problem, see the "Identifying Startup Problems" section on the power supply. Required Tools You might need a flat-blade or number 2 Phillips-head screwdriver to the On (|) position. Removing and Installing the 1000 W, 1300 W, 2500 W, 3000 W, 4000 W, and 6000 ...supply while the system is divided into the power supply AC-in the Catalyst 6500 series switches that the power supply LEDs are removed and installed using the same procedures. OL-5781-04 Catalyst 6500 Series Switches Installation Guide 4-9 In case of the power cord to remove and ...
...not lit If the LEDs indicate a power problem, see the "Identifying Startup Problems" section on the power supply. Required Tools You might need a flat-blade or number 2 Phillips-head screwdriver to the On (|) position. Removing and Installing the 1000 W, 1300 W, 2500 W, 3000 W, 4000 W, and 6000 ...supply while the system is divided into the power supply AC-in the Catalyst 6500 series switches that the power supply LEDs are removed and installed using the same procedures. OL-5781-04 Catalyst 6500 Series Switches Installation Guide 4-9 In case of the power cord to remove and ...

Installation Guide
Page 153
... and Installing the DC-Input Power Supplies This section covers the DC-input power supply removal and installation procedure for the Catalyst 6503 and the Catalyst 6503-E switches. Removing and Installing a 950 W DC-Input Power Supply This section describes how to remove and install the 950 W...W DC-input power supply can be installed in the Catalyst 6503 and the Catalyst 6503-E switch chassis only. Tools Required You might need a flat-blade or number 2 Phillips-head screwdriver to remain isolated from the system frame and the chassis (DC-I). The section is to loosen or tighten the...
... and Installing the DC-Input Power Supplies This section covers the DC-input power supply removal and installation procedure for the Catalyst 6503 and the Catalyst 6503-E switches. Removing and Installing a 950 W DC-Input Power Supply This section describes how to remove and install the 950 W...W DC-input power supply can be installed in the Catalyst 6503 and the Catalyst 6503-E switch chassis only. Tools Required You might need a flat-blade or number 2 Phillips-head screwdriver to remain isolated from the system frame and the chassis (DC-I). The section is to loosen or tighten the...

Installation Guide
Page 157
...4-17 • Installing a 1300 W or 2500 W DC-Input Power Supply, page 4-22 Required Tools Use a flat-blade or number 2 Phillips-head screwdriver to cut any of adhesive tape over the circuit breaker handle to the DC circuit on... 1300 W DC power supply or Figure 4-12 for the 2500 W DC power supply.) OL-5781-04 Catalyst 6500 Series Switches Installation Guide 4-17 Removing a 1300 W or 2500 W DC-Input Power Supply Warning Before performing any cable... following procedures, ensure that power is removed from the chassis. Turn the power switch to the Off (0) position on the power supply.
...4-17 • Installing a 1300 W or 2500 W DC-Input Power Supply, page 4-22 Required Tools Use a flat-blade or number 2 Phillips-head screwdriver to cut any of adhesive tape over the circuit breaker handle to the DC circuit on... 1300 W DC power supply or Figure 4-12 for the 2500 W DC power supply.) OL-5781-04 Catalyst 6500 Series Switches Installation Guide 4-17 Removing a 1300 W or 2500 W DC-Input Power Supply Warning Before performing any cable... following procedures, ensure that power is removed from the chassis. Turn the power switch to the Off (0) position on the power supply.

Installation Guide
Page 165
... Power Supply, page 4-27 Required Tools Use a flat-blade or number 2 Phillips-head screwdriver to perform these steps to remove a DC-input power supply: Step 1 Step 2 Verify that power is off the terminal block. (See Figure 4-18.) OL-5781-04 Catalyst 6500 Series Switches Installation Guide 4-25 Turn OFF the DC power line...
... Power Supply, page 4-27 Required Tools Use a flat-blade or number 2 Phillips-head screwdriver to perform these steps to remove a DC-input power supply: Step 1 Step 2 Verify that power is off the terminal block. (See Figure 4-18.) OL-5781-04 Catalyst 6500 Series Switches Installation Guide 4-25 Turn OFF the DC power line...

Installation Guide
Page 171
... DC-Input Power Supply, page 4-31 • Installing a 4000 W DC-Input Power Supply, page 4-35 Required Tools Use a flat-blade or number 2 Phillips-head screwdriver to perform these steps to remove a 4000 W DC-input power supply: Step 1 Step 2 Verify that ...power is off to the DC circuit connected to the Off (0) position on the circuit. OL-5781-04 Catalyst 6500 Series Switches Installation Guide 4-31 As an added precaution, place the appropriate safety flag and lockout devices at the source power... into the following procedures, ensure that power is removed from the chassis.
... DC-Input Power Supply, page 4-31 • Installing a 4000 W DC-Input Power Supply, page 4-35 Required Tools Use a flat-blade or number 2 Phillips-head screwdriver to perform these steps to remove a 4000 W DC-input power supply: Step 1 Step 2 Verify that ...power is off to the DC circuit connected to the Off (0) position on the circuit. OL-5781-04 Catalyst 6500 Series Switches Installation Guide 4-31 As an added precaution, place the appropriate safety flag and lockout devices at the source power... into the following procedures, ensure that power is removed from the chassis.

Installation Guide
Page 192
...filler plate (Cisco part number 800-16719-01) over the opening, and secure it with one hand, and slide it completely out of the chassis. Removing and Installing the Power Entry Modules (PEMs) Chapter 4 Removal and Replacement Procedures Figure 4-41 Catalyst 6503 Switch-Power Supply ...Location 63031 Power supply 2 (redundant) Power supply 1 INPUT OK FAN OUTPUT OK FAIL INPUT FAN OUTPUT OK OK FAIL Required Tools Use a flat-blade...
...filler plate (Cisco part number 800-16719-01) over the opening, and secure it with one hand, and slide it completely out of the chassis. Removing and Installing the Power Entry Modules (PEMs) Chapter 4 Removal and Replacement Procedures Figure 4-41 Catalyst 6503 Switch-Power Supply ...Location 63031 Power supply 2 (redundant) Power supply 1 INPUT OK FAN OUTPUT OK FAIL INPUT FAN OUTPUT OK OK FAIL Required Tools Use a flat-blade...

Installation Guide
Page 197
OL-5781-04 Catalyst 6500 Series Switches Installation Guide 4-57 Chapter 4 Removal and Replacement Procedures Removing ... CARRAILEARRM RX TX PORT 3 ACTIVE TX RX CARRAILEARRM RX TX PORT4 Figure 4-48 DC-Input PEM Catalyst 6503 DC PEM 79980 68154 Captive installation screws Removing and Installing the Fan Assembly This section describes how... an electrical hazard or damage to remove and install fan assemblies for the Catalyst 6500 series switches. Required Tools You might need a flat-blade or number 2 Phillips-head screwdriver to loosen or tighten the captive installation ...
OL-5781-04 Catalyst 6500 Series Switches Installation Guide 4-57 Chapter 4 Removal and Replacement Procedures Removing ... CARRAILEARRM RX TX PORT 3 ACTIVE TX RX CARRAILEARRM RX TX PORT4 Figure 4-48 DC-Input PEM Catalyst 6503 DC PEM 79980 68154 Captive installation screws Removing and Installing the Fan Assembly This section describes how... an electrical hazard or damage to remove and install fan assemblies for the Catalyst 6500 series switches. Required Tools You might need a flat-blade or number 2 Phillips-head screwdriver to loosen or tighten the captive installation ...

Installation Guide
Page 198
...Catalyst 6509-NEB switch. (The fan tray is located above the module cage.) • See Figure 4-54 for the Catalyst 6513 switch. (The fan tray is located to unseat the fan assembly power connector from the spinning fan blades. rock it gently, if necessary, to the left of the chassis...56 for the Catalyst 6509-NEB-A switch. (The two fan trays are located above the module cage.) Note On Catalyst 6509-NEB-A switches equipped with both hands, and pull it in a safe place. 4-58 Catalyst 6500 Series Switches Installation Guide OL-5781-04 Let the fan blades completely stop completely ...
...Catalyst 6509-NEB switch. (The fan tray is located above the module cage.) • See Figure 4-54 for the Catalyst 6513 switch. (The fan tray is located to unseat the fan assembly power connector from the spinning fan blades. rock it gently, if necessary, to the left of the chassis...56 for the Catalyst 6509-NEB-A switch. (The two fan trays are located above the module cage.) Note On Catalyst 6509-NEB-A switches equipped with both hands, and pull it in a safe place. 4-58 Catalyst 6500 Series Switches Installation Guide OL-5781-04 Let the fan blades completely stop completely ...