
Hardware Installation Guide
Page 7
... P E N D I X C A P P E N D I X 78-13342-03 Determining the Configuration Register Value 3-2 Resetting the Router 3-4 Resetting the Password 3-6 Resetting the Configuration Register Value 3-6 Problem-Solving 3-7 OK LED Diagnostics 3-7 Troubleshooting WICs and VICs 3-8 Troubleshooting the Power ... BRI Card B-5 Installing and Upgrading Memory and Packet Voice Data Modules C-1 Safety Information C-1 Opening the Chassis C-3 Locating Modules C-4 Installing a DIMM C-4 Installing a SIMM C-6 Installing a PVDM C-7 Closing the Chassis C-10 Cisco 1760 Modular Access Router Hardware Installation Guide ix
... P E N D I X C A P P E N D I X 78-13342-03 Determining the Configuration Register Value 3-2 Resetting the Router 3-4 Resetting the Password 3-6 Resetting the Configuration Register Value 3-6 Problem-Solving 3-7 OK LED Diagnostics 3-7 Troubleshooting WICs and VICs 3-8 Troubleshooting the Power ... BRI Card B-5 Installing and Upgrading Memory and Packet Voice Data Modules C-1 Safety Information C-1 Opening the Chassis C-3 Locating Modules C-4 Installing a DIMM C-4 Installing a SIMM C-6 Installing a PVDM C-7 Closing the Chassis C-10 Cisco 1760 Modular Access Router Hardware Installation Guide ix
Hardware Installation Guide
Page 8
... Private Network Module D-1 Before You Begin D-1 VPN Module Parts D-1 Safety Warnings D-2 Preventing Electrostatic Discharge Damage D-3 Installing the VPN Module in a Cisco 1760 Router D-4 Opening the Cisco 1760 Chassis D-4 Installing the VPN Module D-6 Closing the Cisco 1760 Chassis D-9 Installing the Echo Canceler Expansion Modules on Cisco Interface Cards E-1 Multiflex Trunk Interface Cards E-1 Echo E-2 Echo Canceler Expansion Modules E-2 Installing and Configuring the Echo Canceler Expansion Modules E-3 Cisco 1760 Modular Access Router Hardware Installation...
... Private Network Module D-1 Before You Begin D-1 VPN Module Parts D-1 Safety Warnings D-2 Preventing Electrostatic Discharge Damage D-3 Installing the VPN Module in a Cisco 1760 Router D-4 Opening the Cisco 1760 Chassis D-4 Installing the VPN Module D-6 Closing the Cisco 1760 Chassis D-9 Installing the Echo Canceler Expansion Modules on Cisco Interface Cards E-1 Multiflex Trunk Interface Cards E-1 Echo E-2 Echo Canceler Expansion Modules E-2 Installing and Configuring the Echo Canceler Expansion Modules E-3 Cisco 1760 Modular Access Router Hardware Installation...
Hardware Installation Guide
Page 10
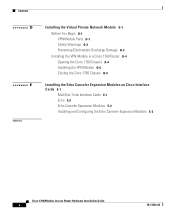
... the Cisco 1751 and 1760 Routers provides information about the echo canceler expansion modules that you might have with your router. • Appendix D, "Installing the Virtual Private Network Module," describes how to install the Virtual Private Network (VPN) module in this product: • Quick Start Guide for use Cisco IOS software to configure voice interfaces and virtual LANs (VLANs). Cisco 1760...
... the Cisco 1751 and 1760 Routers provides information about the echo canceler expansion modules that you might have with your router. • Appendix D, "Installing the Virtual Private Network Module," describes how to install the Virtual Private Network (VPN) module in this product: • Quick Start Guide for use Cisco IOS software to configure voice interfaces and virtual LANs (VLANs). Cisco 1760...

Hardware Installation Guide
Page 33
... present. See Table 3-1 in the "Troubleshooting" chapter for how to the router, basic router functionality, and the presence of packet voice data modules (PVDMs) and Virtual Private Network (VPN) modules. On when a VPN module is operating in half-duplex mode. 78-13342-03 Cisco 1760 Modular Access Router Hardware Installation Guide 1-5 Yellow Blinks when there are described in Table 1-4. Table...
... present. See Table 3-1 in the "Troubleshooting" chapter for how to the router, basic router functionality, and the presence of packet voice data modules (PVDMs) and Virtual Private Network (VPN) modules. On when a VPN module is operating in half-duplex mode. 78-13342-03 Cisco 1760 Modular Access Router Hardware Installation Guide 1-5 Yellow Blinks when there are described in Table 1-4. Table...
Hardware Installation Guide
Page 37
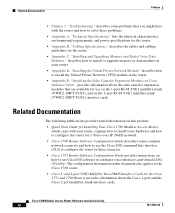
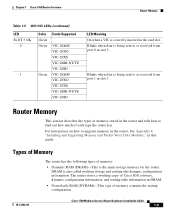
...Blinks when data is the main storage memory for the router. Types of Memory The router has the following types of memory contains the startup configuration. 78-13342-03 Cisco 1760 Modular Access Router Hardware Installation Guide 1-9 Blinks when data is correctly ...inserted in this guide. Router Memory This section describes the types of memory stored in the router and tells how to upgrade memory in the router, See Appendix C, "Installing and Upgrading Memory and Packet Voice Data Modules...
...Blinks when data is the main storage memory for the router. Types of Memory The router has the following types of memory contains the startup configuration. 78-13342-03 Cisco 1760 Modular Access Router Hardware Installation Guide 1-9 Blinks when data is correctly ...inserted in this guide. Router Memory This section describes the types of memory stored in the router and tells how to upgrade memory in the router, See Appendix C, "Installing and Upgrading Memory and Packet Voice Data Modules...

Hardware Installation Guide
Page 66
...: FF FF FF FF FF FF FF FF FF FF FF FF FF FF FF FF Packet Voice DSP Module Slot 0: Hardware Revision : 2.2 Part Number : 73-3815-01 Board Revision : A0 Cisco 1760 Modular Access Router Hardware Installation Guide 3-8 78-13342-03 The user programmable machine has a write failure. The parameter RAM area of...
...: FF FF FF FF FF FF FF FF FF FF FF FF FF FF FF FF Packet Voice DSP Module Slot 0: Hardware Revision : 2.2 Part Number : 73-3815-01 Board Revision : A0 Cisco 1760 Modular Access Router Hardware Installation Guide 3-8 78-13342-03 The user programmable machine has a write failure. The parameter RAM area of...

Hardware Installation Guide
Page 67
... 50 30 33 33 39 0x20: 30 30 37 58 03 00 81 00 00 00 00 04 00 09 02 FF Packet Voice DSP Module Slot 1: Hardware Revision : 2.2 Part Number : 73-3741-01 Board Revision : A0 Deviation Number : 0-0 Fab Version : 02 PCB Serial Number : ICP0326001Y RMA Test History : 00 RMA... 00 01 03 00 FF FF FF FF FF FF FF FF WIC/VIC Slot 1: Dual FXS Voice Interface Card Hardware revision 1.1 Board revision F0 Cisco 1760 Modular Access Router Hardware Installation Guide 3-9
... 50 30 33 33 39 0x20: 30 30 37 58 03 00 81 00 00 00 00 04 00 09 02 FF Packet Voice DSP Module Slot 1: Hardware Revision : 2.2 Part Number : 73-3741-01 Board Revision : A0 Deviation Number : 0-0 Fab Version : 02 PCB Serial Number : ICP0326001Y RMA Test History : 00 RMA... 00 01 03 00 FF FF FF FF FF FF FF FF WIC/VIC Slot 1: Dual FXS Voice Interface Card Hardware revision 1.1 Board revision F0 Cisco 1760 Modular Access Router Hardware Installation Guide 3-9

Hardware Installation Guide
Page 68
...0014501612 Part number 800-02493-01 Test history 0x00 RMA number 00-00-00 Connector type WAN Module EEPROM format version 1 EEPROM contents (hex): 0x20: 01 0E 01 01 00 DD 46...number 0019621176 Part number 800-02493-02 Test history 0x00 RMA number 00-00-00 Connector type WAN Module EEPROM format version 1 EEPROM contents (hex): 0x20: 01 0E 01 01 01 2B 65 38... for each port available on the router. Table 3-2 lists problems that could occur with the WICs and VICs and describes possible solutions. 3-10 Cisco 1760 Modular Access Router Hardware Installation Guide 78-13342-03
...0014501612 Part number 800-02493-01 Test history 0x00 RMA number 00-00-00 Connector type WAN Module EEPROM format version 1 EEPROM contents (hex): 0x20: 01 0E 01 01 00 DD 46...number 0019621176 Part number 800-02493-02 Test history 0x00 RMA number 00-00-00 Connector type WAN Module EEPROM format version 1 EEPROM contents (hex): 0x20: 01 0E 01 01 01 2B 65 38... for each port available on the router. Table 3-2 lists problems that could occur with the WICs and VICs and describes possible solutions. 3-10 Cisco 1760 Modular Access Router Hardware Installation Guide 78-13342-03

Hardware Installation Guide
Page 75
...PVDMs, VPN, SIMM, or DRAM module) Weight, fully populated 9.4 lb (4.3 kg). Ethernet port RJ-45. Auxiliary port RJ-45. Weight Weight (no WICs, VICs, 8.2 lb (3.7 kg). DC-DC regulators supply +3.3V and +2.5V from -12V. Linear regulator supplies -5V from +5V. Table A-1 Router Specifications ...1.7 x 17.5 x 12.8 in. (4.32 x 44.45 x 32.51 cm). Power Consumption Up to 50W when fully populated. 78-13342-03 Cisco 1760 Modular Access Router Hardware Installation Guide A-1 Power Supply On-board Supplies regulated +5V, +12V, and -12V. A A P P E N D I X Technical Specifications ...
...PVDMs, VPN, SIMM, or DRAM module) Weight, fully populated 9.4 lb (4.3 kg). Ethernet port RJ-45. Auxiliary port RJ-45. Weight Weight (no WICs, VICs, 8.2 lb (3.7 kg). DC-DC regulators supply +3.3V and +2.5V from -12V. Linear regulator supplies -5V from +5V. Table A-1 Router Specifications ...1.7 x 17.5 x 12.8 in. (4.32 x 44.45 x 32.51 cm). Power Consumption Up to 50W when fully populated. 78-13342-03 Cisco 1760 Modular Access Router Hardware Installation Guide A-1 Power Supply On-board Supplies regulated +5V, +12V, and -12V. A A P P E N D I X Technical Specifications ...

Hardware Installation Guide
Page 83
... Safety Information This section contains safety information that has an on/off switch, turn off the power and unplug the power cord. 78-13342-03 Cisco 1760 Modular Access Router Hardware Installation Guide C-1 APPENDIX C Installing and Upgrading Memory and Packet Voice Data Modules This chapter describes how to install or upgrade memory or data...
... Safety Information This section contains safety information that has an on/off switch, turn off the power and unplug the power cord. 78-13342-03 Cisco 1760 Modular Access Router Hardware Installation Guide C-1 APPENDIX C Installing and Upgrading Memory and Packet Voice Data Modules This chapter describes how to install or upgrade memory or data...
Hardware Installation Guide
Page 84
... periods of whether power to avoid contact with telephone-network voltages. When detaching cables, detach the end away from the router first. Warning Do not work on equipment that is connected to install or replace this procedure, wear grounding wrist straps...WAN ports regardless of lightning activity. Safety Information Appendix C Installing and Upgrading Memory and Packet Voice Data Modules Warning Before opening the chassis, disconnect the telephone-network cables to the router is OFF or ON. Cisco 1760 Modular Access Router Hardware Installation Guide C-2 78-13342-03
... periods of whether power to avoid contact with telephone-network voltages. When detaching cables, detach the end away from the router first. Warning Do not work on equipment that is connected to install or replace this procedure, wear grounding wrist straps...WAN ports regardless of lightning activity. Safety Information Appendix C Installing and Upgrading Memory and Packet Voice Data Modules Warning Before opening the chassis, disconnect the telephone-network cables to the router is OFF or ON. Cisco 1760 Modular Access Router Hardware Installation Guide C-2 78-13342-03

Hardware Installation Guide
Page 85
... Voice Data Modules Opening the Chassis Opening the Chassis Follow these steps to remove the screws that the router is turned off in Figure C-2. Figure C-2 Removing the Top Cover of the Router 60957 1.5 M150A00X--6/2104.50HAVz~MAX Pull the top cover off and is disconnected from the power supply. Note Some Cisco 1760 routers have five...
... Voice Data Modules Opening the Chassis Opening the Chassis Follow these steps to remove the screws that the router is turned off in Figure C-2. Figure C-2 Removing the Top Cover of the Router 60957 1.5 M150A00X--6/2104.50HAVz~MAX Pull the top cover off and is disconnected from the power supply. Note Some Cisco 1760 routers have five...

Hardware Installation Guide
Page 86
..., and begin installing modules. DIMMs are available in the router. Locating Modules Appendix C Installing and Upgrading Memory and Packet Voice Data Modules Step 4 Place the router bottom on the motherboard. Locating Modules Figure C-3 shows where to increase the amount of dynamic RAM (DRAM) in the following sizes: • 16 MB Cisco 1760 Modular Access Router Hardware Installation Guide C-4 78...
..., and begin installing modules. DIMMs are available in the router. Locating Modules Appendix C Installing and Upgrading Memory and Packet Voice Data Modules Step 4 Place the router bottom on the motherboard. Locating Modules Figure C-3 shows where to increase the amount of dynamic RAM (DRAM) in the following sizes: • 16 MB Cisco 1760 Modular Access Router Hardware Installation Guide C-4 78...

Hardware Installation Guide
Page 87
... backplane with your hand or any existing DIMM by the card edges only. Follow these steps to install a DIMM on the edge of the "Cisco 1760 Router Overview" chapter. Figure C-4 Installing a DIMM DIMM 2 DIMM slot 1 2 42289 DIMM slot guides Step 3 Insert the DIMM into the DIMM slot..., making sure that the notches on the router motherboard: Warning During this procedure, wear grounding wrist straps to avoid ESD damage to see the router memory size. Appendix C Installing and Upgrading Memory and Packet Voice Data Modules Installing a DIMM • 32 MB • 64...
... backplane with your hand or any existing DIMM by the card edges only. Follow these steps to install a DIMM on the edge of the "Cisco 1760 Router Overview" chapter. Figure C-4 Installing a DIMM DIMM 2 DIMM slot 1 2 42289 DIMM slot guides Step 3 Insert the DIMM into the DIMM slot..., making sure that the notches on the router motherboard: Warning During this procedure, wear grounding wrist straps to avoid ESD damage to see the router memory size. Appendix C Installing and Upgrading Memory and Packet Voice Data Modules Installing a DIMM • 32 MB • 64...

Hardware Installation Guide
Page 88
... 45 degrees toward you could shock yourself. When the SIMM is properly seated, the connector springs will click into the slot (see Figure C-5). Cisco 1760 Modular Access Router Hardware Installation Guide C-6 78-13342-03 Remove any metal tool, or you . Face the front panel of Flash memory in size. Step 4...upgrade Flash memory is lined up over the end of the DIMM. Installing a SIMM Appendix C Installing and Upgrading Memory and Packet Voice Data Modules Step 4 Press the DIMM firmly into the slot until the slot guides on each side of the slot move up and over the edge ...
... 45 degrees toward you could shock yourself. When the SIMM is properly seated, the connector springs will click into the slot (see Figure C-5). Cisco 1760 Modular Access Router Hardware Installation Guide C-6 78-13342-03 Remove any metal tool, or you . Face the front panel of Flash memory in size. Step 4...upgrade Flash memory is lined up over the end of the DIMM. Installing a SIMM Appendix C Installing and Upgrading Memory and Packet Voice Data Modules Step 4 Press the DIMM firmly into the slot until the slot guides on each side of the slot move up and over the edge ...

Hardware Installation Guide
Page 89
... of the SIMM when it is fully installed (on both sides). 2. Each analog VIC used with the Cisco 1760 router has two voice ports and requires a single DSP. Appendix C Installing and Upgrading Memory and Packet Voice Data Modules Installing a PVDM Figure C-5 Installing a SIMM View from vertical. 3. The locking spring will clip the front side...
... of the SIMM when it is fully installed (on both sides). 2. Each analog VIC used with the Cisco 1760 router has two voice ports and requires a single DSP. Appendix C Installing and Upgrading Memory and Packet Voice Data Modules Installing a PVDM Figure C-5 Installing a SIMM View from vertical. 3. The locking spring will clip the front side...

Hardware Installation Guide
Page 90
...equal to the number of DSPs to increase the number of DSPs required by pulling the PVDM snaps away from the module. (See Figure C-6.) Cisco 1760 Modular Access Router Hardware Installation Guide C-8 78-13342-03 Warning During this procedure, wear grounding wrist straps to avoid ESD damage to 2... voice-BRI VICs The Cisco 1760 router has two PVDM slots. The total number of DSPs provided by one PVDM (a single DSP), and you want to 3, you could shock yourself. Installing a PVDM Appendix C Installing and Upgrading Memory and Packet Voice Data Modules Table C-1 PVDM and VIC ...
...equal to the number of DSPs to increase the number of DSPs required by pulling the PVDM snaps away from the module. (See Figure C-6.) Cisco 1760 Modular Access Router Hardware Installation Guide C-8 78-13342-03 Warning During this procedure, wear grounding wrist straps to avoid ESD damage to 2... voice-BRI VICs The Cisco 1760 router has two PVDM slots. The total number of DSPs provided by one PVDM (a single DSP), and you want to 3, you could shock yourself. Installing a PVDM Appendix C Installing and Upgrading Memory and Packet Voice Data Modules Table C-1 PVDM and VIC ...

Hardware Installation Guide
Page 91
... the front panel of the PVDM are engaged. 78-13342-03 Cisco 1760 Modular Access Router Hardware Installation Guide C-9 Orient the module so that the indexing slot in the slot. Caution Handle PVDMs by mishandling. Step 5 Holding the module firmly in the slot, rotate it into the PVDM slot. Make...can be installed, install it toward the rear of the router, until you hear a clicking sound and the module is firmly seated in the connector (bottom edge) of the module is to be damaged by the edges only. Insert the module vertically into PVDM slot 0. PVDMs are made. Appendix C...
... the front panel of the PVDM are engaged. 78-13342-03 Cisco 1760 Modular Access Router Hardware Installation Guide C-9 Orient the module so that the indexing slot in the slot. Caution Handle PVDMs by mishandling. Step 5 Holding the module firmly in the slot, rotate it into the PVDM slot. Make...can be installed, install it toward the rear of the router, until you hear a clicking sound and the module is firmly seated in the connector (bottom edge) of the module is to be damaged by the edges only. Insert the module vertically into PVDM slot 0. PVDMs are made. Appendix C...

Hardware Installation Guide
Page 92
... and Upgrading Memory and Packet Voice Data Modules Closing the Chassis After installing memory or data modules on the motherboard, close the chassis by following these steps: Step 1 Step 2 Slide the top cover of the router back on the bottom of the Router," on page C-3.) C-10 Cisco 1760 Modular Access Router Hardware Installation Guide 78-13342-03
... and Upgrading Memory and Packet Voice Data Modules Closing the Chassis After installing memory or data modules on the motherboard, close the chassis by following these steps: Step 1 Step 2 Slide the top cover of the router back on the bottom of the Router," on page C-3.) C-10 Cisco 1760 Modular Access Router Hardware Installation Guide 78-13342-03

Hardware Installation Guide
Page 93
D A P P E N D I X Installing the Virtual Private Network Module This chapter describes how to install the VPN module. VPN Module Parts These parts are needed for installation and are included with the VPN module: • Two metal standoffs • Four screws 78-13342-03 Cisco 1760 Modular Access Router Hardware Installation Guide D-1 Read this section before installing the VPN module in your Cisco 1760 router. Before You Begin This section describes important safety information and the tools required to install the Virtual Private Network (VPN) module in a Cisco 1760 router.
D A P P E N D I X Installing the Virtual Private Network Module This chapter describes how to install the VPN module. VPN Module Parts These parts are needed for installation and are included with the VPN module: • Two metal standoffs • Four screws 78-13342-03 Cisco 1760 Modular Access Router Hardware Installation Guide D-1 Read this section before installing the VPN module in your Cisco 1760 router. Before You Begin This section describes important safety information and the tools required to install the Virtual Private Network (VPN) module in a Cisco 1760 router.


