User Guide
Page 2
...equipment and receiver. • Connect the equipment into an outlet on , the user is not intended for a Class B digital device, pursuant to Part 15 of the FCC Rules. This equipment generates, uses and can be sure to check the AC Adaptor for help. Address: 570 MT. Please... will not occur in a residential installation. NOTICE This equipment has been tested and found to comply with Part 15 of Conformity Model Number: WK-3300/WK-3800/WK-8000 Trade Name: CASIO COMPUTER CO., LTD. However, there is subject to the following important information before cleaning the product...
...equipment and receiver. • Connect the equipment into an outlet on , the user is not intended for a Class B digital device, pursuant to Part 15 of the FCC Rules. This equipment generates, uses and can be sure to check the AC Adaptor for help. Address: 570 MT. Please... will not occur in a residential installation. NOTICE This equipment has been tested and found to comply with Part 15 of Conformity Model Number: WK-3300/WK-3800/WK-8000 Trade Name: CASIO COMPUTER CO., LTD. However, there is subject to the following important information before cleaning the product...
User Guide
Page 7
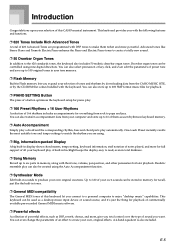
.... Up to 120 of your own sounds can be stored in tones. ❐ General MIDI compatibility The General MIDI tones of this CASIO musical instrument. Advanced tones like the built-in memory for later playback. One-touch Preset instantly recalls the most suitable tone and tempo... "desktop music" capabilities. You can also store up to six parts in keyboard memory. ❐ Auto Accompaniment Simply play a chord and the corresponding rhythm, bass and chord parts play can also transfer accompaniment data from the CASIO MUSIC SITE, or by downloading data from your computer and store ...
.... Up to 120 of your own sounds can be stored in tones. ❐ General MIDI compatibility The General MIDI tones of this CASIO musical instrument. Advanced tones like the built-in memory for later playback. One-touch Preset instantly recalls the most suitable tone and tempo... "desktop music" capabilities. You can also store up to six parts in keyboard memory. ❐ Auto Accompaniment Simply play a chord and the corresponding rhythm, bass and chord parts play can also transfer accompaniment data from the CASIO MUSIC SITE, or by downloading data from your computer and store ...
User Guide
Page 8
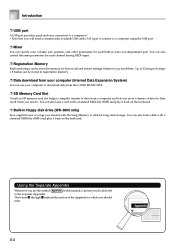
... H indicate the section of data for later recall when you need them. You can also control the same parameters for each built-in Auto Accompaniment part. Up to 32 setups (4 setups × 8 banks) can be stored in memory for later recall and instant settings whenever you need it means ...be stored in registration memory. ❐ Data download from your computer (Internet Data Expansion System) You can use your computer to download data from the CASIO MUSIC SITE. ❐ SD Memory Card Slot A built-in SD memory card slot helps to simplify transfer of data from a computer and lets ...
... H indicate the section of data for later recall when you need them. You can also control the same parameters for each built-in Auto Accompaniment part. Up to 32 setups (4 setups × 8 banks) can be stored in memory for later recall and instant settings whenever you need it means ...be stored in registration memory. ❐ Data download from your computer (Internet Data Expansion System) You can use your computer to download data from the CASIO MUSIC SITE. ❐ SD Memory Card Slot A built-in SD memory card slot helps to simplify transfer of data from a computer and lets ...
User Guide
Page 18
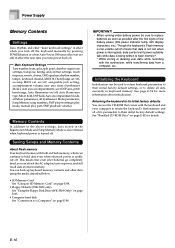
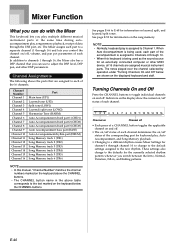
... parameters to their initial factory default settings, or to delete all Synthesizer Mode parameters, Song Memory song numbers, SMF player settings (play mode, manual play part, SMF playback volume) Memory Contents In addition to their initial factory default settings. See "Bundled CD-ROM Data" on /off . Saving Setups and Memory Contents...
... parameters to their initial factory default settings, or to delete all Synthesizer Mode parameters, Song Memory song numbers, SMF player settings (play mode, manual play part, SMF playback volume) Memory Contents In addition to their initial factory default settings. See "Bundled CD-ROM Data" on /off . Saving Setups and Memory Contents...
User Guide
Page 22
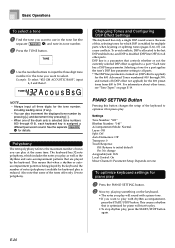
... notes you can also increment the displayed tone number by pressing [+] and decrement it for the tone you want to select. For information about other parts. Settings Tone Number: "000" Rhythm Number: "140" Accompaniment Mode: Normal Layer: Off Split: Off Auto Harmonize: Off Transpose: 0 Touch Response: Off: ...DSP line is a parameter that are played by the keyboard, the number of the tones offer only 10-note polyphony. Selecting a tone for a part applies the tone's DSP line parameter setting to all other tones, see "Tone Types" on (DSP effect is applied) for the 400 Advanced Tones ...
... notes you can also increment the displayed tone number by pressing [+] and decrement it for the tone you want to select. For information about other parts. Settings Tone Number: "000" Rhythm Number: "140" Accompaniment Mode: Normal Layer: Off Split: Off Auto Harmonize: Off Transpose: 0 Touch Response: Off: ...DSP line is a parameter that are played by the keyboard, the number of the tones offer only 10-note polyphony. Selecting a tone for a part applies the tone's DSP line parameter setting to all other tones, see "Tone Types" on (DSP effect is applied) for the 400 Advanced Tones ...
User Guide
Page 30
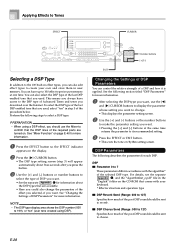
... describes the parameters for more information. 1 After selecting the DSP type you want, use the Mixer to confirm that the DSP lines of the required parts are turned on the CD-ROM that are available. • Here you could also change . • This displays the parameter setting screen. 2 Use the [+] and...
... describes the parameters for more information. 1 After selecting the DSP type you want, use the Mixer to confirm that the DSP lines of the required parts are turned on the CD-ROM that are available. • Here you could also change . • This displays the parameter setting screen. 2 Use the [+] and...

User Guide
Page 31
...Send, and DSP on page E-40 for more information. • Playing a demo tune (page E-12) automatically changes the effect to the one that parts setting. To turn on the display. 2 Use the [+] and [-] buttons or the number buttons to select the user DSP area number where you want... playing on .* * The Mixer DSP line setting is automatically turned off 1 Press the DSP button to flash on the DSP line for the currently selected part on . Indicator 2 Press the [̄] CURSOR button once. • This displays the reverb editing screen. • The reverb type setting screen (step 4)...
...Send, and DSP on page E-40 for more information. • Playing a demo tune (page E-12) automatically changes the effect to the one that parts setting. To turn on the display. 2 Use the [+] and [-] buttons or the number buttons to select the user DSP area number where you want... playing on .* * The Mixer DSP line setting is automatically turned off 1 Press the DSP button to flash on the DSP line for the currently selected part on . Indicator 2 Press the [̄] CURSOR button once. • This displays the reverb editing screen. • The reverb type setting screen (step 4)...
User Guide
Page 32
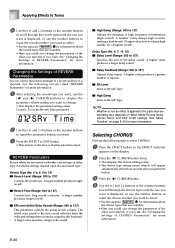
... delay repeat. A larger value specifies a larger echo sound. I High Damp Same as Reverb Type NOTE • Whether or not an effect is applied to the parts that are sounding also depends on Mixer Mode Reverb Send, Chorus Send, and DSP on the display. 2 Press the [̄] CURSOR button twice. • This...
... delay repeat. A larger value specifies a larger echo sound. I High Damp Same as Reverb Type NOTE • Whether or not an effect is applied to the parts that are sounding also depends on Mixer Mode Reverb Send, Chorus Send, and DSP on the display. 2 Press the [̄] CURSOR button twice. • This...

User Guide
Page 33
... Effects to Tones Changing the Settings of CHORUS Parameters You can control the relative strength of an effect and how it is applied to the parts that are sounding also depends on Mixer Mode Reverb Send, Chorus Send, and DSP on the effect. E-31 See the following section titled "CHORUS Parameters...
... Effects to Tones Changing the Settings of CHORUS Parameters You can control the relative strength of an effect and how it is applied to the parts that are sounding also depends on Mixer Mode Reverb Send, Chorus Send, and DSP on the effect. E-31 See the following section titled "CHORUS Parameters...

User Guide
Page 34
...RHYTHM ACCOMP VOLUME INTRO/ENDING 1/2 VARIATION/FILL-IN 1/2 SYNCHRO/FILL-IN NEXT TEMPO START/STOP This keyboard automatically plays bass and chord parts in keyboard memory. See "Internet Data Expansion System" on page E-82 for the melody notes you play with the chords you want...can also transfer accompaniment data from page E-34. For a complete list, see the separate Appendix C. The bass and chord parts are off ) FULL RANGE CHORD FINGERED CASIO CHORD • Only rhythm sounds are produced when all of the MODE button cycles through the available accompaniment modes as user ...
...RHYTHM ACCOMP VOLUME INTRO/ENDING 1/2 VARIATION/FILL-IN 1/2 SYNCHRO/FILL-IN NEXT TEMPO START/STOP This keyboard automatically plays bass and chord parts in keyboard memory. See "Internet Data Expansion System" on page E-82 for the melody notes you play with the chords you want...can also transfer accompaniment data from page E-34. For a complete list, see the separate Appendix C. The bass and chord parts are off ) FULL RANGE CHORD FINGERED CASIO CHORD • Only rhythm sounds are produced when all of the MODE button cycles through the available accompaniment modes as user ...

User Guide
Page 36
... keyboard • WK-8000 Accompaniment keyboard Melody keyboard NOTE • The accompaniment keyboard can adjust the accompaniment part volume level independently of the accompaniment keyboard. Chord Types CASIO CHORD accompaniment lets you play it possible for playing chords only. C seventh (C7) CC#DE E FF...keep the major chord key depressed and press any other two accompaniment keyboard keys located to easily play makes it . CASIO CHORD This method of chord play chords, regardless of previous musical knowledge and experience. Chord Types Example Major chords Major...
... keyboard • WK-8000 Accompaniment keyboard Melody keyboard NOTE • The accompaniment keyboard can adjust the accompaniment part volume level independently of the accompaniment keyboard. Chord Types CASIO CHORD accompaniment lets you play it possible for playing chords only. C seventh (C7) CC#DE E FF...keep the major chord key depressed and press any other two accompaniment keyboard keys located to easily play makes it . CASIO CHORD This method of chord play chords, regardless of previous musical knowledge and experience. Chord Types Example Major chords Major...

User Guide
Page 41
... volume setting Ac ompVo l 2 Use the number buttons or the [+]/[-] buttons to change Channel 5 to the tone you can adjust the volume of the accompaniment parts as volume balance. NOTE • The default harmonize note tone when you play on Auto Harmonize is performed by Auto Harmonize is assigned to the...
... volume setting Ac ompVo l 2 Use the number buttons or the [+]/[-] buttons to change Channel 5 to the tone you can adjust the volume of the accompaniment parts as volume balance. NOTE • The default harmonize note tone when you play on Auto Harmonize is performed by Auto Harmonize is assigned to the...
User Guide
Page 42
... Settings for channel 6 through channel 10 to change to the text marked on the keyboard below are assigned musical instrument parts. These settings also change to the default settings assigned to Channels 6 through 16) and lets you switch between the Intro...UP2) Split tone (LOW1) Layered/split tone (LOW2) Harmonize Tone (HARM) Auto Accompaniment chord part 1 (CHD1) Auto Accompaniment chord part 2 (CHD2) Auto Accompaniment chord part 3 (CHD3) Auto Accompaniment bass part (BASS) Auto Accompaniment rhythm part (DRUM) Song Memory track 1 (TR1) Song Memory track 2 (TR2) Song Memory track 3...
... Settings for channel 6 through channel 10 to change to the text marked on the keyboard below are assigned musical instrument parts. These settings also change to the default settings assigned to Channels 6 through 16) and lets you switch between the Intro...UP2) Split tone (LOW1) Layered/split tone (LOW2) Harmonize Tone (HARM) Auto Accompaniment chord part 1 (CHD1) Auto Accompaniment chord part 2 (CHD2) Auto Accompaniment chord part 3 (CHD3) Auto Accompaniment bass part (BASS) Auto Accompaniment rhythm part (DRUM) Song Memory track 1 (TR1) Song Memory track 2 (TR2) Song Memory track 3...
User Guide
Page 44
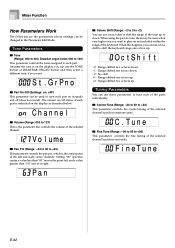
... Parameters You can use the TONE button or DRAWBAR ORGAN button and then select a different tone, if you can use these parameters to tune each part. C. Anytime the tone is the center point of the left , and a value greater than "00" moves it right. Channe l I Volume (Range: 000 to shift ... in cent units. When using the piccolo tone, there may be cases when very high notes you can be changed in the Parameter Edit Mode. I Part On/Off (Settings: on, oFF) This parameter can use octave shift to 127) This is indicated on /off (does not sound). S t .GrPno I Coarse Tune ...
... Parameters You can use the TONE button or DRAWBAR ORGAN button and then select a different tone, if you can use these parameters to tune each part. C. Anytime the tone is the center point of the left , and a value greater than "00" moves it right. Channe l I Volume (Range: 000 to shift ... in cent units. When using the piccolo tone, there may be cases when very high notes you can be changed in the Parameter Edit Mode. I Part On/Off (Settings: on, oFF) This parameter can use octave shift to 127) This is indicated on /off (does not sound). S t .GrPno I Coarse Tune ...

User Guide
Page 45
...) Sets the post-DSP volume. Rvb Send I Reverb Send (Range: 000 to 127) This parameter controls how much chorus send is applied to a part. ChoSnd NOTE • Changing the tone, volume, pan pot, coarse tune, fine tune, reverb send, or chorus send setting causes the corresponding MIDI ...• "Reverb Send" does not work with some drum sounds. D . A setting of "000" turns reverb off for a particular channel, or to all parts in place of 127 applies maximum chorus send. • "Chorus Send" does not work with drum sounds. I Chorus Send (Range: 000 to 127) This parameter...
...) Sets the post-DSP volume. Rvb Send I Reverb Send (Range: 000 to 127) This parameter controls how much chorus send is applied to a part. ChoSnd NOTE • Changing the tone, volume, pan pot, coarse tune, fine tune, reverb send, or chorus send setting causes the corresponding MIDI ...• "Reverb Send" does not work with some drum sounds. D . A setting of "000" turns reverb off for a particular channel, or to all parts in place of 127 applies maximum chorus send. • "Chorus Send" does not work with drum sounds. I Chorus Send (Range: 000 to 127) This parameter...

User Guide
Page 47
... sound. You can specify more volume for stronger pressure and less volume or a lighter pressure, or you can cause distortion or noise during the attack part of the tone. (3) Tone Pitch Parameters I Vibrato Type, Vibrato Delay, Vibrato Rate, Vibrato Depth These parameters adjust the vibrato effect, which causes periodic changes in...
... sound. You can specify more volume for stronger pressure and less volume or a lighter pressure, or you can cause distortion or noise during the attack part of the tone. (3) Tone Pitch Parameters I Vibrato Type, Vibrato Delay, Vibrato Rate, Vibrato Depth These parameters adjust the vibrato effect, which causes periodic changes in...
User Guide
Page 55
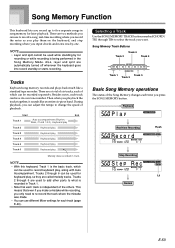
... Track 2 Track 4 Track 6 Track 1 Track 5 Track 3 Basic Song Memory operations The status of the Song Memory changes each track can be used to add other parts to record a song: real-time recording where you record the notes as you play them on the keyboard, and step recording where you input chords...
... Track 2 Track 4 Track 6 Track 1 Track 5 Track 3 Basic Song Memory operations The status of the Song Memory changes each track can be used to add other parts to record a song: real-time recording where you record the notes as you play them on the keyboard, and step recording where you input chords...

User Guide
Page 57
... The keyboard has memory for more information. • Remember that you want accompaniment to start, play a chord on the accompaniment keyboard. To start Auto Accompaniment part way into a recording In place of the track your are currently recording to be used as they are being used) whenever memory becomes full. •...
... The keyboard has memory for more information. • Remember that you want accompaniment to start, play a chord on the accompaniment keyboard. To start Auto Accompaniment part way into a recording In place of the track your are currently recording to be used as they are being used) whenever memory becomes full. •...

User Guide
Page 61
...press [4]. • Pressing the [̈] CURSOR button inputs rests up to Tracks 2 through 6 while playing back what you want to record melody parts only. To insert an ending In step 5, press INTRO/ENDING 1 or INTRO/ENDING 2 button at the start accompaniment with step recording" on Track... press VARIATION/FILL-IN 1 or VARIATION/ FILL-IN 2 button immediately before the chord where you can result in step 6. To add chord accompaniment part way through 6 is recorded. The procedure you use to insert the ending. E-59 Example: To input , press [4] and then [8]. Track 1 ...
...press [4]. • Pressing the [̈] CURSOR button inputs rests up to Tracks 2 through 6 while playing back what you want to record melody parts only. To insert an ending In step 5, press INTRO/ENDING 1 or INTRO/ENDING 2 button at the start accompaniment with step recording" on Track... press VARIATION/FILL-IN 1 or VARIATION/ FILL-IN 2 button immediately before the chord where you can result in step 6. To add chord accompaniment part way through 6 is recorded. The procedure you use to insert the ending. E-59 Example: To input , press [4] and then [8]. Track 1 ...
User Guide
Page 68
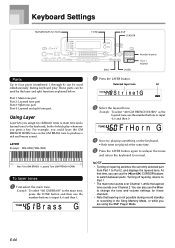
...2 Press the LAYER button. F rHo r n G 4 Now try playing something on layering switches the currently selected part from Part 1 to Part 2, and displays the layered tone. These parts can be used by the layer and split functions explained below. At that layering is not possible during keyboard play whenever... TONE button and then use the number buttons to input 4, 6 and then 0. Keyboard Settings TRANSPOSE/FUNCTION TONE EXIT CURSOR Parts Up to four parts (numbered 1 through 4) can be used simultaneously during record standby or recording in the Song Memory Mode, or while you ...
...2 Press the LAYER button. F rHo r n G 4 Now try playing something on layering switches the currently selected part from Part 1 to Part 2, and displays the layered tone. These parts can be used by the layer and split functions explained below. At that layering is not possible during keyboard play whenever... TONE button and then use the number buttons to input 4, 6 and then 0. Keyboard Settings TRANSPOSE/FUNCTION TONE EXIT CURSOR Parts Up to four parts (numbered 1 through 4) can be used simultaneously during record standby or recording in the Song Memory Mode, or while you ...


