

User Guide
Page 9
...use . • For safety reasons, unplug the power cord from the wall outlet.) • Never touch the plug while your original vendor or an authorized CASIO service provider about repair or replacement. Doing so can damage the cord and create the danger of fire and electric shock. (Always hold the plug... contact your hands are wet. Heat can melt the covering of the power cord and create the danger of fire and electric shock. • Never pull on the power cord when unplugging it , which creates the danger of fire and electric shock. • Be sure to unplug the power cord from...
...use . • For safety reasons, unplug the power cord from the wall outlet.) • Never touch the plug while your original vendor or an authorized CASIO service provider about repair or replacement. Doing so can damage the cord and create the danger of fire and electric shock. (Always hold the plug... contact your hands are wet. Heat can melt the covering of the power cord and create the danger of fire and electric shock. • Never pull on the power cord when unplugging it , which creates the danger of fire and electric shock. • Be sure to unplug the power cord from...
User Guide
Page 30
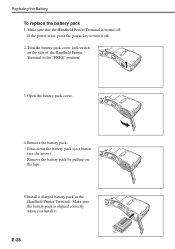
... pack in the Handheld Printer Terminal. Turn the battery pack cover lock switch on the tape. 5. Remove the battery pack. Remove the battery pack by pulling on the side of the Handheld Printer Terminal to turn it . Make sure that the Handheld Printer Terminal is aligned correctly when you install it...
... pack in the Handheld Printer Terminal. Turn the battery pack cover lock switch on the tape. 5. Remove the battery pack. Remove the battery pack by pulling on the side of the Handheld Printer Terminal to turn it . Make sure that the Handheld Printer Terminal is aligned correctly when you install it...
User Guide
Page 32
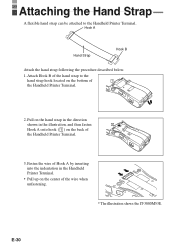
.... Attaching the Hand Strap A flexible hand strap can be attached to the hand strap hook located on the bottom of 1 the Handheld Printer Terminal. 2. E-30 Pull on the hand strap in the direction shown in the Handheld Printer Terminal. •...
.... Attaching the Hand Strap A flexible hand strap can be attached to the hand strap hook located on the bottom of 1 the Handheld Printer Terminal. 2. E-30 Pull on the hand strap in the direction shown in the Handheld Printer Terminal. •...
User Guide
Page 33
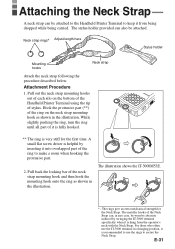
... by swinging the IT-3000 terminal specifically when it into overlapped part of the ring to make a room when hooking the protrusive part. 2. The rings give an extra mechanical strength for the first time. The metallic hooks of the Neck Strap can, in the illustration. Pull out the neck strap... hung from being dropped while being carried. E-31 The illustration shows the IT-3000M53E. * ; Pull back the locking bar of it is fully hooked. ** The ring is recommended to use the IT-3000 terminal in the illustration. For those who often use the rings to keep it is very stiff...
... by swinging the IT-3000 terminal specifically when it into overlapped part of the ring to make a room when hooking the protrusive part. 2. The rings give an extra mechanical strength for the first time. The metallic hooks of the Neck Strap can, in the illustration. Pull out the neck strap... hung from being dropped while being carried. E-31 The illustration shows the IT-3000M53E. * ; Pull back the locking bar of it is fully hooked. ** The ring is recommended to use the IT-3000 terminal in the illustration. For those who often use the rings to keep it is very stiff...
User Guide
Page 34
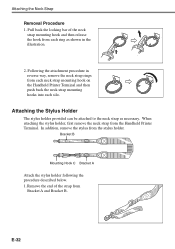
... described below. 1. Remove the end of the neck strap mounting hook and then release the hook from each silo. Attaching the Neck Strap Removal Procedure 1. Pull back the locking bar of the strap from each neck strap mounting hook on the Handheld Printer Terminal and then push back the neck strap...
... described below. 1. Remove the end of the neck strap mounting hook and then release the hook from each silo. Attaching the Neck Strap Removal Procedure 1. Pull back the locking bar of the strap from each neck strap mounting hook on the Handheld Printer Terminal and then push back the neck strap...
User Guide
Page 71
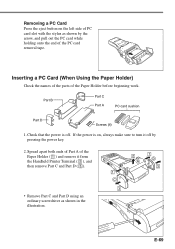
... the illustration. 1 C 3 2 A 1 D 3 E-69 Check that the power is on the left side of PC card slot with the stylus as shown by the arrow, and pull out the PC card while holding onto the end of the Paper Holder ( 1 ) and remove it off . Part B Part C Part A PC card cushion Part D Screws...
... the illustration. 1 C 3 2 A 1 D 3 E-69 Check that the power is on the left side of PC card slot with the stylus as shown by the arrow, and pull out the PC card while holding onto the end of the Paper Holder ( 1 ) and remove it off . Part B Part C Part A PC card cushion Part D Screws...
User Guide
Page 73
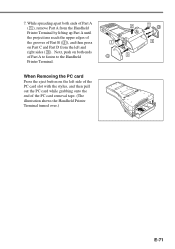
... the grooves of Part B ( 2 ), and then press on Part C and Part D from the left side of the PC card slot with the stylus, and then pull out the PC card while grabbing onto the end of Part A to fasten to the Handheld Printer Terminal. While spreading apart both ends of the...
... the grooves of Part B ( 2 ), and then press on Part C and Part D from the left side of the PC card slot with the stylus, and then pull out the PC card while grabbing onto the end of Part A to fasten to the Handheld Printer Terminal. While spreading apart both ends of the...
User Guide
Page 74
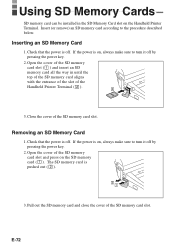
... off by pressing the power key. 2. Close the cover of the SD memory card slot. Check that the power is on the SD memory card ( 1 ). Pull out the SD memory card and close the cover of the SD memory card slot. The SD memory card is off by pressing the power...
... off by pressing the power key. 2. Close the cover of the SD memory card slot. Check that the power is on the SD memory card ( 1 ). Pull out the SD memory card and close the cover of the SD memory card slot. The SD memory card is off by pressing the power...