

User Guide
Page 16
...3000M54E2 only E-48 Bluetooth® Communication E-49 Resetting the Handheld Printer Terminal E-50 Performing a Full Reset (Initialization E-51 IT-3000 Specifications E-52 Using the Bridge Satellite Cradle (HA-B61IO E-54 E-14 Contents Safety Precautions E-1 Operating Precautions E-9 Important ...E-10...the Stylus Holder E-32 Configuring Handheld Printer Terminal Settings E-34 Calibrating Touch Screen Alignment E-34 Adjusting Display Contrast E-35 Adjusting Display Brightness E-35 Display Auto Dimmer E-35 Using the Printer E-36 When Using Roll Paper E-36 When Using Formed Sheet ...
...3000M54E2 only E-48 Bluetooth® Communication E-49 Resetting the Handheld Printer Terminal E-50 Performing a Full Reset (Initialization E-51 IT-3000 Specifications E-52 Using the Bridge Satellite Cradle (HA-B61IO E-54 E-14 Contents Safety Precautions E-1 Operating Precautions E-9 Important ...E-10...the Stylus Holder E-32 Configuring Handheld Printer Terminal Settings E-34 Calibrating Touch Screen Alignment E-34 Adjusting Display Contrast E-35 Adjusting Display Brightness E-35 Display Auto Dimmer E-35 Using the Printer E-36 When Using Roll Paper E-36 When Using Formed Sheet ...
User Guide
Page 26
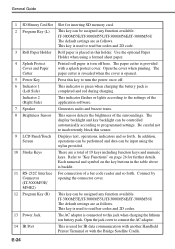
...charging. General Guide 1 SD Memory Card Slot Slot for inserting SD memory card. 2 Program Key (L) This key can be assigned any function available. The display backlight and key backlight can be controlled automatically according to turn the power on the key buttons in this jack when charging the lithium ion... the Bridge Satellite Cradle. The paper cutter is revealed when the cover is opened. 5 Power Key Press this sensor. 9 LCD Panel/Touch Screen Displays text, operations, indicators and so forth. Be careful not to inadvertently block this key to programmed settings.
...charging. General Guide 1 SD Memory Card Slot Slot for inserting SD memory card. 2 Program Key (L) This key can be assigned any function available. The display backlight and key backlight can be controlled automatically according to turn the power on the key buttons in this jack when charging the lithium ion... the Bridge Satellite Cradle. The paper cutter is revealed when the cover is opened. 5 Power Key Press this sensor. 9 LCD Panel/Touch Screen Displays text, operations, indicators and so forth. Be careful not to inadvertently block this key to programmed settings.

User Guide
Page 36
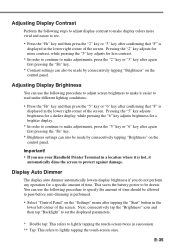
.... • Press the "Fn" key and then press the "4" key after you feel that touch screen response is displayed in the lower right corner of the screen. * The following screen can also be displayed by consecutively tapping the stylus on the control panel. • Press the stylus against the target at five...
.... • Press the "Fn" key and then press the "4" key after you feel that touch screen response is displayed in the lower right corner of the screen. * The following screen can also be displayed by consecutively tapping the stylus on the control panel. • Press the stylus against the target at five...
User Guide
Page 37
...be drawn. Pressing the "5" key adjusts brightness for a darker display, while pressing the "6" key adjusts brightness for a specific amount of time. Adjusting Display Contrast Perform the following steps to adjust display contrast to make display colors more contrast, while pressing the "3" key adjusts for less ...button in the lower right corner of the screen. Next, consecutively tap the "Brightness" icon and then tap "Backlight" to set the displayed parameters. * Double tap: This refers to lightly tapping the touch-screen twice in succession. ** Tap: This refers to see. •...
...be drawn. Pressing the "5" key adjusts brightness for a darker display, while pressing the "6" key adjusts brightness for a specific amount of time. Adjusting Display Contrast Perform the following steps to adjust display contrast to make display colors more contrast, while pressing the "3" key adjusts for less ...button in the lower right corner of the screen. Next, consecutively tap the "Brightness" icon and then tap "Backlight" to set the displayed parameters. * Double tap: This refers to lightly tapping the touch-screen twice in succession. ** Tap: This refers to see. •...

User Guide
Page 52
... switch on the next page. E-50 This starts the reset operation. In this message appears, press the program key (R) to be successful depending on the display when the reset operation discovers a memory problem. Use the stylus to misoperation or some other reason.
... switch on the next page. E-50 This starts the reset operation. In this message appears, press the program key (R) to be successful depending on the display when the reset operation discovers a memory problem. Use the stylus to misoperation or some other reason.
User Guide
Page 53
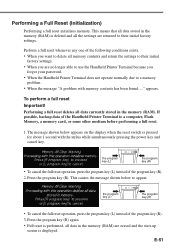
Performing a Full Reset (Initialization) Performing a full reset initializes memory. appears. To perform a full reset Important! This causes the message shown below appears on the display when the reset switch is performed, all memory contents and return the settings to their initial factory settings. The message shown below to their initial ... message "A problem with the stylus while simultaneously pressing the power key and cancel key. This means that all data stored in the memory (RAM) is displayed. If possible, backup data of the program key (R). 2.
Performing a Full Reset (Initialization) Performing a full reset initializes memory. appears. To perform a full reset Important! This causes the message shown below appears on the display when the reset switch is performed, all memory contents and return the settings to their initial factory settings. The message shown below to their initial ... message "A problem with the stylus while simultaneously pressing the power key and cancel key. This means that all data stored in the memory (RAM) is displayed. If possible, backup data of the program key (R). 2.
User Guide
Page 54
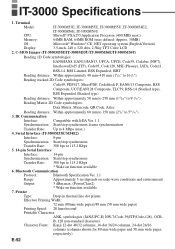
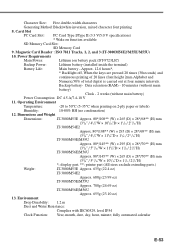
..., IT-3000M55E, IT-3000M55U, IT-3000M54E2, CPU: IT-3000M56E, IT-3000M56U Marvell® PXA255 Application Processor (400 MHz max.) Memory: OS: 64MB RAM, 64MB ROM (user defined: Approx. 30MB) Microsoft® Windows® CE .NET operating system (English Version) Display: 3.5-inch, 240 × 320 dots, 2-Way TFT Color LCD 2. C-MOS Imager (IT-3000M55E/IT-3000M55U...: 300 bps to 115.2 Kbps 5. 14-pin Serial Interface Interface: 14-pin Synchronization: Start/stop synchronous, frame synchronization Transfer Rate: Up to 515/16") 3. IT-3000 Specifications 1.
..., IT-3000M55E, IT-3000M55U, IT-3000M54E2, CPU: IT-3000M56E, IT-3000M56U Marvell® PXA255 Application Processor (400 MHz max.) Memory: OS: 64MB RAM, 64MB ROM (user defined: Approx. 30MB) Microsoft® Windows® CE .NET operating system (English Version) Display: 3.5-inch, 240 × 320 dots, 2-Way TFT Color LCD 2. C-MOS Imager (IT-3000M55E/IT-3000M55U...: 300 bps to 115.2 Kbps 5. 14-pin Serial Interface Interface: 14-pin Synchronization: Start/stop synchronous, frame synchronization Transfer Rate: Up to 515/16") 3. IT-3000 Specifications 1.
User Guide
Page 55
...) Battery Life: Main battery - Operating Environment Temperature: -20 to 50°C (5-35°C when printing on function available SD Memory Card Slot: SD Memory Card 9. display part, **; Approx. 12.6 hours*, * Backlight off, When the keys are pressed 20 times (30seconds) and continuous printing of 20 lines (font height 2mm Alphabet and...
...) Battery Life: Main battery - Operating Environment Temperature: -20 to 50°C (5-35°C when printing on function available SD Memory Card Slot: SD Memory Card 9. display part, **; Approx. 12.6 hours*, * Backlight off, When the keys are pressed 20 times (30seconds) and continuous printing of 20 lines (font height 2mm Alphabet and...