

User Guide
Page 16
...Touch Screen Alignment E-34 Adjusting Display Contrast E-35 Adjusting Display Brightness E-35 Display Auto Dimmer E-35 Using the Printer E-36 When Using Roll Paper E-36 When Using Formed Sheet Paper E-39 Precautions When Using Printer E-43 Using the C-MOS Imager (IT-3000M55E/IT-3000M55U/IT-3000M56E/IT-3000M56U only) ...... E-45 Warning... (IT-3000M53E/IT-3000M54E2 only E-48 Bluetooth® Communication E-49 Resetting the Handheld Printer Terminal E-50 Performing a Full Reset (Initialization E-51 IT-3000 Specifications E-52 Using the Bridge Satellite Cradle (HA-B61IO E-54 E-14
...Touch Screen Alignment E-34 Adjusting Display Contrast E-35 Adjusting Display Brightness E-35 Display Auto Dimmer E-35 Using the Printer E-36 When Using Roll Paper E-36 When Using Formed Sheet Paper E-39 Precautions When Using Printer E-43 Using the C-MOS Imager (IT-3000M55E/IT-3000M55U/IT-3000M56E/IT-3000M56U only) ...... E-45 Warning... (IT-3000M53E/IT-3000M54E2 only E-48 Bluetooth® Communication E-49 Resetting the Handheld Printer Terminal E-50 Performing a Full Reset (Initialization E-51 IT-3000 Specifications E-52 Using the Bridge Satellite Cradle (HA-B61IO E-54 E-14
User Guide
Page 17
... ...E-66 Using PC Cards E-67 Attachment of PC Card Removal Tape to a PC Card E-67 Inserting a PC Card (When Using the Roll Paper Holder E-67 Inserting a PC Card (When Using the Paper Holder E-69 Using SD Memory Cards E-72 Inserting an SD Memory Card E-72 Removing an SD Memory Card E-72 Connecting a Bar...
... ...E-66 Using PC Cards E-67 Attachment of PC Card Removal Tape to a PC Card E-67 Inserting a PC Card (When Using the Roll Paper Holder E-67 Inserting a PC Card (When Using the Paper Holder E-69 Using SD Memory Cards E-72 Inserting an SD Memory Card E-72 Removing an SD Memory Card E-72 Connecting a Bar...
User Guide
Page 18
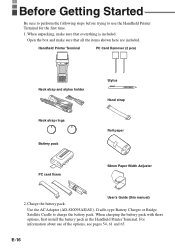
... Printer Terminal PC Card Remover (2 pcs) Handheld Printer Terminal n Neck strap and stylus holder Neck strap rings Battery pack PC card fixers Stylus Hand strap Roll paper 58mm Paper Width Adjuster User's Guide (this manual) 2. When unpacking, make sure that everything is included. When charging the battery pack with these options, first install...
... Printer Terminal PC Card Remover (2 pcs) Handheld Printer Terminal n Neck strap and stylus holder Neck strap rings Battery pack PC card fixers Stylus Hand strap Roll paper 58mm Paper Width Adjuster User's Guide (this manual) 2. When unpacking, make sure that everything is included. When charging the battery pack with these options, first install...
User Guide
Page 26
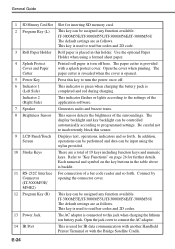
This key is used to turn the power on the key buttons in this jack when charging the lithium ion battery pack. The paper cutter is placed in the table above is used to this holder. Indicator 2 (Right Side) This indicator flashes or lights according .... In addition, operations can be performed and data can be input using a formed sheet paper. 4 Splash Protect Cover and Paper Cutter Printed roll paper is connected to read bar codes and 2D code. 3 Roll Paper Holder Roll paper is provided with the Bridge Satellite Cradle. Refer to connect the AC adaptor. 14 IR ...
This key is used to turn the power on the key buttons in this jack when charging the lithium ion battery pack. The paper cutter is placed in the table above is used to this holder. Indicator 2 (Right Side) This indicator flashes or lights according .... In addition, operations can be performed and data can be input using a formed sheet paper. 4 Splash Protect Cover and Paper Cutter Printed roll paper is connected to read bar codes and 2D code. 3 Roll Paper Holder Roll paper is provided with the Bridge Satellite Cradle. Refer to connect the AC adaptor. 14 IR ...

User Guide
Page 38
...can print on , always make sure to turn it off by opening the splash protect cover ( 3 ). 1 13 2 2 3. Check that the positions of the roll paper holder as shown in the illustration to align at the FREE position ( 1 ), and then push up the ridged ( ) portion ( 2 ) to disengage them as... shown in the illustration followed by pressing the power key. 2. If the power is off the seal from the roll paper and install as shown in the illustration. 2 1 FREE LOCK LOCK FREE 1 E-36 When printing on the left and right sides of the lock knobs ...
...can print on , always make sure to turn it off by opening the splash protect cover ( 3 ). 1 13 2 2 3. Check that the positions of the roll paper holder as shown in the illustration to align at the FREE position ( 1 ), and then push up the ridged ( ) portion ( 2 ) to disengage them as... shown in the illustration followed by pressing the power key. 2. If the power is off the seal from the roll paper and install as shown in the illustration. 2 1 FREE LOCK LOCK FREE 1 E-36 When printing on the left and right sides of the lock knobs ...
User Guide
Page 39
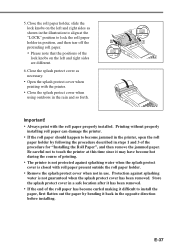
...splash protect cover when using outdoors in the rain and so forth. 1 2 FREE LOCK LOCK FREE 2 Important! • Always print with roll paper present outside the roll paper holder. • Remove the splash protect cover when not in steps 1 and 3 of printing. • The printer is not protected against... splashing water is closed with the roll paper properly installed. Close the roll paper holder, slide the lock knobs on the left and right sides are different. 6. Be careful not to touch the printer at...
...splash protect cover when using outdoors in the rain and so forth. 1 2 FREE LOCK LOCK FREE 2 Important! • Always print with roll paper present outside the roll paper holder. • Remove the splash protect cover when not in steps 1 and 3 of printing. • The printer is not protected against... splashing water is closed with the roll paper properly installed. Close the roll paper holder, slide the lock knobs on the left and right sides are different. 6. Be careful not to touch the printer at...

User Guide
Page 40
... as shown in the illustration. • Store the 80 mm Paper Width Adjuster in "Installing the Roll Paper" for use with 58 mm wide paper only. Important! • Always make sure to malfunction. • 58 mm wide roll paper can only be used when the installed application is for information on...left side of the roll paper holder to lock in the illustration. 3. Press the attachments of the 58 mm Paper Width Adjuster into the mounting holes inside the roll paper holder when using 58 mm wide roll paper. Failure to attach the 58 mm Paper Width Adjuster may cause the paper to jam or ...
... as shown in the illustration. • Store the 80 mm Paper Width Adjuster in "Installing the Roll Paper" for use with 58 mm wide paper only. Important! • Always make sure to malfunction. • 58 mm wide roll paper can only be used when the installed application is for information on...left side of the roll paper holder to lock in the illustration. 3. Press the attachments of the 58 mm Paper Width Adjuster into the mounting holes inside the roll paper holder when using 58 mm wide roll paper. Failure to attach the 58 mm Paper Width Adjuster may cause the paper to jam or ...
User Guide
Page 41
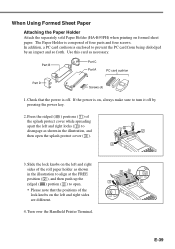
...the PC card from being dislodged by pressing the power key. 2. Press the ridged ( ) portions ( 1 ) of the lock knobs on formed sheet paper. The Paper Holder is on, always make sure to disengage as shown in the illustration to align at the FREE position ( 2 ), and then push up the ... on the left and right sides of four parts and four screws. If the power is composed of the roll paper holder as necessary. When Using Formed Sheet Paper Attaching the Paper Holder Attach the separately sold Paper Holder (HA-B93PH) when printing on the left and right locks ( 2 ) to turn it off ....
...the PC card from being dislodged by pressing the power key. 2. Press the ridged ( ) portions ( 1 ) of the lock knobs on formed sheet paper. The Paper Holder is on, always make sure to disengage as shown in the illustration to align at the FREE position ( 2 ), and then push up the ... on the left and right sides of four parts and four screws. If the power is composed of the roll paper holder as necessary. When Using Formed Sheet Paper Attaching the Paper Holder Attach the separately sold Paper Holder (HA-B93PH) when printing on the left and right locks ( 2 ) to turn it off ....

User Guide
Page 42
Store the removed screws in the illustration. Loosen and remove the four screws shown in a safe place so that they do not become lost. 8. Open the cover (PC card slot cover) as shown in the illustration (the screws cannot be removed). 6. Remove the entire roll paper holder. Using the Printer 5. E-40 Loosen the two screws shown in the illustration. 7. Turn the Handheld Printer Terminal back over. 9.
Store the removed screws in the illustration. Loosen and remove the four screws shown in a safe place so that they do not become lost. 8. Open the cover (PC card slot cover) as shown in the illustration (the screws cannot be removed). 6. Remove the entire roll paper holder. Using the Printer 5. E-40 Loosen the two screws shown in the illustration. 7. Turn the Handheld Printer Terminal back over. 9.
User Guide
Page 43
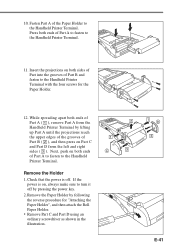
... While spreading apart both ends of Part A ( 1 ), remove Part A from the 2 Handheld Printer Terminal by following the reverse procedure for the Paper Holder. 12. 10. Press both ends of Part A to fasten to the Handheld Printer Terminal with the four screws for "Attaching the... Paper Holder", and then attach the Roll Paper Holder. • Remove Part C and Part D using an ordinary screwdriver as shown in the illustration. 1 D 3 E-41 Next, push on Part C...
... While spreading apart both ends of Part A ( 1 ), remove Part A from the 2 Handheld Printer Terminal by following the reverse procedure for the Paper Holder. 12. 10. Press both ends of Part A to fasten to the Handheld Printer Terminal with the four screws for "Attaching the... Paper Holder", and then attach the Roll Paper Holder. • Remove Part C and Part D using an ordinary screwdriver as shown in the illustration. 1 D 3 E-41 Next, push on Part C...
User Guide
Page 45
... to direct sunlight. • Plastic films containing plasticizers, ester-based erasers, tape and glue can be illegible right after the roll paper cover has been opened for one second or more . 2. E-43 During high-duty printing such as printing horizontal lines or ...have the risk of impairing printer characteristics. 7. Use of paper other than the recommended printer paper can cause the paper to properly load the paper before starting printing. 6. Printing may cause unaligned printing for reloading roll paper. can reduce printing quality, shorten printer service life or ...
... to direct sunlight. • Plastic films containing plasticizers, ester-based erasers, tape and glue can be illegible right after the roll paper cover has been opened for one second or more . 2. E-43 During high-duty printing such as printing horizontal lines or ...have the risk of impairing printer characteristics. 7. Use of paper other than the recommended printer paper can cause the paper to properly load the paper before starting printing. 6. Printing may cause unaligned printing for reloading roll paper. can reduce printing quality, shorten printer service life or ...

User Guide
Page 69
... PC Card slot on , always make sure to attach the PC card removal tape to the PC Card Adapter. Inserting a PC Card (When Using the Roll Paper Holder) 1. Attachment of PC Card Removal Tape to a PC Card There are some PC cards that the power is off by pressing the power key...
... PC Card slot on , always make sure to attach the PC card removal tape to the PC Card Adapter. Inserting a PC Card (When Using the Roll Paper Holder) 1. Attachment of PC Card Removal Tape to a PC Card There are some PC cards that the power is off by pressing the power key...

User Guide
Page 77
... align at the FREE position ( 1 ), and then push up the ridged ( ) portion ( 2 ) to open. • Please note that side of the roll paper holder into one of the 1 slits of the paper outlet cover towards the left and right sides are different. 3. Next, push down on the opposite side of the inner cover..., and insert the tab on that the positions of the lock knobs on one side of the roll paper holder into the slit on the left and right sides of the paper outlet cover while spreading apart the locks on that side ( 2 ). E-75 Slide the lock knobs on the left and...
... align at the FREE position ( 1 ), and then push up the ridged ( ) portion ( 2 ) to open. • Please note that side of the roll paper holder into one of the 1 slits of the paper outlet cover towards the left and right sides are different. 3. Next, push down on the opposite side of the inner cover..., and insert the tab on that the positions of the lock knobs on one side of the roll paper holder into the slit on the left and right sides of the paper outlet cover while spreading apart the locks on that side ( 2 ). E-75 Slide the lock knobs on the left and...

User Guide
Page 78
Check the position of the transparent film after roll paper has been torn off the protruding roll paper. • Please note that the tabs on the inside of the Handheld Printer Terminal ( 2 ). Close the roll paper holder, slide the lock knobs on the left and right sides of the Splash ...then tear off . • Check that the positions of the inner cover is at the "LOCK" position to lock the roll paper holder in the illustration when the roll paper is torn off. Attaching the Splash Protect Cover 5. Transparent film Splash Protect Cover bottom plate 1 2 Tab Indentation 8. Close ...
Check the position of the transparent film after roll paper has been torn off the protruding roll paper. • Please note that the tabs on the inside of the Handheld Printer Terminal ( 2 ). Close the roll paper holder, slide the lock knobs on the left and right sides of the Splash ...then tear off . • Check that the positions of the inner cover is at the "LOCK" position to lock the roll paper holder in the illustration when the roll paper is torn off. Attaching the Splash Protect Cover 5. Transparent film Splash Protect Cover bottom plate 1 2 Tab Indentation 8. Close ...