
User Guide
Page 11
...for a long period. Dead batteries can scratch the touch screen and lead to malfunction. • Never use any tool other than the special stylus to operate the touch screen. Extreme heat or extreme cold - High humidity - Other tools can leak, leading to malfunction and damage to ... Handheld Printer Terminal to operate its options only within the specified temperature range. Large amounts of dust • Use only the special stylus that comes with data storage and other volatile agents to clean the Handheld Printer Terminal. Operating Precautions Your Handheld Printer Terminal and its...
...for a long period. Dead batteries can scratch the touch screen and lead to malfunction. • Never use any tool other than the special stylus to operate the touch screen. Extreme heat or extreme cold - High humidity - Other tools can leak, leading to malfunction and damage to ... Handheld Printer Terminal to operate its options only within the specified temperature range. Large amounts of dust • Use only the special stylus that comes with data storage and other volatile agents to clean the Handheld Printer Terminal. Operating Precautions Your Handheld Printer Terminal and its...

User Guide
Page 16
...3000M54E2 only E-48 Bluetooth® Communication E-49 Resetting the Handheld Printer Terminal E-50 Performing a Full Reset (Initialization E-51 IT-3000 Specifications E-52 Using the Bridge Satellite Cradle (HA-B61IO E-54 E-14 Contents Safety Precautions E-1 Operating Precautions E-9 Important ...E-10... Battery E-27 Replacing the Battery Pack E-27 Attaching the Hand Strap E-30 Attaching the Neck Strap E-31 Attaching the Stylus Holder E-32 Configuring Handheld Printer Terminal Settings E-34 Calibrating Touch Screen Alignment E-34 Adjusting Display Contrast E-35 Adjusting Display...
...3000M54E2 only E-48 Bluetooth® Communication E-49 Resetting the Handheld Printer Terminal E-50 Performing a Full Reset (Initialization E-51 IT-3000 Specifications E-52 Using the Bridge Satellite Cradle (HA-B61IO E-54 E-14 Contents Safety Precautions E-1 Operating Precautions E-9 Important ...E-10... Battery E-27 Replacing the Battery Pack E-27 Attaching the Hand Strap E-30 Attaching the Neck Strap E-31 Attaching the Stylus Holder E-32 Configuring Handheld Printer Terminal Settings E-34 Calibrating Touch Screen Alignment E-34 Adjusting Display Contrast E-35 Adjusting Display...
User Guide
Page 18
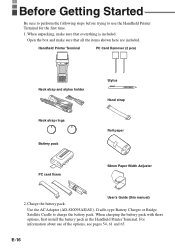
... unpacking, make sure that everything is included. Handheld Printer Terminal PC Card Remover (2 pcs) Handheld Printer Terminal n Neck strap and stylus holder Neck strap rings Battery pack PC card fixers Stylus Hand strap Roll paper 58mm Paper Width Adjuster User's Guide (this manual) 2. Use the AC Adaptor (AD-S10095AE/AU), Cradle-type...
... unpacking, make sure that everything is included. Handheld Printer Terminal PC Card Remover (2 pcs) Handheld Printer Terminal n Neck strap and stylus holder Neck strap rings Battery pack PC card fixers Stylus Hand strap Roll paper 58mm Paper Width Adjuster User's Guide (this manual) 2. Use the AC Adaptor (AD-S10095AE/AU), Cradle-type...
User Guide
Page 26
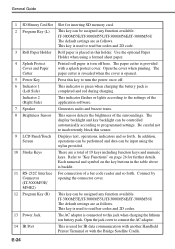
Use the optional Paper Holder when using the stylus provided. 10 Stroke Keys There are as follows. Each numeral and symbol on page 26 for further details. Open the jack cover to connect the ...
Use the optional Paper Holder when using the stylus provided. 10 Stroke Keys There are as follows. Each numeral and symbol on page 26 for further details. Open the jack cover to connect the ...
User Guide
Page 33
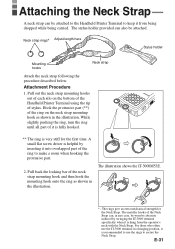
...each silo on the neck strap mounting hook as shown in rare case, be attached. A small flat screw driver is helpful by swinging the IT-3000 terminal specifically when it is very stiff for the Neck Strap. The rings give an extra mechanical strength for the first time. Attaching the Neck... Mounting hooks Neck strap Attach the neck strap following the procedure described below. E-31 Pull out the neck strap mounting hooks out of stylus. The metallic hooks of the Neck Strap can also be worn by abrasion induced by inserting it into overlapped part of it is fully hooked. **...
...each silo on the neck strap mounting hook as shown in rare case, be attached. A small flat screw driver is helpful by swinging the IT-3000 terminal specifically when it is very stiff for the Neck Strap. The rings give an extra mechanical strength for the first time. Attaching the Neck... Mounting hooks Neck strap Attach the neck strap following the procedure described below. E-31 Pull out the neck strap mounting hooks out of stylus. The metallic hooks of the Neck Strap can also be worn by abrasion induced by inserting it into overlapped part of it is fully hooked. **...
User Guide
Page 34
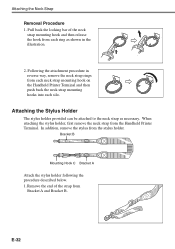
... Procedure 1. Following the attachment procedure in the illustration. 2. Bracket B Mounting Hook C Bracket A Attach the stylus holder following the procedure described below. 1. E-32 Attaching the Stylus Holder The stylus holder provided can be attached to the neck strap as shown in reverse way, remove the neck strap rings from... the stylus holder. In addition, remove the stylus from each neck strap mounting hook on the Handheld Printer Terminal and then push back the neck strap mounting hooks...
... Procedure 1. Following the attachment procedure in the illustration. 2. Bracket B Mounting Hook C Bracket A Attach the stylus holder following the procedure described below. 1. E-32 Attaching the Stylus Holder The stylus holder provided can be attached to the neck strap as shown in reverse way, remove the neck strap rings from... the stylus holder. In addition, remove the stylus from each neck strap mounting hook on the Handheld Printer Terminal and then push back the neck strap mounting hooks...

User Guide
Page 35
Important! • Do not swing the Handheld Printer Terminal with Bracket A and Bracket B. • Do not pass the strap through the strap as shown in the stylus holder after passing through Bracket C, and then fasten in the same way it back. • Place the stylus in the illustration. 4. Remove Mounting Hook C. 3. Fold back the strap after first re-attaching the neck strap to the Handheld Printer Terminal. Pass the stylus holder through the stylus holder when folding it was originally fastened with the neck strap. E-33 2.
Important! • Do not swing the Handheld Printer Terminal with Bracket A and Bracket B. • Do not pass the strap through the strap as shown in the stylus holder after passing through Bracket C, and then fasten in the same way it back. • Place the stylus in the illustration. 4. Remove Mounting Hook C. 3. Fold back the strap after first re-attaching the neck strap to the Handheld Printer Terminal. Pass the stylus holder through the stylus holder when folding it was originally fastened with the neck strap. E-33 2.

User Guide
Page 36
E-34 The screen shown below appears after confirming that the operations being executed do not match the location you press stylus against the center of the touch screen. • Press the "Fn" key and then press the "4" key after you are tapping on the touch screen, ... is poor or that "F" is displayed in the lower right corner of the screen. * The following screen can also be displayed by consecutively tapping the stylus on the control panel. • Press the stylus against the target at five different locations. • Press the ENTER key or tap anywhere on the screen.
E-34 The screen shown below appears after confirming that the operations being executed do not match the location you press stylus against the center of the touch screen. • Press the "Fn" key and then press the "4" key after you are tapping on the touch screen, ... is poor or that "F" is displayed in the lower right corner of the screen. * The following screen can also be displayed by consecutively tapping the stylus on the control panel. • Press the stylus against the target at five different locations. • Press the ENTER key or tap anywhere on the screen.

User Guide
Page 52
This starts the reset operation. E-50 Use the stylus to continue with the reset operation. If reset finds a memory problem A message like the one shown below appears on the back of the memory. the ...
This starts the reset operation. E-50 Use the stylus to continue with the reset operation. If reset finds a memory problem A message like the one shown below appears on the back of the memory. the ...
User Guide
Page 53
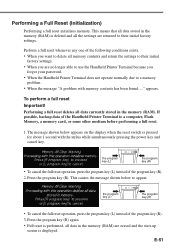
... memory contents and return the settings to their initial factory settings. The message shown below to a memory problem. • When the message "A problem with the stylus while simultaneously pressing the power key and cancel key. Press the program key (R). This causes the message shown below appears on the display when the...
... memory contents and return the settings to their initial factory settings. The message shown below to a memory problem. • When the message "A problem with the stylus while simultaneously pressing the power key and cancel key. Press the program key (R). This causes the message shown below appears on the display when the...
User Guide
Page 71
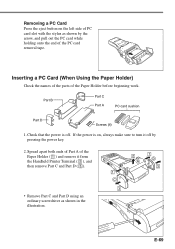
... the PC card removal tape. Inserting a PC Card (When Using the Paper Holder) Check the names of the parts of PC card slot with the stylus as shown in the illustration. 1 C 3 2 A 1 D 3 E-69 If the power is off by the arrow, and pull out the PC card while holding onto the end...
... the PC card removal tape. Inserting a PC Card (When Using the Paper Holder) Check the names of the parts of PC card slot with the stylus as shown in the illustration. 1 C 3 2 A 1 D 3 E-69 If the power is off by the arrow, and pull out the PC card while holding onto the end...
User Guide
Page 73
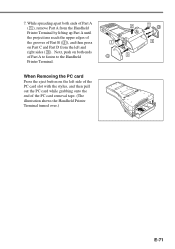
When Removing the PC card Press the eject button on Part C and Part D from the left side of the PC card slot with the stylus, and then pull out the PC card while grabbing onto the end of Part A to fasten to the Handheld Printer Terminal. Next, push on both ...
When Removing the PC card Press the eject button on Part C and Part D from the left side of the PC card slot with the stylus, and then pull out the PC card while grabbing onto the end of Part A to fasten to the Handheld Printer Terminal. Next, push on both ...