Owners Manual
Page 3
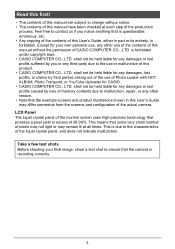
...Guide may remain lit at each step of the production process. This is forbidden under copyright laws. • CASIO COMPUTER CO., LTD. Take a few test shots Before shooting your own personal use, any other use of Photo...from the screens and configuration of the actual camera. Read this first! • The contents of this manual are subject to change without the permission of CASIO COMPUTER CO., LTD. This means that the example screens and product ... ensure that provides a pixel yield in excess of the monitor screen uses high-precision technology that the camera is forbidden.
...Guide may remain lit at each step of the production process. This is forbidden under copyright laws. • CASIO COMPUTER CO., LTD. Take a few test shots Before shooting your own personal use, any other use of Photo...from the screens and configuration of the actual camera. Read this first! • The contents of this manual are subject to change without the permission of CASIO COMPUTER CO., LTD. This means that the example screens and product ... ensure that provides a pixel yield in excess of the monitor screen uses high-precision technology that the camera is forbidden.
Owners Manual
Page 5
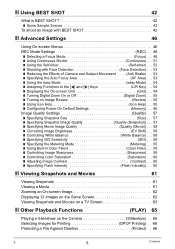
... the Effects of Camera and Subject Movement . . . . (Anti Shake) . . . 53 ❚ Specifying the Auto Focus Area AF Area) . . . 53 ❚ Using the easy Mode easy Mode) . . . 54 ❚ Assigning Functions to the [4] and [6] Keys L/R Key) . . . 54 ❚ Displaying the On-screen Grid Grid) . . . 54 ❚ Turning Digital Zoom On or Off Digital Zoom) . . . 55 ❚ Turning...
... the Effects of Camera and Subject Movement . . . . (Anti Shake) . . . 53 ❚ Specifying the Auto Focus Area AF Area) . . . 53 ❚ Using the easy Mode easy Mode) . . . 54 ❚ Assigning Functions to the [4] and [6] Keys L/R Key) . . . 54 ❚ Displaying the On-screen Grid Grid) . . . 54 ❚ Turning Digital Zoom On or Off Digital Zoom) . . . 55 ❚ Turning...
Owners Manual
Page 6
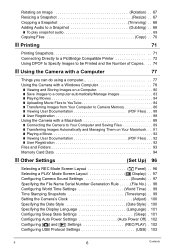
... Registration 92 Files and Folders 93 Memory Card Data 94 ❚❙ Other Settings (Set Up) 96 Selecting a REC Mode Screen Layout R Panel) . . 96 Selecting a PLAY Mode Screen Layout P Display) . . 97 Configuring Camera Sound Settings Sounds) . . 97 Specifying the File Name Serial Number Generation Rule . . . . . (File No.) . . 98 Configuring World Time Settings World...
... Registration 92 Files and Folders 93 Memory Card Data 94 ❚❙ Other Settings (Set Up) 96 Selecting a REC Mode Screen Layout R Panel) . . 96 Selecting a PLAY Mode Screen Layout P Display) . . 97 Configuring Camera Sound Settings Sounds) . . 97 Specifying the File Name Serial Number Generation Rule . . . . . (File No.) . . 98 Configuring World Time Settings World...
Owners Manual
Page 7
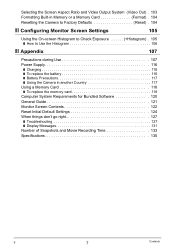
... Out) . 103 Formatting Built-in Memory or a Memory Card Format) . 104 Resetting the Camera to Factory Defaults Reset) . 104 ❚❙ Configuring Monitor Screen Settings 105 Using the On-screen Histogram to Check Exposure Histogram) . 105 ❚ How to Use the Histogram 106 ❚&#...10074; Battery Precautions 117 ❚ Using the Camera in another Country 117 Using a Memory Card 118 ❚ To replace the memory card 118 Computer System Requirements for Bundled Software 120 General Guide 121 Monitor Screen Contents 122 Reset Initial Default Settings 124 When things...
... Out) . 103 Formatting Built-in Memory or a Memory Card Format) . 104 Resetting the Camera to Factory Defaults Reset) . 104 ❚❙ Configuring Monitor Screen Settings 105 Using the On-screen Histogram to Check Exposure Histogram) . 105 ❚ How to Use the Histogram 106 ❚&#...10074; Battery Precautions 117 ❚ Using the Camera in another Country 117 Using a Memory Card 118 ❚ To replace the memory card 118 Computer System Requirements for Bundled Software 120 General Guide 121 Monitor Screen Contents 122 Reset Initial Default Settings 124 When things...
Owners Manual
Page 12
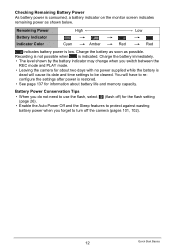
...will cause its date and time settings to use the flash, select ? (flash off the camera (pages 101, 102). 12 Quick Start Basics Recording is not possible when is low. ...to protect against wasting battery power when you switch between the REC mode and PLAY mode. • Leaving the camera for information about two days with no power supplied while the battery is dead will have to reconfigure the settings... battery power is indicated. Checking Remaining Battery Power As battery power is consumed, a battery indicator on the monitor screen indicates remaining power as possible.
...will cause its date and time settings to use the flash, select ? (flash off the camera (pages 101, 102). 12 Quick Start Basics Recording is not possible when is low. ...to protect against wasting battery power when you switch between the REC mode and PLAY mode. • Leaving the camera for information about two days with no power supplied while the battery is dead will have to reconfigure the settings... battery power is indicated. Checking Remaining Battery Power As battery power is consumed, a battery indicator on the monitor screen indicates remaining power as possible.
Owners Manual
Page 13
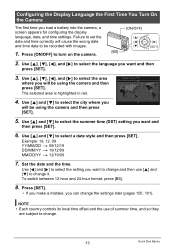
...hour format, press [BS]. 8. Use [8], [2], [4], and [6] to select the area where you will be using the camera and then press [SET]. 5. Use [8] and [2] to select the summer time (DST) setting you want and then...you want to change and then use of summer time, and so they are subject to be using the camera and then press [SET]. Use [8], [2], [4], and [6] to set the date and time correctly will ...Basics Press [SET]. • If you make a mistake, you load a battery into the camera, a screen appears for configuring the display language, date, and time settings. Example: 19. 12. 09 ...
...hour format, press [BS]. 8. Use [8], [2], [4], and [6] to select the area where you will be using the camera and then press [SET]. 5. Use [8] and [2] to select the summer time (DST) setting you want and then...you want to change and then use of summer time, and so they are subject to be using the camera and then press [SET]. Use [8], [2], [4], and [6] to set the date and time correctly will ...Basics Press [SET]. • If you make a mistake, you load a battery into the camera, a screen appears for configuring the display language, date, and time settings. Example: 19. 12. 09 ...
Owners Manual
Page 16
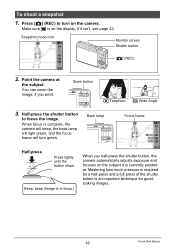
...camera automatically adjusts exposure and focuses on the subject it isn't, see page 42. Back lamp Focus frame Half-press Press lightly until the button stops. Make sure t is currently pointed at the subject. To shoot a snapshot 1. Snapshot mode icon Monitor screen Shutter button [r] (REC) 2. Zoom... button z Telephoto w Wide Angle 3. When focus is an important technique for goodlooking images. 16 Quick Start Basics Point the camera at .
...camera automatically adjusts exposure and focuses on the subject it isn't, see page 42. Back lamp Focus frame Half-press Press lightly until the button stops. Make sure t is currently pointed at the subject. To shoot a snapshot 1. Snapshot mode icon Monitor screen Shutter button [r] (REC) 2. Zoom... button z Telephoto w Wide Angle 3. When focus is an important technique for goodlooking images. 16 Quick Start Basics Point the camera at .
Owners Manual
Page 17
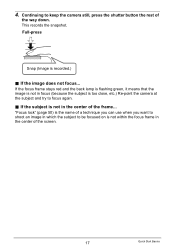
... the back lamp is flashing green, it means that the image is not in focus (because the subject is too close, etc.) Re-point the camera at the subject and try to be focused on is the name of a technique you can use when you want to shoot an image in... which the subject to focus again. . Continuing to keep the camera still, press the shutter button the rest of the screen. 17 Quick Start Basics Full-press Snap (Image is not in the center of the way down. This records the...
... the back lamp is flashing green, it means that the image is not in focus (because the subject is too close, etc.) Re-point the camera at the subject and try to be focused on is the name of a technique you can use when you want to shoot an image in... which the subject to focus again. . Continuing to keep the camera still, press the shutter button the rest of the screen. 17 Quick Start Basics Full-press Snap (Image is not in the center of the way down. This records the...
Owners Manual
Page 19
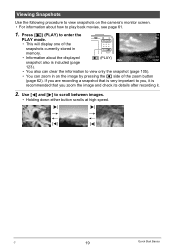
If you zoom the image and check its details after recording it. 2. Viewing Snapshots Use the following procedure to view snapshots on the image by pressing the z side of the snapshots currently stored in on the camera's monitor screen. • For information about the displayed [p] (PLAY)... snapshot also is included (page 123). • You also can zoom in memory. • Information about how to you, it is recommended ...
If you zoom the image and check its details after recording it. 2. Viewing Snapshots Use the following procedure to view snapshots on the image by pressing the z side of the snapshots currently stored in on the camera's monitor screen. • For information about the displayed [p] (PLAY)... snapshot also is included (page 123). • You also can zoom in memory. • Information about how to you, it is recommended ...
Owners Manual
Page 21
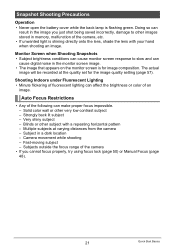
Doing so can cause digital noise in memory, malfunction of the camera • If you just shot being saved incorrectly, ...color wall or other subject with your hand when shooting an image. Subjects outside the focus range of the camera, etc. • If unwanted light is shining directly onto the lens, shade the lens with a ... distances from the camera - Multiple subjects at the quality set for image composition. Monitor Screen when Shooting Snapshots • Subject brightness conditions can cause monitor screen response to other images stored in the monitor screen image. •...
Doing so can cause digital noise in memory, malfunction of the camera • If you just shot being saved incorrectly, ...color wall or other subject with your hand when shooting an image. Subjects outside the focus range of the camera, etc. • If unwanted light is shining directly onto the lens, shade the lens with a ... distances from the camera - Multiple subjects at the quality set for image composition. Monitor Screen when Shooting Snapshots • Subject brightness conditions can cause monitor screen response to other images stored in the monitor screen image. •...
Owners Manual
Page 25
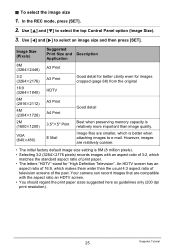
... 3:2 (3264x2176 pixels) records images with the aspect ratio an HDTV screen. • You should regard the print paper sizes suggested here as guidelines only (200 dpi print resolution). 25 Snapshot Tutorial Your camera can record images that are smaller, which is relatively more important than... the usual 4:3 aspect ratio of television screens of 3:2, which makes them wider than image quality. Use [8] and [2]...
... 3:2 (3264x2176 pixels) records images with the aspect ratio an HDTV screen. • You should regard the print paper sizes suggested here as guidelines only (200 dpi print resolution). 25 Snapshot Tutorial Your camera can record images that are smaller, which is relatively more important than... the usual 4:3 aspect ratio of television screens of 3:2, which makes them wider than image quality. Use [8] and [2]...

Owners Manual
Page 30
...hand and subject movement. Turns off Anti Shake settings NOTE • ISO sensitivity, aperture, and shutter speed do not appear on the camera's Anti Shake feature to reduce image blur due to select the setting you half-press the shutter button while "Auto" is displayed immediately...movie recording. Use [8] and [2] to appear somewhat coarser than normal and can turn on the monitor screen when you want and then press [SET]. Use [4] and [6] to subject movement or camera movement when shooting a moving subject using telephoto, when shooting a fast-moving subject, or when shooting under...
...hand and subject movement. Turns off Anti Shake settings NOTE • ISO sensitivity, aperture, and shutter speed do not appear on the camera's Anti Shake feature to reduce image blur due to select the setting you half-press the shutter button while "Auto" is displayed immediately...movie recording. Use [8] and [2] to appear somewhat coarser than normal and can turn on the monitor screen when you want and then press [SET]. Use [4] and [6] to subject movement or camera movement when shooting a moving subject using telephoto, when shooting a fast-moving subject, or when shooting under...
Owners Manual
Page 32
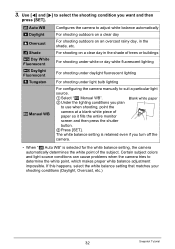
... Fluorescent - Blank white paper 2Under the lighting conditions you turn off the camera. • When "‡ Auto WB" is selected for the white balance setting, the camera automatically determines the white point of paper so it fills the entire monitor screen and then press the shutter button. 3Press [SET]. If this happens, select...
... Fluorescent - Blank white paper 2Under the lighting conditions you turn off the camera. • When "‡ Auto WB" is selected for the white balance setting, the camera automatically determines the white point of paper so it fills the entire monitor screen and then press the shutter button. 3Press [SET]. If this happens, select...
Owners Manual
Page 35
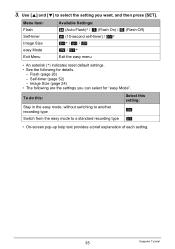
... following are the settings you want, and then press [SET]. Self-timer (page 52) - Use [8] and [2] to a standard recording type Select this setting: k l • On-screen pop-up help text provides a brief explanation of each setting. 35 Snapshot Tutorial
... following are the settings you want, and then press [SET]. Self-timer (page 52) - Use [8] and [2] to a standard recording type Select this setting: k l • On-screen pop-up help text provides a brief explanation of each setting. 35 Snapshot Tutorial
Owners Manual
Page 37
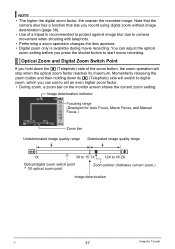
... is recommended to protect against image blur due to set an even higher zoom factor. • During zoom, a zoom bar on the monitor screen shows the current zoom setting. NOTE • The higher the digital zoom factor, the coarser the recorded image. Note that the camera also has a function that lets you press the shutter button to 45...
... is recommended to protect against image blur due to set an even higher zoom factor. • During zoom, a zoom bar on the monitor screen shows the current zoom setting. NOTE • The higher the digital zoom factor, the coarser the recorded image. Note that the camera also has a function that lets you press the shutter button to 45...
Owners Manual
Page 39
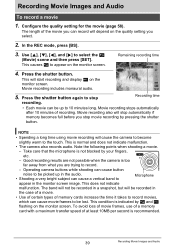
... are trying to select the » (Movie) scene and then press [SET]. Operating camera buttons while shooting can cause button noise to be picked up to Microphone appear in the monitor screen image. In the REC mode, press [BS]. 3. This is recommended. 39 Recording Movie...8226; Spending a long time using movie recording will depend on the monitor screen. Movie recording stops automatically after 10 minutes of at least 10MB per second is normal and does not indicate malfunction. • The camera also records audio. This causes » to the touch. Recording Movie ...
... are trying to select the » (Movie) scene and then press [SET]. Operating camera buttons while shooting can cause button noise to be picked up to Microphone appear in the monitor screen image. In the REC mode, press [BS]. 3. This is recommended. 39 Recording Movie...8226; Spending a long time using movie recording will depend on the monitor screen. Movie recording stops automatically after 10 minutes of at least 10MB per second is normal and does not indicate malfunction. • The camera also records audio. This causes » to the touch. Recording Movie ...
Owners Manual
Page 40
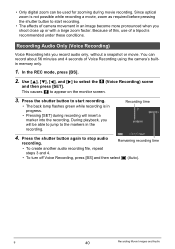
...` to stop audio recording. Press the shutter button again to appear on the monitor screen. 3. You can be used for zooming during recording will be able to jump to start recording. • The effects of camera movement in progress. • Pressing [SET] during movie recording. In the REC...Recording, press [BS] and then select t (Auto). B 40 Recording Movie Images and Audio • Only digital zoom can record about 56 minutes and 4 seconds of Voice Recording using the camera's builtin memory only. 1. Because of this, use of a tripod is in an image become more pronounced when ...
...` to stop audio recording. Press the shutter button again to appear on the monitor screen. 3. You can be used for zooming during recording will be able to jump to start recording. • The effects of camera movement in progress. • Pressing [SET] during movie recording. In the REC...Recording, press [BS] and then select t (Auto). B 40 Recording Movie Images and Audio • Only digital zoom can record about 56 minutes and 4 seconds of Voice Recording using the camera's builtin memory only. 1. Because of this, use of a tripod is in an image become more pronounced when ...
Owners Manual
Page 41
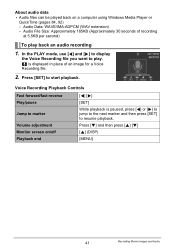
... Recording file. 2. Audio Data: WAVE/IMA-ADPCM (WAV extension) - Voice Recording Playback Controls Fast forward/fast reverse Play/pause Jump to marker Volume adjustment Monitor screen on a computer using Windows Media Player or QuickTime (pages 84, 92) - In the PLAY mode, use [4] and [6] to display the Voice Recording file you want...
... Recording file. 2. Audio Data: WAVE/IMA-ADPCM (WAV extension) - Voice Recording Playback Controls Fast forward/fast reverse Play/pause Jump to marker Volume adjustment Monitor screen on a computer using Windows Media Player or QuickTime (pages 84, 92) - In the PLAY mode, use [4] and [6] to display the Voice Recording file you want...
Owners Manual
Page 42
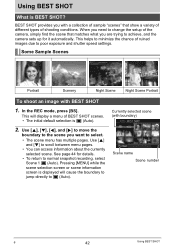
...]. Use [8] and [2] to normal snapshot recording, select Scene 1 t (Auto). Pressing [MENU] while the scene selection screen or scene information screen is displayed will display a menu of sample "scenes" that matches what you want to achieve, and the camera sets up for details. • To return to scroll between menu pages. • You can...
...]. Use [8] and [2] to normal snapshot recording, select Scene 1 t (Auto). Pressing [MENU] while the scene selection screen or scene information screen is displayed will display a menu of sample "scenes" that matches what you want to achieve, and the camera sets up for details. • To return to scroll between menu pages. • You can...
Owners Manual
Page 44
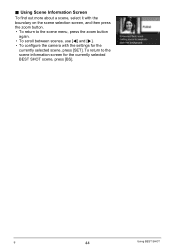
B 44 Using BEST SHOT Using Scene Information Screen To find out more about a scene, select it with the settings for the currently selected BEST SHOT scene, press [BS]. To return to the scene menu, press the zoom button again. • To scroll between scenes, use [4] and [6]. • To configure the camera with the boundary on the scene selection screen, and then press the zoom button. • To return to the scene information screen for the currently selected scene, press [SET]. .
B 44 Using BEST SHOT Using Scene Information Screen To find out more about a scene, select it with the settings for the currently selected BEST SHOT scene, press [BS]. To return to the scene menu, press the zoom button again. • To scroll between scenes, use [4] and [6]. • To configure the camera with the boundary on the scene selection screen, and then press the zoom button. • To return to the scene information screen for the currently selected scene, press [SET]. .


