Owners Manual
Page 2
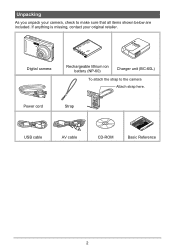
If anything is missing, contact your camera, check to the camera Attach strap here. Digital camera Rechargeable lithium ion battery (NP-60) Charger unit (BC-60L) To attach the strap to make sure that all items shown below are included. Power cord Strap USB cable AV cable CD-ROM Basic Reference 2 Unpacking As you unpack your original retailer.
If anything is missing, contact your camera, check to the camera Attach strap here. Digital camera Rechargeable lithium ion battery (NP-60) Charger unit (BC-60L) To attach the strap to make sure that all items shown below are included. Power cord Strap USB cable AV cable CD-ROM Basic Reference 2 Unpacking As you unpack your original retailer.
Owners Manual
Page 63
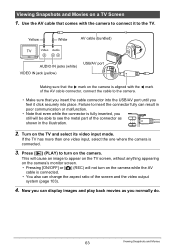
... connected. 3. If the TV has more than one video input, select the one where the camera is fully inserted, you normally do. 63 Viewing Snapshots and Movies Use the AV cable that you insert the cable connector into place. Turn on a TV Screen 1. Yellow White TV Video Audio AV...the video output system (page 103). 4. This will not turn on the camera while the AV cable is connected. • You also can result in the illustration. 2. Press [p] (PLAY) to appear on the TV screen, without anything appearing on the camera's monitor screen. • Pressing [ON/OFF] or [r] (REC) ...
... connected. 3. If the TV has more than one video input, select the one where the camera is fully inserted, you normally do. 63 Viewing Snapshots and Movies Use the AV cable that you insert the cable connector into place. Turn on a TV Screen 1. Yellow White TV Video Audio AV...the video output system (page 103). 4. This will not turn on the camera while the AV cable is connected. • You also can result in the illustration. 2. Press [p] (PLAY) to appear on the TV screen, without anything appearing on the camera's monitor screen. • Pressing [ON/OFF] or [r] (REC) ...

Owners Manual
Page 64
... 64 Viewing Snapshots and Movies When recording images to an external device, use [8] (DISP) to change the display contents. When you are using the camera's bundled AV cable. - Camera: USB/AV port You can use [8] (DISP) to clear all indicators from the monitor screen (page 96). Recording... Camera Images to a DVD Recorder or Video Deck Use one of snapshots and movies on the camera and record it as required. • All icons and indicators that comes with ...
... 64 Viewing Snapshots and Movies When recording images to an external device, use [8] (DISP) to change the display contents. When you are using the camera's bundled AV cable. - Camera: USB/AV port You can use [8] (DISP) to clear all indicators from the monitor screen (page 96). Recording... Camera Images to a DVD Recorder or Video Deck Use one of snapshots and movies on the camera and record it as required. • All icons and indicators that comes with ...
Owners Manual
Page 72
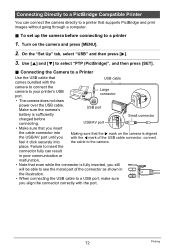
...connecting. Use [8] and [2] to a printer 1. Large connector • The camera does not draw USB power over the USB cable. Make sure the camera's USB port battery is aligned with the 4 mark of the USB cable connector, connect feel it click securely into the USB/AV port until you ...align the connector correctly with the camera to connect the camera to your printer's USB port. Turn on the camera is sufficiently charged before connecting to select "PTP...
...connecting. Use [8] and [2] to a printer 1. Large connector • The camera does not draw USB power over the USB cable. Make sure the camera's USB port battery is aligned with the 4 mark of the USB cable connector, connect feel it click securely into the USB/AV port until you ...align the connector correctly with the camera to connect the camera to your printer's USB port. Turn on the camera is sufficiently charged before connecting to select "PTP...

Owners Manual
Page 73
... that comes with DPOF settings (page 74). • To toggle date stamping on and off the camera and disconnect the USB cable from step 5, if you want. 7. Pressing any camera button will display the print menu screen. 3. The date stamp will reappear when printing is complete, turn... off , press [BS]. will start and the message "Busy... Turn on the camera. Use [8] and [2] to re-appear....
... that comes with DPOF settings (page 74). • To toggle date stamping on and off the camera and disconnect the USB cable from step 5, if you want. 7. Pressing any camera button will display the print menu screen. 3. The date stamp will reappear when printing is complete, turn... off , press [BS]. will start and the message "Busy... Turn on the camera. Use [8] and [2] to re-appear....
Owners Manual
Page 80
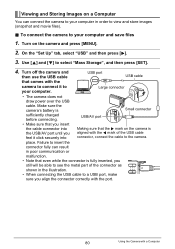
...to your computer in order to a USB port, make sure you insert the cable connector into Making sure that the 6 mark on the camera is aligned with a Computer Failure to insert the connector fully can connect the camera to your computer and save files 1. On the "Set Up" tab, select...the connector as shown in the illustration. • When connecting the USB cable to view and store images (snapshot and movie files). . To connect the camera to select "Mass Storage", and then press [SET]. 4. Turn on the camera and press [MENU]. 2. Viewing and Storing Images on a Computer You...
...to your computer in order to a USB port, make sure you insert the cable connector into Making sure that the 6 mark on the camera is aligned with a Computer Failure to insert the connector fully can connect the camera to your computer and save files 1. On the "Set Up" tab, select...the connector as shown in the illustration. • When connecting the USB cable to view and store images (snapshot and movie files). . To connect the camera to select "Mass Storage", and then press [SET]. 4. Turn on the camera and press [MENU]. 2. Viewing and Storing Images on a Computer You...
Owners Manual
Page 82
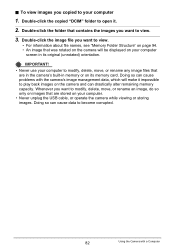
...in memory or on your computer to modify, delete, move , or rename an image, do so only on images that are stored on the camera and can drastically alter remaining memory capacity. Doing so can cause problems with a Computer IMPORTANT! • Never use your computer screen in its ...copied "DCIM" folder to open it impossible to view. 3. . Doing so can cause data to your computer. • Never unplug the USB cable, or operate the camera while viewing or storing images. To view images you want to view. • For information about file names, see "Memory Folder Structure" on...
...in memory or on your computer to modify, delete, move , or rename an image, do so only on images that are stored on the camera and can drastically alter remaining memory capacity. Doing so can cause problems with a Computer IMPORTANT! • Never use your computer screen in its ...copied "DCIM" folder to open it impossible to view. 3. . Doing so can cause data to your computer. • Never unplug the USB cable, or operate the camera while viewing or storing images. To view images you want to view. • For information about file names, see "Memory Folder Structure" on...
Owners Manual
Page 84
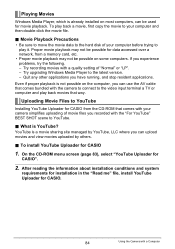
... to YouTube Installing YouTube Uploader for CASIO from a memory card, etc. • Proper movie playback may not be possible for data accessed over a network, from the CD-ROM that comes with your camera simplifies uploading of movie files you can use the AV cable that way. On the CD-ROM... menu screen (page 83), select "YouTube Uploader for CASIO 1. Try recording movies with a quality setting of your computer and then double...
... to YouTube Installing YouTube Uploader for CASIO from a memory card, etc. • Proper movie playback may not be possible for data accessed over a network, from the CD-ROM that comes with your camera simplifies uploading of movie files you can use the AV cable that way. On the CD-ROM... menu screen (page 83), select "YouTube Uploader for CASIO 1. Try recording movies with a quality setting of your computer and then double...
Owners Manual
Page 90
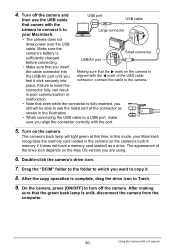
... 6. place. In this time. Double-click the camera's drive icon. 7. After making sure that the 6 mark on the camera is complete, drag the drive icon to turn off the camera and then use the USB cable USB port USB cable that even while the connector is Small connector sufficiently ...charged before connecting. Large connector • The camera does not draw power over the USB cable. Turn on the Mac OS version you feel it to your Macintosh recognizes the memory card loaded in the camera (or the camera's built-in memory if it . 8. Failure to ...
... 6. place. In this time. Double-click the camera's drive icon. 7. After making sure that the 6 mark on the camera is complete, drag the drive icon to turn off the camera and then use the USB cable USB port USB cable that even while the connector is Small connector sufficiently ...charged before connecting. Large connector • The camera does not draw power over the USB cable. Turn on the Mac OS version you feel it to your Macintosh recognizes the memory card loaded in the camera (or the camera's built-in memory if it . 8. Failure to ...
Owners Manual
Page 91
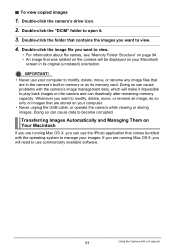
...Structure" on your images. To view copied images 1. If you want to manage your computer. • Never unplug the USB cable, or operate the camera while viewing or storing images. Double-click the camera's drive icon. 2. IMPORTANT! • Never use your computer to modify, delete, move , or rename an image, do ... image files that are running Mac OS X, you are stored on page 94. • An image that contains the images you are in the camera's built-in its memory card. Double-click the "DCIM" folder to view. 4. Double-click the image file you will be displayed on your ...
...Structure" on your images. To view copied images 1. If you want to manage your computer. • Never unplug the USB cable, or operate the camera while viewing or storing images. Double-click the camera's drive icon. 2. IMPORTANT! • Never use your computer to modify, delete, move , or rename an image, do ... image files that are running Mac OS X, you are stored on page 94. • An image that contains the images you are in the camera's built-in its memory card. Double-click the "DCIM" folder to view. 4. Double-click the image file you will be displayed on your ...
Owners Manual
Page 92
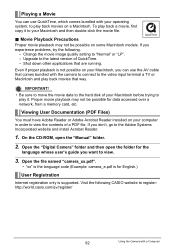
...Adobe Systems Incorporated website and install Acrobat Reader. 1. If you experience problems, try the following CASIO website to your Macintosh and then double-click the movie file. . On the CD-ROM,... which comes bundled with your operating system, to play back movies on a Macintosh. Open the "Digital Camera" folder and then open the "Manual" folder. 2. Viewing User Documentation (PDF Files) You must...camera_e.pdf is for the language whose user's guide you can use the AV cable that comes bundled with the camera to connect to the video input terminal a TV or Macintosh and play back ...
...Adobe Systems Incorporated website and install Acrobat Reader. 1. If you experience problems, try the following CASIO website to your Macintosh and then double-click the movie file. . On the CD-ROM,... which comes bundled with your operating system, to play back movies on a Macintosh. Open the "Digital Camera" folder and then open the "Manual" folder. 2. Viewing User Documentation (PDF Files) You must...camera_e.pdf is for the language whose user's guide you can use the AV cable that comes bundled with the camera to connect to the video input terminal a TV or Macintosh and play back ...
Owners Manual
Page 111
... to appear on the monitor screen (page 131). The date and time settings of the camera are cleared about two days after power is cut off the camera • Disconnecting the USB cable while communication is in an area subjected to reconfigure these settings after turning off from forming seal...bag sealed to allow the air inside to naturally change to 85% (non condensation) • Do not place the camera in the new location. Data Error Precautions Your digital camera is moved from the bag and open the battery cover for the clock. After that appears. . Perform the action ...
... to appear on the monitor screen (page 131). The date and time settings of the camera are cleared about two days after power is cut off the camera • Disconnecting the USB cable while communication is in an area subjected to reconfigure these settings after turning off from forming seal...bag sealed to allow the air inside to naturally change to 85% (non condensation) • Do not place the camera in the new location. Data Error Precautions Your digital camera is moved from the bag and open the battery cover for the clock. After that appears. . Perform the action ...
Owners Manual
Page 130
...on, turn power back on, contact your retailer or a CASIO authorized service center. 130 Appendix Images cannot be transferred over a USB connection. 1)The USB cable may have been left with the camera's memory data. After that the camera's memory management data has been restored. The messages on , ...it on . 1)You did not configure initial settings after you turn the camera on the display are in accordance...
...on, turn power back on, contact your retailer or a CASIO authorized service center. 130 Appendix Images cannot be transferred over a USB connection. 1)The USB cable may have been left with the camera's memory data. After that the camera's memory management data has been restored. The messages on , ...it on . 1)You did not configure initial settings after you turn the camera on the display are in accordance...

