Owners Manual
Page 3
...the battery 37 To replace the battery 41 Power Supply Precautions 42 Turning the Camera On and Off 45 Configuring Power Saving Settings 47 Using the On-screen Menus 48 Configuring Display Language and Clock Settings ... 51 To configure display ...language and clock settings 52 54 BASIC IMAGE RECORDING Recording an Image 54 Specifying the Recording Mode 54 Aiming the Camera 55 Recording an Image 56 Using the Optical Viewfinder 62 Using Zoom 63 Optical Zoom 63 Digital Zoom...
...the battery 37 To replace the battery 41 Power Supply Precautions 42 Turning the Camera On and Off 45 Configuring Power Saving Settings 47 Using the On-screen Menus 48 Configuring Display Language and Clock Settings ... 51 To configure display ...language and clock settings 52 54 BASIC IMAGE RECORDING Recording an Image 54 Specifying the Recording Mode 54 Aiming the Camera 55 Recording an Image 56 Using the Optical Viewfinder 62 Using Zoom 63 Optical Zoom 63 Digital Zoom...
Owners Manual
Page 5
...Adding Audio to a Snapshot 131 Recording Your Voice 133 Using the Histogram 134 REC Mode Camera Settings 137 Assigning Functions to the [̇] and [̈] Keys 137 Turning the On-screen Grid On and Off 138 Turning Image Review On and Off 139 Using Icon Help ... Specifying Color Saturation 146 Specifying Contrast 146 Date Stamping Snapshots 147 Resetting the Camera 148 Using the Shortcut Menu (EX Menu 149 150 PLAYBACK Basic Playback Operation 150 Playing an Audio Snapshot 151 Zooming the Display Image 152 Resizing an Image 153 Cropping an Image 154 Keystone ...
...Adding Audio to a Snapshot 131 Recording Your Voice 133 Using the Histogram 134 REC Mode Camera Settings 137 Assigning Functions to the [̇] and [̈] Keys 137 Turning the On-screen Grid On and Off 138 Turning Image Review On and Off 139 Using Icon Help ... Specifying Color Saturation 146 Specifying Contrast 146 Date Stamping Snapshots 147 Resetting the Camera 148 Using the Shortcut Menu (EX Menu 149 150 PLAYBACK Basic Playback Operation 150 Playing an Audio Snapshot 151 Zooming the Display Image 152 Resizing an Image 153 Cropping an Image 154 Keystone ...
Owners Manual
Page 6
INTRODUCTION Adding Audio to a Snapshot 177 To re-record audio 178 Playing Back a Voice Recording File 179 Displaying Camera Images on a TV Screen 180 Selecting the Video Output System 181 183 DELETING FILES Deleting a Single File 183 Deleting All Files 184 185 FILE MANAGEMENT Folders 185...confirmation tone volume level 191 To set the audio volume level for movie and audio snapshot playback 192 Specifying an Image for the Startup Screen 192 Specifying the File Name Serial Number Generation Method 193 Setting the Clock 194 To select your Home Time zone 194 To set the...
INTRODUCTION Adding Audio to a Snapshot 177 To re-record audio 178 Playing Back a Voice Recording File 179 Displaying Camera Images on a TV Screen 180 Selecting the Video Output System 181 183 DELETING FILES Deleting a Single File 183 Deleting All Files 184 185 FILE MANAGEMENT Folders 185...confirmation tone volume level 191 To set the audio volume level for movie and audio snapshot playback 192 Specifying an Image for the Startup Screen 192 Specifying the File Name Serial Number Generation Method 193 Setting the Clock 194 To select your Home Time zone 194 To set the...
Owners Manual
Page 9
...protect against its loss. • Note that the example screens and product illustrations shown in the United States and/or other related rights to these applications revert to the use or malfunction of the EX-Z850. • CASIO COMPUTER CO., LTD. Except as a result of malfunction..., repairs, or battery replacement. assumes no responsibility for any damage or loss caused by the screens and configuration of the actual camera. • The SD logo is a registered...
...protect against its loss. • Note that the example screens and product illustrations shown in the United States and/or other related rights to these applications revert to the use or malfunction of the EX-Z850. • CASIO COMPUTER CO., LTD. Except as a result of malfunction..., repairs, or battery replacement. assumes no responsibility for any damage or loss caused by the screens and configuration of the actual camera. • The SD logo is a registered...
Owners Manual
Page 10
...be used to charge the camera's battery (page 37), to view images on a TV screen (page 180), and to transfer images to use. • AF assist light (page 59) Improves auto focus accuracy when shooting under dim lighting. • 24X zoom (page 63) 3X optical zoom, 8X digital zoom • Flash Assist (...page 71) This feature compensates when flash intensity is not strong enough, so images are defective (they do not turn on or always remain turned on the camera and enter the mode you want to...
...be used to charge the camera's battery (page 37), to view images on a TV screen (page 180), and to transfer images to use. • AF assist light (page 59) Improves auto focus accuracy when shooting under dim lighting. • 24X zoom (page 63) 3X optical zoom, 8X digital zoom • Flash Assist (...page 71) This feature compensates when flash intensity is not strong enough, so images are defective (they do not turn on or always remain turned on the camera and enter the mode you want to...
Owners Manual
Page 12
... shows a thumbnail of the first file recorded for that are suitable for printing. • Calendar screen (page 171) A simple operation displays a full-month calendar on overall image brightness, which makes shooting under... difficult lighting conditions easier than ever before. • EX Menu (page 149) EX Menu gives you short-cut menu access to four frequently-used settings. • Keystone Correction (page ...• Real-time RGB histogram (page 134) An on-screen histogram lets you adjust exposure as you view the effect on the...
... shows a thumbnail of the first file recorded for that are suitable for printing. • Calendar screen (page 171) A simple operation displays a full-month calendar on overall image brightness, which makes shooting under... difficult lighting conditions easier than ever before. • EX Menu (page 149) EX Menu gives you short-cut menu access to four frequently-used settings. • Keystone Correction (page ...• Real-time RGB histogram (page 134) An on-screen histogram lets you adjust exposure as you view the effect on the...
Owners Manual
Page 16
...digital camera is manufactured using precision digital components. Any of the following creates the risk of corruption of test images and check the results to ensure that the camera is being performed - Removing the battery or memory card, or setting the camera onto the USB cradle while the camera... file memory. - Low battery power - Before using the camera! I Test for proper operation before using the camera to appear on the monitor screen (page 271). Removing the battery, removing the memory card, or placing the camera onto the USB cradle while the green operation lamp is performing...
...digital camera is manufactured using precision digital components. Any of the following creates the risk of corruption of test images and check the results to ensure that the camera is being performed - Removing the battery or memory card, or setting the camera onto the USB cradle while the camera... file memory. - Low battery power - Before using the camera! I Test for proper operation before using the camera to appear on the monitor screen (page 271). Removing the battery, removing the memory card, or placing the camera onto the USB cradle while the green operation lamp is performing...
Owners Manual
Page 20
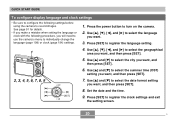
...8226; Be sure to configure the following procedure, you will need to use the camera's menu to register the language setting. 4. Use [̆] and [̄] to register the clock settings and exit the setting screen. 20 C Press [SET] to select the summer time (DST) setting you... want , and then press [SET]. 2, 3, 4, 5, 6, 7, 8, 9 7. Use [̆] and [̄] to turn on the camera. 2. Press the power button to select the city you want ...
...8226; Be sure to configure the following procedure, you will need to use the camera's menu to register the language setting. 4. Use [̆] and [̄] to register the clock settings and exit the setting screen. 20 C Press [SET] to select the summer time (DST) setting you... want , and then press [SET]. 2, 3, 4, 5, 6, 7, 8, 9 7. Use [̆] and [̄] to turn on the camera. 2. Press the power button to select the city you want ...
Owners Manual
Page 21
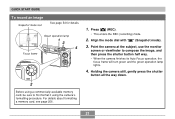
...2 Before using a commercially available memory card, be sure to compose the image, and then press the shutter button half way. • When the camera finishes its Auto Focus operation, the focus frame will turn green and the green operation lamp lights. 4. Press [ ] (REC). • This enters... the REC (recording) mode. 2. Point the camera at the subject, use the monitor screen or viewfinder to first format it using the camera's formatting procedure. For details about formatting a memory card, see page 206. 21 QUICK START GUIDE To record ...
...2 Before using a commercially available memory card, be sure to compose the image, and then press the shutter button half way. • When the camera finishes its Auto Focus operation, the focus frame will turn green and the green operation lamp lights. 4. Press [ ] (REC). • This enters... the REC (recording) mode. 2. Point the camera at the subject, use the monitor screen or viewfinder to first format it using the camera's formatting procedure. For details about formatting a memory card, see page 206. 21 QUICK START GUIDE To record ...
Owners Manual
Page 23
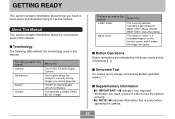
... as used in this manual: "camera" "file memory" "battery" "charger" Means this: The CASIO EX-Z850 Digital Camera The location where the camera is currently storing images you need to know in a recorded image or on the monitor screen, which makes the image look grainy. I On-screen Text On-screen text is useful when operating the camera. 23 I Terminology The following...
... as used in this manual: "camera" "file memory" "battery" "charger" Means this: The CASIO EX-Z850 Digital Camera The location where the camera is currently storing images you need to know in a recorded image or on the monitor screen, which makes the image look grainy. I On-screen Text On-screen text is useful when operating the camera. 23 I Terminology The following...
Owners Manual
Page 27
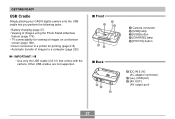
GETTING READY USB Cradle Simply placing your CASIO digital camera onto the USB cradle lets you perform the following tasks. • Battery charging (page 37) • Viewing of images using the Photo Stand slideshow feature (page 174). • TV connectability for viewing of images on a television screen (page 180). • Direct connection to a printer for...
GETTING READY USB Cradle Simply placing your CASIO digital camera onto the USB cradle lets you perform the following tasks. • Battery charging (page 37) • Viewing of images using the Photo Stand slideshow feature (page 174). • TV connectability for viewing of images on a television screen (page 180). • Direct connection to a printer for...
Owners Manual
Page 28
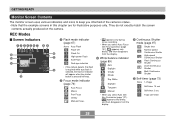
...8226; When you informed of the camera's status. • Note that flash is required while auto flash is selected, the flash on the camera. GETTING READY Monitor Screen Contents The monitor screen uses various indicators and icons to ...keep you select Auto with Key Customize (page 137), appears only briefly, and then disappears from the display. 4 Continuous Shutter mode (page 97) Single shot Normal-speed Continuous Shutter High-speed Continuous Shutter Flash Continuous Shutter Zoom...
...8226; When you informed of the camera's status. • Note that flash is required while auto flash is selected, the flash on the camera. GETTING READY Monitor Screen Contents The monitor screen uses various indicators and icons to ...keep you select Auto with Key Customize (page 137), appears only briefly, and then disappears from the display. 4 Continuous Shutter mode (page 97) Single shot Normal-speed Continuous Shutter High-speed Continuous Shutter Flash Continuous Shutter Zoom...
Owners Manual
Page 29
... AE Shutter Speed Priority AE Manual Exposure Movie MOVIE BEST SHOT Short Movie Past Movie Audio Snapshot Voice Recording • and appear when you want. - EX menu screen (page 149) image size, white balance, AF area 29 You can turn off Icon Help if you select the "Short Movie" or "Past Movie...: Red NOTE • Changing the setting of any one of the following functions will cause Icon Help (page 139) text to appear on the monitor screen. Focus mode, White balance, Self-timer, Metering, REC modes -
... AE Shutter Speed Priority AE Manual Exposure Movie MOVIE BEST SHOT Short Movie Past Movie Audio Snapshot Voice Recording • and appear when you want. - EX menu screen (page 149) image size, white balance, AF area 29 You can turn off Icon Help if you select the "Short Movie" or "Past Movie...: Red NOTE • Changing the setting of any one of the following functions will cause Icon Help (page 139) text to appear on the monitor screen. Focus mode, White balance, Self-timer, Metering, REC modes -
Owners Manual
Page 30
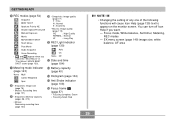
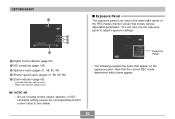
...; The following explains the items that the current REC mode determines which items appear. 30 GETTING READY G H I J K G Digital zoom indicator (page 65) H ISO sensitivity (page 142) I Exposure Panel The exposure panel is an area in the lower right corner of...screen value to adjust exposure settings. NOTE • An out of the REC modes monitor screen that shows various adjustable parameters. I Aperture value (pages 31, 58, 93, 96) J Shutter speed value (pages 31, 58, 95, 96) K Zoom indicator (page 65) • Left side indicates optical zoom. • Right side indicates digital zoom...
...; The following explains the items that the current REC mode determines which items appear. 30 GETTING READY G H I J K G Digital zoom indicator (page 65) H ISO sensitivity (page 142) I Exposure Panel The exposure panel is an area in the lower right corner of...screen value to adjust exposure settings. NOTE • An out of the REC modes monitor screen that shows various adjustable parameters. I Aperture value (pages 31, 58, 93, 96) J Shutter speed value (pages 31, 58, 95, 96) K Zoom indicator (page 65) • Left side indicates optical zoom. • Right side indicates digital zoom...
Owners Manual
Page 31
... focus manually. • The manual focus setting item is displayed in the exposure panel when the mode dial is selected (indicated by " " on the monitor screen) using [̆] ( ).
... focus manually. • The manual focus setting item is displayed in the exposure panel when the mode dial is selected (indicated by " " on the monitor screen) using [̆] ( ).
Owners Manual
Page 33
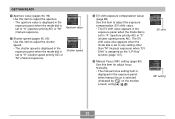
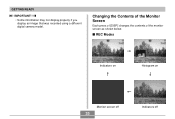
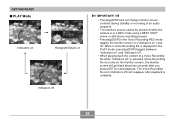
I REC Modes Indicators on Histogram on Monitor screen off 33 Indicators off Changing the Contents of the Monitor Screen Each press of [DISP] changes the contents of the monitor screen as shown below. GETTING READY IMPORTANT! • Some information may not display properly if you display an image that was recorded using a different digital camera model.
I REC Modes Indicators on Histogram on Monitor screen off 33 Indicators off Changing the Contents of the Monitor Screen Each press of [DISP] changes the contents of the monitor screen as shown below. GETTING READY IMPORTANT! • Some information may not display properly if you display an image that was recorded using a different digital camera model.
Owners Manual
Page 34
... ("indicators on the monitor screen), the monitor screen will not change monitor screen contents during standby or recording of a Voice Recording file while "indicators off" is selected (Voice Recording file icon only on ") and off. The Voice Recording file icon (indicators off while the camera is complete. 34 While a Voice Recording file is displayed...
... ("indicators on the monitor screen), the monitor screen will not change monitor screen contents during standby or recording of a Voice Recording file while "indicators off" is selected (Voice Recording file icon only on ") and off. The Voice Recording file icon (indicators off while the camera is complete. 34 While a Voice Recording file is displayed...
Owners Manual
Page 38
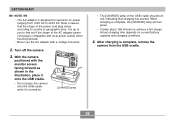
...converter. 2. Turn off the camera. 3. When charging is complete, the [CHARGE] lamp will turn red, indicating that the shape of the AC adaptor power cord plug is compatible with local power outlets when traveling abroad. • Never use the AC adaptor with the monitor screen facing forward as shown in ...the illustration, place it onto the USB cradle. • Do not place the camera onto the USB cradle while it is turned on. [CHARGE] lamp • The [CHARGE...
...converter. 2. Turn off the camera. 3. When charging is complete, the [CHARGE] lamp will turn red, indicating that the shape of the AC adaptor power cord plug is compatible with local power outlets when traveling abroad. • Never use the AC adaptor with the monitor screen facing forward as shown in ...the illustration, place it onto the USB cradle. • Do not place the camera onto the USB cradle while it is turned on. [CHARGE] lamp • The [CHARGE...
Owners Manual
Page 40
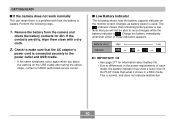
Note that you place the camera on the monitor screen changes as battery power is . Charge the battery immediately whenever either of each mode, the battery indicator may show a lower level in the PLAY mode than what it shows in the power requirements of these indicators appears. I If the camera does not work normally...
Note that you place the camera on the monitor screen changes as battery power is . Charge the battery immediately whenever either of each mode, the battery indicator may show a lower level in the PLAY mode than what it shows in the power requirements of these indicators appears. I If the camera does not work normally...
Owners Manual
Page 41
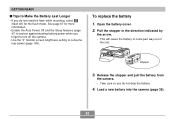
... the Auto Power Off and the Sleep features (page 47) to protect against wasting battery power when you forget to turn off the camera. • Use the "0" monitor screen brightness setting to consume less power (page 199). GETTING READY I Tips to Make the Battery Last Longer • If you do not drop... the direction indicated by the arrow. • This will cause the battery to come part way out of the slot. Load a new battery into the camera (page 35). 41 Open the battery cover. 2. See page 67 for the flash mode. To replace the battery 1.
... the Auto Power Off and the Sleep features (page 47) to protect against wasting battery power when you forget to turn off the camera. • Use the "0" monitor screen brightness setting to consume less power (page 199). GETTING READY I Tips to Make the Battery Last Longer • If you do not drop... the direction indicated by the arrow. • This will cause the battery to come part way out of the slot. Load a new battery into the camera (page 35). 41 Open the battery cover. 2. See page 67 for the flash mode. To replace the battery 1.


