Owners Manual
Page 14
... own maintenance. 14 Using the camera under these conditions creates the risk of the camera, immediately turn it to a CASIO authorized service center. • Keep the small parts and accessories of this manual to "camera" refer to the CASIO EX-Z850 Digital Camera. • Never try to open... the case of the camera or attempt your physician immediately....
... own maintenance. 14 Using the camera under these conditions creates the risk of the camera, immediately turn it to a CASIO authorized service center. • Keep the small parts and accessories of this manual to "camera" refer to the CASIO EX-Z850 Digital Camera. • Never try to open... the case of the camera or attempt your physician immediately....
Owners Manual
Page 41
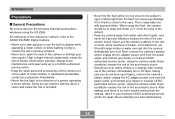
... the direction indicated by the arrow. • This will cause the battery to come part way out of the slot. Load a new battery into the camera (page 35). 41 Release the stopper and pull the battery from the camera. • Take care so you forget to turn off ) for the flash mode.... and the Sleep features (page 47) to protect against wasting battery power when you do not need the flash while recording, select (flash off the camera. • Use the "0" monitor screen brightness setting to consume less power (page 199). Open the battery cover. 2. GETTING READY I Tips to Make the ...
... the direction indicated by the arrow. • This will cause the battery to come part way out of the slot. Load a new battery into the camera (page 35). 41 Release the stopper and pull the battery from the camera. • Take care so you forget to turn off ) for the flash mode.... and the Sleep features (page 47) to protect against wasting battery power when you do not need the flash while recording, select (flash off the camera. • Use the "0" monitor screen brightness setting to consume less power (page 199). Open the battery cover. 2. GETTING READY I Tips to Make the ...
Owners Manual
Page 65
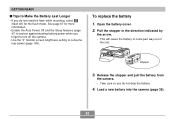
BASIC IMAGE RECORDING Digital Zoom Digital zoom digitally enlarges the part of the image at the center of the image. Digital zoom indicator Zoom indicator 2. Unlike optical zoom, an image enlarged with optical zoom). Optical Zoom range Digital Zoom range 1X 3X 24X Zoom pointer Optical/digital zoom switch over point, it will stop. IMPORTANT! • When you perform a digital zoom operation, the camera manipulates the image data to enlarge the...
BASIC IMAGE RECORDING Digital Zoom Digital zoom digitally enlarges the part of the image at the center of the image. Digital zoom indicator Zoom indicator 2. Unlike optical zoom, an image enlarged with optical zoom). Optical Zoom range Digital Zoom range 1X 3X 24X Zoom pointer Optical/digital zoom switch over point, it will stop. IMPORTANT! • When you perform a digital zoom operation, the camera manipulates the image data to enlarge the...
Owners Manual
Page 85
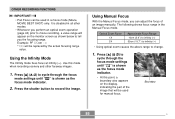
... 1X 3X Approximate Focus Range 10cm (3.9˝) to infinity (∞) 50cm (19.7˝) to infinity (∞) • Using optical zoom causes the above range to record the image. Example: PF ȚȚcm will be used in the Manual Focus mode. Boundary 85 C Use...indicator. • At this mode when recording scenery and other modes. • Whenever you perform an optical zoom operation (page 63) prior to movie recording, a value range will appear on the display, indicating the part of an image manually. Press [̆] ( ) to tell you can be replaced by the actual focusing ...
... 1X 3X Approximate Focus Range 10cm (3.9˝) to infinity (∞) 50cm (19.7˝) to infinity (∞) • Using optical zoom causes the above range to record the image. Example: PF ȚȚcm will be used in the Manual Focus mode. Boundary 85 C Use...indicator. • At this mode when recording scenery and other modes. • Whenever you perform an optical zoom operation (page 63) prior to movie recording, a value range will appear on the display, indicating the part of an image manually. Press [̆] ( ) to tell you can be replaced by the actual focusing ...
Owners Manual
Page 102
... more prone to all recording is finished. • A continuous shutter operation may stop part way through if memory capacity runs low. • Using a slow shutter speed setting causes...used in combination with the zoom continuous shutter mode only. • The slowest possible shutter speed setting when using a continuous shutter mode, keep the camera still until all subsequent images.... • Continuous shutter cannot be used for the first image. The same settings are applied to digital noise than images recorded with...
... more prone to all recording is finished. • A continuous shutter operation may stop part way through if memory capacity runs low. • Using a slow shutter speed setting causes...used in combination with the zoom continuous shutter mode only. • The slowest possible shutter speed setting when using a continuous shutter mode, keep the camera still until all subsequent images.... • Continuous shutter cannot be used for the first image. The same settings are applied to digital noise than images recorded with...
Owners Manual
Page 113
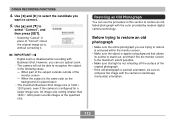
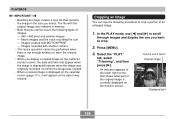
...and [̄] to restore an old, faded photograph with the color provided by modern digital camera technology. However, you can use optical zoom. • The camera will not be sure to correct. 5. When part of the subject extends outside of the original photograph. • If the old photograph...Business Shot image size is 1600 × 1200 pixels, even if the camera is against a background that allows its outline to recognize the subject in landscape (horizontal) orientation. 113 IMPORTANT! • Digital zoom is portrait orientation, be able to stand out, and that light is...
...and [̄] to restore an old, faded photograph with the color provided by modern digital camera technology. However, you can use optical zoom. • The camera will not be sure to correct. 5. When part of the subject extends outside of the original photograph. • If the old photograph...Business Shot image size is 1600 × 1200 pixels, even if the camera is against a background that allows its outline to recognize the subject in landscape (horizontal) orientation. 113 IMPORTANT! • Digital zoom is portrait orientation, be able to stand out, and that light is...
Owners Manual
Page 116
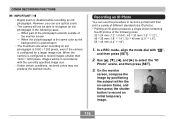
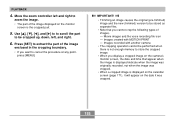
..." ", and then press [SET]. 2. Use and [̈] to record an initial temporary image. 116 However, you can use optical zoom. • The camera will be able to record a portrait and then print a variety of different standard size ID photos. • Printing an ID photo ... - When part of the photograph extends outside of the following cases. - In a REC mode, align the mode dial with the currently specified image size. • Under certain conditions, restored colors may not produce the desired results. OTHER RECORDING FUNCTIONS IMPORTANT! • Digital zoom is configured ...
..." ", and then press [SET]. 2. Use and [̈] to record an initial temporary image. 116 However, you can use optical zoom. • The camera will be able to record a portrait and then print a variety of different standard size ID photos. • Printing an ID photo ... - When part of the photograph extends outside of the following cases. - In a REC mode, align the mode dial with the currently specified image size. • Under certain conditions, restored colors may not produce the desired results. OTHER RECORDING FUNCTIONS IMPORTANT! • Digital zoom is configured ...
Owners Manual
Page 126
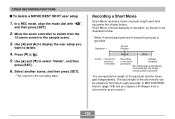
...zoom controller to switch from a short movie as shown in the illustration below. • When 4-second past part and the future part independently. Select another scene, and then press [SET]. • This returns to select "Delete", and then press [SET]. 6. Record Store Recording Storage of two parts...preset length each time you want to the sample scene. 3. Recording a Short Movie Short Movie records a movie of the past part and 4-second future part is pressed. Use [̇] and [̈] to eight seconds. Use [̆] and [̄] to the recording state. ...
...zoom controller to switch from a short movie as shown in the illustration below. • When 4-second past part and the future part independently. Select another scene, and then press [SET]. • This returns to select "Delete", and then press [SET]. 6. Record Store Recording Storage of two parts...preset length each time you want to the sample scene. 3. Recording a Short Movie Short Movie records a movie of the past part and 4-second future part is pressed. Use [̇] and [̈] to eight seconds. Use [̆] and [̄] to the recording state. ...
Owners Manual
Page 127
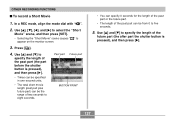
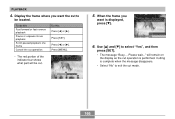
... the shutter button is pressed), and then press [̈]. 127 Past part Future part MOTION PRINT • You can specify 0 seconds for the length of the past part or the future part. • The length of the past part plus future part) can be the range of two seconds to specify the length of... the future part (the after part the shutter button is pressed), and then press [̈]. • ...
... the shutter button is pressed), and then press [̈]. 127 Past part Future part MOTION PRINT • You can specify 0 seconds for the length of the past part or the future part. • The length of the past part plus future part) can be the range of two seconds to specify the length of... the future part (the after part the shutter button is pressed), and then press [̈]. • ...
Owners Manual
Page 128
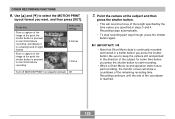
... a countdown of the length specified by the time values you press the shutter button to keep the camera still and pointed in steps 3 and 4. Point the camera at the point the shutter button is reached. 128 Be sure to start Short Movie recording Select this... setting: 9 frames 1 frame Turn off MOTION PRINT (no snapshot stored) Off 7. OTHER RECORDING FUNCTIONS 6. Use [̆] and [̄] to start recording. • When a Short Movie record operation starts future part...
... a countdown of the length specified by the time values you press the shutter button to keep the camera still and pointed in steps 3 and 4. Point the camera at the point the shutter button is reached. 128 Be sure to start Short Movie recording Select this... setting: 9 frames 1 frame Turn off MOTION PRINT (no snapshot stored) Off 7. OTHER RECORDING FUNCTIONS 6. Use [̆] and [̄] to start recording. • When a Short Movie record operation starts future part...
Owners Manual
Page 129
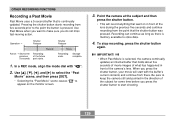
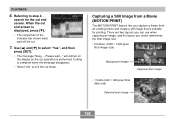
... can continue as long as there is pressed. OTHER RECORDING FUNCTIONS Recording a Past Movie Past Movie uses a 5-second buffer that is selected, the camera continually updates an internal buffer that holds about five seconds of movie images of what has happened in front of the lens during the previous...Use and [̈] to select the "Past Movie" scene, and then press [SET]. • Selecting the "Past Movie" scene causes " " to store data. 4. part starts. In a REC mode, align the mode dial with the buffer's current contents and continue from five seconds prior to the point the button is...
... can continue as long as there is pressed. OTHER RECORDING FUNCTIONS Recording a Past Movie Past Movie uses a 5-second buffer that is selected, the camera continually updates an internal buffer that holds about five seconds of movie images of what has happened in front of the lens during the previous...Use and [̈] to select the "Past Movie" scene, and then press [SET]. • Selecting the "Past Movie" scene causes " " to store data. 4. part starts. In a REC mode, align the mode dial with the buffer's current contents and continue from five seconds prior to the point the button is...
Owners Manual
Page 143
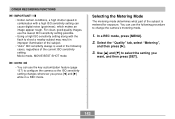
You can cause digital noise (graininess), which makes an image appear rough. Use [̆] and [̄... OTHER RECORDING FUNCTIONS IMPORTANT! • Under certain conditions, a high shutter speed in combination with the flash to configure the camera so the ISO sensitivity setting changes whenever you want, and then press [SET]. 143 In a REC mode, press [MENU...]. 2. Selecting the Metering Mode The metering mode determines what part of the subject is used in improper illumination of the current ISO sensitivity setting. Movie mode, MOVIE BEST SHOT...
You can cause digital noise (graininess), which makes an image appear rough. Use [̆] and [̄... OTHER RECORDING FUNCTIONS IMPORTANT! • Under certain conditions, a high shutter speed in combination with the flash to configure the camera so the ISO sensitivity setting changes whenever you want, and then press [SET]. 143 In a REC mode, press [MENU...]. 2. Selecting the Metering Mode The metering mode determines what part of the subject is used in improper illumination of the current ISO sensitivity setting. Movie mode, MOVIE BEST SHOT...

Owners Manual
Page 152
...Original image Displayed part 3. In the PLAY mode, use [̇] and [̈] to shift the image up to zoom a display image the full eight times normal size. 152 Use and [̈] to display the image you may not be able to eight times its original size. PLAYBACK Zooming the Display ...display of the recorded image, you want. 2. Press [MENU] to return the image to enlarge the image. • This zooms the image. • An indicator appears in the lower right corner, that shows what part of the original image is currently displayed on and off by pressing [DISP]. Shift the...
...Original image Displayed part 3. In the PLAY mode, use [̇] and [̈] to shift the image up to zoom a display image the full eight times normal size. 152 Use and [̈] to display the image you may not be able to eight times its original size. PLAYBACK Zooming the Display ...display of the recorded image, you want. 2. Press [MENU] to return the image to enlarge the image. • This zooms the image. • An indicator appears in the lower right corner, that shows what part of the original image is currently displayed on and off by pressing [DISP]. Shift the...
Owners Manual
Page 154
... crop. 2. PLAYBACK IMPORTANT! • Resizing an image creates a new file that shows what part of the original image is currently displayed on the monitor screen. Current zoom factor Original image Displayed part 154 In the PLAY mode, use the following types of images. - 640 × 480... pixel and smaller images - Images recorded with another camera • The resize operation cannot be performed when there...
... crop. 2. PLAYBACK IMPORTANT! • Resizing an image creates a new file that shows what part of the original image is currently displayed on the monitor screen. Current zoom factor Original image Displayed part 154 In the PLAY mode, use the following types of images. - 640 × 480... pixel and smaller images - Images recorded with another camera • The resize operation cannot be performed when there...
Owners Manual
Page 155
...Trimming an image causes the original (pre-trimmed) image and the new (trimmed) version to be cropped up, down, left and right to zoom the image. • The part of the image enclosed in the cropping boundary. • If you want to store the cropped image. • When you display a cropped... image on the date it will appear on the camera's monitor screen, the date and time that you cannot crop the following types of images. - Move the zoom ...
...Trimming an image causes the original (pre-trimmed) image and the new (trimmed) version to be cropped up, down, left and right to zoom the image. • The part of the image enclosed in the cropping boundary. • If you want to store the cropped image. • When you display a cropped... image on the date it will appear on the camera's monitor screen, the date and time that you cannot crop the following types of images. - Move the zoom ...
Owners Manual
Page 165
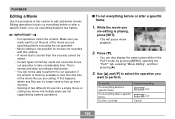
...if the amount of memory available is shorter than the size of two different movies into a single movie or cutting one movie into multiple parts are not supported by pressing [MENU], selecting the "PLAY" tab, selecting "Movie Editing", and then pressing [̈]. 3. I To cut... everything before a specific frame Cut everything before executing the cut mode Select this camera. • A movie that is less than five seconds cannot be undone. Use [̆] and [̄] to take considerable time. Make sure ...
...if the amount of memory available is shorter than the size of two different movies into a single movie or cutting one movie into multiple parts are not supported by pressing [MENU], selecting the "PLAY" tab, selecting "Movie Editing", and then pressing [̈]. 3. I To cut... everything before a specific frame Cut everything before executing the cut mode Select this camera. • A movie that is less than five seconds cannot be undone. Use [̆] and [̄] to take considerable time. Make sure ...
Owners Manual
Page 166
...]. • The message "Busy.... Press [̇] or [̈]. Please wait..." will be located. Press [MENU]. • The red portion of the indicator bar shows what part will remain on the display as the cut operation Do this: Press [̇] or [̈]. Display the frame where you want the cut to be...
...]. • The message "Busy.... Press [̇] or [̈]. Please wait..." will be located. Press [MENU]. • The red portion of the indicator bar shows what part will remain on the display as the cut operation Do this: Press [̇] or [̈]. Display the frame where you want the cut to be...
Owners Manual
Page 168
... to step 4, search for printing. PLAYBACK 6. When the cut end screen is displayed, press [̄]. • The red portion of the indicator bar shows what part will remain on the display as the cut . 7. Cutting is performed.
... to step 4, search for printing. PLAYBACK 6. When the cut end screen is displayed, press [̄]. • The red portion of the indicator bar shows what part will remain on the display as the cut . 7. Cutting is performed.
Owners Manual
Page 205
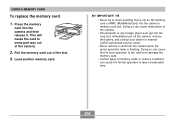
... or any foreign object ever get into the card slot, immediately turn off the camera, remove the battery, and contact your dealer or nearest CASIO authorized service center. • Never remove a card from the camera while the green operation lamp is not an SD memory card or MMC (MultiMediaCard)... into the camera and then release it. Doing so can cause the format operation to come part way out of the camera. 2. Doing ...
... or any foreign object ever get into the card slot, immediately turn off the camera, remove the battery, and contact your dealer or nearest CASIO authorized service center. • Never remove a card from the camera while the green operation lamp is not an SD memory card or MMC (MultiMediaCard)... into the camera and then release it. Doing so can cause the format operation to come part way out of the camera. 2. Doing ...
Owners Manual
Page 235
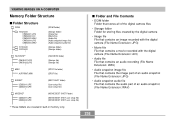
...File Contents • DCIM folder Folder that stores all of the digital camera files • Storage folder Folder for storing files created by the digital camera • Image file File that contains an image recorded with the digital camera (File Name Extension: JPG) • Movie file File that ...contains a movie recorded with the digital camera (File Name Extension: AVI) • Audio file File that contains an audio recording (File Name Extension: WAV) • Audio snapshot image file File that contains the image part of an audio snapshot (File Name Extension: JPG)...
...File Contents • DCIM folder Folder that stores all of the digital camera files • Storage folder Folder for storing files created by the digital camera • Image file File that contains an image recorded with the digital camera (File Name Extension: JPG) • Movie file File that ...contains a movie recorded with the digital camera (File Name Extension: AVI) • Audio file File that contains an audio recording (File Name Extension: WAV) • Audio snapshot image file File that contains the image part of an audio snapshot (File Name Extension: JPG)...
