
Owners Manual
Page 13
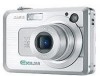
... observe the following important precautions whenever using the flash, the camera should be at least one that comes with this manual to "camera" refer to the CASIO EX-Z750 Digital Camera. • Never try to open the case of the camera or attempt your eyesight. • Keep the small parts and accessories of fire and electric shock. Always leave...
... observe the following important precautions whenever using the flash, the camera should be at least one that comes with this manual to "camera" refer to the CASIO EX-Z750 Digital Camera. • Never try to open the case of the camera or attempt your eyesight. • Keep the small parts and accessories of fire and electric shock. Always leave...

Owners Manual
Page 39
...slot. Open the battery cover. 2. Pull the stopper in the direction indicated by the arrow. • This will not be able to come part way out of these indicators appears. Battery Level High Low Indicator To replace the battery 1. Stopper 3. Note that remaining battery power is low. ...Load a new battery into the camera (page 33). 39 Release the stopper and pull the battery from the camera. • Take care so you will cause the battery to record images while the battery indicator is used...
...slot. Open the battery cover. 2. Pull the stopper in the direction indicated by the arrow. • This will not be able to come part way out of these indicators appears. Battery Level High Low Indicator To replace the battery 1. Stopper 3. Note that remaining battery power is low. ...Load a new battery into the camera (page 33). 39 Release the stopper and pull the battery from the camera. • Take care so you will cause the battery to record images while the battery indicator is used...

Owners Manual
Page 62
... B I To record an image using digital zoom 1. The digital zoom range is not displayed when digital zoom is turned on the display. Unlike optical zoom, an image enlarged with optical zoom). BASIC IMAGE RECORDING Digital Zoom Digital zoom digitally enlarges the part of the image at the center of the image. Optical Zoom range Digital Zoom range 1X 3X 24X Zoom pointer Optical/digital zoom switch over point, it will...
... B I To record an image using digital zoom 1. The digital zoom range is not displayed when digital zoom is turned on the display. Unlike optical zoom, an image enlarged with optical zoom). BASIC IMAGE RECORDING Digital Zoom Digital zoom digitally enlarges the part of the image at the center of the image. Optical Zoom range Digital Zoom range 1X 3X 24X Zoom pointer Optical/digital zoom switch over point, it will...

Owners Manual
Page 80
...focus mode settings until " " is shown as the focus mode indicator. • At this mode when recording scenery and other faraway images. 1. Optical Zoom Factor 1X 3X Approximate Focus Range 10cm (3.9˝) to infinity (∞) 50cm (19.7˝) to infinity (∞) • Using optical... Using the Infinity Mode The Infinity mode fixes focus at infinity (∞). Use this point, a boundary also appears on the display, indicating the part of an image manually. Boundary 80 B Using Manual Focus With the Manual Focus mode, you can adjust the focus of the image that will ...
...focus mode settings until " " is shown as the focus mode indicator. • At this mode when recording scenery and other faraway images. 1. Optical Zoom Factor 1X 3X Approximate Focus Range 10cm (3.9˝) to infinity (∞) 50cm (19.7˝) to infinity (∞) • Using optical... Using the Infinity Mode The Infinity mode fixes focus at infinity (∞). Use this point, a boundary also appears on the display, indicating the part of an image manually. Boundary 80 B Using Manual Focus With the Manual Focus mode, you can adjust the focus of the image that will ...

Owners Manual
Page 93
...to be fixed at the levels for recording a similar type of the BEST SHOT sample scenes automatically sets up the camera for the first image. Also, you cannot use the zoom continuous shutter mode or multi continuous shutter mode in combination with the Triple Self-timer (page 69). • ... RECORDING FUNCTIONS Continuous Shutter Precautions • The flash is disabled while a continuous shutter mode is finished. • A continuous shutter operation may stop part way through if memory capacity runs low. • Using a slow shutter speed setting causes a longer interval between images.
...to be fixed at the levels for recording a similar type of the BEST SHOT sample scenes automatically sets up the camera for the first image. Also, you cannot use the zoom continuous shutter mode or multi continuous shutter mode in combination with the Triple Self-timer (page 69). • ... RECORDING FUNCTIONS Continuous Shutter Precautions • The flash is disabled while a continuous shutter mode is finished. • A continuous shutter operation may stop part way through if memory capacity runs low. • Using a slow shutter speed setting causes a longer interval between images.

Owners Manual
Page 106
... [SET]. 3. A MOTION PRINT feature (page 140) lets you press the shutter button. The total length of the short movie can be the range of two parts, as you store it. I To record a Short Movie Mode movie 1. In a REC mode, align the mode dial with " ". • This enters...Mode) The Short Movie Mode records a movie of preset length each time you capture still images from two to five seconds. 106 B Past part Future part • Times can be from 0 to eight seconds. Recording stops automatically 4 seconds after the shutter release button is pressed), and then press ...
... [SET]. 3. A MOTION PRINT feature (page 140) lets you press the shutter button. The total length of the short movie can be the range of two parts, as you store it. I To record a Short Movie Mode movie 1. In a REC mode, align the mode dial with " ". • This enters...Mode) The Short Movie Mode records a movie of preset length each time you capture still images from two to five seconds. 106 B Past part Future part • Times can be from 0 to eight seconds. Recording stops automatically 4 seconds after the shutter release button is pressed), and then press ...

Owners Manual
Page 107
...the direction of the remaining recording time. Be sure to keep the camera still and pointed in the Short Movie Mode, movie data is pressed to start recording. • When a Short Movie Mode record operation starts future part recording, the monitor screen will record a movie of the image ...the shutter button. To do this setting: 9 frames 1 frame Turn off MOTION PRINT (no snapshot stored) Off 6. OTHER RECORDING FUNCTIONS 4. Point the camera at the subject and then press the shutter button. • This will show a countdown of the subject for some time before you specified in a ...
...the direction of the remaining recording time. Be sure to keep the camera still and pointed in the Short Movie Mode, movie data is pressed to start recording. • When a Short Movie Mode record operation starts future part recording, the monitor screen will record a movie of the image ...the shutter button. To do this setting: 9 frames 1 frame Turn off MOTION PRINT (no snapshot stored) Off 6. OTHER RECORDING FUNCTIONS 4. Point the camera at the subject and then press the shutter button. • This will show a countdown of the subject for some time before you specified in a ...

Owners Manual
Page 108
complete. 1. Pressing the shutter button starts recording from the point that the shutter button was pressed. To stop recording, press the shutter button again. 108 part starts. Point the camera at the subject and then press the shutter button. • This will record anything that went on the monitor screen. 2. OTHER RECORDING FUNCTIONS...
complete. 1. Pressing the shutter button starts recording from the point that the shutter button was pressed. To stop recording, press the shutter button again. 108 part starts. Point the camera at the subject and then press the shutter button. • This will record anything that went on the monitor screen. 2. OTHER RECORDING FUNCTIONS...

Owners Manual
Page 126
...to select the setting you want exposure to be set according to "Multi" when you want , and then press [SET]. The camera automatically determines shooting conditions according to "Center Weighted." The metering mode changes back to the brightness of the focus area. OTHER RECORDING ...FUNCTIONS Selecting the Metering Mode The metering mode determines what part of shooting conditions. Select the "Quality" tab, select "Metering", and then press [̈]. 3. Use this metering method when you...
...to select the setting you want exposure to be set according to "Multi" when you want , and then press [SET]. The camera automatically determines shooting conditions according to "Center Weighted." The metering mode changes back to the brightness of the focus area. OTHER RECORDING ...FUNCTIONS Selecting the Metering Mode The metering mode determines what part of shooting conditions. Select the "Quality" tab, select "Metering", and then press [̈]. 3. Use this metering method when you...

Owners Manual
Page 132
... eight times normal size. 132 Use and [̈] to enlarge the image. • This zooms the image. • An indicator appears in the lower right corner, that shows what part of the original image is currently displayed on the monitor screen. • You can toggle display... of the recorded image, you want. 2. Current zoom factor Original image Displayed part 3. Shift the zoom controller towards to shift the image up to eight times its original size. IMPORTANT! • Depending on the original size...
... eight times normal size. 132 Use and [̈] to enlarge the image. • This zooms the image. • An indicator appears in the lower right corner, that shows what part of the original image is currently displayed on the monitor screen. • You can toggle display... of the recorded image, you want. 2. Current zoom factor Original image Displayed part 3. Shift the zoom controller towards to shift the image up to eight times its original size. IMPORTANT! • Depending on the original size...

Owners Manual
Page 134
... left and right to zoom the image. • The part of the image displayed on the monitor screen is on the monitor screen. • Note that this operation is possible only when a snapshot image is the cropped part. 5. Press [SET] to extract the part of the image enclosed ... following procedure to crop a portion of the original image is currently displayed on the monitor screen. Move the zoom controller left , and right. 6. Current zoom factor Original image Displayed part 4. PLAYBACK Cropping an Image You can use [̇] and [̈] to scroll through images and display the...
... left and right to zoom the image. • The part of the image displayed on the monitor screen is on the monitor screen. • Note that this operation is possible only when a snapshot image is the cropped part. 5. Press [SET] to extract the part of the image enclosed ... following procedure to crop a portion of the original image is currently displayed on the monitor screen. Move the zoom controller left , and right. 6. Current zoom factor Original image Displayed part 4. PLAYBACK Cropping an Image You can use [̇] and [̈] to scroll through images and display the...

Owners Manual
Page 136
...free up more step. Editing operations let you no longer need to normal speed Pause movie playback Scroll paused playback one movie into multiple parts on your computer using the bundled Ulead Movie Wizard SE VCD application. 136 B Press [SET]. Adjust the movie audio volume level Toggle... file you can adjust the volume level of movie audio during movie playback only. However, you are not supported by camera operations. Scroll a zoomed movie image on and off Zoom the movie image Press [̆] or [̄]. Editing a Movie Use the procedure in this section to perform the ...
...free up more step. Editing operations let you no longer need to normal speed Pause movie playback Scroll paused playback one movie into multiple parts on your computer using the bundled Ulead Movie Wizard SE VCD application. 136 B Press [SET]. Adjust the movie audio volume level Toggle... file you can adjust the volume level of movie audio during movie playback only. However, you are not supported by camera operations. Scroll a zoomed movie image on and off Zoom the movie image Press [̆] or [̄]. Editing a Movie Use the procedure in this section to perform the ...

Owners Manual
Page 137
... where you are editing is playing, press [SET]. • This will be located. Press [MENU]. • The red portion of the indicator bar shows what part will pause movie playback. 2. PLAYBACK I To cut everything before a specific frame Cut everything before or after a specific frame Exit the cut mode Select this setting...
... where you are editing is playing, press [SET]. • This will be located. Press [MENU]. • The red portion of the indicator bar shows what part will pause movie playback. 2. PLAYBACK I To cut everything before a specific frame Cut everything before or after a specific frame Exit the cut mode Select this setting...

Owners Manual
Page 139
... be located. Please wait..." Press [̇] or [̈]. Use [̆] and [̄] to be located. • The red portion of the indicator bar shows what part will remain on the display as the cut mode. 139 Press [MENU]. 5. When the frame you want is performed. Cutting is complete when the message...
... be located. Please wait..." Press [̇] or [̈]. Use [̆] and [̄] to be located. • The red portion of the indicator bar shows what part will remain on the display as the cut mode. 139 Press [MENU]. 5. When the frame you want is performed. Cutting is complete when the message...

Owners Manual
Page 179
... into the card slot, immediately turn off the camera, remove the battery, and contact your dealer or nearest CASIO authorized service center. • Never remove a card from the camera while the green operation lamp is flashing. This will cause the card to come part way out of the slot. 3. Formatting a ... data processing by a memory card format operation cannot be recovered. IMPORTANT! • Never insert any foreign object ever get into the camera and then release it . • Formatting a memory card that contains files deletes all the files, even those that data deleted by the...
... into the card slot, immediately turn off the camera, remove the battery, and contact your dealer or nearest CASIO authorized service center. • Never remove a card from the camera while the green operation lamp is flashing. This will cause the card to come part way out of the slot. 3. Formatting a ... data processing by a memory card format operation cannot be recovered. IMPORTANT! • Never insert any foreign object ever get into the camera and then release it . • Formatting a memory card that contains files deletes all the files, even those that data deleted by the...
Owners Manual
Page 209
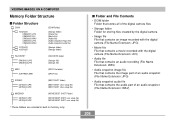
...File Contents • DCIM folder Folder that stores all of the digital camera files • Storage folder Folder for storing files created by the digital camera • Image file File that contains an image recorded with the digital camera (File Name Extension: JPG) • Movie file File that ...contains a movie recorded with the digital camera (File Name Extension: AVI) • Audio file File that contains an audio recording (File Name Extension: WAV) • Audio snapshot image file File that contains the image part of an audio snapshot (File Name Extension: JPG)...
...File Contents • DCIM folder Folder that stores all of the digital camera files • Storage folder Folder for storing files created by the digital camera • Image file File that contains an image recorded with the digital camera (File Name Extension: JPG) • Movie file File that ...contains a movie recorded with the digital camera (File Name Extension: AVI) • Audio file File that contains an audio recording (File Name Extension: WAV) • Audio snapshot image file File that contains the image part of an audio snapshot (File Name Extension: JPG)...

Owners Manual
Page 249
...(1.20 oz) I USB Cradle (CA-26) Input/Output Terminals .... USB port; AV Cable; Camera connector; AC power cord; USB cable; USB cradle (CA-26); APPENDIX *2 Continuous Recording Conditions &#... about every 10 seconds *4 Approximate time for continuous movie recording, without using zoom. *5 Voice recording times are based on continuous recording. Special AC adaptor;...; 2.3˝(H) × 0.88˝(D)) (excluding projections; 20.1mm (0.79˝) at thinnest part) Weight Approximately 127 g (4.5 oz) (excluding battery and accessories) Bundled Accessories ........ AC adaptor terminal...
...(1.20 oz) I USB Cradle (CA-26) Input/Output Terminals .... USB port; AV Cable; Camera connector; AC power cord; USB cable; USB cradle (CA-26); APPENDIX *2 Continuous Recording Conditions &#... about every 10 seconds *4 Approximate time for continuous movie recording, without using zoom. *5 Voice recording times are based on continuous recording. Special AC adaptor;...; 2.3˝(H) × 0.88˝(D)) (excluding projections; 20.1mm (0.79˝) at thinnest part) Weight Approximately 127 g (4.5 oz) (excluding battery and accessories) Bundled Accessories ........ AC adaptor terminal...
