
Owners Manual
Page 12
...-in the direction of small children. High-voltage internal components create the risk of electric shock when exposed. Precautions I General Precautions Be sure to a CASIO authorized service center. • Keep the small parts and accessories of this manual to "camera" refer to the CASIO EX-Z70 Digital Camera. • Never try to open the case of accident. 12
...-in the direction of small children. High-voltage internal components create the risk of electric shock when exposed. Precautions I General Precautions Be sure to a CASIO authorized service center. • Keep the small parts and accessories of this manual to "camera" refer to the CASIO EX-Z70 Digital Camera. • Never try to open the case of accident. 12
Owners Manual
Page 13
...it is too close to the eyes. Intense light from the power outlet, and contact your dealer or nearest CASIO authorized service center. When using the flash, the camera should ever become cracked due to dropping it or otherwise subjecting it to personal computer memory. • Never open...matter or water ever get wet. Moisture creates the risk of fire. • If the camera's case should be deleted. Never attempt your nearest CASIO authorized service center for repair. Next, remove the camera's battery and/or unplug the AC power cord from the power outlet and clean the area ...
...it is too close to the eyes. Intense light from the power outlet, and contact your dealer or nearest CASIO authorized service center. When using the flash, the camera should ever become cracked due to dropping it or otherwise subjecting it to personal computer memory. • Never open...matter or water ever get wet. Moisture creates the risk of fire. • If the camera's case should be deleted. Never attempt your nearest CASIO authorized service center for repair. Next, remove the camera's battery and/or unplug the AC power cord from the power outlet and clean the area ...
Owners Manual
Page 40
G USING THE BATTERY • When transporting a battery, keep it either loaded in the camera or stored in or unplug the battery charger while your hands are not using it for longer charging before the next use it for a long ... battery or the need for charging. 40 Doing so creates the risk of fire, malfunction, and electric shock. • Never plug in its case. A battery left in the camera discharges very small amounts of fire, malfunction, and electric shock. • The battery charger becomes slightly warm during charging. GETTING READY G BATTERY STORAGE...
G USING THE BATTERY • When transporting a battery, keep it either loaded in the camera or stored in or unplug the battery charger while your hands are not using it for longer charging before the next use it for a long ... battery or the need for charging. 40 Doing so creates the risk of fire, malfunction, and electric shock. • Never plug in its case. A battery left in the camera discharges very small amounts of fire, malfunction, and electric shock. • The battery charger becomes slightly warm during charging. GETTING READY G BATTERY STORAGE...

Owners Manual
Page 43
... Available Sleep settings are: "30 sec", "1 min", "2 min", and "Off". • Available Auto Power Off settings are disabled in the following cases. - When the camera is in the Sleep state immediately turns the monitor screen back on. • The Auto Power Off and Sleep features are : "2 min" and "5 ...min". • Note that the Sleep feature does not operate in the PLAY mode. • Pressing any button while the camera is connected to use menus. While playing back a voice recording file - While a movie is being recorded - GETTING READY G See "Using the On-screen...
... Available Sleep settings are: "30 sec", "1 min", "2 min", and "Off". • Available Auto Power Off settings are disabled in the following cases. - When the camera is in the Sleep state immediately turns the monitor screen back on. • The Auto Power Off and Sleep features are : "2 min" and "5 ...min". • Note that the Sleep feature does not operate in the PLAY mode. • Pressing any button while the camera is connected to use menus. While playing back a voice recording file - While a movie is being recorded - GETTING READY G See "Using the On-screen...
Owners Manual
Page 46
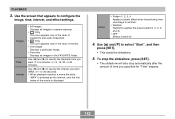
...and exit the setting screen without configuring the clock settings causes incorrect time information to generate the date and time that are used by the camera to be registered. Perform this : Apply the setting and exit the menu screen. IMPORTANT! • See "Menu Reference" on page... READY 6. To do this key operation: Press [SET]. Apply the setting and return to tab selection. * In the case of the following settings before using the camera. 46 Apply the setting and return to configure the clock settings before using larger size characters. IMPORTANT! • Recording images...
...and exit the setting screen without configuring the clock settings causes incorrect time information to generate the date and time that are used by the camera to be registered. Perform this : Apply the setting and exit the menu screen. IMPORTANT! • See "Menu Reference" on page... READY 6. To do this key operation: Press [SET]. Apply the setting and return to tab selection. * In the case of the following settings before using the camera. 46 Apply the setting and return to configure the clock settings before using larger size characters. IMPORTANT! • Recording images...
Owners Manual
Page 59
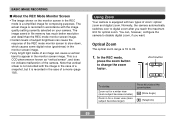
... 1X to slow down, which causes some digital noise (graininess) in the case of a movie (page 102). Note that vertical smear is not recorded with two types of the camera. You can cause the response of the REC mode monitor screen to 3X. 1. Zoom button To do this: Zoom out for a wider view (main subject...
... 1X to slow down, which causes some digital noise (graininess) in the case of a movie (page 102). Note that vertical smear is not recorded with two types of the camera. You can cause the response of the REC mode monitor screen to 3X. 1. Zoom button To do this: Zoom out for a wider view (main subject...
Owners Manual
Page 63
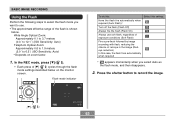
... record the image. [ ̄] ( ) 63 In the REC mode, press [̄] ( ). • Each press of the flash is shown below on zoom factor. 1. Flash mode indicator To do this: Have the flash fire automatically when required (Auto Flash)* Turn off the flash (Flash Off) Always fire the...Soft Flash) Fire a pre-flash followed by image recording with flash, reducing the chance of red-eye in the image (Redeye reduction) In this case, the flash fires automatically when required Select this setting: * appears momentarily when you want to use. • The approximate effective range of [̄...
... record the image. [ ̄] ( ) 63 In the REC mode, press [̄] ( ). • Each press of the flash is shown below on zoom factor. 1. Flash mode indicator To do this: Have the flash fire automatically when required (Auto Flash)* Turn off the flash (Flash Off) Always fire the...Soft Flash) Fire a pre-flash followed by image recording with flash, reducing the chance of red-eye in the image (Redeye reduction) In this case, the flash fires automatically when required Select this setting: * appears momentarily when you want to use. • The approximate effective range of [̄...
Owners Manual
Page 79
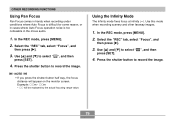
.... OTHER RECORDING FUNCTIONS Using Pan Focus Pan Focus comes in handy when recording under conditions where Auto Focus is difficult for some reason, or in cases where Auto Focus operation noise is too noticeable in the movie audio. 1.
.... OTHER RECORDING FUNCTIONS Using Pan Focus Pan Focus comes in handy when recording under conditions where Auto Focus is difficult for some reason, or in cases where Auto Focus operation noise is too noticeable in the movie audio. 1.
Owners Manual
Page 99
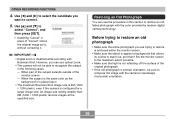
...upon • The maximum Business Shot image size is 2M (1600 × 1200 pixels), even if the camera is disabled while recording with the color provided by modern digital camera technology. However, you are trying to restore is enclosed within the monitor screen. • Make sure the.... 99 Before trying to restore an old photograph • Make sure the entire photograph you can use optical zoom. • The camera will not be sure to correct. 5. IMPORTANT! • Digital zoom is configured for a larger image size. Use [̇] and [̈] to select the candidate you want ...
...upon • The maximum Business Shot image size is 2M (1600 × 1200 pixels), even if the camera is disabled while recording with the color provided by modern digital camera technology. However, you are trying to restore is enclosed within the monitor screen. • Make sure the.... 99 Before trying to restore an old photograph • Make sure the entire photograph you can use optical zoom. • The camera will not be sure to correct. 5. IMPORTANT! • Digital zoom is configured for a larger image size. Use [̇] and [̈] to select the candidate you want ...
Owners Manual
Page 102
OTHER RECORDING FUNCTIONS IMPORTANT! • Digital zoom is configured for storage. Recording a Movie You can record movies with the ...8226; The maximum size when recording an old photograph is 2M (1600 × 1200 pixels), even if the camera is disabled while recording an old photograph. When part of the photograph extends outside of memory available for a ... is configured to recognize an old photograph in accordance with audio. You can use optical zoom. • The camera will be able to record images smaller than 2M (1600 × 1200 pixels), images will not be ...
OTHER RECORDING FUNCTIONS IMPORTANT! • Digital zoom is configured for storage. Recording a Movie You can record movies with the ...8226; The maximum size when recording an old photograph is 2M (1600 × 1200 pixels), even if the camera is disabled while recording an old photograph. When part of the photograph extends outside of memory available for a ... is configured to recognize an old photograph in accordance with audio. You can use optical zoom. • The camera will be able to record images smaller than 2M (1600 × 1200 pixels), images will not be ...
Owners Manual
Page 105
...Digital zoom only is too far from the subject. - This is recorded in monaural. • Very bright light inside of an image can cause button noise to start movie recording (page 102). • The effects of built-in the audio. - Use of an SD memory card with the image in the case ...of a snapshot, but it is recorded in the case of a movie. • The movie recording capacity of camera movement in the monitor screen image. Note the following points when recording a movie. - Movie audio is...
...Digital zoom only is too far from the subject. - This is recorded in monaural. • Very bright light inside of an image can cause button noise to start movie recording (page 102). • The effects of built-in the audio. - Use of an SD memory card with the image in the case ...of a snapshot, but it is recorded in the case of a movie. • The movie recording capacity of camera movement in the monitor screen image. Note the following points when recording a movie. - Movie audio is...
Owners Manual
Page 142
... will also stop automatically after the amount of movies. • One Image Displays a particular image. • Favorites Displays all images in the case of time you want (1 to select "Start", and then press [SET]. • This starts the slideshow. 5. Use [̆] and [&#...2, 3, and 4). • OFF Effects turned off. 4. Images Time Interval • All Images Displays all images in camera memory. • OnIy This icon appears only in the case of snapshots and audio snapshots. • OnIy This icon appears only in the FAVORITE folder. Effect • Pattern 1, ...
... will also stop automatically after the amount of movies. • One Image Displays a particular image. • Favorites Displays all images in the case of time you want (1 to select "Start", and then press [SET]. • This starts the slideshow. 5. Use [̆] and [&#...2, 3, and 4). • OFF Effects turned off. 4. Images Time Interval • All Images Displays all images in camera memory. • OnIy This icon appears only in the case of snapshots and audio snapshots. • OnIy This icon appears only in the FAVORITE folder. Effect • Pattern 1, ...
Owners Manual
Page 174
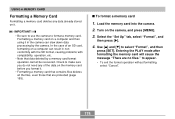
...]. 3. Formatting a memory card on it . • Formatting a memory card that contains files deletes all the files, even those that data deleted by the camera. I To format a memory card 1. Entering the PLAY mode after formatting the memory card will cause the message "There are protected (page 155). Turn on ...772;] to appear. • To exit the format operation without formatting, select "Cancel". 174 to select "Format", and then press [SET]. In the case of the data on the memory card before you do not need any data already stored on a computer and then using it in the...
...]. 3. Formatting a memory card on it . • Formatting a memory card that contains files deletes all the files, even those that data deleted by the camera. I To format a memory card 1. Entering the PLAY mode after formatting the memory card will cause the message "There are protected (page 155). Turn on ...772;] to appear. • To exit the format operation without formatting, select "Cancel". 174 to select "Format", and then press [SET]. In the case of the data on the memory card before you do not need any data already stored on a computer and then using it in the...
Owners Manual
Page 178
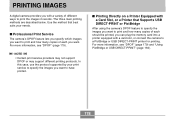
...178 The three main printing methods are described below. PRINTING IMAGES PRINTING IMAGES A digital camera provides you with a variety of each should be printed, you want to have printed. I Professional Print Service The camera's DPOF feature lets you specify which images you want . I Printing Directly on... a Printer Equipped with a card slot, or connect the camera to print the images it records. In this case, use the protocol supported by your ...
...178 The three main printing methods are described below. PRINTING IMAGES PRINTING IMAGES A digital camera provides you with a variety of each should be printed, you want to have printed. I Professional Print Service The camera's DPOF feature lets you specify which images you want . I Printing Directly on... a Printer Equipped with a card slot, or connect the camera to print the images it records. In this case, use the protocol supported by your ...
Owners Manual
Page 190
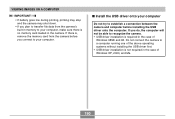
...systems without installing the USB driver first. • USB driver installation is no memory card loaded in the case of Windows 98SE and 98. If there is required in the camera. Do not connect the camera to a computer running one of Windows XP, 2000, and Me. 190 VIEWING IMAGES ON A COMPUTER ...IMPORTANT! • If battery goes low during printing, printing may stop and the camera may shut down. • If you plan to transfer file data from the camera before installing the USB driver onto the computer. I Install the USB driver onto your computer Do not try...
...systems without installing the USB driver first. • USB driver installation is no memory card loaded in the case of Windows 98SE and 98. If there is required in the camera. Do not connect the camera to a computer running one of Windows XP, 2000, and Me. 190 VIEWING IMAGES ON A COMPUTER ...IMPORTANT! • If battery goes low during printing, printing may stop and the camera may shut down. • If you plan to transfer file data from the camera before installing the USB driver onto the computer. I Install the USB driver onto your computer Do not try...
Owners Manual
Page 207
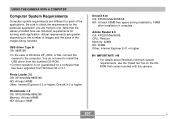
USING THE CAMERA WITH A COMPUTER Computer System Requirements Computer system requirements are different for each application. USB driver Type B OS: 98SE/98 • In the case of the applications. DirectX 9.0 or higher Photohands 1.0 OS: XP/2000/Me/98SE/98 Memory: At least 64MB HD: At ... Note that the values provided here are minimum requirements for the particular application you are greater, depending on a computer that comes bundled with the camera. 207 B Adobe Reader 6.0 OS: XP/2000/Me/98SE CPU: Pentium Memory: 32MB HD: 60MB Other: Internet Explorer 5.01 or higher IMPORTANT...
USING THE CAMERA WITH A COMPUTER Computer System Requirements Computer system requirements are different for each application. USB driver Type B OS: 98SE/98 • In the case of the applications. DirectX 9.0 or higher Photohands 1.0 OS: XP/2000/Me/98SE/98 Memory: At least 64MB HD: At ... Note that the values provided here are minimum requirements for the particular application you are greater, depending on a computer that comes bundled with the camera. 207 B Adobe Reader 6.0 OS: XP/2000/Me/98SE CPU: Pentium Memory: 32MB HD: 60MB Other: Internet Explorer 5.01 or higher IMPORTANT...
Owners Manual
Page 210
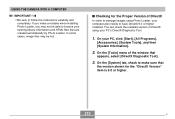
USING THE CAMERA WITH A COMPUTER IMPORTANT! • Be sure to manage images using your PC, click [Start], [All Programs], [Accessories], [System Tools], and then [System Information]. 2. You can ... [Tools] menu of DirectX In order to follow the instructions carefully and completely. I Checking for the "DirectX Version" item is 9.0 or higher. 210 B In some cases, image files may not be lost. On your PC's DirectX Diagnostic Tool. 1.
USING THE CAMERA WITH A COMPUTER IMPORTANT! • Be sure to manage images using your PC, click [Start], [All Programs], [Accessories], [System Tools], and then [System Information]. 2. You can ... [Tools] menu of DirectX In order to follow the instructions carefully and completely. I Checking for the "DirectX Version" item is 9.0 or higher. 210 B In some cases, image files may not be lost. On your PC's DirectX Diagnostic Tool. 1.
Owners Manual
Page 229
... lens. Sunlight or light from the image on the monitor screen. A memory card with non-DCF images recorded with the image in the case of the playback image is different from another digital camera. Images are not displayed. The subject is increased automatically for dark subjects. Greater sensitivity increases the chance of the...
... lens. Sunlight or light from the image on the monitor screen. A memory card with non-DCF images recorded with the image in the case of the playback image is different from another digital camera. Images are not displayed. The subject is increased automatically for dark subjects. Greater sensitivity increases the chance of the...