
Owners Manual
Page 1
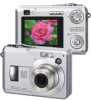
E Digital Camera EX-Z110 User's Guide Thank you for purchasing this CASIO product. • Before using it, be sure to read the precautions contained in this User's Guide. • Keep the User's Guide in a safe place for future reference. • For the most up-to-date information about this product, visit the official EXILIM Website at http://www.exilim.com/. K807PCM1DKX
E Digital Camera EX-Z110 User's Guide Thank you for purchasing this CASIO product. • Before using it, be sure to read the precautions contained in this User's Guide. • Keep the User's Guide in a safe place for future reference. • For the most up-to-date information about this product, visit the official EXILIM Website at http://www.exilim.com/. K807PCM1DKX

Owners Manual
Page 3
...Precautions 12 Data Error Precautions 19 Operating conditions 20 Condensation 20 Power Supply 21 Lens 21 Caring for your camera 21 Other 21 22 QUICK START GUIDE Load the batteries into the camera 22 To configure display language and clock settings ..... 23 To record an image 24 To view a ...recorded image 25 To delete an image 25 26 GETTING READY About This Manual 26 General Guide 27 Camera 27 Monitor Screen Contents 30 REC Modes 30 PLAY Mode 34 Changing the Contents of the Monitor Screen 35 Attaching the Strap 37 Power...
...Precautions 12 Data Error Precautions 19 Operating conditions 20 Condensation 20 Power Supply 21 Lens 21 Caring for your camera 21 Other 21 22 QUICK START GUIDE Load the batteries into the camera 22 To configure display language and clock settings ..... 23 To record an image 24 To view a ...recorded image 25 To delete an image 25 26 GETTING READY About This Manual 26 General Guide 27 Camera 27 Monitor Screen Contents 30 REC Modes 30 PLAY Mode 34 Changing the Contents of the Monitor Screen 35 Attaching the Strap 37 Power...

Owners Manual
Page 7
...Snapshot 215 Playing a Movie 217 Viewing User Documentation (PDF Files) 218 User Registration 218 Exiting the Menu Application 218 Using the Camera with a Macintosh Computer ....... 219 About the bundled CD-ROM 219 Computer System Requirements 220 Managing Images on a Macintosh 221 ...Playing a Movie 222 Viewing User Documentation (PDF Files) 222 To register as a camera user 223 224 APPENDIX Menu Reference 224 Indicator Lamp Reference 227 Troubleshooting Guide 230 If you have problems installing the USB driver... 235 Display Messages 236 Specifications 238...
...Snapshot 215 Playing a Movie 217 Viewing User Documentation (PDF Files) 218 User Registration 218 Exiting the Menu Application 218 Using the Camera with a Macintosh Computer ....... 219 About the bundled CD-ROM 219 Computer System Requirements 220 Managing Images on a Macintosh 221 ...Playing a Movie 222 Viewing User Documentation (PDF Files) 222 To register as a camera user 223 224 APPENDIX Menu Reference 224 Indicator Lamp Reference 227 Troubleshooting Guide 230 If you have problems installing the USB driver... 235 Display Messages 236 Specifications 238...

Owners Manual
Page 8
...for any damages or losses suffered by the screens and configuration of the actual camera. • The SD logo is a registered trademark. • Windows, ... or trademarks of Adobe Systems Incorporated in this User's Guide may differ somewhat by you or any third party due to change without notice. • CASIO COMPUTER CO., LTD. Except as a result of malfunction...CASIO COMPUTER CO., LTD. 8 assumes no responsibility for any damage or loss caused by third parties which may also be held liable for any damage or loss resulting from the use or malfunction of the EX-Z110. • CASIO...
...for any damages or losses suffered by the screens and configuration of the actual camera. • The SD logo is a registered trademark. • Windows, ... or trademarks of Adobe Systems Incorporated in this User's Guide may differ somewhat by you or any third party due to change without notice. • CASIO COMPUTER CO., LTD. Except as a result of malfunction...CASIO COMPUTER CO., LTD. 8 assumes no responsibility for any damage or loss caused by third parties which may also be held liable for any damage or loss resulting from the use or malfunction of the EX-Z110. • CASIO...
Owners Manual
Page 19
...this happens, immediately replace both of the camera. Data Error Precautions • Your digital camera is manufactured using it. • Sometimes, the camera may shutdown after you turn off the camera whenever you will be able to the camera while the camera is still flashing after the low battery ...noted in the User's Guide are no other types of batteries available, note that continued use of batteries of recommended brands at temperature 23°C (73°F), and do not guarantee you are not using precision digital components. Turn off the camera - Disconnecting the USB ...
...this happens, immediately replace both of the camera. Data Error Precautions • Your digital camera is manufactured using it. • Sometimes, the camera may shutdown after you turn off the camera whenever you will be able to the camera while the camera is still flashing after the low battery ...noted in the User's Guide are no other types of batteries available, note that continued use of batteries of recommended brands at temperature 23°C (73°F), and do not guarantee you are not using precision digital components. Turn off the camera - Disconnecting the USB ...

Owners Manual
Page 22
brand type HR-3UA, HR-3UB,or HR-3UF batteries are recommended when using rechargeable nickel metal hydride batteries to power this camera. • Be sure to specify the type of battery you are using to power the camera. • SANYO Electric Co., Ltd. Load the bundled AA-size batteries (LR6) into the camera 1. QUICK START GUIDE QUICK START GUIDE Load the batteries into the camera (page 38). • You can also use commercially available AA-size rechargeable nickel metal hydride batteries and AA-size lithium batteries (FR6) to power the camera (page 40). 1 3 Stopper 2 22
brand type HR-3UA, HR-3UB,or HR-3UF batteries are recommended when using rechargeable nickel metal hydride batteries to power this camera. • Be sure to specify the type of battery you are using to power the camera. • SANYO Electric Co., Ltd. Load the bundled AA-size batteries (LR6) into the camera 1. QUICK START GUIDE QUICK START GUIDE Load the batteries into the camera (page 38). • You can also use commercially available AA-size rechargeable nickel metal hydride batteries and AA-size lithium batteries (FR6) to power the camera (page 40). 1 3 Stopper 2 22

Owners Manual
Page 23
...then press [SET]. [̆] 7. Use [̆] and [̄] to select the date format setting you want . 3. Press [SET] to turn on the camera. 2. Press the power button to register the language setting. 4. Use [̆] and [̄] to select the summer time (DST) setting you [̇] ...want , and then press [SET]. 6. See page 52 for details. 1 1. QUICK START GUIDE To configure display language and clock settings • Be sure to configure the following settings before using the camera to register the clock settings and exit the setting screen. 23 Use [̆] and [̄...
...then press [SET]. [̆] 7. Use [̆] and [̄] to select the date format setting you want . 3. Press [SET] to turn on the camera. 2. Press the power button to register the language setting. 4. Use [̆] and [̄] to select the summer time (DST) setting you [̇] ...want , and then press [SET]. 6. See page 52 for details. 1 1. QUICK START GUIDE To configure display language and clock settings • Be sure to configure the following settings before using the camera to register the clock settings and exit the setting screen. 23 Use [̆] and [̄...

Owners Manual
Page 24
... using a commercially available memory card, be sure to compose the image, and then press the shutter button half way. • When the camera finishes its Auto Focus operation, the focus frame will turn green and the green operation lamp lights. 4. Align the mode dial with " "... details about formatting a memory card, see page 178. 1. Snapshot mode icon Green operation lamp 3 13 4 Focus frame 2 Before using the camera's formatting procedure. QUICK START GUIDE To record an image See page 55 for details. Holding the camera still, gently press the shutter button all the way down. 24
... using a commercially available memory card, be sure to compose the image, and then press the shutter button half way. • When the camera finishes its Auto Focus operation, the focus frame will turn green and the green operation lamp lights. 4. Align the mode dial with " "... details about formatting a memory card, see page 178. 1. Snapshot mode icon Green operation lamp 3 13 4 Focus frame 2 Before using the camera's formatting procedure. QUICK START GUIDE To record an image See page 55 for details. Holding the camera still, gently press the shutter button all the way down. 24

Owners Manual
Page 25
Press [ ] (PLAY). • This enters the PLAY (playback) mode. 2. Use [̇] and [̈] to display the image you want to delete the image. 25 QUICK START GUIDE To view a recorded image To delete an image See page 129 for details. 1 1 See page 157 for details. 2 1. Press [SET] to delete. 4. Press [̄] ( ). 3. Use [̆] and [̄] to scroll through the images. 2, 3, 4, 5 1. Press [ ] (PLAY). 2. Use [̇] and [̈] to select "Delete". • To exit the image delete operation without deleting anything, select "Cancel". 5.
Press [ ] (PLAY). • This enters the PLAY (playback) mode. 2. Use [̇] and [̈] to display the image you want to delete the image. 25 QUICK START GUIDE To view a recorded image To delete an image See page 129 for details. 1 1 See page 157 for details. 2 1. Press [SET] to delete. 4. Press [̄] ( ). 3. Use [̆] and [̄] to scroll through the images. 2, 3, 4, 5 1. Press [ ] (PLAY). 2. Use [̇] and [̈] to select "Delete". • To exit the image delete operation without deleting anything, select "Cancel". 5.

Owners Manual
Page 27
...names of each component, button, and switch on the camera. Camera I File Memory The term "file memory" in the camera For more information about how the camera stores images, see page 206. General Guide The following three locations. • The camera's built-in memory • An SD memory card... loaded in the camera • A MultiMediaCard loaded in this manual is ...
...names of each component, button, and switch on the camera. Camera I File Memory The term "file memory" in the camera For more information about how the camera stores images, see page 206. General Guide The following three locations. • The camera's built-in memory • An SD memory card... loaded in the camera • A MultiMediaCard loaded in this manual is ...
Owners Manual
Page 190
...image for details about how to print. 13. Some print services do not support DPOF printing. Check with the camera - The Photohands User's Guide is recorded. • Specifying date printing with your service for details. See the user documentation that disable time ...Please wait..." Pressing any of the camera's buttons while printing is complete, turn off the camera and then disconnect the USB cable from the camera. Date Printing Any one of the Photohands User's Guide for more information. 190 PRINTING IMAGES 12. On the camera's monitor screen, use [̆] ...
...image for details about how to print. 13. Some print services do not support DPOF printing. Check with the camera - The Photohands User's Guide is recorded. • Specifying date printing with your service for details. See the user documentation that disable time ...Please wait..." Pressing any of the camera's buttons while printing is complete, turn off the camera and then disconnect the USB cable from the camera. Date Printing Any one of the Photohands User's Guide for more information. 190 PRINTING IMAGES 12. On the camera's monitor screen, use [̆] ...

Owners Manual
Page 222
...Proper movie playback may not be possible on some Macintosh models. Open the "Digital Camera" folder, and then open the "Manual" folder. 2. I To view the camera user's guide 1. Even if proper playback is for the language whose user's guide you experience problems, try the following. • Try recording movies with ... that way. If you can use the AV cable that comes bundled with the camera to connect to view the contents of "Normal" or "LP". • Try upgrading to view. 3. USING THE CAMERA WITH A COMPUTER Playing a Movie You can use QuickTime, which comes bundled with your...
...Proper movie playback may not be possible on some Macintosh models. Open the "Digital Camera" folder, and then open the "Manual" folder. 2. I To view the camera user's guide 1. Even if proper playback is for the language whose user's guide you experience problems, try the following. • Try recording movies with ... that way. If you can use the AV cable that comes bundled with the camera to connect to view the contents of "Normal" or "LP". • Try upgrading to view. 3. USING THE CAMERA WITH A COMPUTER Playing a Movie You can use QuickTime, which comes bundled with your...

Owners Manual
Page 223
Open the "Photo Loader" folder and then open the "Manual" folder. 2. To register as a camera user Internet registration only is supported. USING THE CAMERA WITH A COMPUTER I To view the Photo Loader user's guide 1. Visit the following CASIO website to register: http://world.casio.com/qv/register/ 223 On the CD-ROM, open the "English" folder. 3. Open "PhotoLoader_english".
Open the "Photo Loader" folder and then open the "Manual" folder. 2. To register as a camera user Internet registration only is supported. USING THE CAMERA WITH A COMPUTER I To view the Photo Loader user's guide 1. Visit the following CASIO website to register: http://world.casio.com/qv/register/ 223 On the CD-ROM, open the "English" folder. 3. Open "PhotoLoader_english".

Owners Manual
Page 230
... batteries are dead. 1) Turn power back on . Possible Cause 1) The batteries are not oriented correctly. 2) The batteries are dead. 3) You are moving the camera. 1) Clean the lens. 2) Make sure the subject is full. 1) Press [ ] (REC) to enter the REC mode. 2) Wait until the flash unit...to keep to your computer and then delete files from image memory, or use a different memory card. Image Recording 230 Power Supply APPENDIX Troubleshooting Guide Symptom Power does not turn on . 2) Replace the batteries (page 41). Action 1) Orient the batteries correctly (page 38). 2) Replace ...
... batteries are dead. 1) Turn power back on . Possible Cause 1) The batteries are not oriented correctly. 2) The batteries are dead. 3) You are moving the camera. 1) Clean the lens. 2) Make sure the subject is full. 1) Press [ ] (REC) to enter the REC mode. 2) Wait until the flash unit...to keep to your computer and then delete files from image memory, or use a different memory card. Image Recording 230 Power Supply APPENDIX Troubleshooting Guide Symptom Power does not turn on . 2) Replace the batteries (page 41). Action 1) Orient the batteries correctly (page 38). 2) Replace ...