Owners Manual
Page 1
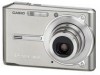
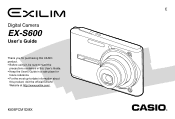
E Digital Camera EX-S600 User's Guide Thank you for purchasing this CASIO product. • Before using it, be sure to read the precautions contained in this User's Guide. • Keep the User's Guide in a safe place for future reference. • For the most up-to-date information about this product, visit the official EXILIM Website at http://www.exilim.com/. K836PCM1DMX
E Digital Camera EX-S600 User's Guide Thank you for purchasing this CASIO product. • Before using it, be sure to read the precautions contained in this User's Guide. • Keep the User's Guide in a safe place for future reference. • For the most up-to-date information about this product, visit the official EXILIM Website at http://www.exilim.com/. K836PCM1DMX

Owners Manual
Page 2
... geographic area. Special AC Adaptor (Inlet Type) (AD-C52G) * The shape of the items shown below are included with your dealer as soon as possible. Camera Rechargeable Lithium Ion Battery (NP-20) USB Cradle (CA-30) Strap CD-ROMs (2) USB Cable AV Cable Basic Reference • Note that all of the... AC power cord plug varies according to make sure that the shape of the AC adaptor depends on the area where you purchased the camera. AC Power Cord * Special AC Adaptor (Plug-in Type) (AD-C52J) 2 If something is missing, contact your...
... geographic area. Special AC Adaptor (Inlet Type) (AD-C52G) * The shape of the items shown below are included with your dealer as soon as possible. Camera Rechargeable Lithium Ion Battery (NP-20) USB Cradle (CA-30) Strap CD-ROMs (2) USB Cable AV Cable Basic Reference • Note that all of the... AC power cord plug varies according to make sure that the shape of the AC adaptor depends on the area where you purchased the camera. AC Power Cord * Special AC Adaptor (Plug-in Type) (AD-C52J) 2 If something is missing, contact your...
Owners Manual
Page 3
... Requirements 32 Loading the Rechargeable Battery 32 To charge the battery 33 To replace the battery 37 Power Supply Precautions 38 Turning the Camera On and Off 41 Configuring Power Saving Settings 43 Using the On-screen Menus 44 Configuring Display Language and Clock Settings ... 47...To configure display language and clock settings 48 50 BASIC IMAGE RECORDING Recording an Image 50 Aiming the Camera 50 Recording an Image 51 Using Zoom 56 Optical Zoom 56 Digital Zoom 58 Using the Flash 60 Flash Unit Status 62 Changing the Flash Intensity Setting 63 Using ...
... Requirements 32 Loading the Rechargeable Battery 32 To charge the battery 33 To replace the battery 37 Power Supply Precautions 38 Turning the Camera On and Off 41 Configuring Power Saving Settings 43 Using the On-screen Menus 44 Configuring Display Language and Clock Settings ... 47...To configure display language and clock settings 48 50 BASIC IMAGE RECORDING Recording an Image 50 Aiming the Camera 50 Recording an Image 51 Using Zoom 56 Optical Zoom 56 Digital Zoom 58 Using the Flash 60 Flash Unit Status 62 Changing the Flash Intensity Setting 63 Using ...

Owners Manual
Page 4
... To delete a BEST SHOT user setup 89 Reducing the Effects of Hand or Subject Movement 90 Shooting with High Sensitivity 91 Recording Images of Business Cards and Documents (Business Shot 92 Before recording with Business Shot 93 To use Business Shot 93 Restoring an Old Photograph 94 Before trying to restore...
... To delete a BEST SHOT user setup 89 Reducing the Effects of Hand or Subject Movement 90 Shooting with High Sensitivity 91 Recording Images of Business Cards and Documents (Business Shot 92 Before recording with Business Shot 93 To use Business Shot 93 Restoring an Old Photograph 94 Before trying to restore...
Owners Manual
Page 5
...the Metering Mode 118 Using the Filter Function 119 Specifying Outline Sharpness 120 Specifying Color Saturation 120 Specifying Contrast 121 Resetting the Camera 121 122 PLAYBACK Basic Playback Operation 122 Playing an Audio Snapshot 123 Zooming the Display Image 124 Resizing an Image 125 ...141 Using Image Roulette 142 Adding Audio to a Snapshot 143 To re-record audio 144 Playing Back a Voice Recording File 145 Displaying Camera Images on a TV Screen 146 Selecting the Video Output System 148 149 DELETING FILES Deleting a Single File 149 Deleting All Files ...
...the Metering Mode 118 Using the Filter Function 119 Specifying Outline Sharpness 120 Specifying Color Saturation 120 Specifying Contrast 121 Resetting the Camera 121 122 PLAYBACK Basic Playback Operation 122 Playing an Audio Snapshot 123 Zooming the Display Image 124 Resizing an Image 125 ...141 Using Image Roulette 142 Adding Audio to a Snapshot 143 To re-record audio 144 Playing Back a Voice Recording File 145 Displaying Camera Images on a TV Screen 146 Selecting the Video Output System 148 149 DELETING FILES Deleting a Single File 149 Deleting All Files ...
Owners Manual
Page 6
...) and [ ] (PLAY) Power On/Off Functions 166 Formatting Built-in Memory 167 169 USING A MEMORY CARD Using a Memory Card 170 To insert a memory card into the camera 170 To replace the memory card 171 Formatting a Memory Card 172 Copying Files 173 To copy all the files in built-in memory to a memory... card 174 To copy a specific file from a memory card to built-in memory 175 176 PRINTING IMAGES ...
...) and [ ] (PLAY) Power On/Off Functions 166 Formatting Built-in Memory 167 169 USING A MEMORY CARD Using a Memory Card 170 To insert a memory card into the camera 170 To replace the memory card 171 Formatting a Memory Card 172 Copying Files 173 To copy all the files in built-in memory to a memory... card 174 To copy a specific file from a memory card to built-in memory 175 176 PRINTING IMAGES ...
Owners Manual
Page 7
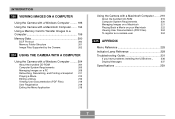
...Camera with a Windows Computer ........ 186 Using the Camera with a Macintosh Computer ....... 194 Using a Memory Card to Transfer Images to a Computer 199 Memory Data 200 DCF Protocol 200 Memory Folder Structure 201 Image Files Supported by the Camera 202 204 USING THE CAMERA WITH A COMPUTER Using the Camera...Editing a Movie 216 Viewing User Documentation (PDF Files) 218 User Registration 218 Exiting the Menu Application 218 Using the Camera with a Macintosh Computer ....... 219 About the bundled CD-ROM 219 Computer System Requirements 220 Managing Images on a ...
...Camera with a Windows Computer ........ 186 Using the Camera with a Macintosh Computer ....... 194 Using a Memory Card to Transfer Images to a Computer 199 Memory Data 200 DCF Protocol 200 Memory Folder Structure 201 Image Files Supported by the Camera 202 204 USING THE CAMERA WITH A COMPUTER Using the Camera...Editing a Movie 216 Viewing User Documentation (PDF Files) 218 User Registration 218 Exiting the Menu Application 218 Using the Camera with a Macintosh Computer ....... 219 About the bundled CD-ROM 219 Computer System Requirements 220 Managing Images on a ...
Owners Manual
Page 8
assumes no responsibility for any damage or loss caused by the screens and configuration of the actual camera. • The SD logo is a registered trademark. • Windows, Internet Explorer, Windows Media, and DirectX are registered trademarks of Microsoft Corporation. • ... liable for any damages or losses suffered by third parties which may arise through the use of the EX-S600. • CASIO COMPUTER CO., LTD. Be sure to back up all copyrights and other media to CASIO COMPUTER CO., LTD. 8 Except as a result of malfunction, repairs, or battery replacement. shall not ...
assumes no responsibility for any damage or loss caused by the screens and configuration of the actual camera. • The SD logo is a registered trademark. • Windows, Internet Explorer, Windows Media, and DirectX are registered trademarks of Microsoft Corporation. • ... liable for any damages or losses suffered by third parties which may arise through the use of the EX-S600. • CASIO COMPUTER CO., LTD. Be sure to back up all copyrights and other media to CASIO COMPUTER CO., LTD. 8 Except as a result of malfunction, repairs, or battery replacement. shall not ...
Owners Manual
Page 9
...99.99%. This means that provides a pixel yield of such files over the Internet without using a memory card. • Bundled with a USB Cradle The bundled USB cradle can be used to charge the camera's battery (page 33), to view images on a TV screen (page 146), and to transfer images to...AF assist light (page 53) Improves auto focus accuracy when shooting under dim lighting. • 12X zoom (page 56) 3X optical zoom, 4X digital zoom 9 B I LCD Panel The LCD panel is on ). INTRODUCTION I Copyright Restrictions Except for free, violates copyright laws and international contracts.
...99.99%. This means that provides a pixel yield of such files over the Internet without using a memory card. • Bundled with a USB Cradle The bundled USB cradle can be used to charge the camera's battery (page 33), to view images on a TV screen (page 146), and to transfer images to...AF assist light (page 53) Improves auto focus accuracy when shooting under dim lighting. • 12X zoom (page 56) 3X optical zoom, 4X digital zoom 9 B I LCD Panel The LCD panel is on ). INTRODUCTION I Copyright Restrictions Except for free, violates copyright laws and international contracts.
Owners Manual
Page 10
... records the image without waiting for Auto Focus to restore an old, faded photograph with the color provided by modern digital camera technology. • High-resolution movie recording with audio (page 97) VGA size, 30 fps, MPEG-4 AVI format 10 INTRODUCTION • Flash Assist (page ... different points and automatically selects the best one. • BEST SHOT (page 85) Simply select the sample scene that matches the type of a business card, document, whiteboard, or similar subjects from an angle. • Restoring an Old Photograph (page 94) You can be performed. New BEST SHOT sample ...
... records the image without waiting for Auto Focus to restore an old, faded photograph with the color provided by modern digital camera technology. • High-resolution movie recording with audio (page 97) VGA size, 30 fps, MPEG-4 AVI format 10 INTRODUCTION • Flash Assist (page ... different points and automatically selects the best one. • BEST SHOT (page 85) Simply select the sample scene that matches the type of a business card, document, whiteboard, or similar subjects from an angle. • Restoring an Old Photograph (page 94) You can be performed. New BEST SHOT sample ...
Owners Manual
Page 11
... a DPOF compatible printer. You can select from five seconds before [ ] (MOVIE) was pressed), and a BEST SHOT mode (instant camera setup based on the camera's monitor screen. You can also be printed easily in the sequence you view the effect on overall image brightness, which makes shooting under... and Past Movie (movie starts from among 162 cities in 32 time zones. • Support for SD memory cards and MMC (MultiMedia Cards) for memory expansion (page 169) • Digital Print Order Format (DPOF) (page 177) Images can be used when specifying images and quantities for printing by ...
... a DPOF compatible printer. You can select from five seconds before [ ] (MOVIE) was pressed), and a BEST SHOT mode (instant camera setup based on the camera's monitor screen. You can also be printed easily in the sequence you view the effect on overall image brightness, which makes shooting under... and Past Movie (movie starts from among 162 cities in 32 time zones. • Support for SD memory cards and MMC (MultiMedia Cards) for memory expansion (page 169) • Digital Print Order Format (DPOF) (page 177) Images can be used when specifying images and quantities for printing by ...
Owners Manual
Page 12
...a computer. • PRINT Image Matching III Compatible (page 185) Images include PRINT Image Matching III data (mode setting and other camera setup information). Software can be upgraded to a PictBridge or USB DIRECT-PRINT compatible printer and you can be played by a DVD ...DCF Data Storage (page 200) DCF (Design rule for Camera File system) data storage protocol provides image compatibility between the digital camera and printers. • Bundled with Photo Loader and Photohands (pages 208, 211, 221) Your camera comes bundled with Photo Loader, the popular application that supports...
...a computer. • PRINT Image Matching III Compatible (page 185) Images include PRINT Image Matching III data (mode setting and other camera setup information). Software can be upgraded to a PictBridge or USB DIRECT-PRINT compatible printer and you can be played by a DVD ...DCF Data Storage (page 200) DCF (Design rule for Camera File system) data storage protocol provides image compatibility between the digital camera and printers. • Bundled with Photo Loader and Photohands (pages 208, 211, 221) Your camera comes bundled with Photo Loader, the popular application that supports...
Owners Manual
Page 13
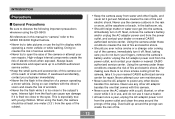
... smoke coming out of the camera or attempt your dealer or nearest CASIO authorized service center. Next, remove the camera's battery and/or unplug the AC adaptor power cord from water and other device besides this manual to "camera" refer to the CASIO EX-S600 Digital Camera. • Never try to... open the case of the camera, immediately turn it off . After making sure there is too close to the eyes. Using the camera under these conditions creates the risk of the...
... smoke coming out of the camera or attempt your dealer or nearest CASIO authorized service center. Next, remove the camera's battery and/or unplug the AC adaptor power cord from water and other device besides this manual to "camera" refer to the CASIO EX-S600 Digital Camera. • Never try to... open the case of the camera, immediately turn it off . After making sure there is too close to the eyes. Using the camera under these conditions creates the risk of the...
Owners Manual
Page 14
... Never open the battery cover, disconnect the AC adaptor from the camera, or unplug the AC adaptor from the power outlet, and contact your dealer or nearest CASIO authorized service center. • Never use is prohibited. Next, remove the camera's battery and/or unplug the AC adaptor power cord from the ...will not only make sure you first record a number of an aircraft or in any other image data already stored in its use the camera inside of test images and check the results to rough treatment, immediately turn it off. Always keep backup copies of the current image impossible...
... Never open the battery cover, disconnect the AC adaptor from the camera, or unplug the AC adaptor from the power outlet, and contact your dealer or nearest CASIO authorized service center. • Never use is prohibited. Next, remove the camera's battery and/or unplug the AC adaptor power cord from the ...will not only make sure you first record a number of an aircraft or in any other image data already stored in its use the camera inside of test images and check the results to rough treatment, immediately turn it off. Always keep backup copies of the current image impossible...
Owners Manual
Page 15
Low battery power - Inside of the error. Removing the battery or memory card, or setting the camera onto the USB cradle while the camera is manufactured using precision digital components. Follow the instructions provided by the message to eliminate the cause of a closed vehicle, especially one... - Removing the battery, removing the memory card, or placing the camera onto the USB cradle while the operation lamp is being performed - In areas subject to high humidity or dust - I Data Error Precautions • Your digital camera is performing a record or memory access operation...
Low battery power - Inside of the error. Removing the battery or memory card, or setting the camera onto the USB cradle while the camera is manufactured using precision digital components. Follow the instructions provided by the message to eliminate the cause of a closed vehicle, especially one... - Removing the battery, removing the memory card, or placing the camera onto the USB cradle while the operation lamp is being performed - In areas subject to high humidity or dust - I Data Error Precautions • Your digital camera is performing a record or memory access operation...
Owners Manual
Page 16
... battery from both the battery and USB cradle). Use of any other type of temperature, there is the possibility that is not supported. • This camera does not have a separate battery for a few hours. I Condensation • When you should avoid exposing it to a sudden change of battery is much ...warmer or colder than your current location. The date and time settings of the camera, so you bring the camera indoors on interior components. Leave it into a plastic bag before moving it in the plastic bag until the air inside the bag ...
... battery from both the battery and USB cradle). Use of any other type of temperature, there is the possibility that is not supported. • This camera does not have a separate battery for a few hours. I Condensation • When you should avoid exposing it to a sudden change of battery is much ...warmer or colder than your current location. The date and time settings of the camera, so you bring the camera indoors on interior components. Leave it into a plastic bag before moving it in the plastic bag until the air inside the bag ...
Owners Manual
Page 17
... flash. If the flash becomes dirty, wipe it clean with a soft, dry cloth. • If the exterior of the camera needs cleaning, wipe it with your camera • Fingerprints, dust, or any other foreign matter on the flash can remove dust particles from the lens surface by using ...lens, and does not indicate malfunction of images, such as a slight bend in certain types of the camera. You can interfere with proper image recording. I Other • The camera may sometimes notice some distortion in lines that should be straight. This does not indicate malfunction. 17 Next,...
... flash. If the flash becomes dirty, wipe it clean with a soft, dry cloth. • If the exterior of the camera needs cleaning, wipe it with your camera • Fingerprints, dust, or any other foreign matter on the flash can remove dust particles from the lens surface by using ...lens, and does not indicate malfunction of images, such as a slight bend in certain types of the camera. You can interfere with proper image recording. I Other • The camera may sometimes notice some distortion in lines that should be straight. This does not indicate malfunction. 17 Next,...
Owners Manual
Page 18
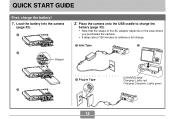
Place the camera onto the USB cradle to charge the battery (page 33). • Note that the shape of the AC adaptor depends on the area where you purchased the camera. • It takes about 120 minutes to achieve a full charge. 1 Inlet Type 2 2 Stopper 1 Plug-in Type [CHARGE] lamp Charging: Lights red Charging Complete: Lights green 3 18 QUICK START GUIDE QUICK START GUIDE First, charge the battery! 1. Load the battery into the camera (page 32). 1 2.
Place the camera onto the USB cradle to charge the battery (page 33). • Note that the shape of the AC adaptor depends on the area where you purchased the camera. • It takes about 120 minutes to achieve a full charge. 1 Inlet Type 2 2 Stopper 1 Plug-in Type [CHARGE] lamp Charging: Lights red Charging Complete: Lights green 3 18 QUICK START GUIDE QUICK START GUIDE First, charge the battery! 1. Load the battery into the camera (page 32). 1 2.
Owners Manual
Page 19
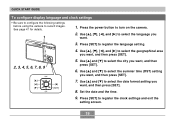
...want. 3. Use and [̈] to select the city you want , and then press [SET]. 6. Use [̆] and [̄] to turn on the camera. 2. Press the power button to select the summer time (DST) setting you want , and then press [SET]. [̆] 7. QUICK START GUIDE To configure... display language and clock settings • Be sure to configure the following settings before using the camera to register the language setting. 4. Press [SET] to record images. Use and [̈] to select the date format setting you want , and ...
...want. 3. Use and [̈] to select the city you want , and then press [SET]. 6. Use [̆] and [̄] to turn on the camera. 2. Press the power button to select the summer time (DST) setting you want , and then press [SET]. [̆] 7. QUICK START GUIDE To configure... display language and clock settings • Be sure to configure the following settings before using the camera to register the language setting. 4. Press [SET] to record images. Use and [̈] to select the date format setting you want , and ...

Owners Manual
Page 20
... the subject, use the monitor screen to appear on the monitor screen. 2. Holding the camera still, gently press the shutter button all the way down. For details about formatting a memory card, see page 172. 20 Press [ ] (REC). • This enters the REC (recording) mode. • This causes ... button half way. • When the camera finishes its Auto Focus operation, the focus frame will turn green and the operation lamp lights green. 3. Before using a commercially available memory card, be sure to first format it using the camera's formatting procedure. QUICK START GUIDE To record...
... the subject, use the monitor screen to appear on the monitor screen. 2. Holding the camera still, gently press the shutter button all the way down. For details about formatting a memory card, see page 172. 20 Press [ ] (REC). • This enters the REC (recording) mode. • This causes ... button half way. • When the camera finishes its Auto Focus operation, the focus frame will turn green and the operation lamp lights green. 3. Before using a commercially available memory card, be sure to first format it using the camera's formatting procedure. QUICK START GUIDE To record...
