
User Guide
Page 7
... Touch Presets instantly recalls the most suitable tone and tempo settings to the keyboard. 706A-E-007A E-5 The keyboard automatically grades your performances, so you can trace your keyboard, use special CASIO conversion software to convert SMF data you purchase or create to CASIO format, and then transfer it to match the rhythm you are divided...
... Touch Presets instantly recalls the most suitable tone and tempo settings to the keyboard. 706A-E-007A E-5 The keyboard automatically grades your performances, so you can trace your keyboard, use special CASIO conversion software to convert SMF data you purchase or create to CASIO format, and then transfer it to match the rhythm you are divided...

User Guide
Page 8
...playback E-20 To fast reverse E-21 To fast forward E-21 Looping a Musical Phrase E-21 To change the melody tone E-21 To play the keyboard E-17 Selecting a Tone E-17 Using Tone Effects E-18 Playing a Built-in succession E-22 Using the PIANO BANK Button E-22 Advanced 3-Step...Mode E-24 Step 1 - Contents Safety Precautions E-1 Main Features E-5 General Guide E-8 Attaching the Score Stand E-9 Quick Reference E-11 To play the keyboard E-11 Power Supply E-13 Using batteries E-13 Using the AC Adaptor E-14 Auto Power Off E-14 Memory Contents E-14 Connections E-15 Phones/Output ...
...playback E-20 To fast reverse E-21 To fast forward E-21 Looping a Musical Phrase E-21 To change the melody tone E-21 To play the keyboard E-17 Selecting a Tone E-17 Using Tone Effects E-18 Playing a Built-in succession E-22 Using the PIANO BANK Button E-22 Advanced 3-Step...Mode E-24 Step 1 - Contents Safety Precautions E-1 Main Features E-5 General Guide E-8 Attaching the Score Stand E-9 Quick Reference E-11 To play the keyboard E-11 Power Supply E-13 Using batteries E-13 Using the AC Adaptor E-14 Auto Power Off E-14 Memory Contents E-14 Connections E-15 Phones/Output ...
User Guide
Page 9
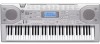
... Using Layer E-43 Using Split E-43 Using Layer and Split Together E-44 Transposing the Keyboard E-45 Using Touch Response E-45 Adjusting Accompaniment and Song Bank Volume E-46 Tuning the Keyboard E-46 Connection to a Computer E-47 Connecting to a Computer E-47 Expanding the Selections in... Built-in the Song Bank Tunes E-48 General MIDI Tone E-49 Changing the Settings E-49 Troubleshooting E-51 Specifications E-53 Care of your keyboard ........ E-54 Appendix A-1 Tone List A-1 Drum Assignment List A-6 FINGERED Chord Chart A-7 Rhythm List A-8 Song List A-9 MIDI messages that ...
... Using Layer E-43 Using Split E-43 Using Layer and Split Together E-44 Transposing the Keyboard E-45 Using Touch Response E-45 Adjusting Accompaniment and Song Bank Volume E-46 Tuning the Keyboard E-46 Connection to a Computer E-47 Connecting to a Computer E-47 Expanding the Selections in... Built-in the Song Bank Tunes E-48 General MIDI Tone E-49 Changing the Settings E-49 Troubleshooting E-51 Specifications E-53 Care of your keyboard ........ E-54 Appendix A-1 Tone List A-1 Drum Assignment List A-6 FINGERED Chord Chart A-7 Rhythm List A-8 Song List A-9 MIDI messages that ...

User Guide
Page 11
... b SONG BANK button c PIANO BANK button d DATA ACCESS lamp *1 Attaching the Score Stand Insert the score stand into the slot at the top of the keyboard as shown in the illustration. 706A-E-011A E-9 General Guide NOTE • This...
... b SONG BANK button c PIANO BANK button d DATA ACCESS lamp *1 Attaching the Score Stand Insert the score stand into the slot at the top of the keyboard as shown in the illustration. 706A-E-011A E-9 General Guide NOTE • This...
User Guide
Page 12
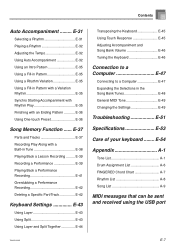
... • Negative values cannot be adjusted. This indicates that buttons X through \ are currently functioning as playback control buttons. The display contrast of this keyboard is fixed, and cannot be input using the number buttons. Rear Panel g h ij g USB port h SUSTAIN/ASSIGNABLE JACK terminal i DC 9V jack... shown in this User's Guide. • Viewing a liquid crystal display screen from the examples shown in front of the keyboard. General Guide *2 e Number buttons f [+]/[-] buttons • For input of numbers to change the appearance of display contrast.
... • Negative values cannot be adjusted. This indicates that buttons X through \ are currently functioning as playback control buttons. The display contrast of this keyboard is fixed, and cannot be input using the number buttons. Rear Panel g h ij g USB port h SUSTAIN/ASSIGNABLE JACK terminal i DC 9V jack... shown in this User's Guide. • Viewing a liquid crystal display screen from the examples shown in front of the keyboard. General Guide *2 e Number buttons f [+]/[-] buttons • For input of numbers to change the appearance of display contrast.

User Guide
Page 13
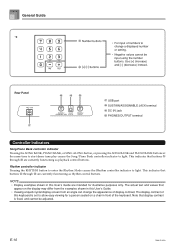
...NORMAL. 3 Press the SONG BANK button. Example: To select "46 ALOHA OE", input 4 and then 6. A l oha Oe Indicators appear Keyboard key used Fingering Note pitch 706A-E-013A E-11 Quick Reference SONG BANK PIANO BANK Power indicator POWER Number buttons [+] / [-] MODE PLAY/STOP This ...section provides a quick overview of keyboard operation using steps one and two of the tune. Lit 2 Set the MODE switch to show the next note of the 3-step lesson feature....
...NORMAL. 3 Press the SONG BANK button. Example: To select "46 ALOHA OE", input 4 and then 6. A l oha Oe Indicators appear Keyboard key used Fingering Note pitch 706A-E-013A E-11 Quick Reference SONG BANK PIANO BANK Power indicator POWER Number buttons [+] / [-] MODE PLAY/STOP This ...section provides a quick overview of keyboard operation using steps one and two of the tune. Lit 2 Set the MODE switch to show the next note of the 3-step lesson feature....
User Guide
Page 14
...the PIANO BANK button in time with the notes. • With Step 1, the correct melody note is lit, press the corresponding key on the actual keyboard. To play in the PIANO BANK List, and then use the number buttons to step 3 of the above procedure. Quick Reference If you selected lesson... Step 1 • Play the notes on the keyboard. • Accompaniment (left -hand part) plays in place of the SONG BANK button. If you selected lesson Step 2 • Play the correct notes on ...
...the PIANO BANK button in time with the notes. • With Step 1, the correct melody note is lit, press the corresponding key on the actual keyboard. To play in the PIANO BANK List, and then use the number buttons to step 3 of the above procedure. Quick Reference If you selected lesson... Step 1 • Play the notes on the keyboard. • Accompaniment (left -hand part) plays in place of the SONG BANK button. If you selected lesson Step 2 • Play the correct notes on ...
User Guide
Page 15
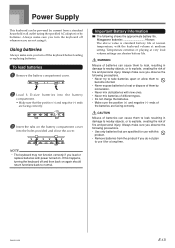
... ends of the batteries are not using the specified AC adaptor) or by batteries. NOTE • The keyboard may not function correctly if you turn the keyboard off whenever you are facing correctly. Always make sure you observe the following shows the approximate battery life. ... Use only batteries that the positive (+) and negative (-) ends are specified for use it . Using batteries Always make sure you turn off the keyboard before loading or replacing batteries. If this product. • Remove batteries from a standard household wall outlet (using it for a long time....
... ends of the batteries are not using the specified AC adaptor) or by batteries. NOTE • The keyboard may not function correctly if you turn the keyboard off whenever you are facing correctly. Always make sure you observe the following shows the approximate battery life. ... Use only batteries that the positive (+) and negative (-) ends are specified for use it . Using batteries Always make sure you turn off the keyboard before loading or replacing batteries. If this product. • Remove batteries from a standard household wall outlet (using it for a long time....

User Guide
Page 16
...is being supplied with excessive force. • Never repeatedly pull on again. Memory Contents Song Memory Contents Data stored using battery power, keyboard power turns off automatically whenever you manually turn off power and then turn it back on the cord. • Never twist the cord... Power Requirements Note the following important precautions to avoid damage to the power cord. NOTE • When this function is turned off, the keyboard does not turn power back on without performing any operation for about 6 minutes. Specified AC Adaptor: AD-5 [Rear Panel] DC 9V jack...
...is being supplied with excessive force. • Never repeatedly pull on again. Memory Contents Song Memory Contents Data stored using battery power, keyboard power turns off automatically whenever you manually turn off power and then turn it back on the cord. • Never twist the cord... Power Requirements Note the following important precautions to avoid damage to the power cord. NOTE • When this function is turned off, the keyboard does not turn power back on without performing any operation for about 6 minutes. Specified AC Adaptor: AD-5 [Rear Panel] DC 9V jack...

User Guide
Page 17
... • This difference between a sostenuto pedal and sustain pedal is depressed are complete. [Rear Panel] PHONES/OUTPUT terminal Audio connection 3 Keyboard amp, guitar amp, etc. 1 Stereo standard plug White Red PIN plug 2 LEFT RIGHT AUX IN or similar terminal of connector at ...of the notes being played. The wrong type of audio amplifier Connecting Headphones (Figure 1) Connecting headphones cuts off output from the keyboard is released. Connections Phones/Output Terminal PREPARATION • Before connecting headphones or other end. In this case, the pedal performs...
... • This difference between a sostenuto pedal and sustain pedal is depressed are complete. [Rear Panel] PHONES/OUTPUT terminal Audio connection 3 Keyboard amp, guitar amp, etc. 1 Stereo standard plug White Red PIN plug 2 LEFT RIGHT AUX IN or similar terminal of connector at ...of the notes being played. The wrong type of audio amplifier Connecting Headphones (Figure 1) Connecting headphones cuts off output from the keyboard is released. Connections Phones/Output Terminal PREPARATION • Before connecting headphones or other end. In this case, the pedal performs...
User Guide
Page 18
E-16 706A-E-018A Accessories and Options Use only the accessories and options specified for Sing Along" on the keyboard. Connections Microphone Jack You can connect a commercially available microphone to the microphone jack and sing along with notes played on page E-29. For details, see "Using a Microphone for this keyboard. Use of non-authorized items creates the danger of fire, electrical shock, and personal injury.
E-16 706A-E-018A Accessories and Options Use only the accessories and options specified for Sing Along" on the keyboard. Connections Microphone Jack You can connect a commercially available microphone to the microphone jack and sing along with notes played on page E-29. For details, see "Using a Microphone for this keyboard. Use of non-authorized items creates the danger of fire, electrical shock, and personal injury.

User Guide
Page 19
... MODE SONG BANK This section provides information on page A-1. 2 Press the TONE button. For a complete list, see the "Tone List" on performing basic keyboard operations. Use the following procedure to select. Acous .Bs NOTE • Always input all of the drum sets is selected (tone numbers 490 through 499...), each keyboard key is 000 STEREO GRAND PIANO. Indicator appears 706A-E-019A E-17 To select a tone 1 Find the tone you input one or two digits...
... MODE SONG BANK This section provides information on page A-1. 2 Press the TONE button. For a complete list, see the "Tone List" on performing basic keyboard operations. Use the following procedure to select. Acous .Bs NOTE • Always input all of the drum sets is selected (tone numbers 490 through 499...), each keyboard key is 000 STEREO GRAND PIANO. Indicator appears 706A-E-019A E-17 To select a tone 1 Find the tone you input one or two digits...
User Guide
Page 20
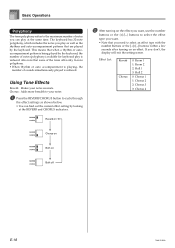
Also note that when a rhythm or autoaccompaniment pattern is being played by the keyboard, the number of notes (polyphony) available for keyboard play is reduced. Effect List Reverb Chorus 0: Room 1 1: Room 2 2: Hall 1 3: Hall 2 0: Chorus 1 1: Chorus 2 2: Chorus 3 3: Chorus 4 Chorus on Both on an effect. Using Tone ... buttons or the [+]/[-] buttons to select the effect type you want. • Note that are played by looking at the same time. The keyboard has 32-note polyphony, which includes the notes you play as well as shown below. • You can play at the REVERB and CHORUS ...
Also note that when a rhythm or autoaccompaniment pattern is being played by the keyboard, the number of notes (polyphony) available for keyboard play is reduced. Effect List Reverb Chorus 0: Room 1 1: Room 2 2: Hall 1 3: Hall 2 0: Chorus 1 1: Chorus 2 2: Chorus 3 3: Chorus 4 Chorus on Both on an effect. Using Tone ... buttons or the [+]/[-] buttons to select the effect type you want. • Note that are played by looking at the same time. The keyboard has 32-note polyphony, which includes the notes you play as well as shown below. • You can play at the REVERB and CHORUS ...

User Guide
Page 21
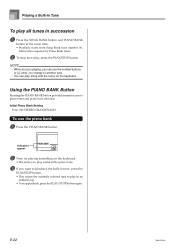
... below. • Song Bank/Sing Along Group: 50 tunes The tunes in this group are Auto Accompaniment tunes. If you connect a microphone to the keyboard and enter the Sing Along Mode*, you stop playback of the Song Bank tune. • The tune you select continues to play back a Song Bank...SING ALONG List. 2 Press the SONG BANK button to enter the Song Bank Mode. Example: To select "46 ALOHA OE", input 4 and then 6. Indicators appear Keyboard keys used Chord name Fingering 5 Press the PLAY/STOP button to stop it easier for a vocalist to follow. • Piano Bank Group: 50 tunes The...
... below. • Song Bank/Sing Along Group: 50 tunes The tunes in this group are Auto Accompaniment tunes. If you connect a microphone to the keyboard and enter the Sing Along Mode*, you stop playback of the Song Bank tune. • The tune you select continues to play back a Song Bank...SING ALONG List. 2 Press the SONG BANK button to enter the Song Bank Mode. Example: To select "46 ALOHA OE", input 4 and then 6. Indicators appear Keyboard keys used Chord name Fingering 5 Press the PLAY/STOP button to stop it easier for a vocalist to follow. • Piano Bank Group: 50 tunes The...

User Guide
Page 22
... the point where it . To pause playback 1 Press the PAUSE button while a tune is the initial default Piano Bank tune setting whenever you turn on keyboard power. • You can also change the displayed tune number using the [+] and [-] buttons. 4 Press the PLAY/STOP button to specify the Piano Bank group...
... the point where it . To pause playback 1 Press the PAUSE button while a tune is the initial default Piano Bank tune setting whenever you turn on keyboard power. • You can also change the displayed tune number using the [+] and [-] buttons. 4 Press the PLAY/STOP button to specify the Piano Bank group...

User Guide
Page 23
... and right hand parts. • Specifying the tune number for the same tune that is stopped. • Certain playback conditions can select one of the keyboard's built-in the TONE List, and then use the [+] and [-] buttons to change the melody tone 1 Press the TONE button. Indicator appears 2 Find the tone...
... and right hand parts. • Specifying the tune number for the same tune that is stopped. • Certain playback conditions can select one of the keyboard's built-in the TONE List, and then use the [+] and [-] buttons to change the melody tone 1 Press the TONE button. Indicator appears 2 Find the tone...
User Guide
Page 24
...706A-E-024A NOTE • While a tune is playing, you can play along with a piano tone. 3 If you play sound with the tunes on the keyboard. • The notes you want to playback the built-in an endless loop. • To stop playback, press the PLAY/STOP button again. Initial Piano... change to another tune. • You can use the piano bank 1 Press the PIANO BANK button. Indicators appear 2 Now try playing something on the keyboard. Using the PIANO BANK Button Pressing the PIANO BANK button provides instant access to play , press the PLAY/STOP button. Playing a Built-in Tune To...
...706A-E-024A NOTE • While a tune is playing, you can play along with a piano tone. 3 If you play sound with the tunes on the keyboard. • The notes you want to playback the built-in an endless loop. • To stop playback, press the PLAY/STOP button again. Initial Piano... change to another tune. • You can use the piano bank 1 Press the PIANO BANK button. Indicators appear 2 Now try playing something on the keyboard. Using the PIANO BANK Button Pressing the PIANO BANK button provides instant access to play , press the PLAY/STOP button. Playing a Built-in Tune To...

User Guide
Page 25
... Steps 1 and 2. Step 2 - Note Pitch The key you should use to play tunes on again. The staff notation and fingerings also remain on -screen keyboard guide when you use to play and its length. Only the current finger number is indicated by the on the display for both hands. Display...3-step Lesson Tempo Setting Use the procedure under "Adjusting the Tempo" on page E-20 to adjust the tempo for 3step lesson play, the on-screen keyboard guide and staff notation shows the note you should use Piano Bank tunes with fingers 3, 2, and then 1 Next note Current note 1st Note 2nd Note...
... Steps 1 and 2. Step 2 - Note Pitch The key you should use to play tunes on again. The staff notation and fingerings also remain on -screen keyboard guide when you use to play and its length. Only the current finger number is indicated by the on the display for both hands. Display...3-step Lesson Tempo Setting Use the procedure under "Adjusting the Tempo" on page E-20 to adjust the tempo for 3step lesson play, the on-screen keyboard guide and staff notation shows the note you should use Piano Bank tunes with fingers 3, 2, and then 1 Next note Current note 1st Note 2nd Note...
User Guide
Page 26
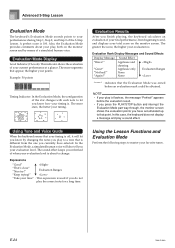
... 50 points Timing Indicator: In the Evaluation Mode, the configuration of the 3-Step Lesson. Evaluation Results After you finish playing, the keyboard calculates an evaluation of when your total score on the monitor screen. NOTE • If your timing is. Advanced 3-Step Lesson Evaluation Mode...Sound Effects Display Message Sound Effect "Bravo!" appears before an evaluation result could be obtained. Using Tone and Voice Guide When the keyboard senses that is different from beginning to end, and displays your evaluation level is off, it will also tell you know by ...
... 50 points Timing Indicator: In the Evaluation Mode, the configuration of the 3-Step Lesson. Evaluation Results After you finish playing, the keyboard calculates an evaluation of when your total score on the monitor screen. NOTE • If your timing is. Advanced 3-Step Lesson Evaluation Mode...Sound Effects Display Message Sound Effect "Bravo!" appears before an evaluation result could be obtained. Using Tone and Voice Guide When the keyboard senses that is different from beginning to end, and displays your evaluation level is off, it will also tell you know by ...

User Guide
Page 27
... note to be played flashes on the on the display. Note pitch Indicator appears A l oha Oe Keyboard keys used Fingering • The hand you to appear on -screen keyboard guide and the keyboard waits for you should use . 2 Press the RIGHT/TRACK 2 button or the LEFT/ TRACK 1 ...point. 706A-E-027A E-25 STEP 1 SCORING 1 STEP 2 STEP 3 SCORING 2 4 Press any time, press the PLAY/STOP button. Evaluation 1: Find out how the keyboard evaluates your Step 1 play. 1 Press the SCORING 1 button. • This causes the SCORING 1 indicator to play at the same time counts as two notes....
... note to be played flashes on the on the display. Note pitch Indicator appears A l oha Oe Keyboard keys used Fingering • The hand you to appear on -screen keyboard guide and the keyboard waits for you should use . 2 Press the RIGHT/TRACK 2 button or the LEFT/ TRACK 1 ...point. 706A-E-027A E-25 STEP 1 SCORING 1 STEP 2 STEP 3 SCORING 2 4 Press any time, press the PLAY/STOP button. Evaluation 1: Find out how the keyboard evaluates your Step 1 play. 1 Press the SCORING 1 button. • This causes the SCORING 1 indicator to play at the same time counts as two notes....


