
User Guide
Page 1
CTK6000/WK6500E1B Safety Precautions Before trying to use the keyboard, be sure to read the separate "Safety Precautions". E USER'S GUIDE Please keep all information for future reference.
CTK6000/WK6500E1B Safety Precautions Before trying to use the keyboard, be sure to read the separate "Safety Precautions". E USER'S GUIDE Please keep all information for future reference.
User Guide
Page 4
...Song E-75 Editing a Track E-79 Editing Events E-81 Directly Inputting Note Events (Step Input) ...... E-13 To turn on Digital Keyboard power E-13 Listening to a Sound .... E-64 What you can do with the song sequencer ...... E-24 Playing an Auto Accompaniment ... Guide E-4 Reading the Display E-6 Modes E-7 Menus E-7 , Precautions while "Please Wait" is displayed E-7 Saving Settings E-8 Returning the Digital Keyboard to Its Factory Default Settings E-8 Getting Ready to Play E-9 Preparing the Music Stand E-9 Power Supply E-9 Connections E-11 Connecting Headphones E-11 ...
...Song E-75 Editing a Track E-79 Editing Events E-81 Directly Inputting Note Events (Step Input) ...... E-13 To turn on Digital Keyboard power E-13 Listening to a Sound .... E-64 What you can do with the song sequencer ...... E-24 Playing an Auto Accompaniment ... Guide E-4 Reading the Display E-6 Modes E-7 Menus E-7 , Precautions while "Please Wait" is displayed E-7 Saving Settings E-8 Returning the Digital Keyboard to Its Factory Default Settings E-8 Getting Ready to Play E-9 Preparing the Music Stand E-9 Power Supply E-9 Connections E-11 Connecting Headphones E-11 ...

User Guide
Page 5
E-112 Minimum Computer System Requirements....E-112 Storing and Loading Digital Keyboard Memory Data E-113 Reference E-114 Troubleshooting E-114 Specifications E-116 Operating Precautions E-118 DSP Effect List E-119 Fingering Guide E-124 Supported Input ... Channel to a Computer .... Using a Memory Card E-102 Loading and Removing a Memory Card.........E-103 Entering the Card Mode E-103 Formatting a Memory Card E-103 Saving Digital Keyboard Data to a Memory Card E-104 Loading Data from a Memory Card E-106 To delete a file from a memory card E-107 To rename a file on a memory ...
E-112 Minimum Computer System Requirements....E-112 Storing and Loading Digital Keyboard Memory Data E-113 Reference E-114 Troubleshooting E-114 Specifications E-116 Operating Precautions E-118 DSP Effect List E-119 Fingering Guide E-124 Supported Input ... Channel to a Computer .... Using a Memory Card E-102 Loading and Removing a Memory Card.........E-103 Entering the Card Mode E-103 Formatting a Memory Card E-103 Saving Digital Keyboard Data to a Memory Card E-104 Loading Data from a Memory Card E-106 To delete a file from a memory card E-107 To rename a file on a memory ...
User Guide
Page 7
...89 R-9 [I] SYNTH, 8 button 14, 88, 89 R-10 [J] OTHERS, , button 14, 59, 88, 89 R-11 [K] GM/DRUMS, . L-1 POWER button 13 L-2 VOLUME knob (CTK-6000 13 MAIN VOLUME knob (WK-6500 13 L-3 MIC VOLUME knob (WK-6500 only 11 RHYTHM buttons L-4 [A] POPS/ROCK/DANCE button 14, 24 L-5 [B] JAZZ/EUROPEAN button... by holding down the R-13 (FUNCTION) button when pressing a button. General Guide • In this manual, the term "Digital Keyboard" refers to the CTK-6000/WK-6500. • This manual uses the numbers and names below to refer to buttons and controllers. • The following explains ...
...89 R-9 [I] SYNTH, 8 button 14, 88, 89 R-10 [J] OTHERS, , button 14, 59, 88, 89 R-11 [K] GM/DRUMS, . L-1 POWER button 13 L-2 VOLUME knob (CTK-6000 13 MAIN VOLUME knob (WK-6500 13 L-3 MIC VOLUME knob (WK-6500 only 11 RHYTHM buttons L-4 [A] POPS/ROCK/DANCE button 14, 24 L-5 [B] JAZZ/EUROPEAN button... by holding down the R-13 (FUNCTION) button when pressing a button. General Guide • In this manual, the term "Digital Keyboard" refers to the CTK-6000/WK-6500. • This manual uses the numbers and names below to refer to buttons and controllers. • The following explains ...

User Guide
Page 8
... example, the location of the pointer (K) on the right side of the display in Group A and Group B. This indicates that is currently selected on the keyboard or when Auto Accompaniment is played. It also can be displayed in the lower left corner while Group B parts are Organized" (page E-39). 3 Indicator ... selected item is the one that is affected by a large dot (0). General Guide Reading the Display This section explains the contents of the Digital Keyboard's display screen. 1 2 45 6 3 1 Detailed information area This area displays a variety of information while the Digital...
... example, the location of the pointer (K) on the right side of the display in Group A and Group B. This indicates that is currently selected on the keyboard or when Auto Accompaniment is played. It also can be displayed in the lower left corner while Group B parts are Organized" (page E-39). 3 Indicator ... selected item is the one that is affected by a large dot (0). General Guide Reading the Display This section explains the contents of the Digital Keyboard's display screen. 1 2 45 6 3 1 Detailed information area This area displays a variety of information while the Digital...
User Guide
Page 9
... memory card can use the same operations to the rhythm mode. Wait until the message disappears. • "Please Wait" indicates that the Digital Keyboard is shown as you want to "Troubleshooting" (page E-114). • After entering any operation, or insert or remove a memory card while ...are performed in the rhythm mode. In the rhythm mode, pressing the C-7 (CARD) button will enter the card mode. - You also can cause Digital Keyboard data to be sure to return to display mode and function specific menus. Card mode C-7 (CARD) or R-15 (EXIT) button C-7 (CARD) button...
... memory card can use the same operations to the rhythm mode. Wait until the message disappears. • "Please Wait" indicates that the Digital Keyboard is shown as you want to "Troubleshooting" (page E-114). • After entering any operation, or insert or remove a memory card while ...are performed in the rhythm mode. In the rhythm mode, pressing the C-7 (CARD) button will enter the card mode. - You also can cause Digital Keyboard data to be sure to return to display mode and function specific menus. Card mode C-7 (CARD) or R-15 (EXIT) button C-7 (CARD) button...
User Guide
Page 10
... a predetermined default setup each time you turn it remembers its latest setup or to their initial power on . You can configure the Digital Keyboard so it on defaults whenever you turn off power. User tone data (page E-45) - E-8 B Song sequencer data (page E-64)... Auto Resume setting (page E-100) Returning the Digital Keyboard to their initial factory default settings. General Guide Saving Settings Your Digital Keyboard is equipped with a song sequencer and other settings you configure on the Digital Keyboard's console normally are always retained even when power is turned...
... a predetermined default setup each time you turn it remembers its latest setup or to their initial power on . You can configure the Digital Keyboard so it on defaults whenever you turn off power. User tone data (page E-45) - E-8 B Song sequencer data (page E-64)... Auto Resume setting (page E-100) Returning the Digital Keyboard to their initial factory default settings. General Guide Saving Settings Your Digital Keyboard is equipped with a song sequencer and other settings you configure on the Digital Keyboard's console normally are always retained even when power is turned...
User Guide
Page 12
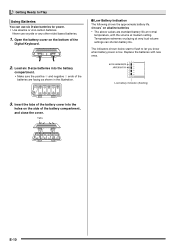
Never use six D-size batteries for power. • Use alkaline or zinc-carbon batteries. Open the battery cover on the bottom of the Digital Keyboard. ■ Low Battery Indication The following shows the approximate battery life. 4 hours* on the side of the battery compartment, and close the cover. Load six D-...
Never use six D-size batteries for power. • Use alkaline or zinc-carbon batteries. Open the battery cover on the bottom of the Digital Keyboard. ■ Low Battery Indication The following shows the approximate battery life. 4 hours* on the side of the battery compartment, and close the cover. Load six D-...
User Guide
Page 13
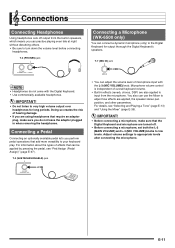
...IN) jack • Headphones do not leave the adaptor plugged in when removing the headphones. For information about the types of overall keyboard volume. • Built-in speakers, which means you are turned off output from the microphone. Microphone volume control is independent of ... and Playing a Tone" (page E-13) and "Using the Mixer" (page E-39). • Before connecting a microphone, make sure that the Digital Keyboard and microphone are using headphones that require an adaptor plug, make sure you perform pedal operations that can use the Mixer to adjust how effects...
...IN) jack • Headphones do not leave the adaptor plugged in when removing the headphones. For information about the types of overall keyboard volume. • Built-in speakers, which means you are turned off output from the microphone. Microphone volume control is independent of ... and Playing a Tone" (page E-13) and "Using the Mixer" (page E-39). • Before connecting a microphone, make sure that the Digital Keyboard and microphone are using headphones that require an adaptor plug, make sure you perform pedal operations that can use the Mixer to adjust how effects...
User Guide
Page 14
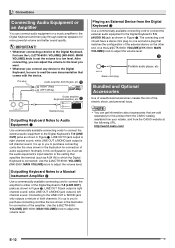
... illustration for connection of the amplifier. http://world.casio.com/ E-12 B INPUT 1 INPUT 2 Standard plug Outputting Keyboard Notes to Audio Equipment 1 Use commercially available connecting cords to connect the external audio equipment to the Digital Keyboard's T-8 (LINE OUT) jacks as shown in Figure 2. Use the L-2 (CTK-6000: VOLUME) (WK-6500: MAIN VOLUME) knob to the...
... illustration for connection of the amplifier. http://world.casio.com/ E-12 B INPUT 1 INPUT 2 Standard plug Outputting Keyboard Notes to Audio Equipment 1 Use commercially available connecting cords to connect the external audio equipment to the Digital Keyboard's T-8 (LINE OUT) jacks as shown in Figure 2. Use the L-2 (CTK-6000: VOLUME) (WK-6500: MAIN VOLUME) knob to the...
User Guide
Page 15
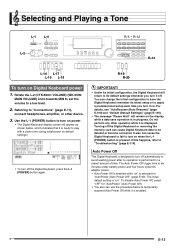
...no operation is ready to play with a piano tone (using initial power on default settings). • To turn on power. • The Digital Keyboard display screen will return to its latest setup or to "Troubleshooting" (page E-114). Referring to a low level. 2. It also can use the ... select "oFF" for a preset amount of time. RR--1122 L-2 R-14 L-14 L-17 L-15 L-18 R-19 R-20 To turn on Digital Keyboard power 1. Rotate the L-2 (CTK-6000: VOLUME) (WK-6500: MAIN VOLUME) knob towards MIN to set the volume to "Connections" (page E-11), connect headphones, amplifier, or other operation...
...no operation is ready to play with a piano tone (using initial power on default settings). • To turn on power. • The Digital Keyboard display screen will return to its latest setup or to "Troubleshooting" (page E-114). Referring to a low level. 2. It also can use the ... select "oFF" for a preset amount of time. RR--1122 L-2 R-14 L-14 L-17 L-15 L-18 R-19 R-20 To turn on Digital Keyboard power 1. Rotate the L-2 (CTK-6000: VOLUME) (WK-6500: MAIN VOLUME) knob towards MIN to set the volume to "Connections" (page E-11), connect headphones, amplifier, or other operation...
User Guide
Page 16
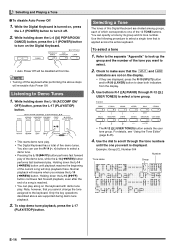
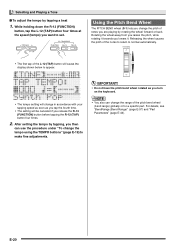
...forward playback, even after performing the above are displayed, press the R-19 (SPLIT) button and/or R-20 (LAYER) button to turn it off the keyboard after the end of a song is displayed. Note, however, that the @ and A indicators are divided among groups, each of the tone you want...Off 1. Use buttons R-1 ([A] PIANO) through the tone numbers until playback reaches the beginning of the current song will be disabled at this Digital Keyboard are not on , press the L-1 (POWER) button to scroll through R-12 ([L] USER TONES) to select a tone group. • This starts demo ...
...forward playback, even after performing the above are displayed, press the R-19 (SPLIT) button and/or R-20 (LAYER) button to turn it off the keyboard after the end of a song is displayed. Note, however, that the @ and A indicators are divided among groups, each of the tone you want...Off 1. Use buttons R-1 ([A] PIANO) through the tone numbers until playback reaches the beginning of the current song will be disabled at this Digital Keyboard are not on , press the L-1 (POWER) button to scroll through R-12 ([L] USER TONES) to select a tone group. • This starts demo ...
User Guide
Page 17
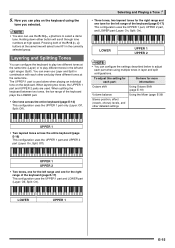
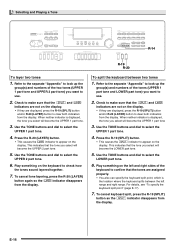
...adjust each part: Go here for the right range of the R-14 (-, +) buttons at the same time (Layer) or to play on the keyboard. 5. Layering and Splitting Tones You can play different tones in layer and split configurations. Selecting and Playing a Tone • Three tones, two ...1 E-15 Holding down either button will select tone 001 in combination with each other detailed settings UPPER 1 • Two layered tones across the entire keyboard (page E-14) This configuration uses the UPPER 1 part only (Layer: Off, Split: Off). To adjust this setting for the left and right ranges...
...adjust each part: Go here for the right range of the R-14 (-, +) buttons at the same time (Layer) or to play on the keyboard. 5. Layering and Splitting Tones You can play different tones in layer and split configurations. Selecting and Playing a Tone • Three tones, two ...1 E-15 Holding down either button will select tone 001 in combination with each other detailed settings UPPER 1 • Two layered tones across the entire keyboard (page E-14) This configuration uses the UPPER 1 part only (Layer: Off, Split: Off). To adjust this setting for the left and right ranges...
User Guide
Page 18
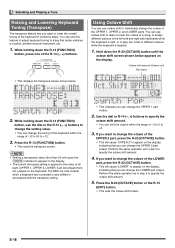
... you select will become the UPPER 1 part tone 3. Press the R-20 (LAYER) button. • This causes the A indicator to appear on the keyboard to check how the tones sound layered together. 7. This indicates that the tone you select will become the UPPER 2 part tone. 5. To cancel tone ... part tone. 5. Use the TONE buttons and dial to select the UPPER 2 part tone. 6. When neither indicator is the location where the keyboard splits between two tones 1. Play something on the left range and right range. Check to clear both indicators from the display. E-16 Use the...
... you select will become the UPPER 1 part tone 3. Press the R-20 (LAYER) button. • This causes the A indicator to appear on the keyboard to check how the tones sound layered together. 7. This indicates that the tone you select will become the UPPER 2 part tone. 5. To cancel tone ... part tone. 5. Use the TONE buttons and dial to select the UPPER 2 part tone. 6. When neither indicator is the location where the keyboard splits between two tones 1. Play something on the left range and right range. Check to clear both indicators from the display. E-16 Use the...
User Guide
Page 19
... release the R-19 (SPLIT) button. • The initial default split point is at key F#3. • During Auto Accompaniment play (page E-24), the keyboard to change the displayed split point key name. 2. Play something on the left and right sides of the procedure under "To layer two tones" (page... E-16). 2. To cancel keyboard split, press the R-19 (SPLIT) button so the @ indicator disappears from the display. Selecting and Playing a Tone To use the R-14 (-, +) buttons...
... release the R-19 (SPLIT) button. • The initial default split point is at key F#3. • During Auto Accompaniment play (page E-24), the keyboard to change the displayed split point key name. 2. Play something on the left and right sides of the procedure under "To layer two tones" (page... E-16). 2. To cancel keyboard split, press the R-19 (SPLIT) button so the @ indicator disappears from the display. Selecting and Playing a Tone To use the R-14 (-, +) buttons...
User Guide
Page 20
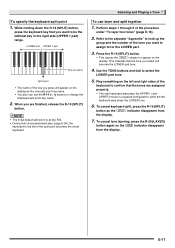
.... 2. Octave shift amount (Octave unit) Part name • This displays the transpose screen shown below appears on the keyboard. The MIDI out note number when a keyboard key is pressed is also shifted in accordance with the transpose setting. • This indicates you raise or lower the ...indicator to +12. 3. If you want to change the octave of a song, to assign different octaves to the left side and right side keyboards while the keyboard is split, or to play two notes in step 3 to appear on the display, indicating that better matches a vocalist, another musical instrument, ...
.... 2. Octave shift amount (Octave unit) Part name • This displays the transpose screen shown below appears on the keyboard. The MIDI out note number when a keyboard key is pressed is also shifted in accordance with the transpose setting. • This indicates you raise or lower the ...indicator to +12. 3. If you want to change the octave of a song, to assign different octaves to the left side and right side keyboards while the keyboard is split, or to play two notes in step 3 to appear on the display, indicating that better matches a vocalist, another musical instrument, ...
User Guide
Page 22
... the speed (tempo) you lowers it towards you want to appear. • Do not have the pitch bend wheel rotated as you turn on the keyboard. • The tempo setting will change in accordance with your tapping speed as soon as you tap the fourth time. • The setting will be...
... the speed (tempo) you lowers it towards you want to appear. • Do not have the pitch bend wheel rotated as you turn on the keyboard. • The tempo setting will change in accordance with your tapping speed as soon as you tap the fourth time. • The setting will be...

User Guide
Page 23
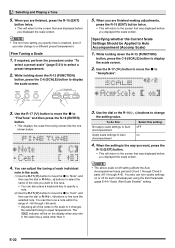
... holding down the R-13 (FUNCTION) button, press the C-6 (SCALE) button to display the scale screen, with the scale function are retained even when the Digital Keyboard is turned off. Selecting and Playing a Tone 3. Press the R-16 (ENTER) button. • This displays a preset temperament selection screen like the one of the 17... function to select one shown below. (2) Use the dial or the R-14 (-, +) buttons to change the root note (C to B). • You can also use the keyboard to specify the root note.
... holding down the R-13 (FUNCTION) button, press the C-6 (SCALE) button to display the scale screen, with the scale function are retained even when the Digital Keyboard is turned off. Selecting and Playing a Tone 3. Press the R-16 (ENTER) button. • This displays a preset temperament selection screen like the one of the 17... function to select one shown below. (2) Use the dial or the R-14 (-, +) buttons to change the root note (C to B). • You can also use the keyboard to specify the root note.
User Guide
Page 24
... below. 3. To do this: Select this setting: Not apply scale settings to Auto oFF Accompaniment Apply scale settings to equal temperament. You can also press a keyboard key to specify a note. (2) Use the R-17 (y) button to move the 0 to "Note", and then use the dial or R-14 (-, +) buttons to select the name...
... below. 3. To do this: Select this setting: Not apply scale settings to Auto oFF Accompaniment Apply scale settings to equal temperament. You can also press a keyboard key to specify a note. (2) Use the R-17 (y) button to move the 0 to "Note", and then use the dial or R-14 (-, +) buttons to select the name...
User Guide
Page 25
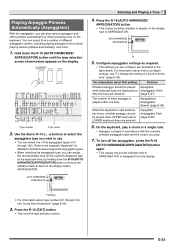
...Type name 2. Refer to the separate "Appendix" for detailed information about this setting: Go here: Whether arpeggio should be played ArpegHold while keyboard keys are depressed or (Arpeggiator Hold) after the keys are released (page E-97) The number of times arpeggio is played within one of... arpeggios and other phrases automatically by holding down the R-18 (AUTO HARMONIZE/ ARPEGGIATOR) button until a pointer indicator starts to flash on the keyboard. You can select from a number of a function menu item" (page E-96). For information about type number 001 through 162). To turn...
...Type name 2. Refer to the separate "Appendix" for detailed information about this setting: Go here: Whether arpeggio should be played ArpegHold while keyboard keys are depressed or (Arpeggiator Hold) after the keys are released (page E-97) The number of times arpeggio is played within one of... arpeggios and other phrases automatically by holding down the R-18 (AUTO HARMONIZE/ ARPEGGIATOR) button until a pointer indicator starts to flash on the keyboard. You can select from a number of a function menu item" (page E-96). For information about type number 001 through 162). To turn...


