
ScanFront 300/300P Instructions
Page 47
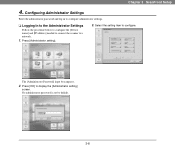
Configuring Administrator Settings Enter the administrator password and log in to configure administrator settings. ❏ Logging In to the Administrator Settings Follow the procedure below to configure the [Device name] and [IP address] needed to connect the scanner to configure. Select the setting item to a network. 1. The [Administrator Password] input box appears. 2. No administrator password is set by default. 3-8 Press [Administrator setting]. 3. Press [OK] to display the [Administrator setting] screen. Chapter 3 ScanFront Setup 4.
Configuring Administrator Settings Enter the administrator password and log in to configure administrator settings. ❏ Logging In to the Administrator Settings Follow the procedure below to configure the [Device name] and [IP address] needed to connect the scanner to configure. Select the setting item to a network. 1. The [Administrator Password] input box appears. 2. No administrator password is set by default. 3-8 Press [Administrator setting]. 3. Press [OK] to display the [Administrator setting] screen. Chapter 3 ScanFront Setup 4.

Setup and Operation Guide
Page 23
... box appears. 14 Be sure to select a unique name that is different from those of the SF+MAC address by default. No administrator password is set to identify the scanner on the network and is the name used as the URL when accessing the Web Menu. Press... [OK] to a network. When a DHCP server is used to the 14 alphanumeric characters of all other devices. • Under default settings, the IP address is assigned automatically by default. 3. Press [Network setting]. IMPORTANT • The device name is set by the DHCP server. ❏ Network Settings Follow the ...
... box appears. 14 Be sure to select a unique name that is different from those of the SF+MAC address by default. No administrator password is set to identify the scanner on the network and is the name used as the URL when accessing the Web Menu. Press... [OK] to a network. When a DHCP server is used to the 14 alphanumeric characters of all other devices. • Under default settings, the IP address is assigned automatically by default. 3. Press [Network setting]. IMPORTANT • The device name is set by the DHCP server. ❏ Network Settings Follow the ...

Setup and Operation Guide
Page 25
... times and time stamps for the IP address. 5. Click [Device Configuration]. If the time zone is ScanFront, and http://172.19.xxx.xxx for image files will not match the time setting displayed on p. ...of use. Launch the Web browser on other settings, refer to the Operation Guide and ScanFront 300/300P/330 INSTRUCTIONS (electronic manual). If you finish configuring the network settings, log in to the Web... 16 The [Device Configuration] screen appears. Hint No administrator password is set by default. ❏ Configuring the Date and Time and Confirming the Time Zone When you set...
... times and time stamps for the IP address. 5. Click [Device Configuration]. If the time zone is ScanFront, and http://172.19.xxx.xxx for image files will not match the time setting displayed on p. ...of use. Launch the Web browser on other settings, refer to the Operation Guide and ScanFront 300/300P/330 INSTRUCTIONS (electronic manual). If you finish configuring the network settings, log in to the Web... 16 The [Device Configuration] screen appears. Hint No administrator password is set by default. ❏ Configuring the Date and Time and Confirming the Time Zone When you set...

