User Guide
Page 7
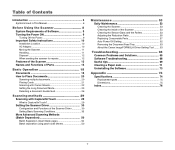
... double feed 26 Scanning methods 29 Scanning with CaptureOnTouch 29 What is CaptureOnTouch 29 Setting the Scanner Driver 30 Configuration and Functions of the Scanner Driver 30 Setting Basic Scanning Conditions 33 More Advanced Scanning Methods (Batch Separation 50 Batch Separation (Insert ... the Reduction Ratio 55 Replacing Consumable Parts 57 Auto Power Off Setting 62 Removing the Document Feed Tray 63 About the Canon imageFORMULA Driver Setting Tool ........ 63 Troubleshooting 65 Common Problems and Solutions 65 Software Troubleshooting 68 Useful tips 69 Clearing a Paper Jam...
... double feed 26 Scanning methods 29 Scanning with CaptureOnTouch 29 What is CaptureOnTouch 29 Setting the Scanner Driver 30 Configuration and Functions of the Scanner Driver 30 Setting Basic Scanning Conditions 33 More Advanced Scanning Methods (Batch Separation 50 Batch Separation (Insert ... the Reduction Ratio 55 Replacing Consumable Parts 57 Auto Power Off Setting 62 Removing the Document Feed Tray 63 About the Canon imageFORMULA Driver Setting Tool ........ 63 Troubleshooting 65 Common Problems and Solutions 65 Software Troubleshooting 68 Useful tips 69 Clearing a Paper Jam...
User Guide
Page 8
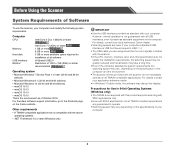
... to the Products page on all TWAIN-compatible applications. For details, contact your computer. 8 For details, consult your local authorized Canon dealer. • Scanning speeds are lower if your computer's standard USB interface is not guaranteed with all software Hi-Speed USB2.0... Resolution of the computer and the environment. • The scanner drivers provided with your computer must satisfy the following system requirements. For the latest software support information, go to operate. • Scanning...
... to the Products page on all TWAIN-compatible applications. For details, contact your computer. 8 For details, consult your local authorized Canon dealer. • Scanning speeds are lower if your computer's standard USB interface is not guaranteed with all software Hi-Speed USB2.0... Resolution of the computer and the environment. • The scanner drivers provided with your computer must satisfy the following system requirements. For the latest software support information, go to operate. • Scanning...
User Guide
Page 13
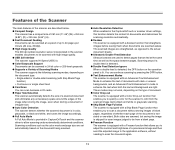
... the following scanning modes, depending on the document being scanned. ● Auto Resolution Detection When enabled in the CaptureOnTouch or scanner driver settings, this function detects the content of documents and determines the scanning resolution automatically. ● Deskew The scanner is equipped with... a Variety of irregular size. ● Auto Color Detection The scanner detects whether the scanned document is in CaptureOnTouch and the scanner driver to enhance the text when both the text and background are set automatically based on the document type: • Single-sided or ...
... the following scanning modes, depending on the document being scanned. ● Auto Resolution Detection When enabled in the CaptureOnTouch or scanner driver settings, this function detects the content of documents and determines the scanning resolution automatically. ● Deskew The scanner is equipped with... a Variety of irregular size. ● Auto Color Detection The scanner detects whether the scanned document is in CaptureOnTouch and the scanner driver to enhance the text when both the text and background are set automatically based on the document type: • Single-sided or ...

User Guide
Page 19
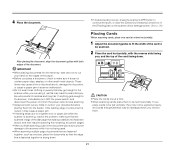
...) CAUTION • When scanning cards, place them . • Embossed cards may be damaged when you remove them to be scanned correctly, depending on the scanner driver settings screen. (See p. 26) 19 There are tears. The surface is coated. If you place cards to be fed vertically, they may not be ejected...
...) CAUTION • When scanning cards, place them . • Embossed cards may be damaged when you remove them to be scanned correctly, depending on the scanner driver settings screen. (See p. 26) 19 There are tears. The surface is coated. If you place cards to be fed vertically, they may not be ejected...
User Guide
Page 21
... guides to fit the width of the card to stop scanning. • Always smooth out any folds or curls in your hand on the scanner driver settings screen. (See p. 26) After placing the document, align the document guides with the reverse side facing you finish scanning, push in the scanner, immediately...
... guides to fit the width of the card to stop scanning. • Always smooth out any folds or curls in your hand on the scanner driver settings screen. (See p. 26) After placing the document, align the document guides with the reverse side facing you finish scanning, push in the scanner, immediately...
User Guide
Page 22
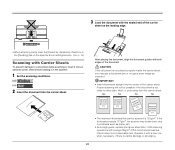
... straight into an optional carrier sheet before loading it with both edges of the carrier sheet. Replace it in the [Feeding] tab on the scanner driver settings screen. (See p. 26) Scanning with Carrier Sheets To prevent damage to problems such as intended. After placing the document, align the document guides with...
... straight into an optional carrier sheet before loading it with both edges of the carrier sheet. Replace it in the [Feeding] tab on the scanner driver settings screen. (See p. 26) Scanning with Carrier Sheets To prevent damage to problems such as intended. After placing the document, align the document guides with...

User Guide
Page 23
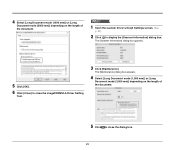
...8226; When scanning with the scanner is normally 356 mm (14"), but you can scan documents up to close the settings screen. 1 Open the scanner driver's Detail Settings screen. (See p. 32) 2 Click the [More] button. Note the following when using carrier sheet for legal sized document, the scanner... must be scanned. The scanner driver's Detail Settings screen opens. 4 Click to 3,000 mm (118.1") in length can be damaged. Be careful to place the document so that can be...
...8226; When scanning with the scanner is normally 356 mm (14"), but you can scan documents up to close the settings screen. 1 Open the scanner driver's Detail Settings screen. (See p. 32) 2 Click the [More] button. Note the following when using carrier sheet for legal sized document, the scanner... must be scanned. The scanner driver's Detail Settings screen opens. 4 Click to 3,000 mm (118.1") in length can be damaged. Be careful to place the document so that can be...

User Guide
Page 24
IMPORTANT Log on to memory shortage, and scanning may be disabled. • When scanning large-sized documents with the Long Document mode, scanning may be slower. Errors also occur due to Windows as an Administrator. 1 Click the Start button, and then click [Canon R40], and [Canon imageFORMULA Driver Setting Tool]. Hint In Windows 8.1, it is registered at the following location. 24 imageFORMULA Driver Setting Tool starts. 2 Click the [Control] tab. 3 Click the [Setting] button of [Hardware].
IMPORTANT Log on to memory shortage, and scanning may be disabled. • When scanning large-sized documents with the Long Document mode, scanning may be slower. Errors also occur due to Windows as an Administrator. 1 Click the Start button, and then click [Canon R40], and [Canon imageFORMULA Driver Setting Tool]. Hint In Windows 8.1, it is registered at the following location. 24 imageFORMULA Driver Setting Tool starts. 2 Click the [Control] tab. 3 Click the [Setting] button of [Hardware].
User Guide
Page 25
The [Scanner Information] dialog box appears. 5 Click [OK]. 6 Click [Close] to close the imageFORMULA Driver Setting Tool. 3 Click [Maintenance]. 4 Select [Long Document mode (1000 mm)] or [Long Document mode (3000 mm)] depending on the length of the document. 1 Open the scanner driver's Detail Settings screen. (See p. 32) 2 Click to display the [Scanner Information] dialog box. The [Maintenance] dialog box appears. 4 Select [Long Document mode (1,000 mm)] or [Long Document mode (3,000 mm)] depending on the length of the document. 5 Click to close the dialog box. 25
The [Scanner Information] dialog box appears. 5 Click [OK]. 6 Click [Close] to close the imageFORMULA Driver Setting Tool. 3 Click [Maintenance]. 4 Select [Long Document mode (1000 mm)] or [Long Document mode (3000 mm)] depending on the length of the document. 1 Open the scanner driver's Detail Settings screen. (See p. 32) 2 Click to display the [Scanner Information] dialog box. The [Maintenance] dialog box appears. 4 Select [Long Document mode (1,000 mm)] or [Long Document mode (3,000 mm)] depending on the length of the document. 5 Click to close the dialog box. 25

User Guide
Page 26
...To use the double feed detection function, you must first open the [Others] tab and select the [Rapid recovery system] check box. 1 Open the scanner driver's Detail Settings screen. (See p. 30) 2 Click the [Feeding] tab. 5 Click the [OK] button and close the settings screen. 26 You can ...also specify whether to use the double feed detection ignore function, open the scanner driver settings screen and enable double feed detection. Setting procedure 1 Set the scanning conditions. 3 Select either the [Detect by Length] or the [Detect...
...To use the double feed detection function, you must first open the [Others] tab and select the [Rapid recovery system] check box. 1 Open the scanner driver's Detail Settings screen. (See p. 30) 2 Click the [Feeding] tab. 5 Click the [OK] button and close the settings screen. 26 You can ...also specify whether to use the double feed detection ignore function, open the scanner driver settings screen and enable double feed detection. Setting procedure 1 Set the scanning conditions. 3 Select either the [Detect by Length] or the [Detect...

User Guide
Page 27
... the double feed detection ignore function If a document double feed is displayed in the application and then scan the documents again. 27 The scanner driver's Detail Settings screen opens. 4 Select the [Rapid recovery system] check box. When this happens, stop the scanning in the Job No. 1 ...Open the scanner driver's Detail Settings screen. (See p. 32) 2 Select the [Double Feed Detection] check box, and then select any one of the operating panel. Double...
... the double feed detection ignore function If a document double feed is displayed in the application and then scan the documents again. 27 The scanner driver's Detail Settings screen opens. 4 Select the [Rapid recovery system] check box. When this happens, stop the scanning in the Job No. 1 ...Open the scanner driver's Detail Settings screen. (See p. 32) 2 Select the [Double Feed Detection] check box, and then select any one of the operating panel. Double...

User Guide
Page 30
... [Brightness] tab Adjust the brightness and contrast of the scanner driver. In addition, you scan a document in a TWAIN compatible application, open the scanner driver and configure the scanning conditions and other settings. Setting the Scanner Driver When you can also click [Gamma] and set the gamma ...basic scanning conditions such as the mode, page size, resolution, and scanning side. Configuration and Functions of the Scanner Driver [Basic] tab The scanner driver consists of the scanner driver. This section describes the configuration and functions of scanned images.
... [Brightness] tab Adjust the brightness and contrast of the scanner driver. In addition, you scan a document in a TWAIN compatible application, open the scanner driver and configure the scanning conditions and other settings. Setting the Scanner Driver When you can also click [Gamma] and set the gamma ...basic scanning conditions such as the mode, page size, resolution, and scanning side. Configuration and Functions of the Scanner Driver [Basic] tab The scanner driver consists of the scanner driver. This section describes the configuration and functions of scanned images.

User Guide
Page 32
When the scanner driver is called from CaptureOnTouch, the following settings screen of the scanner driver appears. Simple Mode Advanced Mode Hint When the Advanced Settings screen is opened from some applications, the Advanced Settings screen may have the Simple mode and Advanced mode. 32
When the scanner driver is called from CaptureOnTouch, the following settings screen of the scanner driver appears. Simple Mode Advanced Mode Hint When the Advanced Settings screen is opened from some applications, the Advanced Settings screen may have the Simple mode and Advanced mode. 32

User Guide
Page 34
Dots per inch], [Page Size], and [Scanning Side] basic conditions in the settings screen of the scanner driver. • Higher resolutions provide clearer images but result in the document. If the scanning side is detected automatically from the content printed in larger file ...
Dots per inch], [Page Size], and [Scanning Side] basic conditions in the settings screen of the scanner driver. • Higher resolutions provide clearer images but result in the document. If the scanning side is detected automatically from the content printed in larger file ...

User Guide
Page 43
... the next document is placed and scanning is placed and scanned. (Only enabled for applications that support batch separation.) In this case, set the scanner driver as follows. • Set [Feeding Option] on the [Feeding] tab to [Panel-Feeding] or [Automatic Feeding]. When you want to use multistream settings for scanning...
... the next document is placed and scanning is placed and scanned. (Only enabled for applications that support batch separation.) In this case, set the scanner driver as follows. • Set [Feeding Option] on the [Feeding] tab to [Panel-Feeding] or [Automatic Feeding]. When you want to use multistream settings for scanning...

User Guide
Page 45
You can delete a setting from the scanned images. When you want to save a scanner driver setting When you finish configuring a setting, select [Add/Delete] of [User Preference] to save or load a configuration file with the [Back Up] or [Restore] button. &#...
You can delete a setting from the scanned images. When you want to save a scanner driver setting When you finish configuring a setting, select [Add/Delete] of [User Preference] to save or load a configuration file with the [Back Up] or [Restore] button. &#...

User Guide
Page 47
Function Restrictions Depending on Color Mode Setting Some of the setting items in each of the driver tabs are disabled as follows depending on the setting for [Color Mode] on the [Basic] tab. [Brightness] tab [Others] Tab Setting value Detect Automatically Black ...
Function Restrictions Depending on Color Mode Setting Some of the setting items in each of the driver tabs are disabled as follows depending on the setting for [Color Mode] on the [Basic] tab. [Brightness] tab [Others] Tab Setting value Detect Automatically Black ...

User Guide
Page 48
... either one of the following two conditions are disabled as follows depending on the setting for [Color Mode] in the settings screen of the scanner driver. Some of the setting items are met. • [Detection mode] in the [Auto Image Type Detection Settings] dialog box is set to [Error Diffusion] 3)Not...
... either one of the following two conditions are disabled as follows depending on the setting for [Color Mode] in the settings screen of the scanner driver. Some of the setting items are met. • [Detection mode] in the [Auto Image Type Detection Settings] dialog box is set to [Error Diffusion] 3)Not...
User Guide
Page 50
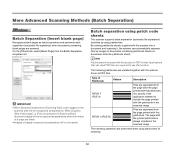
... supports batch separation (automatic file separation) functions by images of Patchcode Pattern PATCH T (FILE A) PATCH II (FILE B) Description Files are installed together with the scanner driver as PDF files. The page with this scanner into a document and scanning it, the scanner can read PDF files are performed when using patchcodes for...
... supports batch separation (automatic file separation) functions by images of Patchcode Pattern PATCH T (FILE A) PATCH II (FILE B) Description Files are installed together with the scanner driver as PDF files. The page with this scanner into a document and scanning it, the scanner can read PDF files are performed when using patchcodes for...

User Guide
Page 52
2 Place the documents in the scanner after inserting the patchcode sheet in front of documents to change file separation. 3 In an application, open the scanner driver settings screen and select [Patchcode] in [Batch Separation] on the [Others] tab. 52 Insert the patchcode sheets at the beginning of the page that separates the files.
2 Place the documents in the scanner after inserting the patchcode sheet in front of documents to change file separation. 3 In an application, open the scanner driver settings screen and select [Patchcode] in [Batch Separation] on the [Others] tab. 52 Insert the patchcode sheets at the beginning of the page that separates the files.


