User Manual
Page 14
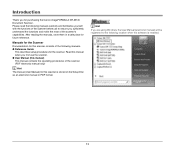
... to ensure you sufficiently understand the functions and make the most of an operation, or contains additional explanations for purchasing the Canon imageFORMULA DR-M140 Document Scanner. IMPORTANT Indicates operational requirements and restrictions. Reading these cautions. CAUTION Indicates a caution concerning operations that should be registered to the following symbols are using Windows, the User Manual (electronic manual) will be observed for future reference. Please read...
... to ensure you sufficiently understand the functions and make the most of an operation, or contains additional explanations for purchasing the Canon imageFORMULA DR-M140 Document Scanner. IMPORTANT Indicates operational requirements and restrictions. Reading these cautions. CAUTION Indicates a caution concerning operations that should be registered to the following symbols are using Windows, the User Manual (electronic manual) will be observed for future reference. Please read...
User Manual
Page 15
... Scanning Methods 60 Using a Patchcode for Scanning 60 Maintenance 62 Daily Maintenance 62 Cleaning the Scanner 62 Cleaning the Inside of the Scanner 62 Cleaning the Sensor Glass and the Rollers 62 Adjusting the Reduction Ratio 64 Replacing Consumable Parts 65 Auto Power Off Setting 69 Troubleshooting 71 Common Problems and Solutions 71 Software Troubleshooting 73 Useful tips 74 Clearing Paper Jams and Skewed Documents ......... 76 Uninstalling the Software 78 Appendix 79 Specifications 79 Replacement Parts 80 Option 80 About the Flatbed Scanner Unit...
... Scanning Methods 60 Using a Patchcode for Scanning 60 Maintenance 62 Daily Maintenance 62 Cleaning the Scanner 62 Cleaning the Inside of the Scanner 62 Cleaning the Sensor Glass and the Rollers 62 Adjusting the Reduction Ratio 64 Replacing Consumable Parts 65 Auto Power Off Setting 69 Troubleshooting 71 Common Problems and Solutions 71 Software Troubleshooting 73 Useful tips 74 Clearing Paper Jams and Skewed Documents ......... 76 Uninstalling the Software 78 Appendix 79 Specifications 79 Replacement Parts 80 Option 80 About the Flatbed Scanner Unit...
User Manual
Page 31
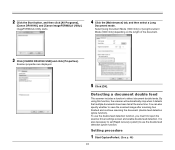
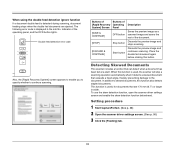
.... imageFORMULA Utility starts. 4 Click the [Maintenance] tab, and then select a Long Document mode. Detecting a document double feed This scanner includes a function to save the scanned image after scanning has finished and continue scanning the document (double feed detection ignore function). It is also necessary to set [Rapid recovery system] to use the double feed detection function, you must first open the scanner driver settings screen and enable double feed detection. 2 Click the Start button, and then click [All Programs], [Canon DR-M140], and [Canon imageFORMULA Utility].
.... imageFORMULA Utility starts. 4 Click the [Maintenance] tab, and then select a Long Document mode. Detecting a document double feed This scanner includes a function to save the scanned image after scanning has finished and continue scanning the document (double feed detection ignore function). It is also necessary to set [Rapid recovery system] to use the double feed detection function, you must first open the scanner driver settings screen and enable double feed detection. 2 Click the Start button, and then click [All Programs], [Canon DR-M140], and [Canon imageFORMULA Utility].
User Manual
Page 33
...) 2 Open the scanner driver settings screen. (See p. 50) 3 Click the [Feeding] tab. 33 Buttons of [Rapid Recovery System] Screen [SAVE & CONTINUE] [STOP] [DISCARD & CONTINUE] Buttons of Operating Panel DFR button Stop button Start button Description Saves the preview image as a scanned image and scans the rest of the operating panel, and the DFR button lights. The following error code is displayed in width. Discards the preview image and continues scanning. Place the double fed document again before clicking this function also detects stapled documents. Double feed...
...) 2 Open the scanner driver settings screen. (See p. 50) 3 Click the [Feeding] tab. 33 Buttons of [Rapid Recovery System] Screen [SAVE & CONTINUE] [STOP] [DISCARD & CONTINUE] Buttons of Operating Panel DFR button Stop button Start button Description Saves the preview image as a scanned image and scans the rest of the operating panel, and the DFR button lights. The following error code is displayed in width. Discards the preview image and continues scanning. Place the double fed document again before clicking this function also detects stapled documents. Double feed...

User Manual
Page 44
... next document. (Next step) Proceeds to new e-mail in the scan process. (Page Number / Total Number of Pages) Displays the current page and total number of the output method items. Select Scan Job: For Select Scan Job, specify the output method separately for processing scanned images. Save to folder Saves the scanned images to output differ depending on the output method. To use this output method, configure the settings for the image files to Scan...
... next document. (Next step) Proceeds to new e-mail in the scan process. (Page Number / Total Number of Pages) Displays the current page and total number of the output method items. Select Scan Job: For Select Scan Job, specify the output method separately for processing scanned images. Save to folder Saves the scanned images to output differ depending on the output method. To use this output method, configure the settings for the image files to Scan...
User Manual
Page 71
... not turn on. (3) The computer's USB interface may be guaranteed to work with all available USB cables. (5) If the scanner is connected to the computer via a USB hub, try removing the hub and connecting directly to clean the area where the lines appear. Clean both sides of skipping blank page] value, or select another job for duplex scanning. When the scanner driver's [Scanning Side] setting is [Skip Blank Page], documents with very little black may be scratched. Troubleshooting Common Problems and...
... not turn on. (3) The computer's USB interface may be guaranteed to work with all available USB cables. (5) If the scanner is connected to the computer via a USB hub, try removing the hub and connecting directly to clean the area where the lines appear. Clean both sides of skipping blank page] value, or select another job for duplex scanning. When the scanner driver's [Scanning Side] setting is [Skip Blank Page], documents with very little black may be scratched. Troubleshooting Common Problems and...
User Manual
Page 72
... [Scan] menu in TIFF format, even if the file type is specified as black and white are automatically saved in CapturePerfect, a dialog box appears with CapturePerfect while [Color Mode] is selected as the feeding method on the application. Problem 8 Scanned images are saved in progress, exit the application, change the scanning [Color Mode] to insufficient memory while scanning is set to [24-bit Color] • A large page size (e.g. If an error message appears due to either multi-page TIFF...
... [Scan] menu in TIFF format, even if the file type is specified as black and white are automatically saved in CapturePerfect, a dialog box appears with CapturePerfect while [Color Mode] is selected as the feeding method on the application. Problem 8 Scanned images are saved in progress, exit the application, change the scanning [Color Mode] to insufficient memory while scanning is set to [24-bit Color] • A large page size (e.g. If an error message appears due to either multi-page TIFF...

User Manual
Page 74
... of scanned image saving. Can I copy or back up scanner setting configurations? See also the following three settings in CaptureOnTouch. Add counter to the following question, "Can I copy or back up CaptureOnTouch settings?". For example, save multiple pages in a separate file. Scanned image file names are constructed partly or wholly according to file name Append serial numbers in PDF or TIFF format, you click the button on the [File name] on the Scan First output settings screen...
... of scanned image saving. Can I copy or back up scanner setting configurations? See also the following three settings in CaptureOnTouch. Add counter to the following question, "Can I copy or back up CaptureOnTouch settings?". For example, save multiple pages in a separate file. Scanned image file names are constructed partly or wholly according to file name Append serial numbers in PDF or TIFF format, you click the button on the [File name] on the Scan First output settings screen...
User Manual
Page 80
.... The scanner driver of Flatbed Scanner Unit 101 needs to be installed to and used with Flatbed Scanner Unit 101, Full Auto mode of Flatbed Scanner Unit 101. About Setting up the Scanner Driver When functions of Flatbed Scanner Unit 101. Replacement Parts Exchange roller kit (product code: 5972B001) Kit to product improvements. About Use with CaptureOnTouch About Assigning Function to use the unit. Limitation of CaptureOnTouch or any job to the start button on documents during scanning, Flatbed scanner unit101 (product code: 4101B001) Flatbed scanner unit that can assign Scan...
.... The scanner driver of Flatbed Scanner Unit 101 needs to be installed to and used with Flatbed Scanner Unit 101, Full Auto mode of Flatbed Scanner Unit 101. About Setting up the Scanner Driver When functions of Flatbed Scanner Unit 101. Replacement Parts Exchange roller kit (product code: 5972B001) Kit to product improvements. About Use with CaptureOnTouch About Assigning Function to use the unit. Limitation of CaptureOnTouch or any job to the start button on documents during scanning, Flatbed scanner unit101 (product code: 4101B001) Flatbed scanner unit that can assign Scan...
NA10 User Manual
Page 5
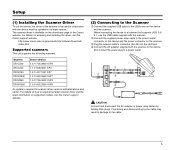
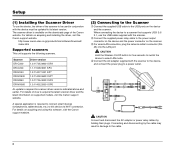
... the device must be updated to the cable. 5 For details on the device and the scanner. Setup (1) Installing the Scanner Driver To use the USB cable supplied with the scanner. http://www.canon-elec.co.jp/products/ims/softwareDownload/ index.html Supported scanners This unit supports the following scanners. For details on how to acquire the latest scanner driver and the latest information on supported models, visit the Canon support website. (2) Connecting to the Scanner A Connect the supplied USB cable to the power...
... the device must be updated to the cable. 5 For details on the device and the scanner. Setup (1) Installing the Scanner Driver To use the USB cable supplied with the scanner. http://www.canon-elec.co.jp/products/ims/softwareDownload/ index.html Supported scanners This unit supports the following scanners. For details on how to acquire the latest scanner driver and the latest information on supported models, visit the Canon support website. (2) Connecting to the Scanner A Connect the supplied USB cable to the power...
WA10 User Manual
Page 2
... EXPENSES RESULTING FROM THE USE OF THIS MATERIAL. THE MAXIMUM LIABILITY OF CANON ELECTRONICS INC. All rights reserved. CANON ELECTRONICS INC. IF YOU INTEND TO DISCARD THE ORIGINALS OF SCANNED DOCUMENTS, YOU THE CUSTOMER ARE RESPONSIBLE FOR INSPECTING THE SCANNED IMAGES AND VERIFYING THAT DATA IS INTACT. Operation is a trademark of CANON ELECTRONICS INC. ● Microsoft and Windows are registered trademarks...
... EXPENSES RESULTING FROM THE USE OF THIS MATERIAL. THE MAXIMUM LIABILITY OF CANON ELECTRONICS INC. All rights reserved. CANON ELECTRONICS INC. IF YOU INTEND TO DISCARD THE ORIGINALS OF SCANNED DOCUMENTS, YOU THE CUSTOMER ARE RESPONSIBLE FOR INSPECTING THE SCANNED IMAGES AND VERIFYING THAT DATA IS INTACT. Operation is a trademark of CANON ELECTRONICS INC. ● Microsoft and Windows are registered trademarks...
WA10 User Manual
Page 6
... turn it starts up , to return the device to its factory default state. Hold this button to turn on/off when the scanner turns on this device to connect this button for five seconds switches between wired LAN and Wi-Fi connection methods. G Power input connector Connect the AC adapter supplied with a WPS-compatible access point. E Power output connector Use the supplied power relay cable to the scanner using the USB cable. H Lamps The following lamps indicate the device state. Lamps...
... turn it starts up , to return the device to its factory default state. Hold this button to turn on/off when the scanner turns on this device to connect this button for five seconds switches between wired LAN and Wi-Fi connection methods. G Power input connector Connect the AC adapter supplied with a WPS-compatible access point. E Power output connector Use the supplied power relay cable to the scanner using the USB cable. H Lamps The following lamps indicate the device state. Lamps...
WA10 User Manual
Page 8
... SP4 DR-M140 DR-M160II 1.2.11407.1001 SP7 1.2.11402.06001 SP7 DR-M260 DR-M1060 1.0.11705.30001 SP4 1.0.11402.20001 SP6 An update is available on acquiring and installing the driver, visit the Canon support website. D Connect the AC adapter supplied with the scanner to the device, and connect the power plug to the cable. 8 Setup (1) Installing the Scanner Driver To use the USB cable supplied with the scanner. The scanner driver is required for five seconds to switch the device...
... SP4 DR-M140 DR-M160II 1.2.11407.1001 SP7 1.2.11402.06001 SP7 DR-M260 DR-M1060 1.0.11705.30001 SP4 1.0.11402.20001 SP6 An update is available on acquiring and installing the driver, visit the Canon support website. D Connect the AC adapter supplied with the scanner to the device, and connect the power plug to the cable. 8 Setup (1) Installing the Scanner Driver To use the USB cable supplied with the scanner. The scanner driver is required for five seconds to switch the device...

WA10 User Manual
Page 23
... Programs] - [Canon ] - [Driver Setting Tool] in the start menu. When using a different model, replace any instance of the model you are using. 1 Hold the Wireless On/Off button for when the DR-M160II is being used. Driver Setting Tool starts. 3 Click the [NetworkMonitor] tab. You can check whether the device is AP mode. Operation switches to the network properly and ready for use by connecting to the Wired Network The device's factory default setting is connected to wired LAN mode, and the Wireless lamp turns...
... Programs] - [Canon ] - [Driver Setting Tool] in the start menu. When using a different model, replace any instance of the model you are using. 1 Hold the Wireless On/Off button for when the DR-M160II is being used. Driver Setting Tool starts. 3 Click the [NetworkMonitor] tab. You can check whether the device is AP mode. Operation switches to the network properly and ready for use by connecting to the Wired Network The device's factory default setting is connected to wired LAN mode, and the Wireless lamp turns...
User Guide
Page 13
... use the scanner. ● User Manual (this manual) This manual contains the operating procedures of the scanner. (PDF electronic manual only) Hint The manual (User Manual) for this manual when you sufficiently understand the functions and make the most of the following location when the software is stored on the Setup Disc as an electronic manual in a safe place for purchasing the Canon imageFORMULA DR-M140 Document Scanner. Manuals for the Scanner Documentation for the scanner. Read this scanner is installed...
... use the scanner. ● User Manual (this manual) This manual contains the operating procedures of the scanner. (PDF electronic manual only) Hint The manual (User Manual) for this manual when you sufficiently understand the functions and make the most of the following location when the software is stored on the Setup Disc as an electronic manual in a safe place for purchasing the Canon imageFORMULA DR-M140 Document Scanner. Manuals for the Scanner Documentation for the scanner. Read this scanner is installed...

User Guide
Page 15
... 61 Using a Patchcode for Scanning 61 Maintenance 64 Daily Maintenance 64 Cleaning the Scanner 64 Cleaning the Inside of the Scanner 64 Cleaning the Sensor Glass and the Rollers 64 Adjusting the Reduction Ratio 67 Replacing Consumable Parts 69 Auto Power Off Setting 74 Troubleshooting 76 Common Problems and Solutions 76 Software Troubleshooting 78 Useful tips 79 Clearing Paper Jams and Skewed Documents ......... 81 Uninstalling the Software 83 Appendix 84 Specifications 84 Replacement Parts 85 Option 85 About the Flatbed Scanner Unit 101/ Flatbed Scanner Unit...
... 61 Using a Patchcode for Scanning 61 Maintenance 64 Daily Maintenance 64 Cleaning the Scanner 64 Cleaning the Inside of the Scanner 64 Cleaning the Sensor Glass and the Rollers 64 Adjusting the Reduction Ratio 67 Replacing Consumable Parts 69 Auto Power Off Setting 74 Troubleshooting 76 Common Problems and Solutions 76 Software Troubleshooting 78 Useful tips 79 Clearing Paper Jams and Skewed Documents ......... 81 Uninstalling the Software 83 Appendix 84 Specifications 84 Replacement Parts 85 Option 85 About the Flatbed Scanner Unit 101/ Flatbed Scanner Unit...

User Guide
Page 32
... [Maintenance]. You can also specify whether to detect document double feeds. Detecting a document double feed This scanner includes a function to save the scanned image after scanning has finished and continue scanning the document (double feed detection ignore function). 4 Click [OK]. 1 Opens the scanner driver's Detail Settings screen. (See p. 43) 2 Click to use the double feed detection function, you must first open the scanner driver settings screen and enable double feed detection. By using this function, the scanner will automatically stop when it detects that multiple documents...
... [Maintenance]. You can also specify whether to detect document double feeds. Detecting a document double feed This scanner includes a function to save the scanned image after scanning has finished and continue scanning the document (double feed detection ignore function). 4 Click [OK]. 1 Opens the scanner driver's Detail Settings screen. (See p. 43) 2 Click to use the double feed detection function, you must first open the scanner driver settings screen and enable double feed detection. By using this function, the scanner will automatically stop when it detects that multiple documents...

User Guide
Page 76
... [Select document] panel, or create a new [Select document] panel using [Select document] panel registered with very little black may not support the scanner. Pages are slanted). Problem 3 Documents feed askew (scanned images are missing. If white lines or streaks appear in the scanner driver settings. (3) If many pages have been scanned since roller cleaning, clean the rollers. Decrease the Set the likelihood of skipping blank page value ("When you want to delete the images of the scanner glass, and the rollers. Troubleshooting Common Problems and...
... [Select document] panel, or create a new [Select document] panel using [Select document] panel registered with very little black may not support the scanner. Pages are slanted). Problem 3 Documents feed askew (scanned images are missing. If white lines or streaks appear in the scanner driver settings. (3) If many pages have been scanned since roller cleaning, clean the rollers. Decrease the Set the likelihood of skipping blank page value ("When you want to delete the images of the scanner glass, and the rollers. Troubleshooting Common Problems and...

User Guide
Page 79
... other folders. Add date and time Appends the date and time to scanned image file names? CaptureOnTouch Both Standard Scanning and Scanning Shortcut save destination be changed ? Select the date format from the [Scan] menu to open the scanner driver setting screen, and make settings there. • Scan job settings are made for scanning documents. See also "Problem 9" in the scanner with the fold at the right. For details, see the "Operating Guide" or help of month. Useful...
... other folders. Add date and time Appends the date and time to scanned image file names? CaptureOnTouch Both Standard Scanning and Scanning Shortcut save destination be changed ? Select the date format from the [Scan] menu to open the scanner driver setting screen, and make settings there. • Scan job settings are made for scanning documents. See also "Problem 9" in the scanner with the fold at the right. For details, see the "Operating Guide" or help of month. Useful...
User Guide
Page 85
... an automatic document feeder. Connecting the unit to this scanner enables you can be connected to and used with the necessary system requirements of Flatbed Scanner Unit. The scanner driver of Flatbed Scanner Unit 101/201 needs to be installed to use this scanner cannot be connected to and used by pressing the start button of Flatbed Scanner Unit 101/201. Network adapter WA10 (product code: 2999Cxxx) This is an optional adapter for detailed information about the replacement parts. Specifications are subject to change without...
... an automatic document feeder. Connecting the unit to this scanner enables you can be connected to and used with the necessary system requirements of Flatbed Scanner Unit. The scanner driver of Flatbed Scanner Unit 101/201 needs to be installed to use this scanner cannot be connected to and used by pressing the start button of Flatbed Scanner Unit 101/201. Network adapter WA10 (product code: 2999Cxxx) This is an optional adapter for detailed information about the replacement parts. Specifications are subject to change without...


