Startup Guide
Page 3
.... All rights reserved. These limits are registered trademarks of CANON ELECTRONICS INC. No part of computers and other countries. • ISIS is operated in which business proprietors can radiate radio frequency energy and, if not installed and used in accordance with functions that promotes energy saving through the use of this equipment in a residential area is likely to...
.... All rights reserved. These limits are registered trademarks of CANON ELECTRONICS INC. No part of computers and other countries. • ISIS is operated in which business proprietors can radiate radio frequency energy and, if not installed and used in accordance with functions that promotes energy saving through the use of this equipment in a residential area is likely to...
Startup Guide
Page 7
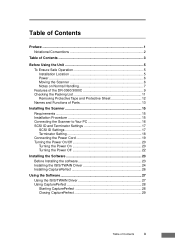
.../3080C 9 Checking the Packing List 11 Removing Protective Tape and Protective Sheet 12 Names and Functions of Parts 13 Installing the Scanner 15 Requirements 15 Installation Procedure 15 Connecting the Scanner to Your PC 16 SCSI ID and Terminator Settings 17 SCSI ID Settings 17 Terminator Setting 18 Connecting the Power Cord 19 Turning the Power On/Off 20 Turning the Power On 20 Turning the Power Off 22 Installing the Software 23 Before Installing the software 23 Installing the ISIS/TWAIN Driver...
.../3080C 9 Checking the Packing List 11 Removing Protective Tape and Protective Sheet 12 Names and Functions of Parts 13 Installing the Scanner 15 Requirements 15 Installation Procedure 15 Connecting the Scanner to Your PC 16 SCSI ID and Terminator Settings 17 SCSI ID Settings 17 Terminator Setting 18 Connecting the Power Cord 19 Turning the Power On/Off 20 Turning the Power On 20 Turning the Power Off 22 Installing the Software 23 Before Installing the software 23 Installing the ISIS/TWAIN Driver...
Startup Guide
Page 8
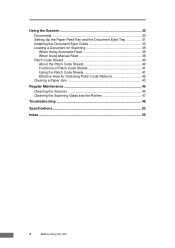
Using the Scanner 30 Documents 30 Setting Up the Paper Feed Tray and the Document Eject Tray 31 Installing the Document Eject Guide 33 Loading a Document for Scanning 35 When Using Automatic Feed 35 When Using Manual Feed 38 Patch Code Sheets 40 About the Patch Code Sheets 40 Functions of Patch Code Sheets 41 Using the Patch Code Sheets 41 Effective Area for Detecting Patch Code Patterns 42 Clearing a Paper Jam 43 Regular Maintenance 46 Cleaning the Scanner 46 Cleaning the Scanning Glass and the Rollers 47 Troubleshooting 48 Specifications 53 Index...
Using the Scanner 30 Documents 30 Setting Up the Paper Feed Tray and the Document Eject Tray 31 Installing the Document Eject Guide 33 Loading a Document for Scanning 35 When Using Automatic Feed 35 When Using Manual Feed 38 Patch Code Sheets 40 About the Patch Code Sheets 40 Functions of Patch Code Sheets 41 Using the Patch Code Sheets 41 Effective Area for Detecting Patch Code Patterns 42 Clearing a Paper Jam 43 Regular Maintenance 46 Cleaning the Scanner 46 Cleaning the Scanning Glass and the Rollers 47 Troubleshooting 48 Specifications 53 Index...

Startup Guide
Page 11
.... ■ Do not multi-outlet adapters to connect multiple devices to have the unit serviced. ■ Always turn the unit off and unplug the power cord. Contact your dealer or service representative to clean the unit, including alcohol, benzene, or paint thinner. ■ If the unit ever makes a strange noise, emits smoke or a strange odor, or becomes hot, or if the unit does not operate at all even...
.... ■ Do not multi-outlet adapters to connect multiple devices to have the unit serviced. ■ Always turn the unit off and unplug the power cord. Contact your dealer or service representative to clean the unit, including alcohol, benzene, or paint thinner. ■ If the unit ever makes a strange noise, emits smoke or a strange odor, or becomes hot, or if the unit does not operate at all even...

Startup Guide
Page 13
... sheets (double side) per minute, and can scan documents ranging in size from business cards to B4 paper. ■ Gray scale support (DR-3060) Documents can be scanned in 256-level gray scale. ■ Color/Gray scale support (DR-3080C) Documents can be scanned in 24-bit color or 256-level gray scale.* ■ Supports a variety of scanning modes** The scanner supports the following scanning modes, depending on the document type: ● Single-sided/double-sided mode ● Continuous/manual feed ■ Automatic document size detection** The scanner automatically...
... sheets (double side) per minute, and can scan documents ranging in size from business cards to B4 paper. ■ Gray scale support (DR-3060) Documents can be scanned in 256-level gray scale. ■ Color/Gray scale support (DR-3080C) Documents can be scanned in 24-bit color or 256-level gray scale.* ■ Supports a variety of scanning modes** The scanner supports the following scanning modes, depending on the document type: ● Single-sided/double-sided mode ● Continuous/manual feed ■ Automatic document size detection** The scanner automatically...

Startup Guide
Page 14
... been idle for a certain period of time. * Only the top side of a pre-scanned image and then sends the adjusted image to the application software, without needing to scan a document regardless of whether every page is double-sided or single-sided. (This function is implemented by the ISIS/TWAIN driver.) ■ "Skip blank page" function The scanner is equipped with a "skip blank page" function that support these functions. 10 Before Using the Unit
... been idle for a certain period of time. * Only the top side of a pre-scanned image and then sends the adjusted image to the application software, without needing to scan a document regardless of whether every page is double-sided or single-sided. (This function is implemented by the ISIS/TWAIN driver.) ■ "Skip blank page" function The scanner is equipped with a "skip blank page" function that support these functions. 10 Before Using the Unit
Startup Guide
Page 24
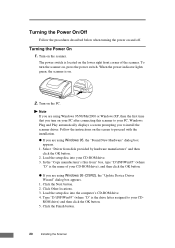
... you turn the scanner on your PC after connecting this scanner to your CD-ROM drive), and then click the OK button. ● If you are using Windows 95 (OSR2), the "Update Device Driver Wizard" dialog box appears. 1. Click the Next button. 2. Turn on the screen to proceed with the installation. ● If you to your CD-ROM drive. 3. To turn on , press the power switch. In the "Copy manufacturer's files from disk...
... you turn the scanner on your PC after connecting this scanner to your CD-ROM drive), and then click the OK button. ● If you are using Windows 95 (OSR2), the "Update Device Driver Wizard" dialog box appears. 1. Click the Next button. 2. Turn on the screen to proceed with the installation. ● If you to your CD-ROM drive. 3. To turn on , press the power switch. In the "Copy manufacturer's files from disk...
Startup Guide
Page 25
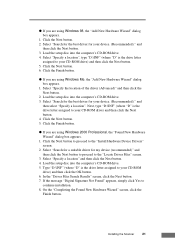
... "Locate Driver Files" screen. 3. Installing the Scanner 21 Select "Search for the best driver for my device (recommended)" and then click the Next button to proceed to your device. (Recommended)." If the message "Digital Signature Not Found" appears, simply click Yes to the "Install Hardware Device Drivers" screen. 2. Click the Next button. 2. Click the Finish button. ● If you are using Windows 98, the "Add New Hardware Wizard" dialog box appears...
... "Locate Driver Files" screen. 3. Installing the Scanner 21 Select "Search for the best driver for my device (recommended)" and then click the Next button to proceed to your device. (Recommended)." If the message "Digital Signature Not Found" appears, simply click Yes to the "Install Hardware Device Drivers" screen. 2. Click the Next button. 2. Click the Finish button. ● If you are using Windows 98, the "Add New Hardware Wizard" dialog box appears...
Startup Guide
Page 30
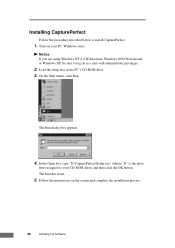
... Open box, type "D:\CapturePerfect\Setup.exe" (where "D" is the drive letter assigned to your PC. The Installer starts. 5. Windows starts. Follow the instructions on the screen and complete the installation process. 26 Installing the Software Turn on your CD-ROM drive) and then click the OK button. Load the setup disc in the PC's CD-ROM drive. 3. Installing CapturePerfect Follow the procedure described below to log on as a user...
... Open box, type "D:\CapturePerfect\Setup.exe" (where "D" is the drive letter assigned to your PC. The Installer starts. 5. Windows starts. Follow the instructions on the screen and complete the installation process. 26 Installing the Software Turn on your CD-ROM drive) and then click the OK button. Load the setup disc in the PC's CD-ROM drive. 3. Installing CapturePerfect Follow the procedure described below to log on as a user...
Startup Guide
Page 34
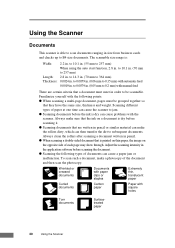
... cause the scanner to subsequent documents. Always clean the rollers after scanning a document written in pencil. ● When scanning a double-sided document that are certain criteria that a document must be scannable. Adjust the scanning intensity in the application software before scanning it. ● Scanning documents that is printed on thin paper, the image on a document is dry can cause a paper jam or malfunction. Familiarize yourself with square holes Torn documents Surfacetreated paper 30 Using the Scanner
... cause the scanner to subsequent documents. Always clean the rollers after scanning a document written in pencil. ● When scanning a double-sided document that are certain criteria that a document must be scannable. Adjust the scanning intensity in the application software before scanning it. ● Scanning documents that is printed on thin paper, the image on a document is dry can cause a paper jam or malfunction. Familiarize yourself with square holes Torn documents Surfacetreated paper 30 Using the Scanner
Startup Guide
Page 39
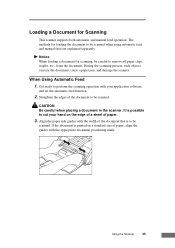
... when placing a document in the scanner. Align the paper side guides with the appropriate document positioning mark. Notice When loading a document for Scanning This scanner supports both automatic and manual feed operation. It is printed on the edge of a sheet of the document to be scanned. If the document is possible to cut your application software, and set the automatic feed function. 2. When Using Automatic Feed 1. Using the Scanner 35 Loading a Document for scanning, be careful to remove all paper clips, staples...
... when placing a document in the scanner. Align the paper side guides with the appropriate document positioning mark. Notice When loading a document for Scanning This scanner supports both automatic and manual feed operation. It is printed on the edge of a sheet of the document to be scanned. If the document is possible to cut your application software, and set the automatic feed function. 2. When Using Automatic Feed 1. Using the Scanner 35 Loading a Document for scanning, be careful to remove all paper clips, staples...

Startup Guide
Page 40
Notice There are stacking limit marks ( ) indicated on the paper feed tray so that the document is equivalent to the left of the mark. Do not load pages in excess of ordinary copier paper (80g/m2).) 36 Using the Scanner B4 A4 LTR 4. Place the document on the paper feed tray. A paper jam may occur if you begin to scan a document that the left edge of the document does not extend to a capacity of approximately 100 sheets of this mark. Note Make sure that is positioned at this mark. (The mark is face up.
Notice There are stacking limit marks ( ) indicated on the paper feed tray so that the document is equivalent to the left of the mark. Do not load pages in excess of ordinary copier paper (80g/m2).) 36 Using the Scanner B4 A4 LTR 4. Place the document on the paper feed tray. A paper jam may occur if you begin to scan a document that the left edge of the document does not extend to a capacity of approximately 100 sheets of this mark. Note Make sure that is positioned at this mark. (The mark is face up.

Startup Guide
Page 41
... careful if you are printed on thin paper may fall out of the last page that some article or clothing does get pulled into the unit. Note Before starting a scan, make sure that the scanned image of the document eject tray. 7. Perform the scanning operation in the scanner correctly. Injury could get caught in the unit, turn the power off immediately. If the scanner is scanning, resolve the problem, make sure that could...
... careful if you are printed on thin paper may fall out of the last page that some article or clothing does get pulled into the unit. Note Before starting a scan, make sure that the scanned image of the document eject tray. 7. Perform the scanning operation in the scanner correctly. Injury could get caught in the unit, turn the power off immediately. If the scanner is scanning, resolve the problem, make sure that could...

Startup Guide
Page 42
When Using Manual Feed 1. Note When "manual feed" is set; If the document is printed on a standard size of the document in and scan it into the document feed opening next to the paper feed tray rises up, allowing you to perform the scanning operation with your application software, and set , the document feed opening remains in manually. Get ready to feed pages in the upper position as long as "manual feed" is set, the document feed opening . The scanner will begin to be scanned. if "automatic feed" is...
When Using Manual Feed 1. Note When "manual feed" is set; If the document is printed on a standard size of the document in and scan it into the document feed opening next to the paper feed tray rises up, allowing you to perform the scanning operation with your application software, and set , the document feed opening remains in manually. Get ready to feed pages in the upper position as long as "manual feed" is set, the document feed opening . The scanner will begin to be scanned. if "automatic feed" is...
Startup Guide
Page 44
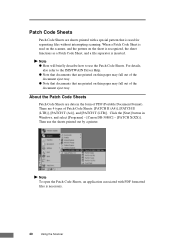
... is used for separating files without interrupting scanning. About the Patch Code Sheets Patch Code Sheets are data in Windows, and select [Programs] - [Canon DR-3080C] - [PATCH X(XX)]. Click the [Start] button in the form of PDF (Portable Document Format). Note ● Here will briefly describe how to the ISIS/TWAIN Driver Help. ● Note that documents that are printed on thin paper may fall out of the document eject tray. Patch Code Sheets Patch Code Sheets are sheets printed with PDF formatted files...
... is used for separating files without interrupting scanning. About the Patch Code Sheets Patch Code Sheets are data in Windows, and select [Programs] - [Canon DR-3080C] - [PATCH X(XX)]. Click the [Start] button in the form of PDF (Portable Document Format). Note ● Here will briefly describe how to the ISIS/TWAIN Driver Help. ● Note that documents that are printed on thin paper may fall out of the document eject tray. Patch Code Sheets Patch Code Sheets are sheets printed with PDF formatted files...

Startup Guide
Page 52
... power cord connected to resolve them. Refer to the troubleshooting section related to the problem that may occur while you are not correct P.52 If after consulting the above section you have encountered. The scanner does not turn on P.48 The PC does not recognize the scanner P.49 Images are not scanned P.51 Documents do not feed properly P.51 Resulting scanned images are using the scanner...
... power cord connected to resolve them. Refer to the troubleshooting section related to the problem that may occur while you are not correct P.52 If after consulting the above section you have encountered. The scanner does not turn on P.48 The PC does not recognize the scanner P.49 Images are not scanned P.51 Documents do not feed properly P.51 Resulting scanned images are using the scanner...
Startup Guide
Page 53
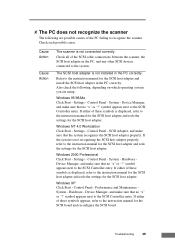
... settings for the SCSI host adapter. Settings - Windows 2000 Professional Click Start - System - Hardware Device Manager, and make sure that no "x" or "!" Windows XP Click Start - Control Panel - Hardware - The SCSI host adapter is displayed, refer to the system. If either of these symbols is not connected correctly. symbol appears next to the instruction manual for the SCSI host adapter. Check each possible cause. Check all of the SCSI cable connections between the scanner, the SCSI host adapter...
... settings for the SCSI host adapter. Settings - Windows 2000 Professional Click Start - System - Hardware Device Manager, and make sure that no "x" or "!" Windows XP Click Start - Control Panel - Hardware - The SCSI host adapter is displayed, refer to the system. If either of these symbols is not connected correctly. symbol appears next to the instruction manual for the SCSI host adapter. Check each possible cause. Check all of the SCSI cable connections between the scanner, the SCSI host adapter...

Startup Guide
Page 55
... service representative and request to have the rollers replaced. For cautions concerning documents, refer to "Documents" on page 47. ✘ Images are not scanned Check the following if the scanner does not scan an image even though the scanning operation is being performed: ● Is the scanner connected to the PC correctly? ● Has the scanner driver been installed? ● Has the application software been installed correctly? Clean the rollers as described on page...
... service representative and request to have the rollers replaced. For cautions concerning documents, refer to "Documents" on page 47. ✘ Images are not scanned Check the following if the scanner does not scan an image even though the scanning operation is being performed: ● Is the scanner connected to the PC correctly? ● Has the scanner driver been installed? ● Has the application software been installed correctly? Clean the rollers as described on page...
Startup Guide
Page 56
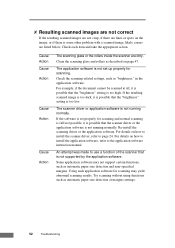
... page 47. Some application software may yield abnormal scanning results. Using such application software for scanning. Clean the scanning glass and rollers as automatic paper size detection and user-specified margins. Check the scanning-related settings, such as automatic paper size detection or margins settings. 52 Troubleshooting Cause Action Cause Action Cause Action Cause Action The scanning glass or the rollers inside the scanner are listed below. Try scanning without using functions such as "brightness," in the application software. The scanner driver...
... page 47. Some application software may yield abnormal scanning results. Using such application software for scanning. Clean the scanning glass and rollers as automatic paper size detection and user-specified margins. Check the scanning-related settings, such as automatic paper size detection or margins settings. 52 Troubleshooting Cause Action Cause Action Cause Action Cause Action The scanning glass or the rollers inside the scanner are listed below. Try scanning without using functions such as "brightness," in the application software. The scanner driver...
Startup Guide
Page 59
... guide attachment 33 Document eject tray extension opening 32 position 13 Document positioning mark adjustment 35 position 13 Documents feeding 35 paper jam 43 stacking limit marks 36 DR-3080C cleaning 46 functions of 9 moving 6 I Installation location 5 Interface cable connetion 16 P Paper jam cleaning 43 Paper side guides adjustment 35 position 13 Patch Code Sheets 40 PDF 40 Power off 22 on 20 Power cord connection 19 Power cord connector position 14 Power indicator position 13 Power switch position 13, 20, 22 R Rollers cleaning 47 S Scanning glass cleaning...
... guide attachment 33 Document eject tray extension opening 32 position 13 Document positioning mark adjustment 35 position 13 Documents feeding 35 paper jam 43 stacking limit marks 36 DR-3080C cleaning 46 functions of 9 moving 6 I Installation location 5 Interface cable connetion 16 P Paper jam cleaning 43 Paper side guides adjustment 35 position 13 Patch Code Sheets 40 PDF 40 Power off 22 on 20 Power cord connection 19 Power cord connector position 14 Power indicator position 13 Power switch position 13, 20, 22 R Rollers cleaning 47 S Scanning glass cleaning...


