User Manual
Page 3
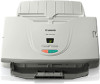
...operation, or contains additional explanations for purchasing the Canon imageFORMULA DR-3010C. Placing Documents 22 Feeding in the Page Separation Mode 22 Feeding in a safe place for safety. Important Safety Instructions 5 Installation Location 5 AC Adapter 6 Moving the Scanner 6 Handling 7 Disposal 8 2. Features of ... the Text of its many functions. Installing the Software 13 Setup Disc 13 Software Installation 14 Connecting the Scanner to make the most of a Document 30 3 DR-3010C Preparing the Scanner 21 Preparing the Trays 21 Preparing the Document Stopper...
...operation, or contains additional explanations for purchasing the Canon imageFORMULA DR-3010C. Placing Documents 22 Feeding in the Page Separation Mode 22 Feeding in a safe place for safety. Important Safety Instructions 5 Installation Location 5 AC Adapter 6 Moving the Scanner 6 Handling 7 Disposal 8 2. Features of ... the Text of its many functions. Installing the Software 13 Setup Disc 13 Software Installation 14 Connecting the Scanner to make the most of a Document 30 3 DR-3010C Preparing the Scanner 21 Preparing the Trays 21 Preparing the Document Stopper...
User Manual
Page 4
... 75 1. Other Functions 36 Setting the Long Document Mode 36 Chapter 4 ISIS/TWAIN Driver Settings 38 1. Uninstalling the Software 79 Uninstalling the ISIS/TWAIN Driver and Job Registration Tool 79 Uninstalling CapturePerfect 3.0 80 3. Scanning Documents That Include Both ... 82 Specifications 82 Replacement Parts 83 External Dimensions 84 INDEX 86 4 DR-3010C Practical Examples 33 6. Troubleshooting 75 2. Starting the Job Registration Tool 56 2. Regular Maintenance 66 Cleaning the Scanner 66 Cleaning the Inside of Documents as Search Keywords 33 Specifying Security ...
... 75 1. Other Functions 36 Setting the Long Document Mode 36 Chapter 4 ISIS/TWAIN Driver Settings 38 1. Uninstalling the Software 79 Uninstalling the ISIS/TWAIN Driver and Job Registration Tool 79 Uninstalling CapturePerfect 3.0 80 3. Scanning Documents That Include Both ... 82 Specifications 82 Replacement Parts 83 External Dimensions 84 INDEX 86 4 DR-3010C Practical Examples 33 6. Troubleshooting 75 2. Starting the Job Registration Tool 56 2. Regular Maintenance 66 Cleaning the Scanner 66 Cleaning the Inside of Documents as Search Keywords 33 Specifying Security ...
User Manual
Page 9
... You can scan folded documents. NOTE Some functions may not work, depending on the software you to automatically scan and perform operations. The scanner will scan both the text and background are using. 9 DR-3010C These modes may not be available, depending on the type of document. „ ...Color Drop-Out The scanner is equipped with a Color Drop-Out function and a Color enhancement ...
... You can scan folded documents. NOTE Some functions may not work, depending on the software you to automatically scan and perform operations. The scanner will scan both the text and background are using. 9 DR-3010C These modes may not be available, depending on the type of document. „ ...Color Drop-Out The scanner is equipped with a Color Drop-Out function and a Color enhancement ...
User Manual
Page 12
Chapter 2 Setup 1. Turning the Power ON 18 Scanner Recognition 18 1. Scanner System Requirements To use the DR-3010C scanner, your computer must satisfy the following system requirements. • Operating systems: y Microsoft Windows 2000 Professional SP4 or later y Microsoft ... better recommended. • An ISIS-compatible application or a TWAIN-compatible application that is compatible with the above operating systems. 12 DR-3010C Installing the Software 13 Setup Disc 13 Software Installation 14 Connecting the Scanner to the Computer 16 3. Scanner System Requirements 12 2.
Chapter 2 Setup 1. Turning the Power ON 18 Scanner Recognition 18 1. Scanner System Requirements To use the DR-3010C scanner, your computer must satisfy the following system requirements. • Operating systems: y Microsoft Windows 2000 Professional SP4 or later y Microsoft ... better recommended. • An ISIS-compatible application or a TWAIN-compatible application that is compatible with the above operating systems. 12 DR-3010C Installing the Software 13 Setup Disc 13 Software Installation 14 Connecting the Scanner to the Computer 16 3. Scanner System Requirements 12 2.
User Manual
Page 13
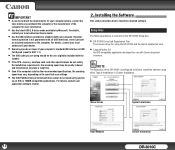
.... Menu Screen Typical Installation Read Manuals Custom Installation 13 DR-3010C For details, contact your local authorized Canon dealer. • Use the USB interface provided as standard with Canon document scanners. Setup Disc The following software is included on the DR-3010C Setup disc. • DR-3010C Driver/Job Registration Tool The scanner driver for your computer's standard USB interface is...
.... Menu Screen Typical Installation Read Manuals Custom Installation 13 DR-3010C For details, contact your local authorized Canon dealer. • Use the USB interface provided as standard with Canon document scanners. Setup Disc The following software is included on the DR-3010C Setup disc. • DR-3010C Driver/Job Registration Tool The scanner driver for your computer's standard USB interface is...
User Manual
Page 14
... the DR-3010C Setup disc into the CD-ROM drive of the computer. 3 Click [Typical Installation]. 5 Click [Next]. 6 Read the license agreement → click [Yes] to Windows as an Administrator. • Close all of the displayed software and the User Manual will be installed automatically. IMPORTANT • Install the software before connecting the scanner to...
... the DR-3010C Setup disc into the CD-ROM drive of the computer. 3 Click [Typical Installation]. 5 Click [Next]. 6 Read the license agreement → click [Yes] to Windows as an Administrator. • Close all of the displayed software and the User Manual will be installed automatically. IMPORTANT • Install the software before connecting the scanner to...
User Manual
Page 16
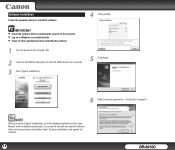
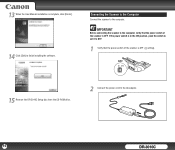
IMPORTANT Before connecting the scanner to the computer, verify that the power switch of the scanner is complete, click [Finish]. 14 Click [Exit] to finish installing the software. Connecting the Scanner to the Computer Connect the scanner to the AC adapter. 16 DR-3010C If the power switch is in the ON position, push the switch to set it to OFF. 1 Verify that the power switch of the scanner is OFF ( setting). 15 Remove the DR-3010C Setup disc from the CD-ROM drive. 2 Connect the power cord to the computer. 13 When the User Manual installation is OFF.
IMPORTANT Before connecting the scanner to the computer, verify that the power switch of the scanner is complete, click [Finish]. 14 Click [Exit] to finish installing the software. Connecting the Scanner to the Computer Connect the scanner to the AC adapter. 16 DR-3010C If the power switch is in the ON position, push the switch to set it to OFF. 1 Verify that the power switch of the scanner is OFF ( setting). 15 Remove the DR-3010C Setup disc from the CD-ROM drive. 2 Connect the power cord to the computer. 13 When the User Manual installation is OFF.
User Manual
Page 20
...sure that the ink on the type of embossment. 20 DR-3010C NOTE • Vertically placed cards may not be output...documents can cause a paper jam or malfunction. In this case, adjust the scanning intensity in the application software and set the Preventing Bleed Through/Removing the Document Background function in the stack. To scan such a...Curled documents Carbon paper Coated paper Torn documents Documents with paper clips or staples Extremely thin, translucent paper Documents with the scanner. Plastic Card Size: 2.12" x 3.37" (53.9 mm x 85.5 mm) (ISO7810 standard) Card thickness...
...sure that the ink on the type of embossment. 20 DR-3010C NOTE • Vertically placed cards may not be output...documents can cause a paper jam or malfunction. In this case, adjust the scanning intensity in the application software and set the Preventing Bleed Through/Removing the Document Background function in the stack. To scan such a...Curled documents Carbon paper Coated paper Torn documents Documents with paper clips or staples Extremely thin, translucent paper Documents with the scanner. Plastic Card Size: 2.12" x 3.37" (53.9 mm x 85.5 mm) (ISO7810 standard) Card thickness...

User Manual
Page 23
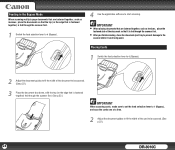
... 5 Adjust the document guides to start scanning. IMPORTANT • Always smooth out any folds or curls in the scanner, immediately disconnect the power cord from the power outlet to stop scanning. 23 DR-3010C If the leading edge of a document is curled, it may cause a paper jam. • If feeding stops...to make sure that the document is not curled or creased, and that may damage the document or cause a paper jam. 6 Use the application software to fit the width of neckties and long hair. NOTE Before scanning, make sure it . This may cause a fire or electrical shock, damage ...
... 5 Adjust the document guides to start scanning. IMPORTANT • Always smooth out any folds or curls in the scanner, immediately disconnect the power cord from the power outlet to stop scanning. 23 DR-3010C If the leading edge of a document is curled, it may cause a paper jam. • If feeding stops...to make sure that the document is not curled or creased, and that may damage the document or cause a paper jam. 6 Use the application software to fit the width of neckties and long hair. NOTE Before scanning, make sure it . This may cause a fire or electrical shock, damage ...
User Manual
Page 24
... selection lever to (Bypass). 2 Adjust the document guides to fit the width of the document to be scanned. (See p.22.) 24 DR-3010C IMPORTANT • When placing documents that are fastened together, such as invoices, place the fastened side of the document so that is not being ... edge that it is fed through the scanner first. • After you finish scanning, close the document eject tray to prevent damage to the scanner while it is fastened together) fed through the scanner first. 1 Switch the feed selection lever to (Bypass). 4 Use the application software to start scanning.
... selection lever to (Bypass). 2 Adjust the document guides to fit the width of the document to be scanned. (See p.22.) 24 DR-3010C IMPORTANT • When placing documents that are fastened together, such as invoices, place the fastened side of the document so that is not being ... edge that it is fed through the scanner first. • After you finish scanning, close the document eject tray to prevent damage to the scanner while it is fastened together) fed through the scanner first. 1 Switch the feed selection lever to (Bypass). 4 Use the application software to start scanning.
User Manual
Page 26
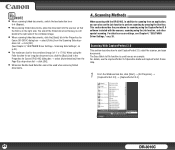
... [All Programs] → [CapturePerfect 3.0] → [CapturePerfect 3.0]. 26 DR-3010C Scanning With CapturePerfect 3.0 This section describes how to File function is 11" x 17"/A3. Scanning Methods When scanning with the scanner, scanning using the Job function, and other special scanning. This section describes...Start key. When using the CapturePerfect 3.0 software included with the DR-3010C, in the Properties for the combined image is used when scanning folded documents. 4. For details on p.43.) • The maximum size for Canon DR-3010C dialog box → select [Folio]...
... [All Programs] → [CapturePerfect 3.0] → [CapturePerfect 3.0]. 26 DR-3010C Scanning With CapturePerfect 3.0 This section describes how to File function is 11" x 17"/A3. Scanning Methods When scanning with the scanner, scanning using the Job function, and other special scanning. This section describes...Start key. When using the CapturePerfect 3.0 software included with the DR-3010C, in the Properties for the combined image is used when scanning folded documents. 4. For details on p.43.) • The maximum size for Canon DR-3010C dialog box → select [Folio]...
User Manual
Page 27
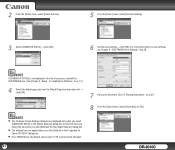
NOTE If [CANON DR-3010C] is set to File]. Installing the Software," on p.38. For more information on scan settings, see Chapter 4, "ISIS/TWAIN Driver Settings," on p. 13.) 4 Select the default page size from the ... Placing Documents," on p.22.) 8 From the [Scan] menu, select [Scan Batch to 'LTR' and cannot be changed. 27 DR-3010C 2 From the [Scan] menu, select [Select Scanner]. 5 From the [Scan] menu, select [Scanner Setting]. 3 Select [CANON DR-3010C] → click [OK]. 6 Set the scan settings → click [OK]. NOTE • The Configure Device Settings dialog box ...
NOTE If [CANON DR-3010C] is set to File]. Installing the Software," on p.38. For more information on scan settings, see Chapter 4, "ISIS/TWAIN Driver Settings," on p. 13.) 4 Select the default page size from the ... Placing Documents," on p.22.) 8 From the [Scan] menu, select [Scan Batch to 'LTR' and cannot be changed. 27 DR-3010C 2 From the [Scan] menu, select [Select Scanner]. 5 From the [Scan] menu, select [Scanner Setting]. 3 Select [CANON DR-3010C] → click [OK]. 6 Set the scan settings → click [OK]. NOTE • The Configure Device Settings dialog box ...

User Manual
Page 39
...] button Returns the settings to 'LTR' and cannot be changed. 5 From the [Scan] menu, select [Scanner Setting]. The Properties for Canon DR-3010C dialog box is displayed. [OK] button Confirms the settings and closes the dialog box. [Scan] button For ...a TWAIN-compatible application that can perform scanning from the Default Page Size drop-down list → click [OK]. 2. It consists of four tabs: Basic, Brightness, Image processing, and Others. Installing the Software...
...] button Returns the settings to 'LTR' and cannot be changed. 5 From the [Scan] menu, select [Scanner Setting]. The Properties for Canon DR-3010C dialog box is displayed. [OK] button Confirms the settings and closes the dialog box. [Scan] button For ...a TWAIN-compatible application that can perform scanning from the Default Page Size drop-down list → click [OK]. 2. It consists of four tabs: Basic, Brightness, Image processing, and Others. Installing the Software...
User Manual
Page 75
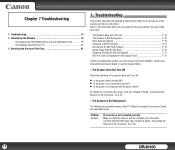
...DR-3010C Troubleshooting 75 2. For details on the Display Panel P. 78 If, after consulting this section, you might occur during use of the PC failing to solve them. Connecting the Scanner to the references below that you still cannot resolve the problem, contact your local authorized Canon... 1. Removing the Document Feed Tray 81 1. Uninstalling the Software 79 Uninstalling the ISIS/TWAIN Driver and Job Registration Tool 79 Uninstalling CapturePerfect 3.0 80 3. The Scanner Does Not Turn ON P. 75 The Scanner Is Not Recognized P. 75 Slow Scanning Speed P. 76 ...
...DR-3010C Troubleshooting 75 2. For details on the Display Panel P. 78 If, after consulting this section, you might occur during use of the PC failing to solve them. Connecting the Scanner to the references below that you still cannot resolve the problem, contact your local authorized Canon... 1. Removing the Document Feed Tray 81 1. Uninstalling the Software 79 Uninstalling the ISIS/TWAIN Driver and Job Registration Tool 79 Uninstalling CapturePerfect 3.0 80 3. The Scanner Does Not Turn ON P. 75 The Scanner Is Not Recognized P. 75 Slow Scanning Speed P. 76 ...
User Manual
Page 76
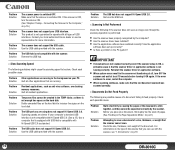
... PC. Problem The USB hub does not support Hi-Speed USB 2.0. Reinstall the scanner driver or application software. • When system errors result in the background on p.19. 76 DR-3010C If the error continues to stick together, and they cannot be slow. Check each... anti-virus software, are slower if your local authorized Canon dealer or service representative for more information. Documents," on your document, thoroughly fan the stack of the document. Quit all resident applications. Problem Solution Problem Solution Problem Solution Problem Solution The scanner power is ...
... PC. Problem The USB hub does not support Hi-Speed USB 2.0. Reinstall the scanner driver or application software. • When system errors result in the background on p.19. 76 DR-3010C If the error continues to stick together, and they cannot be slow. Check each... anti-virus software, are slower if your local authorized Canon dealer or service representative for more information. Documents," on your document, thoroughly fan the stack of the document. Quit all resident applications. Problem Solution Problem Solution Problem Solution Problem Solution The scanner power is ...
User Manual
Page 79
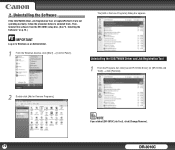
... Job Registration Tool 1 From the Programs list, click [Canon DR-3010C Driver] (or [DR-3010C Job Tool]) → click [Remove]. 2 Double-click [Add or Remove Programs]. 79 NOTE If you clicked [DR-3010C Job Tool], click [Change/Remove]. Then, reinstall the software from the DR-3010C setup disc. (See "2. 2. Uninstalling the Software If the ISIS/TWAIN driver, Job Registration Tool, or...
... Job Registration Tool 1 From the Programs list, click [Canon DR-3010C Driver] (or [DR-3010C Job Tool]) → click [Remove]. 2 Double-click [Add or Remove Programs]. 79 NOTE If you clicked [DR-3010C Job Tool], click [Change/Remove]. Then, reinstall the software from the DR-3010C setup disc. (See "2. 2. Uninstalling the Software If the ISIS/TWAIN driver, Job Registration Tool, or...
User Manual
Page 87
...Launcher, setting 61 Load limit mark 22 Long Document mode 36 M Maintenance ...66 Minus key ...10 Moving the scanner 6 N Name of parts ...10 O OPEN button ...10 Operating system 12 Operation panel 10 P Page Separation mode...scanner by computer 18 Registered job list 57 Replacement parts 83 Retard roller Attaching 72 Removing 71 Roller, replacing Counter, resetting 74 Replacement cycle 69 S Scan Panel ...30 Scanning methods 26 Service...75 Setup disc...13 Custom Installation 13 Read Manuals 13 Typical Installation 13 Software... USB Link switch 8 PUB. CE-IE-632-02 87 DR-3010C
...Launcher, setting 61 Load limit mark 22 Long Document mode 36 M Maintenance ...66 Minus key ...10 Moving the scanner 6 N Name of parts ...10 O OPEN button ...10 Operating system 12 Operation panel 10 P Page Separation mode...scanner by computer 18 Registered job list 57 Replacement parts 83 Retard roller Attaching 72 Removing 71 Roller, replacing Counter, resetting 74 Replacement cycle 69 S Scan Panel ...30 Scanning methods 26 Service...75 Setup disc...13 Custom Installation 13 Read Manuals 13 Typical Installation 13 Software... USB Link switch 8 PUB. CE-IE-632-02 87 DR-3010C


